height VOLVO S60 TWIN ENGINE 2020 User Guide
[x] Cancel search | Manufacturer: VOLVO, Model Year: 2020, Model line: S60 TWIN ENGINE, Model: VOLVO S60 TWIN ENGINE 2020Pages: 657, PDF Size: 13.6 MB
Page 195 of 657

SEATS AND STEERING WHEEL
}}
* Option/accessory.193
Folding up the backrestTo fold up the backrest to the upright position manually:
1. Move the backrest upward/rearward.
2. Press the backrest until it locks into posi-
tion.
3. Fold up the head restraints manually.
4. Adjust the center head restraint if neces- sary.
WARNING
Make sure that the rear seat backrest and head restraint are locked securely in placeafter the seat is folded up. The head restraints at the outer seats must always be raised when there is a passengerin one of these spots of the rear seat.
Related information
Adjusting the rear seat head restraints (p. 193)
Private Locking (p. 255)
Activating and deactivating private locking(p. 255)
Adjusting the rear seat head restraints
Adjust the center head restraint in the rear seat to the seat occupant's height. Fold down the outboard head restraints * to improve rear
visibility.
Adjusting the center seat head restraint
The center head restraint should be adjusted to suit the passenger's height. The entire backof the head should be covered if possible.Manually move the restraint up or down asneeded.
To lower the restraint, push and hold the but- ton (see illustration) while carefully loweringthe head restraint.
WARNING
The center seat head restraint must be in its lowest position when the seat is notoccupied. When the center seat is occu-pied, the head restraint must be correctlyadjusted to the passenger's height, cover-ing the entire back of the head if possible.
Folding the rear seat outboard head restraints using the center display *
The outer head restraints can be folded via the center display's function view. The headrestraint can be folded down when the vehicle is in ignition mode 0.
Page 197 of 657

SEATS AND STEERING WHEEL
* Option/accessory.195
Horn
The horn is located in the center of the steering wheel.
Related information
Adjusting the steering wheel (p. 195)
Adjusting the steering wheel The steering wheel can be adjusted to various positions.
The steering wheel's reach and height can be adjusted.
WARNING
Adjust the steering wheel and ensure it locks into position before driving. Neveradjust the steering wheel while driving.
Steering wheel force can be adjusted with speed-dependent power steering. Steeringwheel force is adjusted according to the vehi-cle's speed to give the driver an enhancedsense of control and stability.
Steering wheel adjuster lever.
1. Move the lever forward to release the steering wheel.
2. Adjust the steering wheel to the desired position.
3. Pull the lever back to lock the steering wheel into place. If the lever is difficult to move, press the steering wheel lightlywhile pulling the lever.
Related information
Steering wheel controls and horn (p. 194)
Adjusting the power
* front seats (p. 183)
Page 318 of 657

||
DRIVER SUPPORT
316
your lane must have clear side lane mark- ings
your vehicle must be positioned straight inyour lane
the oncoming vehicle must be positionedwithin your vehicle's lane markings
the oncoming vehicle's headlights mustbe on
the function can only handle “front-to-front” collisions
the function can only detect vehicles withfour wheels.
WARNING
Warnings and brake interventions due to an imminent collision with an oncomingvehicle always come very late.
Related information
City Safety
™ (p. 306)
City Safety limitations (p. 316)
City Safety limitations
City Safety 60
functionality may be reduced in
certain situations.
Surroundings
Low objects
Hanging objects, such as flags for overhang- ing loads or accessories such as auxiliarylights or front protective grids that extendbeyond the height of the hood, may limit City Safety functionality.
Slippery road conditions
The extended braking distance on slippery roads may reduce City Safety's capacity tohelp avoid a collision. In these types of situa-tions, the Anti-lock Braking System and Elec- tronic Stability Control (ESC 61
) are designed
for optimal braking power with maintained stability.
Backlighting
The visual warning signal in the windshield may be difficult to detect in bright sunlight, ifthere are reflections, or if the driver is wearingsunglasses or not looking straight ahead.
Heat
If the temperature in the passenger compart- ment is high due to e.g. bright sunlight, thevisual warning signal in the windshield may betemporarily disabled.
Camera and radar sensor's field of vision
The camera's field of vision is limited and in certain situations, it may be unable to detectpedestrians, large animals, cyclists or vehicles,or it may detect them later than expected. Vehicles that are dirty may be detected later than clean vehicles, and in dark conditions,motorcycles may be detected late or not at all. If a text message displayed in the instrument panel indicates that the camera/radar sensoris obstructed, it may be difficult for City Safetyto detect pedestrians, large animals, cyclists,vehicles or lane markings in front of the vehi-cle. City Safety functionality may therefore bereduced. Text messages may not be displayed for all sit- uations in which the windshield sensors areblocked. The driver must therefore alwayskeep the windshield in front of the camera/radar sensor clean.
CAUTION
Only a workshop may perform mainte- nance on driver support components – anauthorized Volvo workshop is recom-mended.
60 This function is not available on all markets.
61 Electronic Stability Control
Page 427 of 657

STARTING AND DRIVING
}}
* Option/accessory.425
Preparing for a long trip
It is important to have the vehicle's systems and equipment checked carefully before driv-ing long distances.
Check that
the engine is running properly and that fuel consumption is normal
there are no leaks (fuel, oil or other fluid)
the brake pedal is functioning properly
all lights are working
‒ adjust the head-
light height if the vehicle is carrying aheavy load
tire tread depth and air pressure are atcorrect levels. Change to snow tires whendriving in areas where there is a risk ofsnowy or icy roads
the start battery is sufficiently charged
the wiper blades are in good condition
Related information
Checking tire pressure (p. 525)
Filling washer fluid (p. 621)
Winter driving (p. 425)
Economical driving (p. 421)
Vehicle modem settings (p. 499)
Loading recommendations (p. 557)
Driving with a trailer (p. 436)
Pilot Assist
* (p. 279)
Tire sealing system (p. 541)
Winter driving
It is important to check the vehicle before driving in cold/snowy conditions to makesure it can be driven safely.
Before the cold season arrives: Make sure the engine coolant contains 50% antifreeze. This mixture helps pro-tect the engine from frost erosion down toapprox. –35 °C (–31 °F). Do not mix dif-ferent types of antifreeze as this couldpose a health risk.
Keep the fuel tank well filled to preventcondensation from forming.
Check the viscosity of the engine oil. Oilwith low viscosity (thinner oil) improvescold-weather starting and reduces fuelconsumption when driving with a coldengine.
CAUTION
Low-viscosity oil should not be used with hard driving or in hot weather.
Check the condition and charge level of the start battery. Cold weather placesgreater demands on the start battery andreduces its capacity.
Use washer fluid containing antifreeze tohelp prevent ice from forming in thewasher fluid reservoir.
Page 523 of 657

WHEELS AND TIRES
}}
521
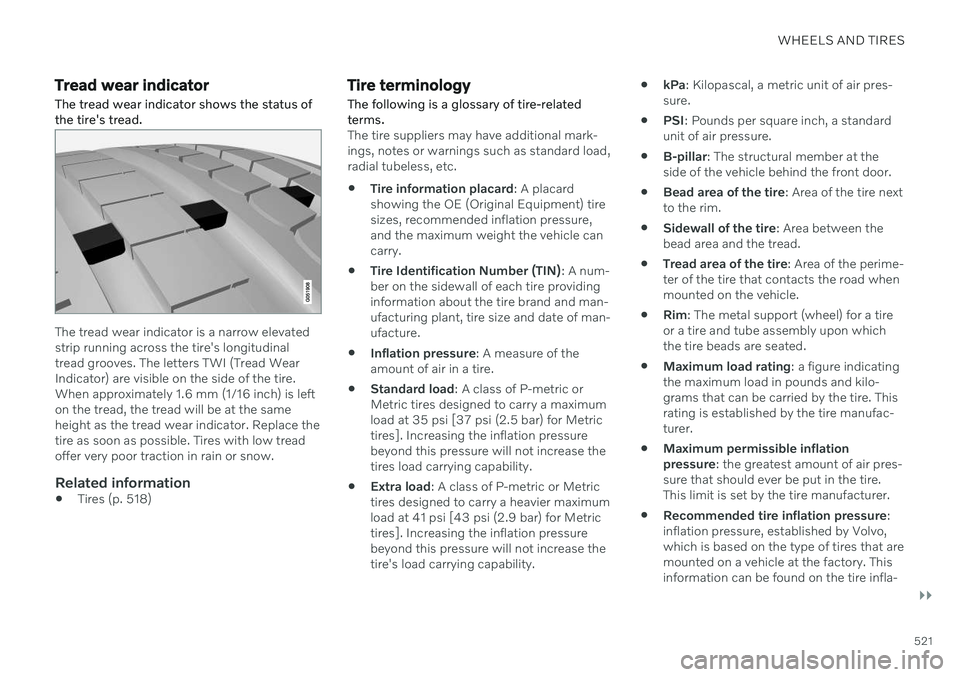
Tread wear indicatorThe tread wear indicator shows the status of the tire's tread.
The tread wear indicator is a narrow elevated strip running across the tire's longitudinaltread grooves. The letters TWI (Tread WearIndicator) are visible on the side of the tire.When approximately 1.6 mm (1/16 inch) is lefton the tread, the tread will be at the sameheight as the tread wear indicator. Replace thetire as soon as possible. Tires with low treadoffer very poor traction in rain or snow.
Related information
Tires (p. 518)
Tire terminology
The following is a glossary of tire-related terms.
The tire suppliers may have additional mark- ings, notes or warnings such as standard load,radial tubeless, etc.
Tire information placard
: A placard
showing the OE (Original Equipment) tiresizes, recommended inflation pressure,and the maximum weight the vehicle cancarry.
Tire Identification Number (TIN)
: A num-
ber on the sidewall of each tire providinginformation about the tire brand and man-ufacturing plant, tire size and date of man-ufacture.
Inflation pressure
: A measure of the
amount of air in a tire.
Standard load
: A class of P-metric or
Metric tires designed to carry a maximumload at 35 psi [37 psi (2.5 bar) for Metrictires]. Increasing the inflation pressurebeyond this pressure will not increase thetires load carrying capability.
Extra load
: A class of P-metric or Metric
tires designed to carry a heavier maximumload at 41 psi [43 psi (2.9 bar) for Metrictires]. Increasing the inflation pressurebeyond this pressure will not increase thetire's load carrying capability.
kPa
: Kilopascal, a metric unit of air pres-
sure.
PSI
: Pounds per square inch, a standard
unit of air pressure.
B-pillar
: The structural member at the
side of the vehicle behind the front door.
Bead area of the tire
: Area of the tire next
to the rim.
Sidewall of the tire
: Area between the
bead area and the tread.
Tread area of the tire
: Area of the perime-
ter of the tire that contacts the road whenmounted on the vehicle.
Rim
: The metal support (wheel) for a tire
or a tire and tube assembly upon whichthe tire beads are seated.
Maximum load rating
: a figure indicating
the maximum load in pounds and kilo-grams that can be carried by the tire. Thisrating is established by the tire manufac-turer.
Maximum permissible inflationpressure
: the greatest amount of air pres-
sure that should ever be put in the tire.This limit is set by the tire manufacturer.
Recommended tire inflation pressure
:
inflation pressure, established by Volvo,which is based on the type of tires that aremounted on a vehicle at the factory. Thisinformation can be found on the tire infla-
Page 524 of 657

||
WHEELS AND TIRES
522tion placard(s) located on the driver's side B-pillar and in the tire inflation table in thischapter.
Cold tires
: The tires are considered to be
cold when they have the same tempera-ture as the surrounding (ambient) air. Thistemperature is normally reached after thevehicle has been parked for at least 3hours.
Related information
Tires (p. 518)
Tire sidewall designations
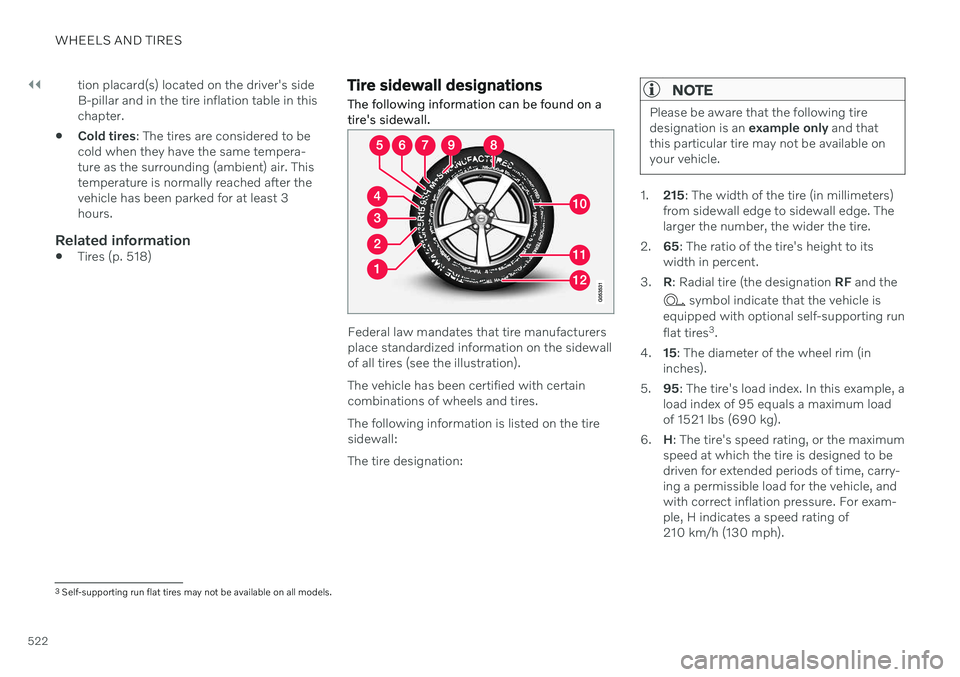
The following information can be found on a tire's sidewall.
Federal law mandates that tire manufacturers place standardized information on the sidewallof all tires (see the illustration). The vehicle has been certified with certain combinations of wheels and tires. The following information is listed on the tire sidewall: The tire designation:
NOTE
Please be aware that the following tire designation is an example only and that
this particular tire may not be available onyour vehicle.
1. 215: The width of the tire (in millimeters)
from sidewall edge to sidewall edge. The larger the number, the wider the tire.
2. 65: The ratio of the tire's height to its
width in percent.
3. R: Radial tire (the designation RF and the
symbol indicate that the vehicle is
equipped with optional self-supporting run flat tires 3
.
4. 15: The diameter of the wheel rim (in
inches).
5. 95: The tire's load index. In this example, a
load index of 95 equals a maximum load of 1521 lbs (690 kg).
6. H: The tire's speed rating, or the maximum
speed at which the tire is designed to bedriven for extended periods of time, carry-ing a permissible load for the vehicle, andwith correct inflation pressure. For exam-ple, H indicates a speed rating of210 km/h (130 mph).
3 Self-supporting run flat tires may not be available on all models.
Page 561 of 657

LOADING, STORAGE AND PASSENGER COMPARTMENT
* Option/accessory.559
WARNING
The vehicle's center of gravity and driving characteristics are altered by roof loads. Follow the vehicle's specifications regar- ding weights and maximum permittedload.
Related information
Loading recommendations (p. 557)
Weights (p. 629)
Grocery bag holders Grocery bag holders (hooks) help keep shop- ping bags in place and prevent them fromfalling over and spilling their contents in thecargo compartment.
On the sides of the cargo compartment
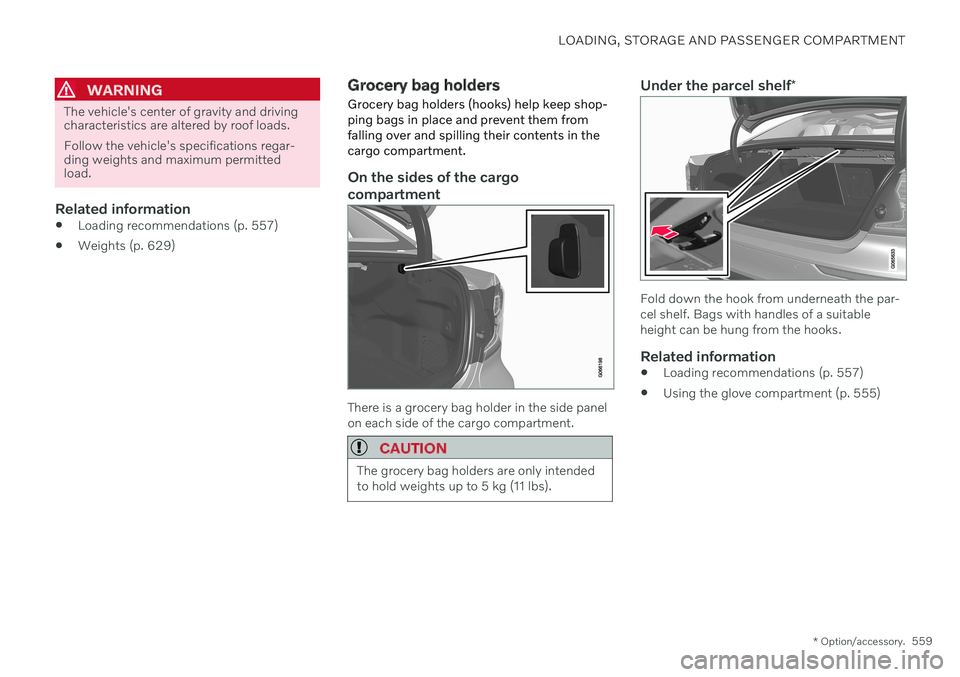
There is a grocery bag holder in the side panel on each side of the cargo compartment.
CAUTION
The grocery bag holders are only intended to hold weights up to 5 kg (11 lbs).
Under the parcel shelf
*
Fold down the hook from underneath the par- cel shelf. Bags with handles of a suitableheight can be hung from the hooks.
Related information
Loading recommendations (p. 557)
Using the glove compartment (p. 555)
Page 629 of 657

SPECIFICATIONS
}}
627
DimensionsThe vehicle's length, height, etc. are shown in the table.
Dimensions mm inches
A Ground clearance A
136 5.4
B Wheelbase 2872 113,1 C Length 4761 187.4
D Load length, floor, folded backrest 1797 70.7
E Load length, floor 1005 39.6 F Height B
1437 56.6Dimensions mm inches
G Load height 485 19,1 H Wheel track, front 1603C
1600 D
1593 E63.1
C
63,0 D
62,7 E
I Wheel track, rear 1603C
1600 D
1593 E63.1
C
63,0 D
62,7 EDimensions mm inches
J Load width, floor 867 34,1
K Width 1850 72.8