mirror controls VOLVO S60 TWIN ENGINE 2020 User Guide
[x] Cancel search | Manufacturer: VOLVO, Model Year: 2020, Model line: S60 TWIN ENGINE, Model: VOLVO S60 TWIN ENGINE 2020Pages: 657, PDF Size: 13.6 MB
Page 193 of 657

SEATS AND STEERING WHEEL
* Option/accessory.191
Adjusting the passenger seat from the driver's seat *
The front passenger seat can be adjusted from the driver's seat.
Activating the functionThe function is activated via the function view in the center display:
Tap the
Adjust Passenger
Seat button to activate.
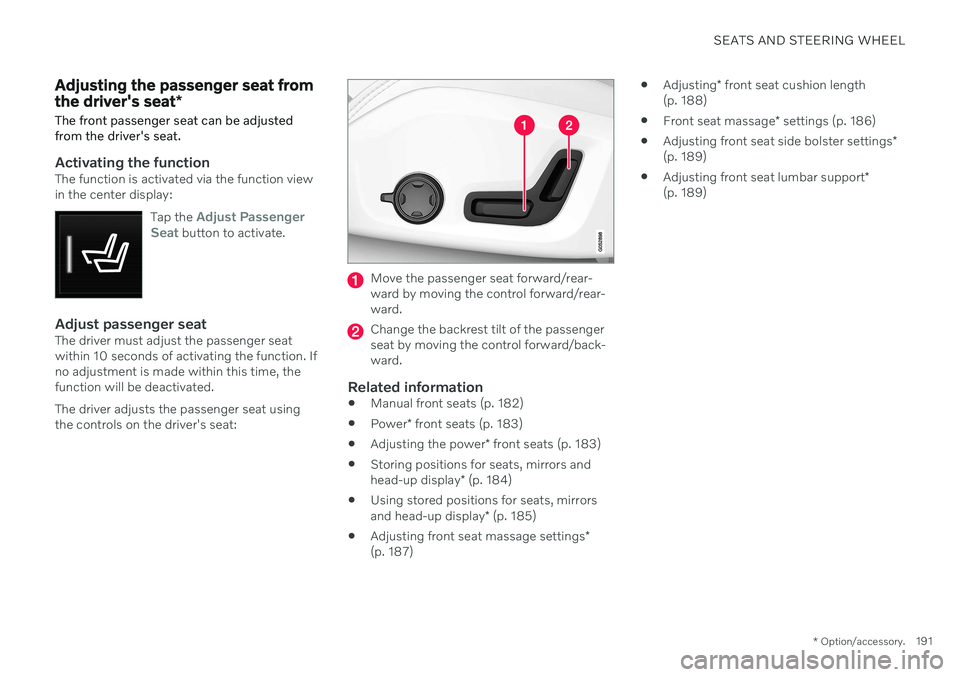
Adjust passenger seatThe driver must adjust the passenger seat within 10 seconds of activating the function. Ifno adjustment is made within this time, thefunction will be deactivated. The driver adjusts the passenger seat using the controls on the driver's seat:
Move the passenger seat forward/rear- ward by moving the control forward/rear-ward.
Change the backrest tilt of the passenger seat by moving the control forward/back-ward.
Related information
Manual front seats (p. 182)
Power
* front seats (p. 183)
Adjusting the power
* front seats (p. 183)
Storing positions for seats, mirrors and head-up display
* (p. 184)
Using stored positions for seats, mirrorsand head-up display
* (p. 185)
Adjusting front seat massage settings
*
(p. 187)
Adjusting
* front seat cushion length
(p. 188)
Front seat massage
* settings (p. 186)
Adjusting front seat side bolster settings
*
(p. 189)
Adjusting front seat lumbar support
*
(p. 189)
Page 200 of 657

CLIMATE CONTROL
* Option/accessory.
198
Climate The vehicle is equipped with electronic cli- mate control. The climate system cools, heatsand dehumidifies the air in the passengercompartment.
All of the climate system functions are con- trolled from the center display and the buttonson the center console. Certain rear seat functions can also be con- trolled from the climate controls * on the rear
of the tunnel console.
Related information
Climate zones (p. 198)
Climate control sensors (p. 198)
Perceived temperature (p. 199)
Climate control system voice commands (p. 199)
Parking climate (p. 219)
Heater (p. 227)
Air quality (p. 200)
Air distribution (p. 203)
Climate system controls (p. 209)
Climate zones The vehicle is divided into climate zones to make it possible to set different temperaturesfor different parts of the passenger compart-ment.
2-zone climate system
Climate zones with 2-zone climate system.
In 2-zone climate systems, the passenger compartment temperature can be set sepa-rately for the left and right sides of the vehicle.
Related information
Climate (p. 198)
Climate control sensors
The climate system has a number of sensors to help regulate the climate settings in thevehicle.
Location of the sensors
Sunlight sensors - on the upper side of the dashboard.
Humidity sensor - in the rearview mirror console.
Ambient temperature sensor - in the right- side door mirror.
Passenger compartment temperature sen- sor - near the buttons in the center con-sole.
Page 211 of 657

CLIMATE CONTROL
}}
* Option/accessory.209
Climate system controls
The climate system functions are controlled from physical buttons on the center console,the center display, and the climate panel on the rear side of the tunnel console *.
Physical buttons in the center console
Button for max defroster.
Button for heated rear window and door mirrors.
Climate bar in the center displayThe most common climate system functionscan be controlled from the climate bar.
Temperature controls for driver and pas- senger side.
Controls for heated * and ventilated * driver
and front passenger seat, as well as heated steering wheel *.
Button for opening Climate view. The graphic in the button shows activated cli-mate system settings.
Climate view in the center displayTap the symbol in the center of theclimate bar to open Climate view. Depending on equipment level, Cli- mate view may be divided into sev-
eral tabs. Toggle between the tabs by swipingthe screen to the left/right or by tapping thedesired heading.
Main climate
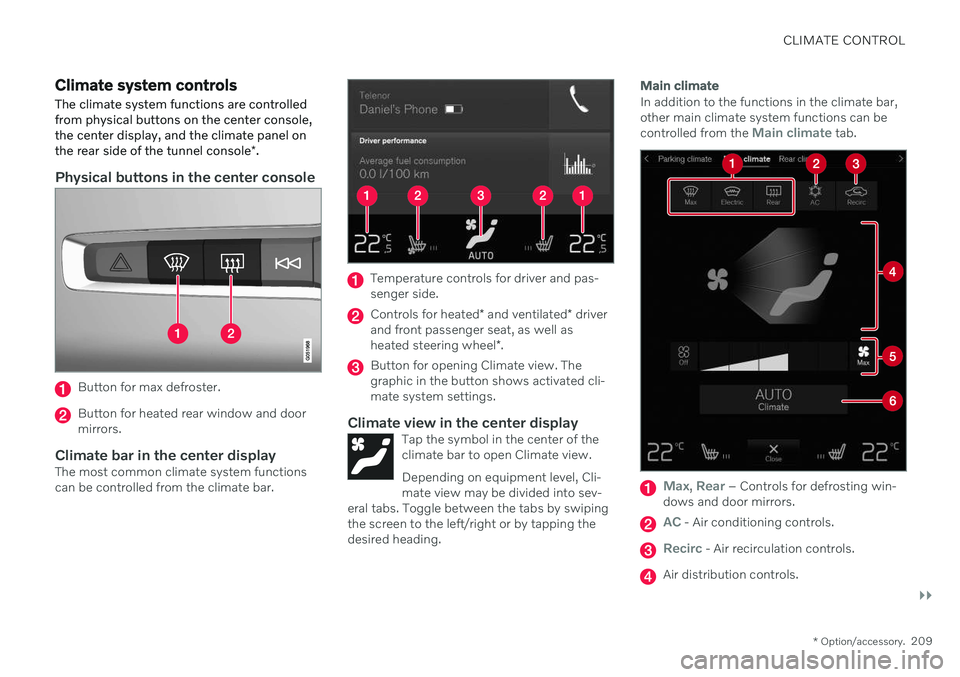
In addition to the functions in the climate bar, other main climate system functions can be controlled from the
Main climate tab.
Max, Rear – Controls for defrosting win-
dows and door mirrors.
AC - Air conditioning controls.
Recirc - Air recirculation controls.
Air distribution controls.
Page 212 of 657

||
CLIMATE CONTROL
* Option/accessory.
210
Blower control.
AUTO - Automatic climate control.
Parking climate
Parking climate functions can be controlled from the Parking climate tab.
Climate controls on the rear side of
the tunnel console *
If the vehicle is equipped with heated rear seats*, there are physical buttons on the rear
side of the tunnel console to control this func- tion.
Related information
Climate (p. 198)
Activating and deactivating power front seats
* (p. 210)
Activating and deactivating the heatedrear seats
* (p. 211)
Activating and deactivating front seat ven-tilation
* (p. 211)
Activating and deactivating the heatedsteering wheel
* (p. 212)
Activating auto climate control (p. 213)
Activating and deactivating recirculation (p. 213)
Activating and deactivating max defroster(p. 214)
Activating and deactivating the heatedrear window and door mirrors (p. 215)
Setting the blower speed for the frontseats (p. 216)
Synchronize temperature (p. 218)
Activating and deactivating air condition-ing (p. 219)
Activating and deactivating power front seats
*
The seats can be heated for added comfort for the driver and passengers in cold weather.
1. Tap the left- or right-side steering wheel and seat button in the center display's cli- mate bar to open the controls for steeringwheel and seat heating. If the vehicle is not equipped with ventila- ted seats or heated steering wheel (for thedriver's side), the button for seat heating isdirectly accessible in the climate bar.
2. Tap the seat heating button repeatedly to
select one of the four levels: Off, High,Medium or Low.
> The level is changed and the set level is displayed in the button.
Related information
Climate system controls (p. 209)
Activating and deactivating the heated front seat
* (p. 211)
Page 217 of 657

CLIMATE CONTROL
}}
215
Button in center console.
–Tap the button.
> The max defroster is activated/deacti-vated and the button lights up/goes out.
Activating and deactivating max defroster from the center display
1. Tap the symbol in the center of the climate bar to open Climate view in the center dis- play.
2.Tap Max.
> The max defroster is activated/deacti- vated and the button lights up/goes out.
Related information
Climate system controls (p. 209)
Activating and deactivating the heated rear window and doormirrors The heated rear window and door mirrors are used to quickly remove condensation and icefrom the glass.
Activating and deactivating the heated rear window and door mirrors fromthe center console
A button in the center console offers quick access to the heated rear window and doormirrors functions.
Button in center console.
–Tap the button.
> Heated windows and door mirrors are
activated and the button lights up/goes out.
Page 218 of 657

||
CLIMATE CONTROL
216
Activating and deactivating the heated rear window and door mirrors fromthe center display
1. Tap the symbol in the center of the climatebar to open Climate view in the center dis- play.
2.Tap Rear.
> Heated windows and door mirrors are activated and the button lights up/goes out.
Related information
Climate system controls (p. 209)
Automatically activating and deactivatingthe heated rear window and door mirrors(p. 216)
Automatically activating and deactivating the heated rearwindow and door mirrors
The heated rear window and door mirrors are used to quickly remove condensation and icefrom the glass.
It is possible to select whether rear window and door mirror heating should be automati-cally activated or deactivated when the engineis started. With automatic start activated,heating will be activated when there is a riskof ice or condensation on the windows or mir-rors. Heating is automatically switched offwhen the window or door mirror is sufficientlywarm and the condensation or ice is gone. 1. Tap
Settings in the Top view in the center
display.
2. Tap
Climate.
3. Select
Auto Rear Defroster to activate/
deactivate automatic rear window and door heating.
Related information
Activating and deactivating the heatedrear window and door mirrors (p. 215)
Setting the blower speed for the front seats 2
The blower can be set to several different automatically controlled speeds for the frontseat.
1. Tap the symbol in the center of the climate bar to open Climate view in the center dis- play.
2The same setting applies to the rear seats with the 2-zone climate system.
Page 444 of 657

||
STARTING AND DRIVING
* Option/accessory.
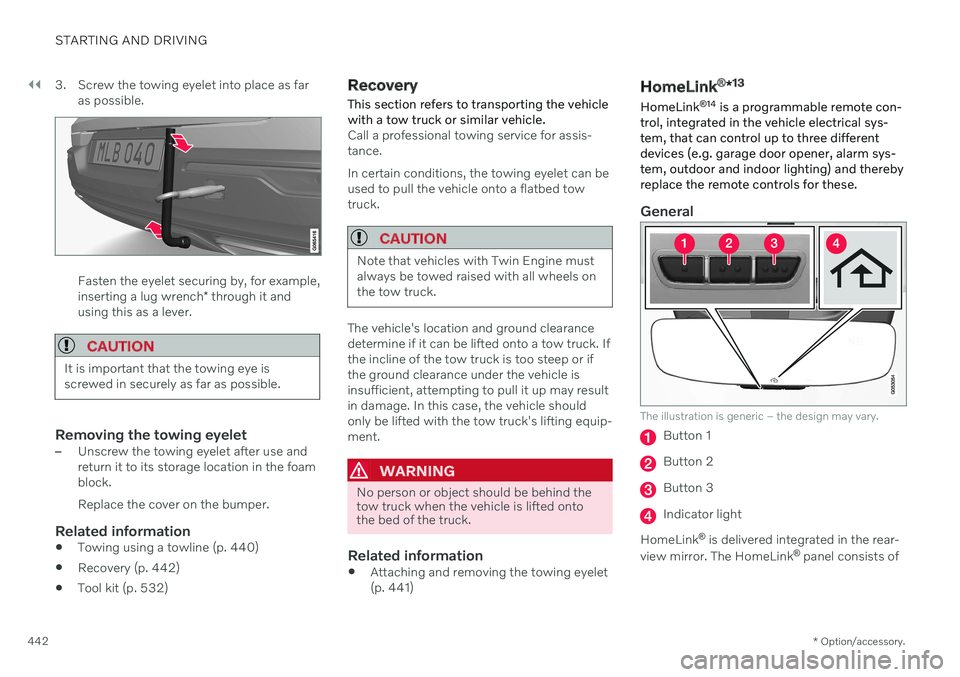
442 3. Screw the towing eyelet into place as far
as possible.
Fasten the eyelet securing by, for example, inserting a lug wrench * through it and
using this as a lever.
CAUTION
It is important that the towing eye is screwed in securely as far as possible.
Removing the towing eyelet–Unscrew the towing eyelet after use and return it to its storage location in the foamblock. Replace the cover on the bumper.
Related information
Towing using a towline (p. 440)
Recovery (p. 442)
Tool kit (p. 532)
Recovery
This section refers to transporting the vehicle with a tow truck or similar vehicle.
Call a professional towing service for assis- tance. In certain conditions, the towing eyelet can be used to pull the vehicle onto a flatbed towtruck.
CAUTION
Note that vehicles with Twin Engine must always be towed raised with all wheels onthe tow truck.
The vehicle's location and ground clearance determine if it can be lifted onto a tow truck. Ifthe incline of the tow truck is too steep or ifthe ground clearance under the vehicle isinsufficient, attempting to pull it up may resultin damage. In this case, the vehicle shouldonly be lifted with the tow truck's lifting equip-ment.
WARNING
No person or object should be behind the tow truck when the vehicle is lifted ontothe bed of the truck.
Related information
Attaching and removing the towing eyelet (p. 441)
HomeLink ®
*13
HomeLink ®
14
is a programmable remote con-
trol, integrated in the vehicle electrical sys- tem, that can control up to three differentdevices (e.g. garage door opener, alarm sys-tem, outdoor and indoor lighting) and therebyreplace the remote controls for these.
General
The illustration is generic – the design may vary.
Button 1
Button 2
Button 3
Indicator light
HomeLink ®
is delivered integrated in the rear-
view mirror. The HomeLink ®
panel consists of
Page 445 of 657

STARTING AND DRIVING
}}
* Option/accessory.443
three programmable buttons and an indicator light in the mirror. For more information about HomeLink
®
,
please visit: www.HomeLink.com or call 1-800-355-3515. Save the original remote controls for future programming (e.g. for use in another vehicle).It is also advisable to delete the button pro-gramming if the vehicle is sold.
Related information
Using HomeLink ®
* (p. 445)
Programming HomeLink ®
* (p. 443)
Type approval for HomeLink ®
* (p. 446)
Programming HomeLink ®
*15
Follow these instructions to program HomeLink ®
, reset all programming, or pro-
gram individual buttons.
NOTE
In some vehicles, the ignition must be on or in the "accessory position" before HomeLink ®
can be programmed or used. It
can be a good idea to put new batteries in the remote control being replaced by HomeLink ®
for faster programming and
better radio signal transmission. TheHomeLink ®
buttons should be reset before
programming.
WARNING
While HomeLink ®
is being programmed,
the garage door or gate being programmed may be activated. Make sure that no one isnear the door or gate during programming.When programming a garage door opener,it is advised to park outside of the garage. 1. Point the remote control at the
HomeLink ®
button to be programmed and
hold it about 2-8 cm (1-3 inches) from the button. Do not obstruct the HomeLink ®
indicator light. Note: Some remote controls are more
effective at programming HomeLink ®
from
a distance of about 15-20 cm (6-12 inches). Keep this in mind if you experi-ence any programming difficulties.
2. Press and hold both the remote control button and the HomeLink ®
button to be
programmed.
13 Certain markets only.
14 HomeLink and the HomeLink house symbol are registered trademarks of Gentex Corporation.
15 Certain markets only.