rear view mirror VOLVO S60 TWIN ENGINE 2020 User Guide
[x] Cancel search | Manufacturer: VOLVO, Model Year: 2020, Model line: S60 TWIN ENGINE, Model: VOLVO S60 TWIN ENGINE 2020Pages: 657, PDF Size: 13.6 MB
Page 190 of 657

SEATS AND STEERING WHEEL
* Option/accessory.
188
Adjusting * front seat cushion
length Depending on the selected equipment level, the length of the seat cushion can either be adjusted using the multifunction control * on
the side of the seat cushion, or manually adjusted using the control on the front of theseat cushion.
Adjusting seat cushion length using the multifunction control
The multifunction control, located on the side of the seat cushion.
1. Activate the multifunction control by turn-
ing the control
upward/downward. The
seat settings view will appear in the center display. 2.
Select
Cushion extension in the seat set-
tings view.
Push in the front part of the four-way button
to extend the seat cushion.
Press the rear part of the four-way but- ton
to shorten the seat cushion.
Manually adjusting seat cushion length
Control for adjusting seat cushion.
1. Grasp the handle on the front of the
seat and pull upward.
2. Adjust the length of the seat cushion.
3. Release the handle and make sure the seat cushion locks into position.
Related information
Manual front seats (p. 182)
Power
* front seats (p. 183)
Adjusting the power
* front seats (p. 183)
Storing positions for seats, mirrors and head-up display
* (p. 184)
Using stored positions for seats, mirrorsand head-up display
* (p. 185)
Adjusting front seat massage settings
*
(p. 187)
Front seat massage
* settings (p. 186)
Adjusting front seat side bolster settings
*
(p. 189)
Adjusting front seat lumbar support
*
(p. 189)
Adjusting the passenger seat from thedriver's seat
* (p. 191)
Page 191 of 657

SEATS AND STEERING WHEEL
}}
* Option/accessory.189
Adjusting front seat side bolster settings*
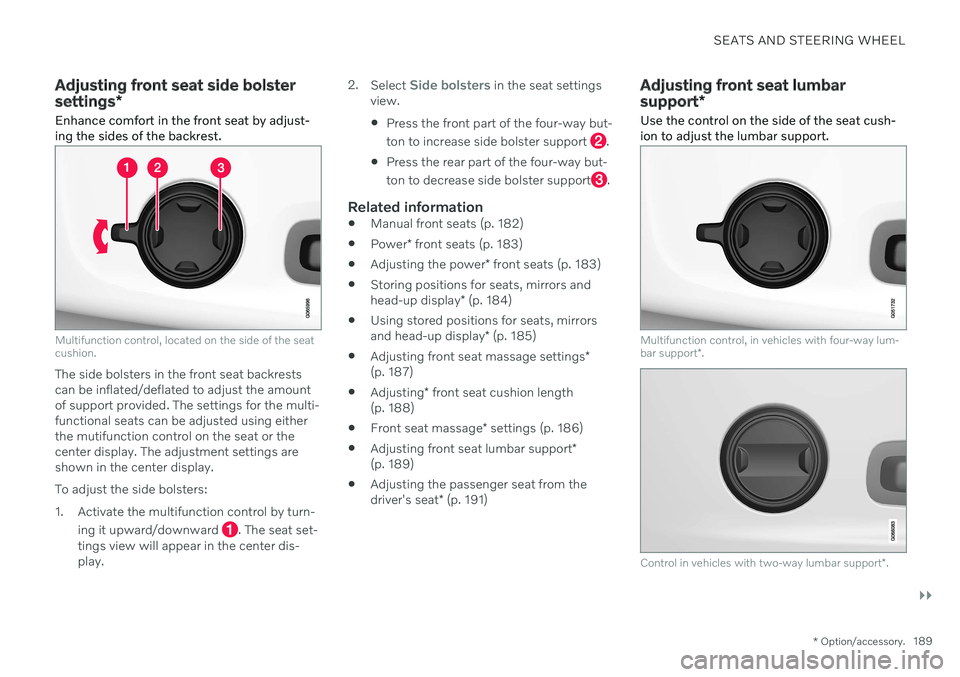
Enhance comfort in the front seat by adjust- ing the sides of the backrest.
Multifunction control, located on the side of the seat cushion.
The side bolsters in the front seat backrests can be inflated/deflated to adjust the amountof support provided. The settings for the multi-functional seats can be adjusted using eitherthe mutifunction control on the seat or thecenter display. The adjustment settings areshown in the center display. To adjust the side bolsters:
1. Activate the multifunction control by turn-
ing it upward/downward
. The seat set-
tings view will appear in the center dis- play. 2.
Select
Side bolsters in the seat settings
view. Press the front part of the four-way but- ton to increase side bolster support
.
Press the rear part of the four-way but- ton to decrease side bolster support
.
Related information
Manual front seats (p. 182)
Power
* front seats (p. 183)
Adjusting the power
* front seats (p. 183)
Storing positions for seats, mirrors and head-up display
* (p. 184)
Using stored positions for seats, mirrorsand head-up display
* (p. 185)
Adjusting front seat massage settings
*
(p. 187)
Adjusting
* front seat cushion length
(p. 188)
Front seat massage
* settings (p. 186)
Adjusting front seat lumbar support
*
(p. 189)
Adjusting the passenger seat from thedriver's seat
* (p. 191)
Adjusting front seat lumbar support *
Use the control on the side of the seat cush- ion to adjust the lumbar support.
Multifunction control, in vehicles with four-way lum- bar support *.
Control in vehicles with two-way lumbar support *.
Page 192 of 657

||
SEATS AND STEERING WHEEL
* Option/accessory.
190 Lumbar support is adjusted using the multi- function control in vehicles with four-way lum- bar support
*, or the round button in vehicles
with two-way lumbar support *. The control is
located on the side of the seat cushion. Depending on the selected equipment level,the lumbar support can be adjusted forward/rearward and up/down (four-way lumbar sup-port) or forward/backward (two-way lumbarsupport).
Adjusting lumbar support in vehicles
with four-way lumbar support
1. Activate the multifunction control by turn-
ing the control
upward/downward. The
seat settings view will appear in the center display. 2.
Select
Lumbar in the seat settings view.
Press the round button up
/down to move the lumbar support upward/ downward.
Press the front part
of the button to
increase lumbar support.
Press the rear part
of the button to
decrease lumbar support.
Adjusting lumbar support in vehicles with two-way lumbar support
1. Press the front part of the round button
to increase lumbar support.
2. Press the rear part
of the round button
to decrease lumbar support.
Related information
Manual front seats (p. 182)
Power
* front seats (p. 183)
Adjusting the power
* front seats (p. 183)
Storing positions for seats, mirrors and head-up display
* (p. 184)
Using stored positions for seats, mirrorsand head-up display
* (p. 185)
Adjusting front seat massage settings
*
(p. 187)
Adjusting
* front seat cushion length
(p. 188)
Front seat massage
* settings (p. 186)
Adjusting front seat side bolster settings
*
(p. 189)
Adjusting the passenger seat from thedriver's seat
* (p. 191)
Page 193 of 657

SEATS AND STEERING WHEEL
* Option/accessory.191
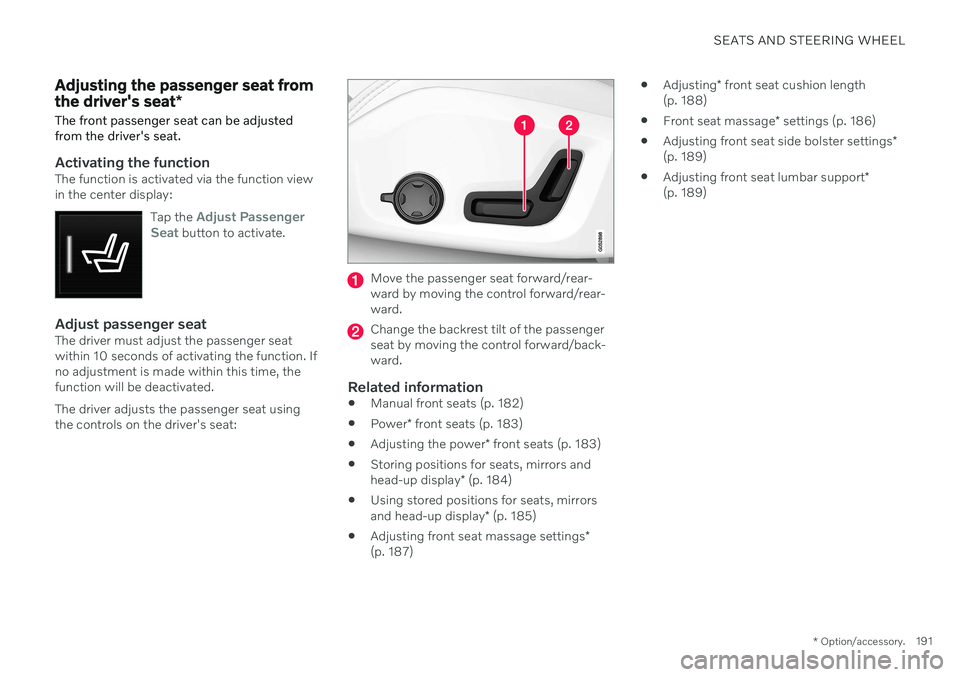
Adjusting the passenger seat from the driver's seat *
The front passenger seat can be adjusted from the driver's seat.
Activating the functionThe function is activated via the function view in the center display:
Tap the
Adjust Passenger
Seat button to activate.
Adjust passenger seatThe driver must adjust the passenger seat within 10 seconds of activating the function. Ifno adjustment is made within this time, thefunction will be deactivated. The driver adjusts the passenger seat using the controls on the driver's seat:
Move the passenger seat forward/rear- ward by moving the control forward/rear-ward.
Change the backrest tilt of the passenger seat by moving the control forward/back-ward.
Related information
Manual front seats (p. 182)
Power
* front seats (p. 183)
Adjusting the power
* front seats (p. 183)
Storing positions for seats, mirrors and head-up display
* (p. 184)
Using stored positions for seats, mirrorsand head-up display
* (p. 185)
Adjusting front seat massage settings
*
(p. 187)
Adjusting
* front seat cushion length
(p. 188)
Front seat massage
* settings (p. 186)
Adjusting front seat side bolster settings
*
(p. 189)
Adjusting front seat lumbar support
*
(p. 189)
Page 200 of 657

CLIMATE CONTROL
* Option/accessory.
198
Climate The vehicle is equipped with electronic cli- mate control. The climate system cools, heatsand dehumidifies the air in the passengercompartment.
All of the climate system functions are con- trolled from the center display and the buttonson the center console. Certain rear seat functions can also be con- trolled from the climate controls * on the rear
of the tunnel console.
Related information
Climate zones (p. 198)
Climate control sensors (p. 198)
Perceived temperature (p. 199)
Climate control system voice commands (p. 199)
Parking climate (p. 219)
Heater (p. 227)
Air quality (p. 200)
Air distribution (p. 203)
Climate system controls (p. 209)
Climate zones The vehicle is divided into climate zones to make it possible to set different temperaturesfor different parts of the passenger compart-ment.
2-zone climate system
Climate zones with 2-zone climate system.
In 2-zone climate systems, the passenger compartment temperature can be set sepa-rately for the left and right sides of the vehicle.
Related information
Climate (p. 198)
Climate control sensors
The climate system has a number of sensors to help regulate the climate settings in thevehicle.
Location of the sensors
Sunlight sensors - on the upper side of the dashboard.
Humidity sensor - in the rearview mirror console.
Ambient temperature sensor - in the right- side door mirror.
Passenger compartment temperature sen- sor - near the buttons in the center con-sole.
Page 211 of 657

CLIMATE CONTROL
}}
* Option/accessory.209
Climate system controls
The climate system functions are controlled from physical buttons on the center console,the center display, and the climate panel on the rear side of the tunnel console *.
Physical buttons in the center console
Button for max defroster.
Button for heated rear window and door mirrors.
Climate bar in the center displayThe most common climate system functionscan be controlled from the climate bar.
Temperature controls for driver and pas- senger side.
Controls for heated * and ventilated * driver
and front passenger seat, as well as heated steering wheel *.
Button for opening Climate view. The graphic in the button shows activated cli-mate system settings.
Climate view in the center displayTap the symbol in the center of theclimate bar to open Climate view. Depending on equipment level, Cli- mate view may be divided into sev-
eral tabs. Toggle between the tabs by swipingthe screen to the left/right or by tapping thedesired heading.
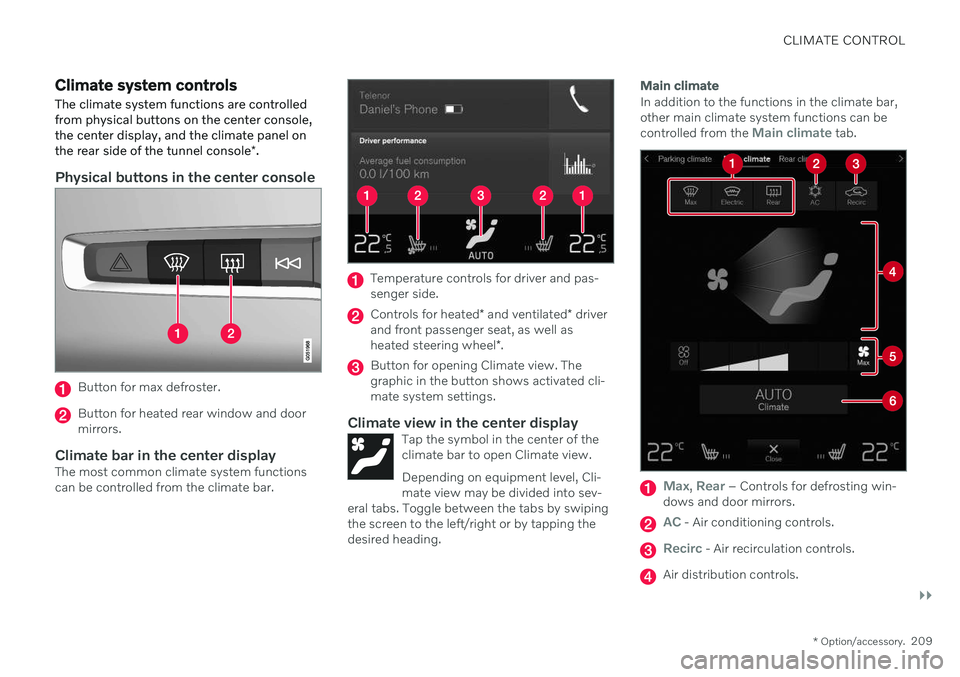
Main climate
In addition to the functions in the climate bar, other main climate system functions can be controlled from the
Main climate tab.
Max, Rear – Controls for defrosting win-
dows and door mirrors.
AC - Air conditioning controls.
Recirc - Air recirculation controls.
Air distribution controls.
Page 217 of 657

CLIMATE CONTROL
}}
215
Button in center console.
–Tap the button.
> The max defroster is activated/deacti-vated and the button lights up/goes out.
Activating and deactivating max defroster from the center display
1. Tap the symbol in the center of the climate bar to open Climate view in the center dis- play.
2.Tap Max.
> The max defroster is activated/deacti- vated and the button lights up/goes out.
Related information
Climate system controls (p. 209)
Activating and deactivating the heated rear window and doormirrors The heated rear window and door mirrors are used to quickly remove condensation and icefrom the glass.
Activating and deactivating the heated rear window and door mirrors fromthe center console
A button in the center console offers quick access to the heated rear window and doormirrors functions.
Button in center console.
–Tap the button.
> Heated windows and door mirrors are
activated and the button lights up/goes out.
Page 218 of 657

||
CLIMATE CONTROL
216
Activating and deactivating the heated rear window and door mirrors fromthe center display
1. Tap the symbol in the center of the climatebar to open Climate view in the center dis- play.
2.Tap Rear.
> Heated windows and door mirrors are activated and the button lights up/goes out.
Related information
Climate system controls (p. 209)
Automatically activating and deactivatingthe heated rear window and door mirrors(p. 216)
Automatically activating and deactivating the heated rearwindow and door mirrors
The heated rear window and door mirrors are used to quickly remove condensation and icefrom the glass.
It is possible to select whether rear window and door mirror heating should be automati-cally activated or deactivated when the engineis started. With automatic start activated,heating will be activated when there is a riskof ice or condensation on the windows or mir-rors. Heating is automatically switched offwhen the window or door mirror is sufficientlywarm and the condensation or ice is gone. 1. Tap
Settings in the Top view in the center
display.
2. Tap
Climate.
3. Select
Auto Rear Defroster to activate/
deactivate automatic rear window and door heating.
Related information
Activating and deactivating the heatedrear window and door mirrors (p. 215)
Setting the blower speed for the front seats 2
The blower can be set to several different automatically controlled speeds for the frontseat.
1. Tap the symbol in the center of the climate bar to open Climate view in the center dis- play.
2The same setting applies to the rear seats with the 2-zone climate system.
Page 222 of 657

CLIMATE CONTROL
* Option/accessory.
220
Preconditioning
Preconditioning is a climate function that, if possible, attempts to achieve a comfortabletemperature in the passenger compartmentbefore driving.
Preconditioning can be started immediately or started at a preset time using a timer. The function utilizes several of the vehicle's systems:
In cold weather, the parking heater heatsthe passenger compartment to a comfort-able temperature.
In warm weather, air conditioning coolsthe passenger compartment to a comfort-able temperature.
The electrically heated steering wheel
*
and seats * can be activated.
Heating for the windshield, rear windowand door mirrors are automatically acti-vated as needed.
During preconditioning in a hot climate, con-densation from the air conditions may dripunder the vehicle. This is normal.
NOTE
Preconditioning is only available when the car is connected to an electrical outlet. Acharging post that is not always active, forexample because of a timer, can cause lossof function for preconditioning. If the vehicle is not connected to an electri- cal socket it is still possible in a warm cli-mate to achieve brief cooling of the pas-senger compartment by direct starting pre-conditioning.
NOTE
During preconditioning of the passenger compartment, the vehicle works to reach acomfortable temperature and not the tem-perature set in the climate system.
Related information
Parking climate (p. 219)
Starting and stopping preconditioning (p. 220)
Preconditioning timer (p. 221)
Starting and stopping preconditioning
Preconditioning heats or cools the passenger compartment, if possible, before driving. Thefunction can be started in the center displayor from a cellular phone.
Starting and stopping from the vehicle
1. Tap the symbol in the center of the climate bar to open Climate view in the center dis- play.
2. Select the
Parking climate tab.
3. Tap the boxes to select if seat/steering wheel heating should be activated along with preconditioning for each function.
4. Tap
Preconditioning.
> Preconditioning starts/stops and the button lights up/goes out.
Page 233 of 657

KEY, LOCKS AND ALARM
* Option/accessory.231
Rear door*
Lock button with indicator light in rear door.
Illuminated indicator lights in each door indi- cate that that particular door is locked. If anydoor is unlocked and opened, the indicatorlight in that door will go out. The lights in theother doors will remain illuminated.
Other indicatorsThe approach lighting and home safe lightingfunctions may be activated when locking andunlocking.
Related information
Lock confirmation settings (p. 231)
Welcome Light (p. 160)
Using home safe lighting (p. 160)
Lock confirmation settings
Settings for how the vehicle confirms locking and unlocking can be adjusted in the centerdisplay's Settings menu.
To change the locking response settings: 1. Tap
Settings in the center display's Top
view.
2. Tap
My CarLocking.
3. Tap
Visible Locking Feedback to select
when the vehicle should provide a visible response:
Lock
Unlock
Both
Or turn off the function by marking Off .
4. Select to receive an audible response when locking the vehicle by marking
Audible Locking Feedback.
To change the settings for folding door mir- rors * when locking:
1. Tap
Settings in the center display's Top
view.
2. Tap
My CarMirrors and Convenience.
3. Select
Fold Mirror When Locked to acti-
vate or deactivate the function.
Related information
Lock indication (p. 230)