buttons VOLVO S60 TWIN ENGINE 2020 Owner's Manual
[x] Cancel search | Manufacturer: VOLVO, Model Year: 2020, Model line: S60 TWIN ENGINE, Model: VOLVO S60 TWIN ENGINE 2020Pages: 657, PDF Size: 13.6 MB
Page 186 of 657
||
SEATS AND STEERING WHEEL
* Option/accessory.
184
Raise/lower the seat by moving the con- trol up/down.
Move the seat forward/rearward by mov- ing the control forward/rearward.
Change the backrest tilt by moving the control forward/backward.
Only one movement (forward/rearward/up/down) can be performed at a time. The front seat backrests cannot be folded down completely.
Related information
Manual front seats (p. 182)
Power
* front seats (p. 183)
Storing positions for seats, mirrors and head-up display
* (p. 184)
Using stored positions for seats, mirrorsand head-up display
* (p. 185)
Adjusting front seat massage settings
*
(p. 187)
Adjusting
* front seat cushion length
(p. 188)
Front seat massage
* settings (p. 186)
Adjusting front seat side bolster settings
*
(p. 189)
Adjusting front seat lumbar support
*
(p. 189)
Adjusting the passenger seat from thedriver's seat
* (p. 191)
Storing positions for seats, mirrors and head-up display *
Adjustment settings for the power * seat, door
mirrors and head-up display * can be stored in
the memory buttons.
Two different positions for the power * seat,
door mirrors and head-up display * can be
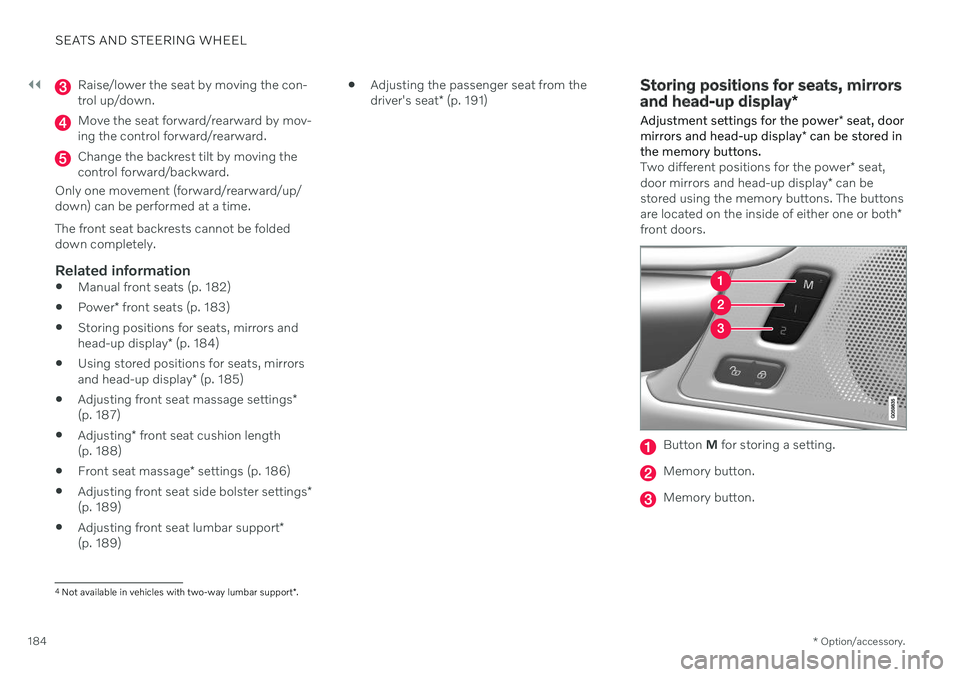
stored using the memory buttons. The buttons are located on the inside of either one or both *
front doors.
Button M for storing a setting.
Memory button.
Memory button.
4
Not available in vehicles with two-way lumbar support *.
Page 187 of 657
SEATS AND STEERING WHEEL
}}
* Option/accessory.185
Storing positions1. Adjust the seat, door mirrors and head-up
display to the desired position.
2. Press and hold the M button. The indica-
tor light in the button will illuminate.
3. Within three seconds, press and hold the 1
or 2 button.
> When the position has been stored in the memory button, an audio signal will sound and the indicator light in the M
button will go out.
If none of the memory buttons are pressedwithin three seconds, the M button will go out
and no position will be stored. The seats, door mirrors or head-up display must be readjusted before a new memoryposition can be set.
Related information
Manual front seats (p. 182)
Power
* front seats (p. 183)
Adjusting the power
* front seats (p. 183)
Using stored positions for seats, mirrors and head-up display
* (p. 185)
Adjusting front seat massage settings
*
(p. 187)
Adjusting
* front seat cushion length
(p. 188)
Front seat massage
* settings (p. 186)
Adjusting front seat side bolster settings
*
(p. 189)
Adjusting front seat lumbar support
*
(p. 189)
Adjusting the passenger seat from thedriver's seat
* (p. 191)
Adjusting the door mirrors (p. 171)
Head-up display settings
* (p. 141)
Using stored positions for seats, mirrors and head-up display *
If the positions for the power * seat, door mir-
rors and head-up display * have been stored,
they can be activated using the memory but- tons.
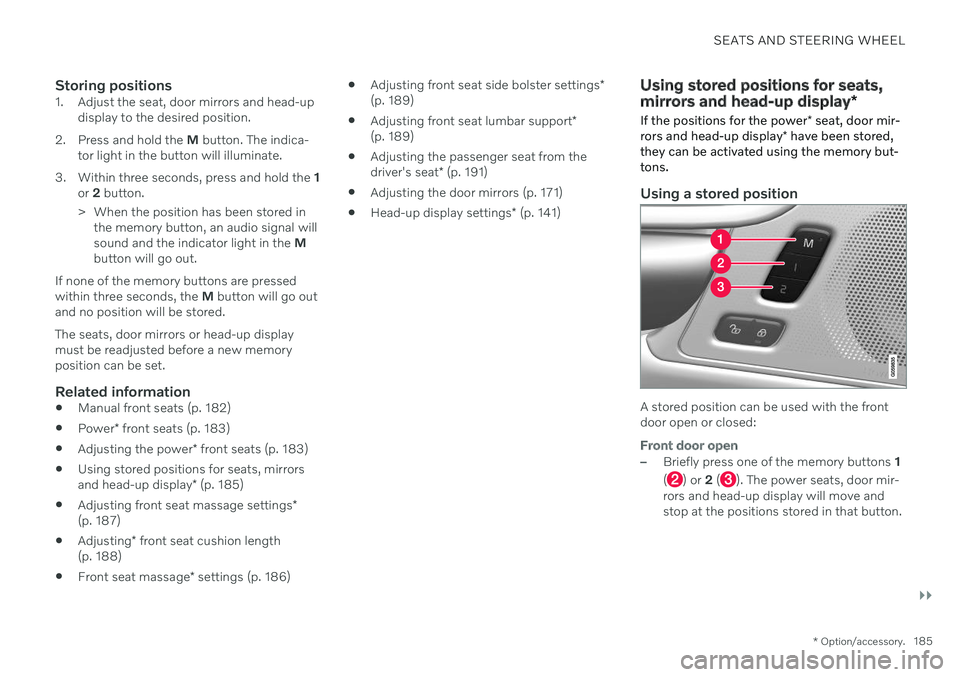
Using a stored position
A stored position can be used with the front door open or closed:
Front door open
–Briefly press one of the memory buttons 1
(
) or 2 (). The power seats, door mir-
rors and head-up display will move and stop at the positions stored in that button.
Page 188 of 657
||
SEATS AND STEERING WHEEL
* Option/accessory.
186
Front door closed
–Press and hold one of the memory buttons 1 (
) or 2 () until the seat, door mirrors
and head-up display stop in the positions stored in that memory button.
If the memory button is released, the seat,door mirrors and head-up display will stopmoving.
WARNING
This list point needs to be translated exactly to: "Because the driver's seatcan be adjusted with the ignition off,children should never be left unatten-ded in the vehicle.
Movement of the seat can be STOP-PED at any time by pressing any but-ton on the power seat control panel.
Do not adjust the seat while driving.
The seat should be adjusted so that thebrake pedal can be depressed fully. Inaddition, position the seat as far rear-ward as comfort and control allow.
The seat rails on the floor must not beobstructed in any way when the seat isin motion.
Related information
Manual front seats (p. 182)
Power
* front seats (p. 183)
Adjusting the power
* front seats (p. 183)
Storing positions for seats, mirrors and head-up display
* (p. 184)
Adjusting front seat massage settings
*
(p. 187)
Adjusting
* front seat cushion length
(p. 188)
Front seat massage
* settings (p. 186)
Adjusting front seat side bolster settings
*
(p. 189)
Adjusting front seat lumbar support
*
(p. 189)
Adjusting the passenger seat from thedriver's seat
* (p. 191)
Adjusting the door mirrors (p. 171)
Head-up display settings
* (p. 141)
Front seat massage * settings
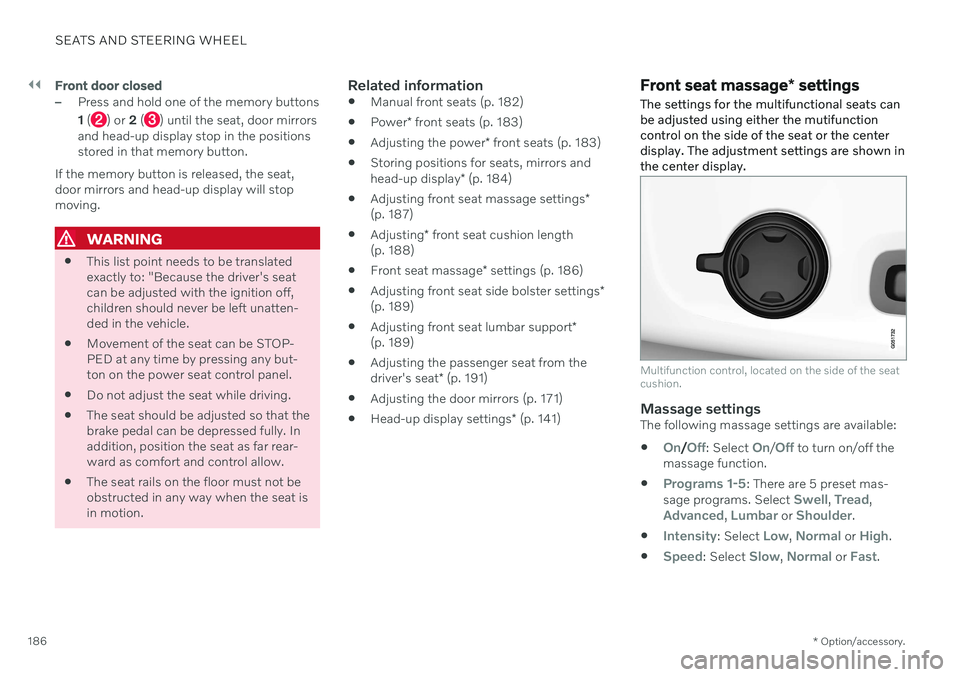
The settings for the multifunctional seats can be adjusted using either the mutifunctioncontrol on the side of the seat or the centerdisplay. The adjustment settings are shown inthe center display.
Multifunction control, located on the side of the seat cushion.
Massage settingsThe following massage settings are available:
On/Off: Select On/Off to turn on/off the
massage function.
Programs 1-5: There are 5 preset mas-
sage programs. Select Swell, Tread,Advanced, Lumbar or Shoulder.
Intensity: Select Low, Normal or High.
Speed: Select Slow, Normal or Fast.
Page 189 of 657
SEATS AND STEERING WHEEL
* Option/accessory.187
Restarting the massage function
The massage function turns off automatically after 20 minutes. The function is reactivatedmanually.
–Tap Restart, which is displayed in the
center display, to restart the selected mas- sage program.
> The massage program will restart. If no selection is made, the message will be stored in Top view.
Related information
Manual front seats (p. 182)
Power
* front seats (p. 183)
Adjusting the power
* front seats (p. 183)
Storing positions for seats, mirrors and head-up display
* (p. 184)
Using stored positions for seats, mirrorsand head-up display
* (p. 185)
Adjusting front seat massage settings
*
(p. 187)
Adjusting
* front seat cushion length
(p. 188)
Adjusting front seat side bolster settings
*
(p. 189)
Adjusting front seat lumbar support
*
(p. 189)
Adjusting the passenger seat from thedriver's seat
* (p. 191)
Adjusting front seat massage settings *
The settings for the multifunctional seats can be adjusted using either the mutifunctioncontrol on the seat or the center display. Theadjustment settings are shown in the centerdisplay.
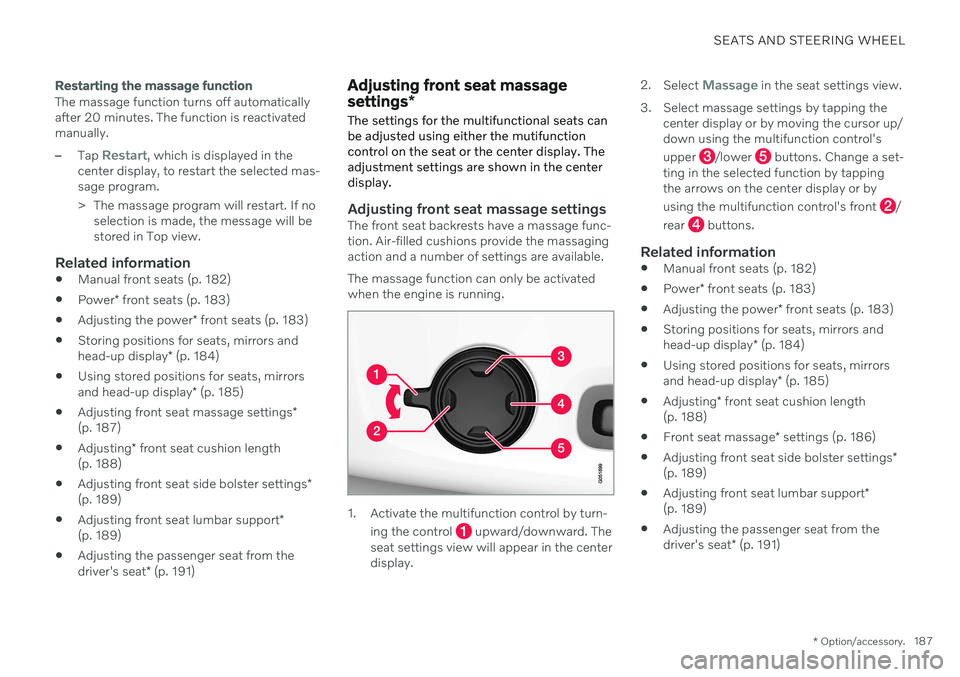
Adjusting front seat massage settingsThe front seat backrests have a massage func- tion. Air-filled cushions provide the massagingaction and a number of settings are available. The massage function can only be activated when the engine is running.
1. Activate the multifunction control by turn-
ing the control
upward/downward. The
seat settings view will appear in the center display. 2.
Select
Massage in the seat settings view.
3. Select massage settings by tapping the center display or by moving the cursor up/ down using the multifunction control's upper
/lower buttons. Change a set-
ting in the selected function by tapping the arrows on the center display or by using the multifunction control's front
/
rear
buttons.
Related information
Manual front seats (p. 182)
Power
* front seats (p. 183)
Adjusting the power
* front seats (p. 183)
Storing positions for seats, mirrors and head-up display
* (p. 184)
Using stored positions for seats, mirrorsand head-up display
* (p. 185)
Adjusting
* front seat cushion length
(p. 188)
Front seat massage
* settings (p. 186)
Adjusting front seat side bolster settings
*
(p. 189)
Adjusting front seat lumbar support
*
(p. 189)
Adjusting the passenger seat from thedriver's seat
* (p. 191)
Page 194 of 657
SEATS AND STEERING WHEEL
* Option/accessory.
192
Folding down the rear seat backrests *
The rear seat backrest is split into two sec- tions. The two sections can be folded forwardindividually.
WARNING
Adjust the seat and ensure it locks into position before driving. Use cautionwhen adjusting the seat. Uncontrolledor careless adjustments could lead toinjury.
Long objects must always be securelytied down to help prevent injury ordamage in the event of sudden brak-ing.
Always turn off the engine and applythe parking brake when loading orunloading the vehicle.
Put the gear selector in
P to help pre-
vent the gear selector from being inad-vertently moved.
CAUTION
When the backrest is folded down, make sure there are no objects in the rear seat,and the seat belts are not buckled. Other-wise there is a risk of damage to theupholstery.
CAUTION
The armrest * in the center seat must be
raised before the seat backrest is folded down. The ski hatch * must be closed before the
seat backrest is folded down.
NOTE
The rear seat must be in the upright posi- tion when private locking is activated inorder for the seats to lock. Seats in thefolded-down position will not lock.
NOTE
The front seats may need to be pushed for- ward and/or the backrest adjusted so thatthe rear seat backrests can be fully low-ered.
Folding down the backrestsThe vehicle must be stationary and at least one of the rear doors must be open before abackrest can be folded down.
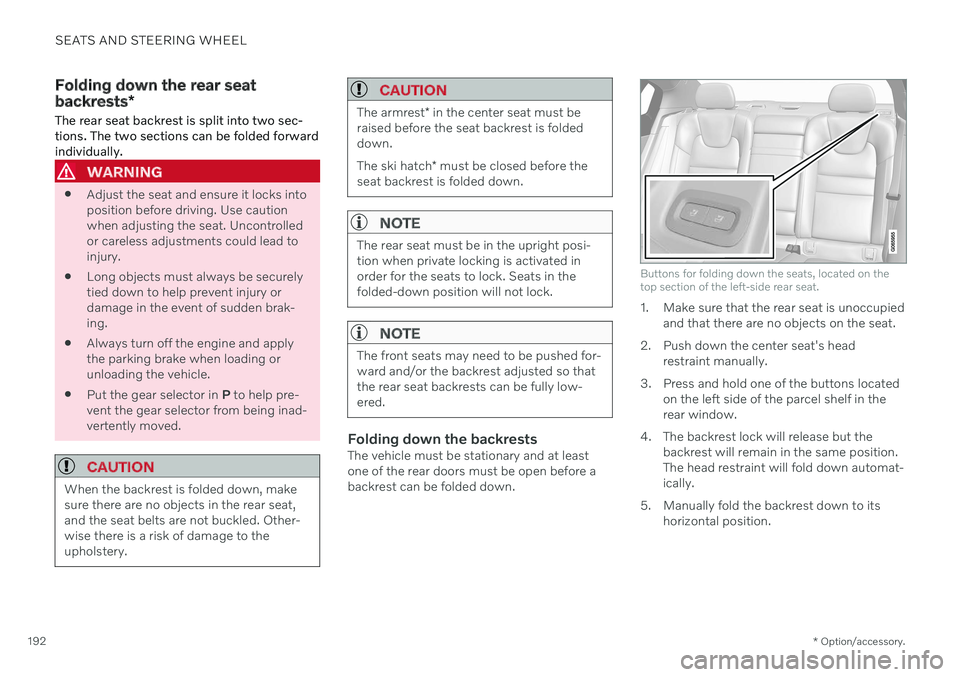
Buttons for folding down the seats, located on the top section of the left-side rear seat.
1. Make sure that the rear seat is unoccupied and that there are no objects on the seat.
2. Push down the center seat's head restraint manually.
3. Press and hold one of the buttons located on the left side of the parcel shelf in the rear window.
4. The backrest lock will release but the backrest will remain in the same position.The head restraint will fold down automat-ically.
5. Manually fold the backrest down to its horizontal position.
Page 200 of 657

CLIMATE CONTROL
* Option/accessory.
198
Climate The vehicle is equipped with electronic cli- mate control. The climate system cools, heatsand dehumidifies the air in the passengercompartment.
All of the climate system functions are con- trolled from the center display and the buttonson the center console. Certain rear seat functions can also be con- trolled from the climate controls * on the rear
of the tunnel console.
Related information
Climate zones (p. 198)
Climate control sensors (p. 198)
Perceived temperature (p. 199)
Climate control system voice commands (p. 199)
Parking climate (p. 219)
Heater (p. 227)
Air quality (p. 200)
Air distribution (p. 203)
Climate system controls (p. 209)
Climate zones The vehicle is divided into climate zones to make it possible to set different temperaturesfor different parts of the passenger compart-ment.
2-zone climate system
Climate zones with 2-zone climate system.
In 2-zone climate systems, the passenger compartment temperature can be set sepa-rately for the left and right sides of the vehicle.
Related information
Climate (p. 198)
Climate control sensors
The climate system has a number of sensors to help regulate the climate settings in thevehicle.
Location of the sensors
Sunlight sensors - on the upper side of the dashboard.
Humidity sensor - in the rearview mirror console.
Ambient temperature sensor - in the right- side door mirror.
Passenger compartment temperature sen- sor - near the buttons in the center con-sole.
Page 206 of 657

CLIMATE CONTROL
204
Adjusting air distribution
Air distribution can be adjusted manually if needed.
1. Tap the symbol in the center of the climate bar to open Climate view in the center dis- play.
Air distribution buttons in Climate view.
Air distribution - windshield defrost vents
Air distribution - dashboard and center console air vents
Air distribution - floor air vents
2. Tap one or more air distribution buttons to open/close the airflow for that vent.
> The air distribution changes and the
buttons will light up or go out.
Related information
Air distribution (p. 203)
Opening, closing and directing air vents (p. 204)
Air distribution options (p. 206)
Opening, closing and directing air vents
Some of the air vents in the passenger com- partment can be individually opened, closedand directed.
Misting can be eliminated by directing the outer air vents towards the door windows. Direct the outer air vents into the passenger compartment to maintain a comfortable tem-perature in warm weather.
Opening and closing the air ventsAir vents on the dashboard:
–Turn the knob in the center of the air vent to open/close airflow from the vent. When the mark on the knob is vertical, the airflow is strongest.
Air vents on the door pillars:
–Move the lever in the center of the air vent up/down to open/close the airflow fromthe vent. The airflow is stopped when the lever is in the lowest position. In other positions, theairflow is constant.
Directing air flow–Move the lever in the center of the air vent horizontally or vertically to direct the air-flow from the vent.
Page 208 of 657

CLIMATE CONTROL
206
Air distribution options
Air distribution can be adjusted manually if needed. The following options are available.
Air distribution Purpose
If all air distribution buttons are deselected in manual mode, the climate control system will revert to automatic mode.
Main airflow from defroster vents. Some airflow from other vents.Helps remove ice and condensation in cold and humid weather(blower speed should not be set too low).
Main airflow from dashboard vents. Some airflow from other vents.Provides effective cooling in warm weather.
Main airflow from floor vents. Some airflow from other vents. Provides heating or cooling in footwell areas.
Page 211 of 657
CLIMATE CONTROL
}}
* Option/accessory.209
Climate system controls
The climate system functions are controlled from physical buttons on the center console,the center display, and the climate panel on the rear side of the tunnel console *.
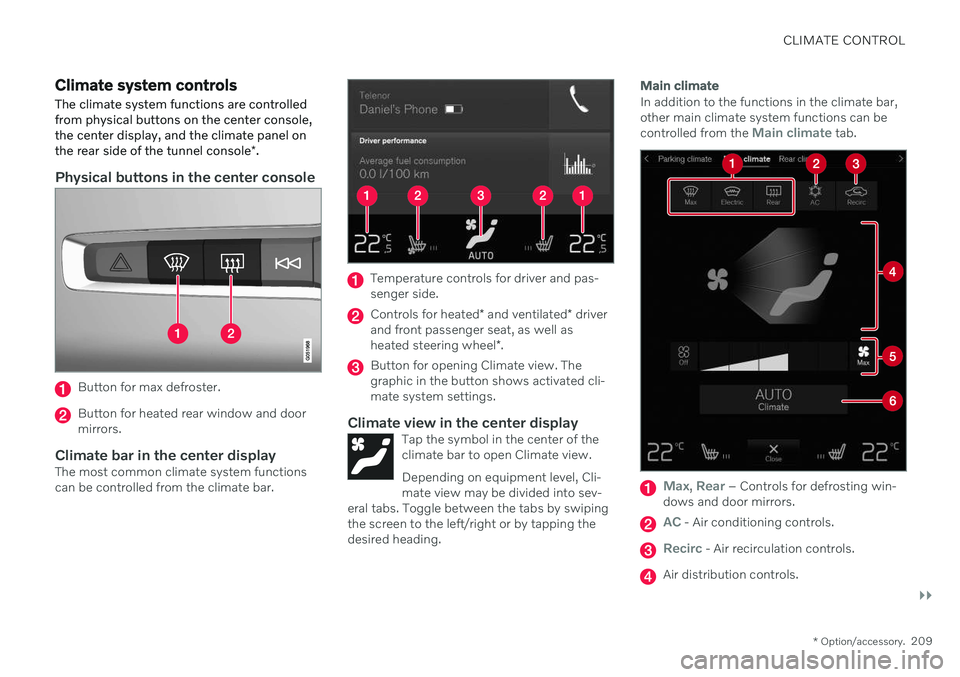
Physical buttons in the center console
Button for max defroster.
Button for heated rear window and door mirrors.
Climate bar in the center displayThe most common climate system functionscan be controlled from the climate bar.
Temperature controls for driver and pas- senger side.
Controls for heated * and ventilated * driver
and front passenger seat, as well as heated steering wheel *.
Button for opening Climate view. The graphic in the button shows activated cli-mate system settings.
Climate view in the center displayTap the symbol in the center of theclimate bar to open Climate view. Depending on equipment level, Cli- mate view may be divided into sev-
eral tabs. Toggle between the tabs by swipingthe screen to the left/right or by tapping thedesired heading.
Main climate
In addition to the functions in the climate bar, other main climate system functions can be controlled from the
Main climate tab.
Max, Rear – Controls for defrosting win-
dows and door mirrors.
AC - Air conditioning controls.
Recirc - Air recirculation controls.
Air distribution controls.
Page 212 of 657

||
CLIMATE CONTROL
* Option/accessory.
210
Blower control.
AUTO - Automatic climate control.
Parking climate
Parking climate functions can be controlled from the Parking climate tab.
Climate controls on the rear side of
the tunnel console *
If the vehicle is equipped with heated rear seats*, there are physical buttons on the rear
side of the tunnel console to control this func- tion.
Related information
Climate (p. 198)
Activating and deactivating power front seats
* (p. 210)
Activating and deactivating the heatedrear seats
* (p. 211)
Activating and deactivating front seat ven-tilation
* (p. 211)
Activating and deactivating the heatedsteering wheel
* (p. 212)
Activating auto climate control (p. 213)
Activating and deactivating recirculation (p. 213)
Activating and deactivating max defroster(p. 214)
Activating and deactivating the heatedrear window and door mirrors (p. 215)
Setting the blower speed for the frontseats (p. 216)
Synchronize temperature (p. 218)
Activating and deactivating air condition-ing (p. 219)
Activating and deactivating power front seats
*
The seats can be heated for added comfort for the driver and passengers in cold weather.
1. Tap the left- or right-side steering wheel and seat button in the center display's cli- mate bar to open the controls for steeringwheel and seat heating. If the vehicle is not equipped with ventila- ted seats or heated steering wheel (for thedriver's side), the button for seat heating isdirectly accessible in the climate bar.
2. Tap the seat heating button repeatedly to
select one of the four levels: Off, High,Medium or Low.
> The level is changed and the set level is displayed in the button.
Related information
Climate system controls (p. 209)
Activating and deactivating the heated front seat
* (p. 211)