window VOLVO S60 TWIN ENGINE 2020 Service Manual
[x] Cancel search | Manufacturer: VOLVO, Model Year: 2020, Model line: S60 TWIN ENGINE, Model: VOLVO S60 TWIN ENGINE 2020Pages: 657, PDF Size: 13.6 MB
Page 222 of 657

CLIMATE CONTROL
* Option/accessory.
220
Preconditioning
Preconditioning is a climate function that, if possible, attempts to achieve a comfortabletemperature in the passenger compartmentbefore driving.
Preconditioning can be started immediately or started at a preset time using a timer. The function utilizes several of the vehicle's systems:
In cold weather, the parking heater heatsthe passenger compartment to a comfort-able temperature.
In warm weather, air conditioning coolsthe passenger compartment to a comfort-able temperature.
The electrically heated steering wheel
*
and seats * can be activated.
Heating for the windshield, rear windowand door mirrors are automatically acti-vated as needed.
During preconditioning in a hot climate, con-densation from the air conditions may dripunder the vehicle. This is normal.
NOTE
Preconditioning is only available when the car is connected to an electrical outlet. Acharging post that is not always active, forexample because of a timer, can cause lossof function for preconditioning. If the vehicle is not connected to an electri- cal socket it is still possible in a warm cli-mate to achieve brief cooling of the pas-senger compartment by direct starting pre-conditioning.
NOTE
During preconditioning of the passenger compartment, the vehicle works to reach acomfortable temperature and not the tem-perature set in the climate system.
Related information
Parking climate (p. 219)
Starting and stopping preconditioning (p. 220)
Preconditioning timer (p. 221)
Starting and stopping preconditioning
Preconditioning heats or cools the passenger compartment, if possible, before driving. Thefunction can be started in the center displayor from a cellular phone.
Starting and stopping from the vehicle
1. Tap the symbol in the center of the climate bar to open Climate view in the center dis- play.
2. Select the
Parking climate tab.
3. Tap the boxes to select if seat/steering wheel heating should be activated along with preconditioning for each function.
4. Tap
Preconditioning.
> Preconditioning starts/stops and the button lights up/goes out.
Page 223 of 657

CLIMATE CONTROL
* Option/accessory.221
NOTE
Preconditioning is only available when the car is connected to an electrical outlet. Acharging post that is not always active, forexample because of a timer, can cause lossof function for preconditioning. If the vehicle is not connected to an electri- cal socket it is still possible in a warm cli-mate to achieve brief cooling of the pas-senger compartment by direct starting pre-conditioning.
NOTE
The vehicle doors and windows should be closed during preconditioning of the pas-senger compartment.
Starting from app *A device with the Volvo On Call * app can be
used to start preconditioning or check set- tings. Preconditioning heats or cools the pas-senger compartment (using the vehicle's airconditioning) to a comfortable temperature. The passenger compartment can also be pre- conditioned using the Engine Remote Start (ERS) 4
function using the Volvo On Call * app.
Related information
Parking climate (p. 219)
Preconditioning (p. 220)
Preconditioning timer (p. 221)
Preconditioning timer
The timer can be set to finish preconditioning at a predetermined time.
The timer can store up to 8 preset times for: A time on a particular date
A time on one or more days of the week, with or without the repeat function.
NOTE
Preconditioning is only available when the car is connected to an electrical outlet. Acharging post that is not always active, forexample because of a timer, can cause lossof function for preconditioning. If the vehicle is not connected to an electri- cal socket it is still possible in a warm cli-mate to achieve brief cooling of the pas-senger compartment by direct starting pre-conditioning.
Related information
Preconditioning (p. 220)
Adding and editing timer settings for pre- conditioning (p. 222)
Activating and deactivating precondition-ing timer (p. 223)
Deleting preconditioning timer settings(p. 223)
4
Certain markets only.
Page 224 of 657

CLIMATE CONTROL
222
Adding and editing timer settings for preconditioningThe preconditioning timer can store up to 8 preset timer settings.
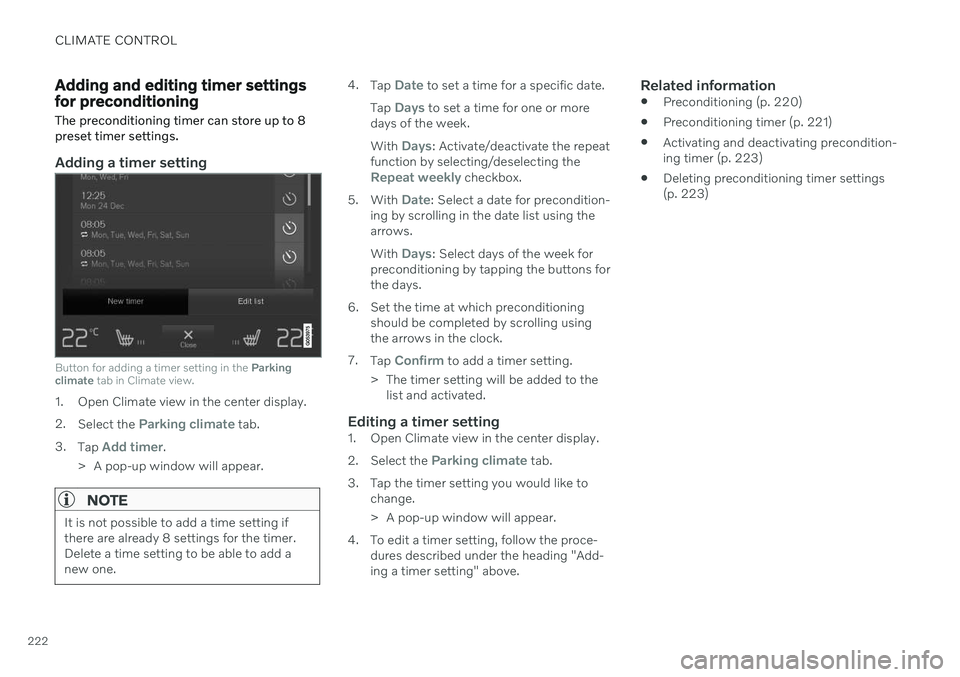
Adding a timer setting
Button for adding a timer setting in the Parking
climate tab in Climate view.
1. Open Climate view in the center display. 2.
Select the
Parking climate tab.
3. Tap
Add timer.
> A pop-up window will appear.
NOTE
It is not possible to add a time setting if there are already 8 settings for the timer.Delete a time setting to be able to add anew one.
4. Tap Date to set a time for a specific date.
Tap
Days to set a time for one or more
days of the week. With
Days: Activate/deactivate the repeat
function by selecting/deselecting the
Repeat weekly checkbox.
5. With
Date: Select a date for precondition-
ing by scrolling in the date list using the arrows. With
Days: Select days of the week for
preconditioning by tapping the buttons for the days.
6. Set the time at which preconditioning should be completed by scrolling usingthe arrows in the clock.
7. Tap
Confirm to add a timer setting.
> The timer setting will be added to the list and activated.
Editing a timer setting1. Open Climate view in the center display. 2. Select the
Parking climate tab.
3. Tap the timer setting you would like to change.
> A pop-up window will appear.
4. To edit a timer setting, follow the proce- dures described under the heading "Add- ing a timer setting" above.
Related information
Preconditioning (p. 220)
Preconditioning timer (p. 221)
Activating and deactivating precondition-ing timer (p. 223)
Deleting preconditioning timer settings(p. 223)
Page 234 of 657

KEY, LOCKS AND ALARM
* Option/accessory.
232
Remote key
The remote key is used to lock and unlock doors and the trunk lid. The remote key mustbe in the vehicle in order to start the engine.
Remote key 3
and button-less key (Key Tag) *.
The remote key is not physically used to start the ignition because the vehicle is standard-equipped with keyless start (Passive Start).The key only needs to be in the front section ofthe passenger compartment. For vehicles equipped with keyless locking and unlocking (Passive Entry) *, the engine can
be started with the key anywhere in the vehi- cle. A smaller, lighter and button-less key (KeyTag) is also provided. The remote keys can be linked to different driver profiles to store personal settings in thevehicle.
Remote key buttons
The remote key has four buttons, one on the left side and three on the right.
Locking - Press once to lock the doors,
trunk lid and fuel filler door and arm the alarm. Press and hold to close all windows.
Unlocking - Press once to unlock the
doors and trunk lid and disarm the alarm. Press and hold to open all windows at the same time. This total airing function canbe used to e.g. quickly air out the vehiclein hot weather.
Trunk lid - Press to unlock and disarm
the trunk lid only. Pressing and holding will open the trunk lid mechanically due to the preloaded springs.
Panic alarm - Used to attract attention in
emergency situations. Press and hold the button for at least 3 seconds or presstwice within 3 seconds to activate theturn signals and horn. To deactivate, waitat least 5 seconds and press the buttonagain. If no action is taken, the panic alarmwill deactivate automatically after 3minutes.
WARNING
If anyone is left in the vehicle, make sure that power to the power windows and pan- oramic roof * is cut off by always taking the
remote key with you when you leave the vehicle.
3 The illustration is generic - details may vary according to vehicle model.
Page 249 of 657

KEY, LOCKS AND ALARM
}}
* Option/accessory.247
Related information
Keyless locking and unlocking
* (p. 247)
Keyless trunk lid unlock
* (p. 249)
Keyless locking and unlocking *
With keyless locking and unlocking, touching the pressure-sensitive indentation on thedoor handle will lock or unlock the vehicle.
NOTE
One of the vehicle's remote keys must be within range for locking and unlocking tobe possible.
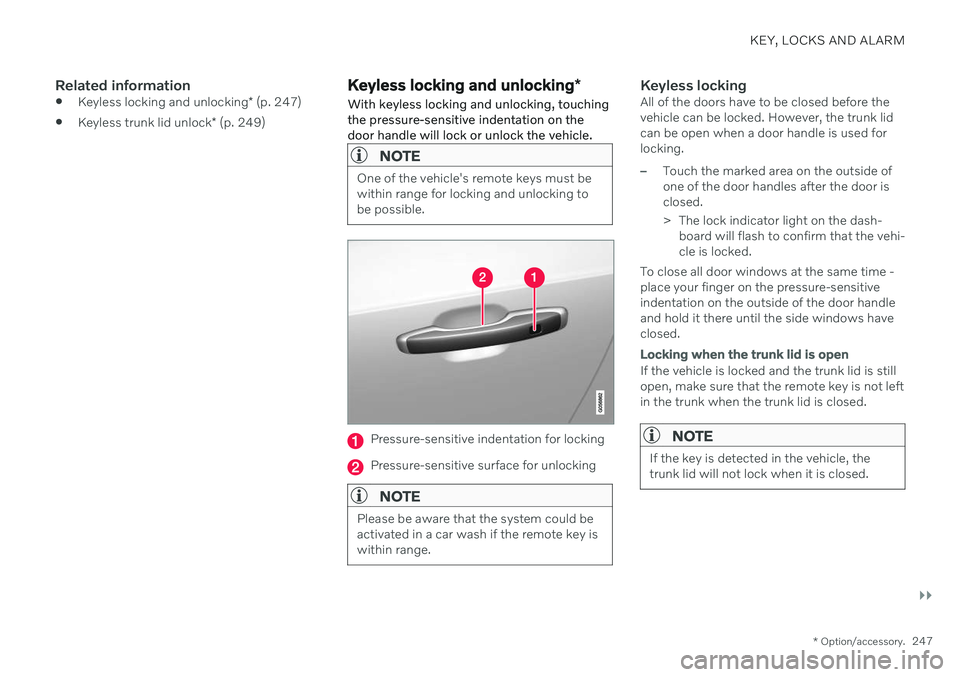
Pressure-sensitive indentation for locking
Pressure-sensitive surface for unlocking
NOTE
Please be aware that the system could be activated in a car wash if the remote key iswithin range.
Keyless lockingAll of the doors have to be closed before the vehicle can be locked. However, the trunk lidcan be open when a door handle is used forlocking.
–Touch the marked area on the outside of one of the door handles after the door isclosed.
> The lock indicator light on the dash- board will flash to confirm that the vehi- cle is locked.
To close all door windows at the same time -place your finger on the pressure-sensitiveindentation on the outside of the door handleand hold it there until the side windows haveclosed.
Locking when the trunk lid is open
If the vehicle is locked and the trunk lid is still open, make sure that the remote key is not leftin the trunk when the trunk lid is closed.
NOTE
If the key is detected in the vehicle, the trunk lid will not lock when it is closed.
Page 255 of 657

KEY, LOCKS AND ALARM
* Option/accessory.253
NOTE
The door's knob control only locks that specific door, not both rear doorssimultaneously.
There are no manual child safety lockson models equipped with electronicchild safety locks.
Activating and deactivating electric
*
child safety locks
The electric child safety lock can be activated and deactivated in any ignition mode higherthan 0. The lock can be activated and deacti-
vated up to 2 minutes after the ignition isturned off if no door has been opened.
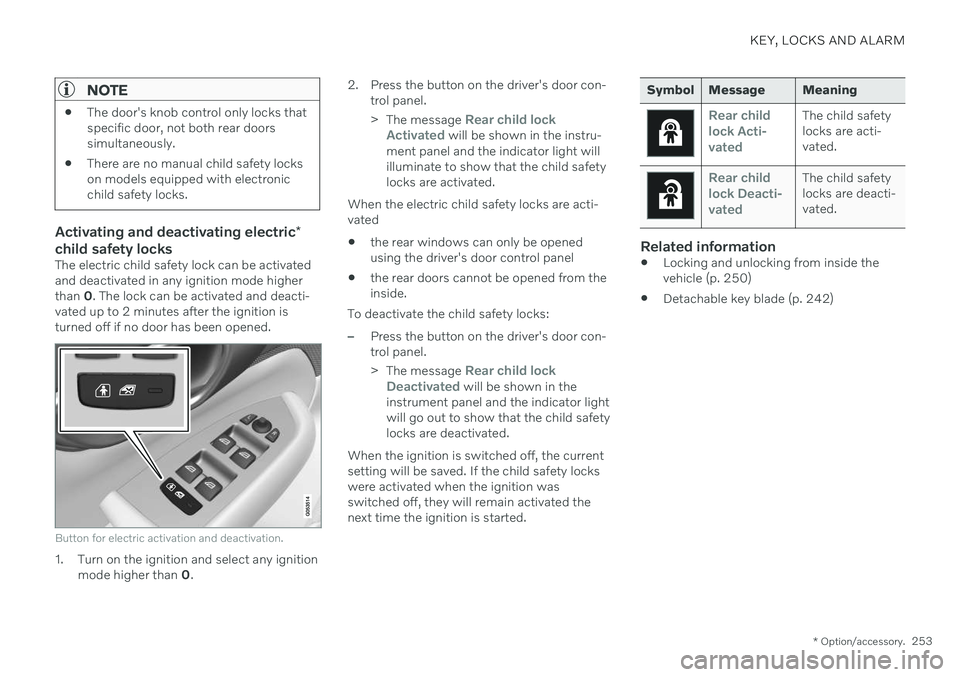
Button for electric activation and deactivation.
1. Turn on the ignition and select any ignition mode higher than 0. 2. Press the button on the driver's door con-
trol panel. >The message
Rear child lock
Activated will be shown in the instru-
ment panel and the indicator light will illuminate to show that the child safetylocks are activated.
When the electric child safety locks are acti-vated
the rear windows can only be openedusing the driver's door control panel
the rear doors cannot be opened from theinside.
To deactivate the child safety locks:
–Press the button on the driver's door con- trol panel. > The message
Rear child lock
Deactivated will be shown in the
instrument panel and the indicator light will go out to show that the child safetylocks are deactivated.
When the ignition is switched off, the currentsetting will be saved. If the child safety lockswere activated when the ignition wasswitched off, they will remain activated thenext time the ignition is started.
Symbol Message Meaning
Rear child lock Acti-
vatedThe child safety locks are acti-vated.
Rear child lock Deacti-
vatedThe child safety locks are deacti-vated.
Related information
Locking and unlocking from inside the vehicle (p. 250)
Detachable key blade (p. 242)
Page 257 of 657

KEY, LOCKS AND ALARM
}}
255
Private Locking The trunk lid and rear seat backrests can be locked using the private locking function, e.g.when the vehicle is left at a workshop or witha valet. This function prevents the trunk lidfrom being opened and locks the rear seatbackrests in the upright position.
The function button for pri- vate locking is located in thecenter display's Functionview. Depending on the cur-rent status of the lock,
Private Locking Unlockedor Private Locking Lockedwill be displayed.
Related information
Activating and deactivating private locking (p. 255)
Activating and deactivating private locking
Private locking is activated using the function button in the center display and a PIN code.
NOTE
For the valet lock function to be activated the car must be in at least ignition mode I.
Two codes are used for private locking:
A security code, which is created the first time the function is used.
A PIN code, which is changed each timethe function is activated.
Entering security code before initial
use
The first time the function is used, a securitycode must be selected. This code can then beused to deactivate private locking if theselected PIN code has been forgotten or lost.The security code functions as a PUK (secur-ity) code for all PIN codes used for privatelocking. Save the security code in a safe place. To create a security code:
1. Tap the button for private locking in Func-
tion view.
> A pop-up window will appear.
2. Enter the desired security code and press
Confirm.
> The security code is saved. The private locking function is now ready for activa- tion.
Activating private locking
NOTE
The rear seat must be in the upright posi- tion when private locking is activated inorder for the seats to lock.
Page 258 of 657

||
KEY, LOCKS AND ALARM
2561. Tap the button for private locking in Func-
tion view.
> A pop-up window will appear.
2. Enter the code you would like to use to unlock the trunk lid and rear seats and tap
Confirm.
> The trunk lid and rear seats will lock. A green indicator light will illuminate next to the button in Function view to con-firm locked status.
Deactivating private locking1. Tap the button for private locking in Func- tion view.
> A pop-up window will appear. 2. Enter the code used for locking and tap
Confirm.
> The trunk lid and rear seats will unlock. The green indicator light next to the button in Function view will go out toconfirm unlocked status.
Forgotten PIN codeIf you have forgotten your PIN code or enteredit incorrectly more than three times, the secur-ity code can be used to deactivate privatelocking. If the vehicle is unlocked using Volvo On Call or the Volvo On Call app, private locking willbe automatically deactivated.
Forgotten security code
If you have forgotten your security code, con- tact an authorized Volvo retailer for assistancedeactivating private locking.
Related information
Private Locking (p. 255)
Alarm The alarm emits sound and light signals if anyone without a valid remote key attemptsto break into the vehicle or interferes with thestart battery or alarm siren.
When armed, the alarm will be triggered if:
the hood, trunk lid or any door is opened.
a battery cable is disconnected.
the alarm siren is disconnected.
Alarm signalsThe following occurs if the alarm is triggered:
A siren will sound for 30 seconds or until the alarm is turned off.
The hazard warning flashers will flash for5 minutes or until the alarm is turned off.
If the reason the alarm was triggered is notrectified, the alarm cycle will repeat up to 10 times 14
.
14 Certain markets only.
Page 304 of 657

||
DRIVER SUPPORT
302
CauseAction
Water or snow is spraying/swirling up and blocking the radar signals or the camera's range of visibility. No action. Very wet or snow-covered roads may sometimes prevent the cam-era/radar sensor from functioning.
There is dirt between the inside of the windshield and the cam-era/radar sensor. Consult a workshop to have the area of the windshield on the inside of the cam-era's casing cleaned. An authorized Volvo workshop is recommended.
Bright sunlight. No action. The camera/radar sensor will reset automatically when lighting con-ditions improve.
High temperatures
If the temperature in the passenger compart- ment is very high, the camera/radar sensorwill switch off temporarily forapprox. 15 minutes after the engine is startedto protect its electronic components. Whenthe temperature has cooled sufficiently, thecamera/radar sensor will automatically restart.
Damaged windshield
NOTE
Failure to take action could result in reduced performance for the driver supportsystems that use the camera and radarunit. It could cause functions to bereduced, deactivated completely or to pro-duce an incorrect function response.
To avoid the risk of malfunction of the driver support systems that use the radar sensor, thefollowing also apply:
If there are cracks, scratches or stonechips on the windshield in front of any ofthe camera and radar sensor "windows"and this covers an area ofabout 0.5 × 3.0 mm (0.02 × 0.12 in.) ormore, contact a workshop to have the windshield replaced 53
.
Volvo advises
against repairing cracks,
scratches or stone chips in the area in front of the camera and radar sensor – theentire windshield should instead bereplaced.
Before replacing the windshield, contact a workshop 53
to verify that the right wind-
shield has been ordered and installed.
The same type of windshield wipers or wipers approved by Volvo should be usedfor replacement.
If the windshield is replaced, the cameraand radar sensor must be recalibrated by a workshop 53
to help ensure proper func-
tioning of all of the vehicle's camera and radar-based systems.
Radar
Vehicle speed
The radar sensor's ability to detect a vehicle ahead is significantly reduced if the speed ofthe vehicle ahead differs greatly from yourvehicle's speed.
53 An authorized Volvo workshop is recommended.
Page 368 of 657

||
DRIVER SUPPORT
3661.
Tap
Park In in Function view or in Camera
view.
> The function will search for a potential parking space and measure it to deter- mine if it is big enough.
2. Be prepared to stop the vehicle when a graphic and message in the center displayindicate that a suitable parking space hasbeen found.
> A pop-up window will appear.
3. Select
Parallel parking or Perpendicular
parking and engage reverse gear.
NOTE
The function searches for space for park- ing, shows instructions and guides thevehicle on its passenger side. But, if sodesired the vehicle can be parked on thedriver's side of the street:
Activate the turn signals on the driver'sside – the system will then search forspace to park on that side of the vehi-cle instead.
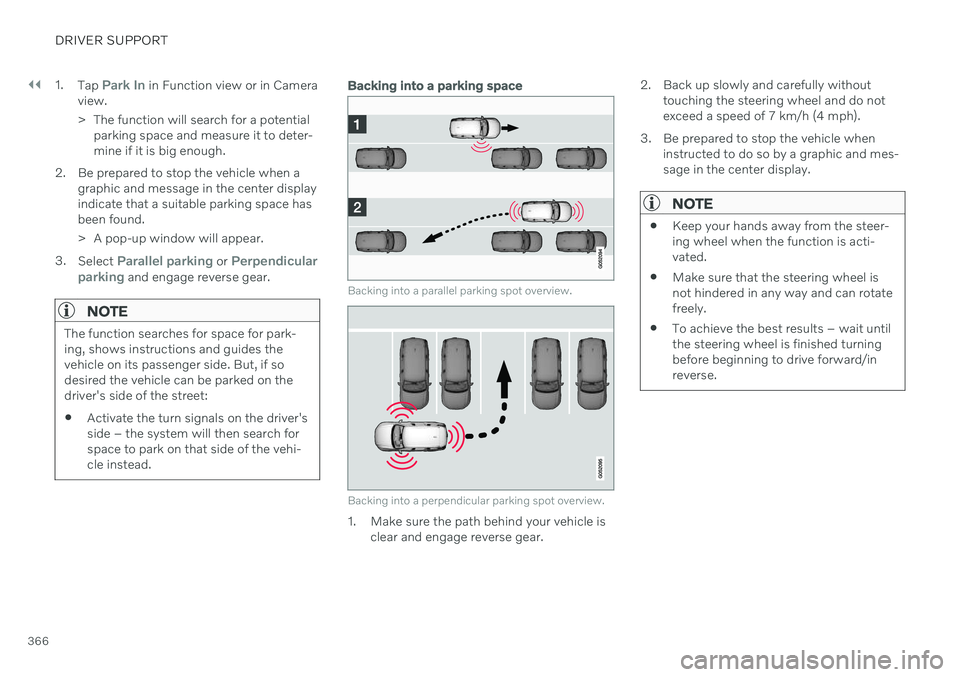
Backing into a parking space
Backing into a parallel parking spot overview.
Backing into a perpendicular parking spot overview.
1. Make sure the path behind your vehicle is
clear and engage reverse gear. 2. Back up slowly and carefully without
touching the steering wheel and do not exceed a speed of 7 km/h (4 mph).
3. Be prepared to stop the vehicle when instructed to do so by a graphic and mes-sage in the center display.
NOTE
Keep your hands away from the steer- ing wheel when the function is acti-vated.
Make sure that the steering wheel isnot hindered in any way and can rotatefreely.
To achieve the best results – wait untilthe steering wheel is finished turningbefore beginning to drive forward/inreverse.