ignition VOLVO S60 TWIN ENGINE 2020 Owners Manual
[x] Cancel search | Manufacturer: VOLVO, Model Year: 2020, Model line: S60 TWIN ENGINE, Model: VOLVO S60 TWIN ENGINE 2020Pages: 657, PDF Size: 13.6 MB
Page 11 of 657

9
Park Assist Camera*
354
Location and field of vision of Park Assist Cameras * 355
Park Assist Camera trajectory lines *
357
Park Assist sensor field 359
Activating Park Assist Camera 360
Park Assist Camera symbols and messages 362
Park Assist Pilot *
363
Types of parking with Park Assist Pilot * 364
Using Park Assist Pilot *
365
Leaving a parallel parking spacewith Park Assist Pilot *368
Park Assist Pilot * limitations
368
Park Assist Pilot * messages
371
HYBRID INFORMATION
General information about Twin Engine 374
Charging the hybrid battery 375
Charging current 377
Charge cable 377
Charging cable residual current device 379
Charging cable temperature moni-toring 380
Opening and closing the chargingsocket cover 380
Initiating hybrid battery charging 380
Charging status in the vehicle'scharging socket 382
Charging status in the chargingcable's charging module 383
Charging status in the instrumentpanel 384
Stopping hybrid battery charging 386
Twin Engine symbols and mes-sages in the instrument panel 388
Long-term storage of vehicleswith hybrid batteries 390
STARTING AND DRIVING
Starting the vehicle
392
Switching off the vehicle 394
Ignition modes 395
Selecting ignition mode 396
Brake functions 397
Brakes 397
Brake Assist System 399
Braking on wet roads 399
Braking on salted roads 400
Maintenance of the brake system 400
Parking brake 400
Activating and deactivating the parking brake 401
Settings for automatically activat-ing the parking brake 402
Parking on a hill 403
Parking brake malfunction 403
Auto-hold brakes 404
Activating and deactivating Auto-hold at a standstill 405
Hill Start Assist 405
Braking assist after a collision 406
Transmission 406
Automatic transmission 406
Gear selector positions for auto-matic transmissions 407
Page 55 of 657

SAFETY
}}
53
WARNING
If your vehicle has become water-damaged in any way (e.g., soaked floor mats/stand-ing water on the floor of the vehicle), donot attempt to start the engine. This maycause airbag deployment, which couldresult in serious injury. Volvo recommendstowing the vehicle directly to an authorizedVolvo workshop. Before attempting to tow the vehicle:
1. Switch off the ignition for at least 10minutes and disconnect the battery.
2. Follow the instructions for manually overriding the shiftlock system.
Deployed airbags
WARNING
If any of the airbags have deployed:
Do not attempt to drive the vehicle. Have it towed to an authorized work-shop.
If necessary, seek medical attention.
Related information
Safety (p. 42)
Driver/passenger-side airbags (p. 53)
Side airbags (p. 60)
Inflatable curtain (p. 60)
Driver/passenger-side airbags
As a supplement to the seat belts, the vehicle is equipped with driver and passenger sidefront airbags.
Driver/passenger side front airbags.
In a frontal collision, the airbags help protect the driver's and passenger's head, neck, faceand chest and the driver's knees and legs. A collision of a sufficiently violent force will trigger the sensors and one or more airbagswill inflate. The airbag helps cushion the initial impact of the collision for the passenger. The airbag deflates when compressed by the colli-sion. A small amount of powder will also bereleased from the airbag. This may appear to be smoke and is normal. The entire process, from inflation to deflation of the airbag, occurswithin tenths of a second.
NOTE
The sensors react differently depending on the circumstances of the accident andwhether or not the seat belt is used. Thisapplies to all belt positions. There may therefore be accident situations in which only one (or none) of the airbagsare deployed. The sensors monitor theimpact of the collision and react accord-ingly to deploy one, several or no airbags.
WARNING
The seat belt and the airbag work together. If the seat belt is not used or is used incor-rectly, the airbag may not provide theintended protection in a collision. To help prevent injury in the event the air- bag is deployed, passengers should sit asupright as possible, with their feet on thefloor and their backs against the seat back-rest.
WARNING
Volvo recommends contacting an author- ized Volvo workshop for repairs. Incorrectlyperformed repairs to the airbag systemcould impair function and lead to seriousinjury.
Page 59 of 657

SAFETY
}}
57
of a properly seated occupant and determine if the passenger's side front airbag should beenabled (may inflate) or disabled (will notinflate). The OWS will disable (will not inflate) the pas- senger's side front airbag when:
the front passenger's seat is unoccupied,or has small/medium objects in the frontseat,
the system determines that an infant ispresent in a rear-facing infant seat that isinstalled according to the manufacturer'sinstructions,
the system determines that a small child ispresent in a forward-facing child restraintthat is installed according to the manufac-turer's instructions,
the system determines that a small child ispresent in a booster seat,
a front passenger takes his/her weight offof the seat for a period of time,
a child or a small person occupies thefront passenger's seat.
The OWS uses a PASSENGER AIRBAG OFFindicator lamp which will illuminate and stayon to remind you that the passenger's sidefront airbag is disabled. The PASSENGERAIRBAG OFF indicator lamp is located in theoverhead console, near the base of the rear-view mirror.
NOTE
When the ignition is switched on, the OWS indicator light will illuminate for sev-eral seconds while the system performs aself-diagnostic test.
However, if a fault is detected in the system:
The OWS indicator light will stay on.
The SRS warning light will come on and stay on and a text message will be dis-played.
WARNING
If a fault in the system is detected and indi- cated as described, be aware that the pas-senger's side front airbag will not deploy inthe event of a collision. In this case, theSRS system and Occupant Weight Sensorshould be inspected by a trained and quali-fied Volvo service technician as soon aspossible.
WARNING
Never try to open, remove or repair any components in the OWS system. Thiscould cause the system to malfunction.Maintenance or repairs should only becarried out by an a trained and qualifiedVolvo service technician.
The front passenger's seat should notbe modified in any way. This couldreduce pressure on the seat cushion,which might interfere with the OWSsystem's function.
Page 64 of 657

||
SAFETY
62
WARNING
Never attempt to perform repairs or reset electrical components on your own afterthe vehicle has been in safety mode. Thiscould result in injury or prevent the vehiclefrom functioning properly. Volvo recom-mends having the vehicle inspected andreset to normal operating status by an authorized Volvo workshop after
Safety
mode See Owner's manual has been dis-
played.
WARNING
When the vehicle is in safety mode, it should not be towed behind another vehi-cle. It should be towed from the site on atow truck. Volvo recommends towing thevehicle directly to an authorized Volvoworkshop.
Related information
Safety (p. 42)
Starting and moving the vehicle when it is in safety mode (p. 62)
Recovery (p. 442)
Starting and moving the vehicle when it is in safety mode If safety mode has been set, it may be possi- ble to reset the system in order to start andmove the vehicle a short distance, for exam-ple, if it is blocking traffic.
Starting the vehicle when it is in safety mode
1. Check the vehicle for damage, particularly
for fuel leakage. Make sure you do not detect any gasoline fumes. If the damage to the vehicle is minor and there is no fuel leakage/fumes, you mayattempt to start the engine.
WARNING
Never attempt to restart the vehicle if you smell fuel fumes when the message Safety
mode See Owner's manual is displayed
in the instrument panel. Leave the vehicle immediately.
2. Switch off the ignition. 3. Then try to start the vehicle.
> The vehicle's electrical system will per-form a system check and then attempt to reset to normal operating mode. The message
Vehicle start System check,
wait will be displayed on the instru-
ment panel during the check. This may take up to a minute.
4. When
Vehicle start System check, waitis no longer displayed in the instrument panel, try again to start the vehicle.
CAUTION
If the message Safety mode See
Owner's manual is still displayed, the
vehicle should not be driven or towed behind another vehicle. If the vehicle needsto be moved, it must be towed on a towtruck. Even if no damage is apparent, theremay be hidden damage that could makethe vehicle impossible to control.
Page 82 of 657

DISPLAYS AND VOICE CONTROL
* Option/accessory.
80
Instrument panel The instrument panel displays information related to the vehicle and driving.
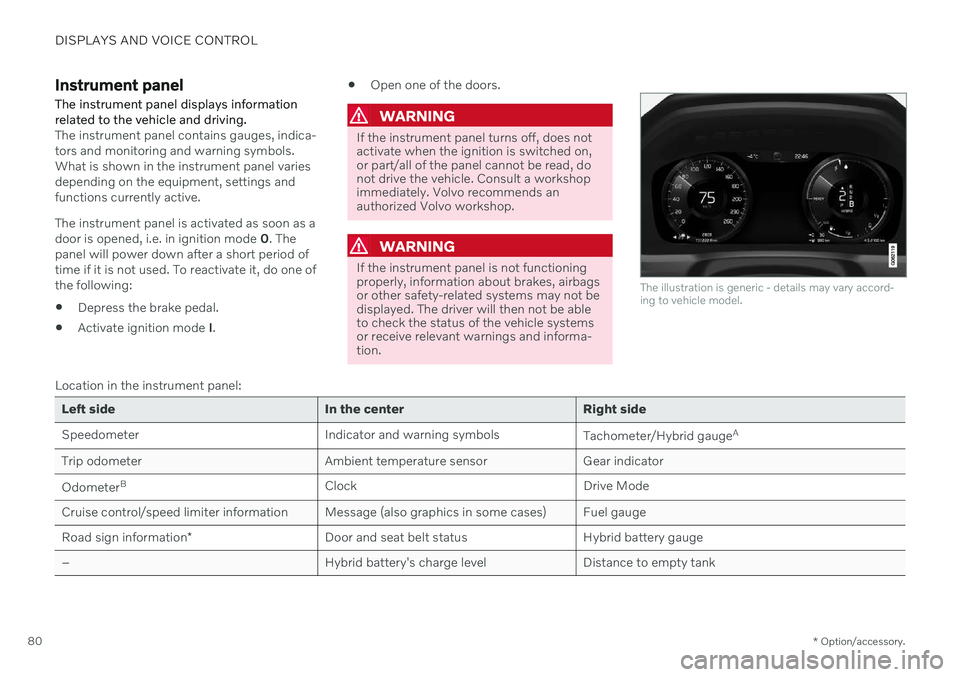
The instrument panel contains gauges, indica- tors and monitoring and warning symbols.What is shown in the instrument panel variesdepending on the equipment, settings andfunctions currently active. The instrument panel is activated as soon as a door is opened, i.e. in ignition mode 0. The
panel will power down after a short period oftime if it is not used. To reactivate it, do one ofthe following:
Depress the brake pedal.
Activate ignition mode
I.
Open one of the doors.
WARNING
If the instrument panel turns off, does not activate when the ignition is switched on,or part/all of the panel cannot be read, donot drive the vehicle. Consult a workshopimmediately. Volvo recommends anauthorized Volvo workshop.
WARNING
If the instrument panel is not functioning properly, information about brakes, airbagsor other safety-related systems may not bedisplayed. The driver will then not be ableto check the status of the vehicle systemsor receive relevant warnings and informa-tion.
The illustration is generic - details may vary accord- ing to vehicle model.
Location in the instrument panel:
Left side In the center Right side
Speedometer Indicator and warning symbols
Tachometer/Hybrid gaugeA
Trip odometer Ambient temperature sensor Gear indicator Odometer B
Clock Drive Mode
Cruise control/speed limiter information Message (also graphics in some cases) Fuel gauge Road sign information * Door and seat belt status Hybrid battery gauge
– Hybrid battery's charge level Distance to empty tank
Page 137 of 657

DISPLAYS AND VOICE CONTROL
}}
135
Protecting a driver profile
It may not always be desirable to store set- tings made in the vehicle to the active driverprofile. In these instances, the driver profilecan be protected.
NOTE
Protecting a driver profile is only possible when the vehicle is stationary.
To protect a driver profile: 1. Tap
Settings in the Top view in the center
display.
2. Tap
SystemDriver Profiles.
3. Select
Edit Profile.
> A menu will open in which the driver profile can be changed.
4. Tap
Protect Profile to protect the profile. 5. Confirm your selection to protect the pro-
file by tapping
Back/Close.
> When the profile is protected, settings made in the vehicle will not be auto- matically stored to the profile. Thechanges must instead be saved man- ually under
SettingsSystem
Driver ProfilesEdit Profile by tap-
ping Save current settings to the
profile. If the profile is not protected,
the settings will be automatically stored to the profile.
Related information
Driver profiles (p. 133)
Linking a remote key to a driver profile
A remote key can be linked to a driver profile. This driver profile and all of its settings willthen automatically be selected every time thevehicle is used with that particular remotekey.
The first time the remote key is used, it is not linked to any specific driver profile. The Guestprofile is automatically activated when the ignition is switched on. A driver profile can also be selected manually without linking it to any key. When the vehicleis unlocked, the last active driver profile will beactivated. If the key has ever been linked to adriver profile, it is not necessary to manuallyselect a driver profile when using that particu-lar key.
Linking a remote key to a specific driver profile
NOTE
A remote key can only be connected to a driver profile when the vehicle is stationary.
First select the profile you would like to link to the key (if that profile is not already active).
Page 141 of 657

DISPLAYS AND VOICE CONTROL
}}
* Option/accessory.139
Reading saved messages
1. Open Top view in the center display.
> A list of saved messages will be dis-played. Messages with an arrow to the right can be expanded.
2. Tap a message to expand/minimize it. > More information about the messagewill appear in the list and the image tothe left of the app will display informa-tion about the message in graphic form.
Handling saved messages
Some messages have a button to e.g. acti- vate/deactivate a function related to the mes-sage.
–Tap the button to perform the action.
Saved messages in Top view are automatically deleted when the ignition is switched off.
Related information
Messages in the center display (p. 137)
Handling messages in the center display(p. 138)
Messages in the instrument panel (p. 103)
Head-up display
*
The head-up display is a complement to the instrument panel and projects informationfrom the instrument panel onto the wind-shield. The projected images can only beseen from the driver's seat.
The head-up display projects warnings and information related to speed, cruise controlfunctions, navigation, etc. onto the windshieldin the driver's field of vision. Traffic informationand incoming phone calls can also be shownon the head-up display.
NOTE
The driver's ability to see information in the head-up display may be impeded by
the use of polarizing sunglasses
a driving posture in which the driver isnot centered in the seat
objects on the display unit's glasscover
unfavorable lighting conditions.
CAUTION
The information is projected from a display unit located in the dashboard. To help pre-vent damage to the display unit's glasscover, do not place any objects on theglass and prevent objects from falling ontoit.
Page 152 of 657

LIGHTING
* Option/accessory.
150
Lighting control and panel
The lighting panel and controls can be used to adjust both exterior and interior lighting.The lighting ring on the left-side steeringwheel lever can be used to activate andadjust the exterior lighting. The brightness ofthe interior lighting can be adjusted using thethumb wheel on the dashboard.
Exterior lighting
Lighting ring position.
When the vehicle's ignition is in mode II, the
lighting ring positions have the following func- tions:
Position Meaning
US: Daytime running lights and parking lights are off. Canada: Daytime running lights and parking lights are on. High beam flash can be used.
Parking lights when the vehicle is parked. US: Daytime running lights are off. Canada: Daytime running lights are on. High beam flash can be used.
Low beams and parking lights. High beams can be activated.High beam flash can be used.
Position Meaning
Daytime running lights and parking lights in daylight condi- tions. A
Low beams and parking lights in weak daylight or dark conditions or when the front fog lights *
and/or rear fog light are acti- vated. Active high beam can be acti- vated. High beams can be activated when low beams are on. High beam flash can be used.
Active high beams on/off.
A US models only: Daytime running lights and parking lights can be deactivated in the center display.
NOTE
Volvo recommends use of Daytime Running Lights in the US. Its use is man-datory in Canada.
Volvo recommends using position when
the vehicle is in motion.
Page 154 of 657

LIGHTING
* Option/accessory.
152
Adjusting the headlight pattern
The headlight pattern can be reset from right- hand to left-hand traffic, and vice versa. Thefunction adapts the light pattern from theheadlights to help reduce glare to oncomingtraffic.
1. Tap Settings in the center display's Top
view.
2. Tap
My CarLights and LightingExterior Lights.
3. Select
Temporary Right Hand Traffic/Temporary Left Hand Traffic.
NOTE
Active Bending Lights are not available when the headlight pattern is temporarilychanged from left-hand to right-hand traf-fic, or vice versa.
Related information
Changing settings in the center display's Top view (p. 129)
Function view in the center display (p. 119)
Active Bending Lights
* (p. 157)
Parking lights
The parking lights can be used to help other road users see the vehicle if it is stopped orparked. Use the lighting ring on the steeringwheel lever to turn on the parking lights.
Lighting ring in the parking light position.
Turn the lighting ring to the position to
turn on the parking lights (the license plate lighting will also illuminate). Canadian models: If the ignition is in the II
position, the daytime running lights will illumi- nate instead of the front parking lights. Withthe lighting ring in this position, the parkinglights will remain on regardless of what posi-tion the ignition is in. US models: When
mode is selected,
the daytime running lights can be deactivated in the center display. The parking lights willalso be deactivated. In weak daylight or dark conditions, the parking lights and low beamswill be illuminated. In dark conditions, the rear parking lights also illuminate when the trunk lid is opened to alertfollowing traffic. This happens regardless ofwhat position the lighting ring or ignition is in.
Related information
Lighting control and panel (p. 150)
Ignition modes (p. 395)
Page 155 of 657

LIGHTING
* Option/accessory.153
Daytime running lights
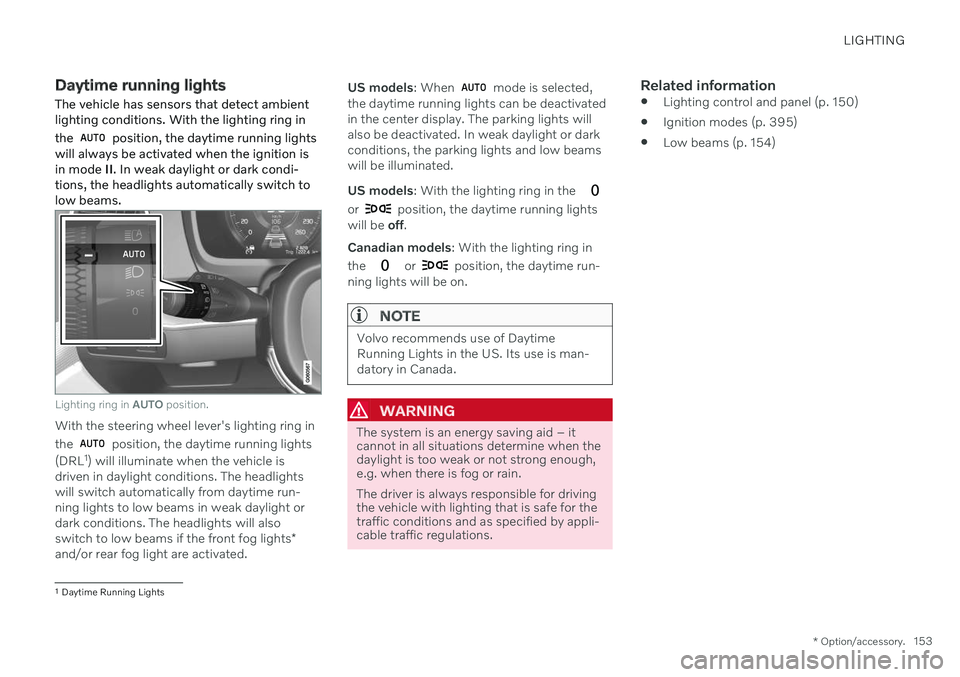
The vehicle has sensors that detect ambient lighting conditions. With the lighting ring in the
position, the daytime running lights
will always be activated when the ignition is in mode II. In weak daylight or dark condi-
tions, the headlights automatically switch tolow beams.
Lighting ring in AUTO position.
With the steering wheel lever's lighting ring in the
position, the daytime running lights
(DRL 1
) will illuminate when the vehicle is
driven in daylight conditions. The headlights will switch automatically from daytime run-ning lights to low beams in weak daylight ordark conditions. The headlights will also switch to low beams if the front fog lights *
and/or rear fog light are activated. US models
: When
mode is selected,
the daytime running lights can be deactivated in the center display. The parking lights willalso be deactivated. In weak daylight or darkconditions, the parking lights and low beamswill be illuminated. US models : With the lighting ring in the
or position, the daytime running lights
will be off.
Canadian models : With the lighting ring in
the
or position, the daytime run-
ning lights will be on.
NOTE
Volvo recommends use of Daytime Running Lights in the US. Its use is man-datory in Canada.
WARNING
The system is an energy saving aid – it cannot in all situations determine when thedaylight is too weak or not strong enough,e.g. when there is fog or rain. The driver is always responsible for driving the vehicle with lighting that is safe for thetraffic conditions and as specified by appli-cable traffic regulations.
Related information
Lighting control and panel (p. 150)
Ignition modes (p. 395)
Low beams (p. 154)
1
Daytime Running Lights