mirror VOLVO S60 TWIN ENGINE 2020 Owners Manual
[x] Cancel search | Manufacturer: VOLVO, Model Year: 2020, Model line: S60 TWIN ENGINE, Model: VOLVO S60 TWIN ENGINE 2020Pages: 657, PDF Size: 13.6 MB
Page 7 of 657

5
WINDOWS, GLASS AND MIRRORS
Windows, glass and mirrors166
Pinch protection for windows and sun curtains 166
Reset procedure for pinch protection 167
Power windows 167
Operating the power windows 168
Using sun curtains *
169
Rearview/door mirrors 170
Adjusting the rearview mirror dim-ming function 170
Adjusting the door mirrors 171
Panoramic roof *
172
Operating the panoramic roof *
174
Auto closing the panoramic roof *
sun curtain 176
Wiper blades and washer fluid 177
Using the windshield wipers 177
Using the rain sensor 178
Using the rain sensor's memoryfunction 179
Using the windshield and head-light washers 179
SEATS AND STEERING WHEEL
Manual front seats
182
Power * front seats
183
Adjusting the power * front seats
183
Storing positions for seats, mir- rors and head-up display *184
Using stored positions for seats,mirrors and head-up display *185
Front seat massage * settings
186
Adjusting front seat massage set-tings * 187
Adjusting * front seat cushion length
188
Adjusting front seat side bolstersettings * 189
Adjusting front seat lumbar support *
189
Adjusting the passenger seat fromthe driver's seat * 191
Folding down the rear seat backrests *
192
Adjusting the rear seat head restraints 193
Steering wheel controls and horn 194
Adjusting the steering wheel 195
CLIMATE CONTROL
Climate198
Climate zones 198
Climate control sensors 198
Perceived temperature 199
Climate control system voice commands 199
Air quality 200
Clean Zone *
201
Clean Zone Interior Package *
201
Interior Air Quality System *
202
Activating and deactivating the air quality sensor * 202
Passenger compartment air filter 203
Air distribution 203
Adjusting air distribution 204
Opening, closing and directing air vents 204
Air distribution options 206
Climate system controls 209
Activating and deactivating power front seats * 210
Activating and deactivating theheated front seat * 211
Activating and deactivating theheated rear seats * 211
Activating and deactivating frontseat ventilation * 211
Page 8 of 657

6
Activating and deactivating the heated steering wheel*212
Activating and deactivating auto-matic steering wheel heating *212
Activating auto climate control 213
Activating and deactivating recir- culation 213
Activating and deactivating therecirculation timer setting 214
Activating and deactivating maxdefroster 214
Activating and deactivating theheated rear window and door mirrors 215
Automatically activating and deac-tivating the heated rear windowand door mirrors 216
Setting the blower speed for thefront seats 216
Setting the temperature for thefront seats 217
Synchronize temperature 218
Activating and deactivating airconditioning 219
Parking climate 219
Preconditioning 220
Starting and stopping preconditioning 220
Preconditioning timer 221
Adding and editing timer settingsfor preconditioning 222
Activating and deactivating pre- conditioning timer223
Deleting preconditioning timersettings 223
Climate comfort retaining function 224
Starting and switching off the cli-mate retaining function when parking 224
Parking climate symbols and mes-sages 226
Heater 227
Parking heater 227
Additional heater 227
Activating and deactivating theauxiliary heater 228
KEY, LOCKS AND ALARM
Lock indication
230
Lock confirmation settings 231
Remote key 232
Locking and unlocking using the remote key 234
Settings for remote and insidedoor unlock 235
Remote key range 235
Replacing the remote key's battery 236
Ordering additional remote keys 239
Red Key - restricted remote key *
240
Settings for Red Key *
241
Detachable key blade 242
Locking and unlocking withdetachable key blade 243
Electronic immobilizer 244
Start and lock system type desig-nations 245
Keyless and touch-sensitive surfaces *
246
Keyless locking and unlocking *
247
Keyless unlock settings *
248
Keyless trunk lid unlock *
249
Antenna locations for the startand lock system 249
Locking and unlocking from insidethe vehicle 250
Page 59 of 657

SAFETY
}}
57
of a properly seated occupant and determine if the passenger's side front airbag should beenabled (may inflate) or disabled (will notinflate). The OWS will disable (will not inflate) the pas- senger's side front airbag when:
the front passenger's seat is unoccupied,or has small/medium objects in the frontseat,
the system determines that an infant ispresent in a rear-facing infant seat that isinstalled according to the manufacturer'sinstructions,
the system determines that a small child ispresent in a forward-facing child restraintthat is installed according to the manufac-turer's instructions,
the system determines that a small child ispresent in a booster seat,
a front passenger takes his/her weight offof the seat for a period of time,
a child or a small person occupies thefront passenger's seat.
The OWS uses a PASSENGER AIRBAG OFFindicator lamp which will illuminate and stayon to remind you that the passenger's sidefront airbag is disabled. The PASSENGERAIRBAG OFF indicator lamp is located in theoverhead console, near the base of the rear-view mirror.
NOTE
When the ignition is switched on, the OWS indicator light will illuminate for sev-eral seconds while the system performs aself-diagnostic test.
However, if a fault is detected in the system:
The OWS indicator light will stay on.
The SRS warning light will come on and stay on and a text message will be dis-played.
WARNING
If a fault in the system is detected and indi- cated as described, be aware that the pas-senger's side front airbag will not deploy inthe event of a collision. In this case, theSRS system and Occupant Weight Sensorshould be inspected by a trained and quali-fied Volvo service technician as soon aspossible.
WARNING
Never try to open, remove or repair any components in the OWS system. Thiscould cause the system to malfunction.Maintenance or repairs should only becarried out by an a trained and qualifiedVolvo service technician.
The front passenger's seat should notbe modified in any way. This couldreduce pressure on the seat cushion,which might interfere with the OWSsystem's function.
Page 67 of 657

SAFETY
}}
65
Volvo has some very specific recommendations
Always wear your seat belt.
Airbags are a SUPPLEMENTAL safety device which, when used with a three-point seat belt can help reduce seriousinjuries during certain types of accidents.Volvo recommends that you do not dis-connect the airbag system in your vehicle.
Volvo strongly recommends that everyonein the vehicle be properly restrained.
Volvo recommends that ALL occupants(adults and children) shorter than 140 cm(4 feet 7 inches) be seated in the rear seatof any vehicle with a front passenger sideairbag.
Drive safely!
Related information
Safety (p. 42)
Child restraints (p. 65)
Activating and deactivating child safetylocks (p. 252)
Child restraints
Suitable child restraints should always be used when children travel in the vehicle.
Child restraint systems
Infant seat
There are three main types of child restraint systems: infant seats, convertible seats andbooster cushions. They are classified accord-ing to the child's age and size. The child restraint should be secured using a three-point seat belt, ISOFIX/LATCH anchorsor top tether anchors.
Convertible seat
WARNING
A child seat should never be used in the front passenger seat of any vehicle with afront passenger airbag - not even if the"Passenger airbag off" symbol near therear-view mirror is illuminated. If theseverity of an accident were to cause theairbag to inflate, this could lead to seriousinjury or death to a child seated in thisposition.
Page 70 of 657

||
SAFETY
68
WARNING
A child seat should never be used in the front passenger seat of any vehicle with afront passenger airbag - not even if the"Passenger airbag off" symbol near therear-view mirror is illuminated. If theseverity of an accident were to cause theairbag to inflate, this could lead to seriousinjury or death to a child seated in thisposition.
3.
Fasten the seat belt.
Fasten the seat belt by inserting the latch plate into the buckle (lock) until a distinctclick is audible.
Pull out the shoulder section of the seat belt.
4. Pull the shoulder section of the seat belt out as far as possible to activate the belt's automatic locking function.
NOTE
The locking retractor will automatically release when the seat belt is unbuckledand allowed to retract fully.
5. Press the infant seat firmly in place, let theseat belt retract and pull it taut. A sound from the seat belt retractor's automaticlocking function will be audible at this timeand is normal. The seat belt should now belocked in place.
Check that the infant seat is properly secured.
6. Press and pull the infant seat along thedirection of the seat belt to check that it is properly held in place by the seat belt.
Page 73 of 657

SAFETY
71
NOTE
The locking retractor will automatically release when the seat belt is unbuckledand allowed to retract fully.
5. Press the convertible seat firmly in place,let the seat belt retract and pull it taut. A sound from the seat belt retractor's auto-matic locking function will be audible atthis time and is normal. The seat beltshould now be locked in place.
Pull out the shoulder section of the seat belt.
6. Push and pull the convertible seat alongthe seat belt path to ensure that it is held securely in place by the seat belt.
WARNING
It should not be possible to move the child restraint more than 2.5 cm (1 in.) in anydirection along the seat belt path.
The convertible seat can be removed by unbuckling the seat belt and letting it retractcompletely.
Ensure that the convertible seat is securely in place.
WARNING
A child seat should never be used in the front passenger seat of any vehicle with afront passenger airbag - not even if the"Passenger airbag off" symbol near therear-view mirror is illuminated. If theseverity of an accident were to cause theairbag to inflate, this could lead to seriousinjury or death to a child seated in thisposition.
Related information
Child restraints (p. 65)
Infant seats (p. 67)
Booster cushions (p. 72)
Top tether anchors (p. 73)
Lower child seat attachment points (p. 74)
ISOFIX/LATCH lower anchors (p. 75)
Page 81 of 657

DISPLAYS AND VOICE CONTROL
* Option/accessory.79
Driver's door
Memory for power front seat settings *,
door mirrors and head-up display *
Central locking
Power windows, door mirrors, electric child safety locks*
Controls for front seat
Related information
Manual front seats (p. 182)
Adjusting the power
* front seats (p. 183)
Adjusting the steering wheel (p. 195)
Lighting control and panel (p. 150)
Starting the vehicle (p. 392)
Instrument panel (p. 80)
Center display overview (p. 107)
Transmission (p. 406)
Page 88 of 657

||
DISPLAYS AND VOICE CONTROL
86
Distance to empty tankThe trip computer calculates the dis- tance that can be driven on the fuelremaining in the tank.
This calculation is based on average fuel con- sumption during the last 30 km (20 miles)and the amount of fuel remaining in the tank. When the gauge displays "----", there is not enough fuel remaining to calculate the remain-ing mileage. Refuel as soon as possible.
NOTE
The information will change based on your driving style.
An economical driving style will generally increase how far you can drive on a certainamount of fuel.
Distance to discharged batteryThis gauge shows the approximatedistance that can be driven with theremaining current in the hybrid bat-tery.
This calculation is based on average consump- tion with a normally loaded vehicle in normaldriving conditions, and takes into accountwhether the air conditioning is on or off. Changing drive modes from
Hybrid to Puremay increase the calculated distance because
Pure mode has reduced climate control set-
tings (ECO Climate). When the gauge displays "----", there is little charge remaining in the battery and electricmotor range cannot be reliably calculated.
NOTE
The information will change based on your driving style.
An economical driving style will generally increase how far you can drive on a certainamount of fuel.
Starting values for fully charged hybrid battery
Because it is difficult to predict driving style and other factors that affect the range of elec-tric motors, Volvo uses a starting value whenthe vehicle is fully charged. This starting valueprovides an "up to" amount instead of a pre-diction on the range of the electric current inthe motor. The difference in starting value between
Hybrid and Pure is because the
vehicle is permitted to use more current from the hybrid battery in
Pure mode, and because
the vehicle switches to ECO Climate.
Mileage when using electric motor
To achieve the longest possible mileage when using the electric motor, the driver of an elec-tric vehicle also needs to think about conserv- ing electricity. The more electricity consumers(stereo, heated windows/mirrors/seats, verycold air from climate control system, etc.) thatare active, the shorter the potential mileage.
NOTE
In addition to high electrical consumption in the passenger compartment, rapidacceleration, sudden braking, high speeds,heavy loads, low ambient temperaturesand driving up hills can reduce possibledriving distance.
Tourist - alternative speedometerThe alternative digital speedometer makes it easier to drive in countries where speed limitsigns are shown in a different measurementunit than the one shown in the vehicle'sgauges. When used, the digital speed is displayed in the opposite unit to that shown in the analogspeedometer. If
mph is used in the analog
speedometer, the equivalent speed in km/h
will be shown in the digital speedometer.
Related information
Displaying trip data in the instrumentpanel (p. 87)
Resetting the trip odometer (p. 88)
Displaying trip statistics in the center dis-play (p. 88)
Page 110 of 657

||
DISPLAYS AND VOICE CONTROL
* Option/accessory.
108
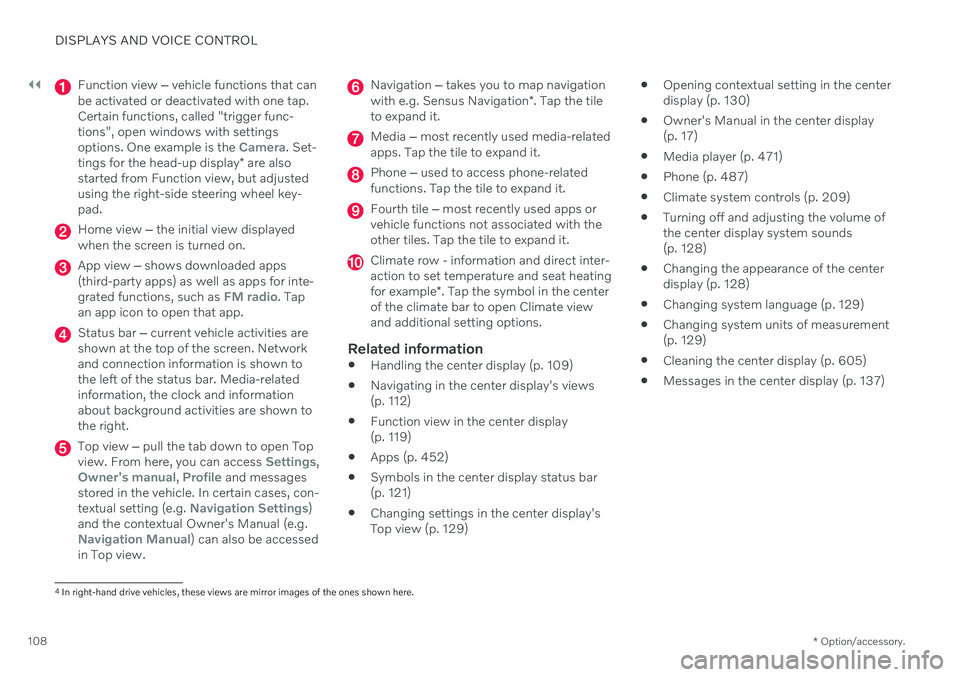
Function view ‒ vehicle functions that can
be activated or deactivated with one tap. Certain functions, called "trigger func-tions", open windows with settingsoptions. One example is the
Camera. Set-
tings for the head-up display * are also
started from Function view, but adjusted using the right-side steering wheel key-pad.
Home view ‒ the initial view displayed
when the screen is turned on.
App view ‒ shows downloaded apps
(third-party apps) as well as apps for inte- grated functions, such as
FM radio. Tap
an app icon to open that app.
Status bar ‒ current vehicle activities are
shown at the top of the screen. Network and connection information is shown tothe left of the status bar. Media-relatedinformation, the clock and informationabout background activities are shown tothe right.
Top view ‒ pull the tab down to open Top
view. From here, you can access Settings,Owner's manual, Profile and messages
stored in the vehicle. In certain cases, con- textual setting (e.g.
Navigation Settings)
and the contextual Owner's Manual (e.g.
Navigation Manual) can also be accessed
in Top view.
Navigation ‒ takes you to map navigation
with e.g. Sensus Navigation *. Tap the tile
to expand it.
Media ‒ most recently used media-related
apps. Tap the tile to expand it.
Phone ‒ used to access phone-related
functions. Tap the tile to expand it.
Fourth tile ‒ most recently used apps or
vehicle functions not associated with the other tiles. Tap the tile to expand it.
Climate row - information and direct inter- action to set temperature and seat heating for example *. Tap the symbol in the center
of the climate bar to open Climate view and additional setting options.
Related information
Handling the center display (p. 109)
Navigating in the center display's views (p. 112)
Function view in the center display (p. 119)
Apps (p. 452)
Symbols in the center display status bar(p. 121)
Changing settings in the center display'sTop view (p. 129)
Opening contextual setting in the centerdisplay (p. 130)
Owner's Manual in the center display(p. 17)
Media player (p. 471)
Phone (p. 487)
Climate system controls (p. 209)
Turning off and adjusting the volume ofthe center display system sounds(p. 128)
Changing the appearance of the centerdisplay (p. 128)
Changing system language (p. 129)
Changing system units of measurement(p. 129)
Cleaning the center display (p. 605)
Messages in the center display (p. 137)
4
In right-hand drive vehicles, these views are mirror images of the ones shown here.
Page 130 of 657

||
DISPLAYS AND VOICE CONTROL
128
New lines in free-text fields in handwriting mode
Create a new line by drawing above the characters in the handwriting field as shown in the illustration12
.
Writing blank spaces in free-text fields
Make a blank space by drawing a line from left to right 13
.
Related information
Using the center display keyboard (p. 123)
Changing the appearance of the center display The appearance of the center display can be changed by selecting a different theme.
1.
Tap Settings in the Top view.
2. Tap
My CarDisplaysDisplay
Themes.
3. Select a theme, e.g.
Minimalistic orChrome Rings.
In addition to these themes, you can also choose between
Normal and Bright. InNormal, the background of the screen is dark
and the text is light. This option is the default setting for all themes. If the bright version isselected, the background will be light and thetext will be dark. This option can, for example,make the screen easier to see in bright day-light conditions. These alternatives are always available for selection and are not affected by the ambientlighting.
Related information
Changing settings in the center display'sTop view (p. 129)
Activating and deactivating the center dis-play (p. 112)
Cleaning the center display (p. 605)
Turning off and adjusting the volume of the center displaysystem sounds
The volume of the center display system sounds can be adjusted or turned off com-pletely.
1. Tap Settings in the Top view in the center
display.
2. Tap
SoundSystem Volumes.
3. Pull the control under
Touch Sounds to
adjust the volume or turn off screen tap sounds. Pull the control to the desiredsound level.
Related information
Center display overview (p. 107)
Changing settings in the center display'sTop view (p. 129)
Sound settings (p. 450)
12
For Arabic keyboards, draw the same character, but in mirror image.
13 For Arabic keyboards, draw the line from right to left.