run flat VOLVO S60 TWIN ENGINE 2020 Owners Manual
[x] Cancel search | Manufacturer: VOLVO, Model Year: 2020, Model line: S60 TWIN ENGINE, Model: VOLVO S60 TWIN ENGINE 2020Pages: 657, PDF Size: 13.6 MB
Page 54 of 657

||
SAFETY
52
Seat belt reminder
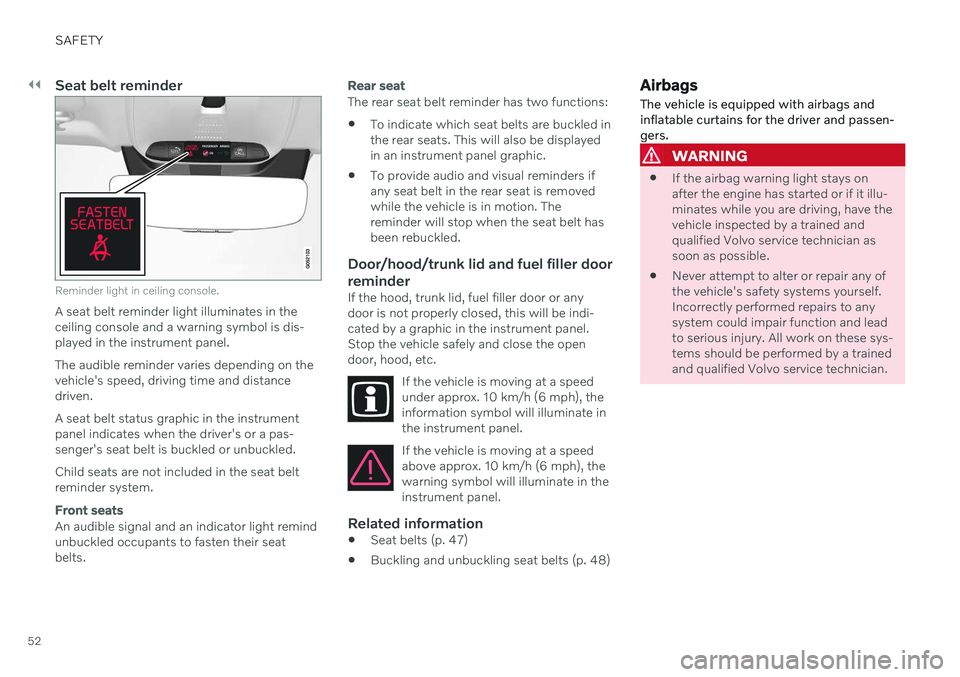
Reminder light in ceiling console.
A seat belt reminder light illuminates in the ceiling console and a warning symbol is dis-played in the instrument panel. The audible reminder varies depending on the vehicle's speed, driving time and distancedriven. A seat belt status graphic in the instrument panel indicates when the driver's or a pas-senger's seat belt is buckled or unbuckled. Child seats are not included in the seat belt reminder system.
Front seats
An audible signal and an indicator light remind unbuckled occupants to fasten their seatbelts.
Rear seat
The rear seat belt reminder has two functions:
To indicate which seat belts are buckled in the rear seats. This will also be displayedin an instrument panel graphic.
To provide audio and visual reminders ifany seat belt in the rear seat is removedwhile the vehicle is in motion. Thereminder will stop when the seat belt hasbeen rebuckled.
Door/hood/trunk lid and fuel filler door
reminder
If the hood, trunk lid, fuel filler door or anydoor is not properly closed, this will be indi-cated by a graphic in the instrument panel.Stop the vehicle safely and close the opendoor, hood, etc.
If the vehicle is moving at a speedunder approx. 10 km/h (6 mph), theinformation symbol will illuminate inthe instrument panel.
If the vehicle is moving at a speed above approx. 10 km/h (6 mph), thewarning symbol will illuminate in theinstrument panel.
Related information
Seat belts (p. 47)
Buckling and unbuckling seat belts (p. 48)
Airbags
The vehicle is equipped with airbags and inflatable curtains for the driver and passen-gers.
WARNING
If the airbag warning light stays on after the engine has started or if it illu-minates while you are driving, have thevehicle inspected by a trained andqualified Volvo service technician assoon as possible.
Never attempt to alter or repair any ofthe vehicle's safety systems yourself.Incorrectly performed repairs to anysystem could impair function and leadto serious injury. All work on these sys-tems should be performed by a trainedand qualified Volvo service technician.
Page 66 of 657

||
SAFETY
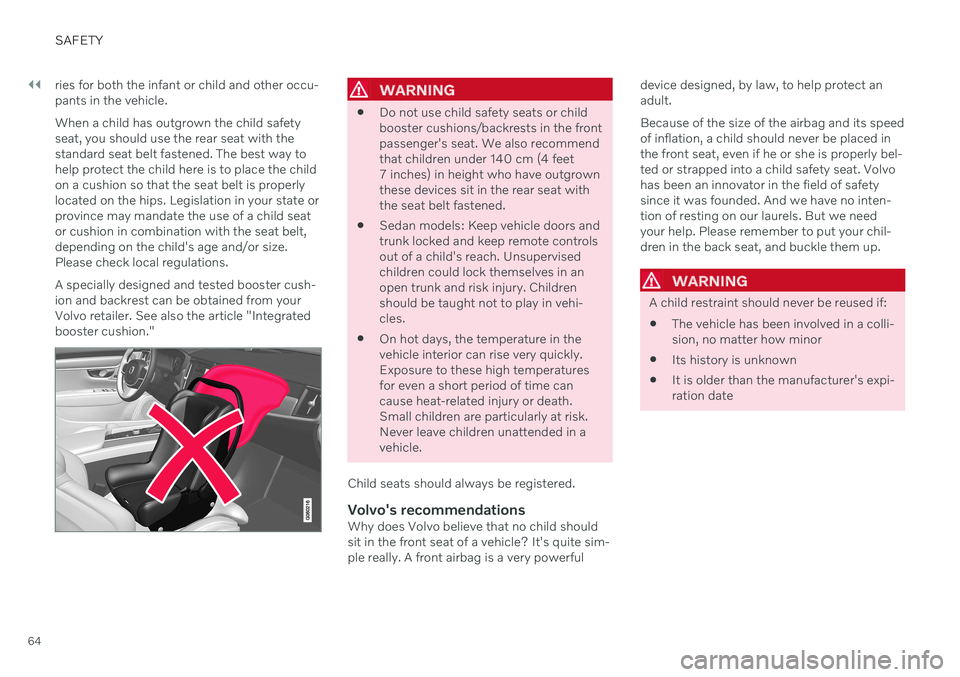
64ries for both the infant or child and other occu- pants in the vehicle. When a child has outgrown the child safety seat, you should use the rear seat with thestandard seat belt fastened. The best way tohelp protect the child here is to place the childon a cushion so that the seat belt is properlylocated on the hips. Legislation in your state orprovince may mandate the use of a child seator cushion in combination with the seat belt,depending on the child's age and/or size.Please check local regulations. A specially designed and tested booster cush- ion and backrest can be obtained from yourVolvo retailer. See also the article "Integratedbooster cushion."
WARNING
Do not use child safety seats or child booster cushions/backrests in the frontpassenger's seat. We also recommendthat children under 140 cm (4 feet7 inches) in height who have outgrownthese devices sit in the rear seat withthe seat belt fastened.
Sedan models: Keep vehicle doors andtrunk locked and keep remote controlsout of a child's reach. Unsupervisedchildren could lock themselves in anopen trunk and risk injury. Childrenshould be taught not to play in vehi-cles.
On hot days, the temperature in thevehicle interior can rise very quickly.Exposure to these high temperaturesfor even a short period of time cancause heat-related injury or death.Small children are particularly at risk.Never leave children unattended in avehicle.
Child seats should always be registered.
Volvo's recommendationsWhy does Volvo believe that no child shouldsit in the front seat of a vehicle? It's quite sim-ple really. A front airbag is a very powerful device designed, by law, to help protect anadult. Because of the size of the airbag and its speed of inflation, a child should never be placed inthe front seat, even if he or she is properly bel-ted or strapped into a child safety seat. Volvohas been an innovator in the field of safetysince it was founded. And we have no inten-tion of resting on our laurels. But we needyour help. Please remember to put your chil-dren in the back seat, and buckle them up.
WARNING
A child restraint should never be reused if:
The vehicle has been involved in a colli- sion, no matter how minor
Its history is unknown
It is older than the manufacturer's expi-ration date
Page 523 of 657

WHEELS AND TIRES
}}
521
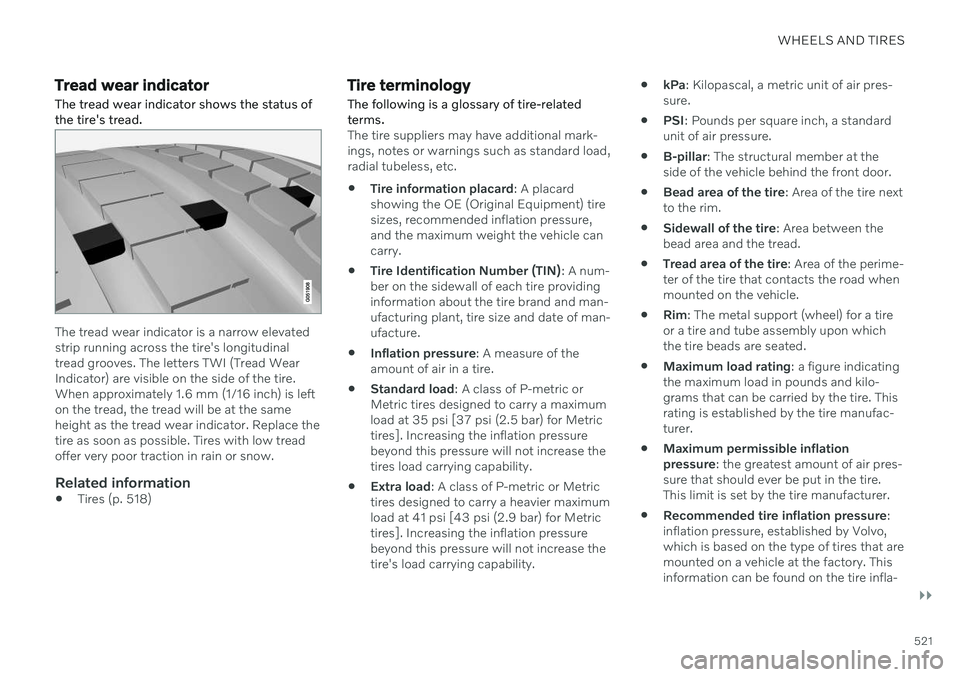
Tread wear indicatorThe tread wear indicator shows the status of the tire's tread.
The tread wear indicator is a narrow elevated strip running across the tire's longitudinaltread grooves. The letters TWI (Tread WearIndicator) are visible on the side of the tire.When approximately 1.6 mm (1/16 inch) is lefton the tread, the tread will be at the sameheight as the tread wear indicator. Replace thetire as soon as possible. Tires with low treadoffer very poor traction in rain or snow.
Related information
Tires (p. 518)
Tire terminology
The following is a glossary of tire-related terms.
The tire suppliers may have additional mark- ings, notes or warnings such as standard load,radial tubeless, etc.
Tire information placard
: A placard
showing the OE (Original Equipment) tiresizes, recommended inflation pressure,and the maximum weight the vehicle cancarry.
Tire Identification Number (TIN)
: A num-
ber on the sidewall of each tire providinginformation about the tire brand and man-ufacturing plant, tire size and date of man-ufacture.
Inflation pressure
: A measure of the
amount of air in a tire.
Standard load
: A class of P-metric or
Metric tires designed to carry a maximumload at 35 psi [37 psi (2.5 bar) for Metrictires]. Increasing the inflation pressurebeyond this pressure will not increase thetires load carrying capability.
Extra load
: A class of P-metric or Metric
tires designed to carry a heavier maximumload at 41 psi [43 psi (2.9 bar) for Metrictires]. Increasing the inflation pressurebeyond this pressure will not increase thetire's load carrying capability.
kPa
: Kilopascal, a metric unit of air pres-
sure.
PSI
: Pounds per square inch, a standard
unit of air pressure.
B-pillar
: The structural member at the
side of the vehicle behind the front door.
Bead area of the tire
: Area of the tire next
to the rim.
Sidewall of the tire
: Area between the
bead area and the tread.
Tread area of the tire
: Area of the perime-
ter of the tire that contacts the road whenmounted on the vehicle.
Rim
: The metal support (wheel) for a tire
or a tire and tube assembly upon whichthe tire beads are seated.
Maximum load rating
: a figure indicating
the maximum load in pounds and kilo-grams that can be carried by the tire. Thisrating is established by the tire manufac-turer.
Maximum permissible inflationpressure
: the greatest amount of air pres-
sure that should ever be put in the tire.This limit is set by the tire manufacturer.
Recommended tire inflation pressure
:
inflation pressure, established by Volvo,which is based on the type of tires that aremounted on a vehicle at the factory. Thisinformation can be found on the tire infla-
Page 524 of 657

||
WHEELS AND TIRES
522tion placard(s) located on the driver's side B-pillar and in the tire inflation table in thischapter.
Cold tires
: The tires are considered to be
cold when they have the same tempera-ture as the surrounding (ambient) air. Thistemperature is normally reached after thevehicle has been parked for at least 3hours.
Related information
Tires (p. 518)
Tire sidewall designations
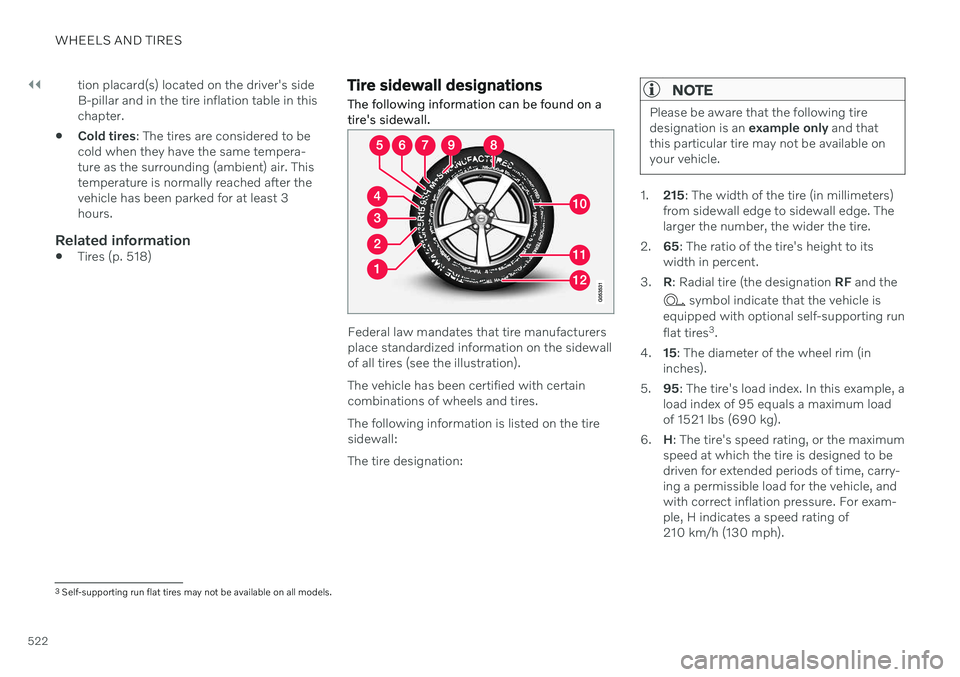
The following information can be found on a tire's sidewall.
Federal law mandates that tire manufacturers place standardized information on the sidewallof all tires (see the illustration). The vehicle has been certified with certain combinations of wheels and tires. The following information is listed on the tire sidewall: The tire designation:
NOTE
Please be aware that the following tire designation is an example only and that
this particular tire may not be available onyour vehicle.
1. 215: The width of the tire (in millimeters)
from sidewall edge to sidewall edge. The larger the number, the wider the tire.
2. 65: The ratio of the tire's height to its
width in percent.
3. R: Radial tire (the designation RF and the
symbol indicate that the vehicle is
equipped with optional self-supporting run flat tires 3
.
4. 15: The diameter of the wheel rim (in
inches).
5. 95: The tire's load index. In this example, a
load index of 95 equals a maximum load of 1521 lbs (690 kg).
6. H: The tire's speed rating, or the maximum
speed at which the tire is designed to bedriven for extended periods of time, carry-ing a permissible load for the vehicle, andwith correct inflation pressure. For exam-ple, H indicates a speed rating of210 km/h (130 mph).
3 Self-supporting run flat tires may not be available on all models.
Page 535 of 657

WHEELS AND TIRES
* Option/accessory.533
Jack*
The jack can be used to lift the vehicle to e.g. change a wheel.CAUTION
When not in use, the jack
* should be
kept in its storage compartment under the cargo compartment floor.
The jack provided with your vehicle isintended to be used only in temporarysituations such as changing wheels inthe event of a flat tire. Only the jackthat came with your particular modelshould be used to lift the vehicle. If thevehicle needs to be lifted more fre-quently or for a prolonged period, usinga garage jack or hoist is recommended.Always follow this device's instructionsfor use.
The jack needs to be cranked together to the correct position in order to fit. For vehicles with
Leveling Control*
: If the
vehicle is equipped with the optional pneu- matic suspension, it must be turned off beforethe vehicle is lifted on a jack.
Related information
Tool kit (p. 532)
Hoisting the vehicle (p. 569)
Wheel bolts
The wheel bolts hold the wheel in place on the wheel hub.
Only use rims that have been tested and approved by Volvo and are included in Volvo'soriginal product range. Use a torque wrench to check that the wheel bolts are tightened correctly. Do not grease the wheel bolt threads.
WARNING
The wheel bolts may need to be tightened again several days after a wheel change.Temperature fluctuations and vibrationscan cause them to loosen slightly.
CAUTION
The wheel bolts should be tightened to 140 Nm (103 ft. lbs.). Over-tightening orunder-tightening could damage the threa-ded joints.
Locking wheel bolts *A tool for removing the locking wheel bolts is located in the foam block under the cargocompartment floor.
Related information
Removing a wheel (p. 534)
Installing a wheel (p. 536)
Page 540 of 657

||
WHEELS AND TIRES
538
WARNING
The vehicle must never be driven with more than one "Temporary Spare" tiremounted.
Driving with a spare wheel may alterthe driving characteristics of the vehi-cle. Replace the spare wheel with anormal wheel as soon as possible.
The spare wheel is smaller than thenormal wheel, which affects the vehi-cle's ground clearance. Watch for highcurbs and do not wash the vehicle inan automatic car wash when a sparewheel is mounted.
Follow the manufacturer's recom-mended tire inflation pressure for thespare wheel.
On all-wheel drive vehicles, the driveon the rear axle can be disconnected.
If the spare wheel is mounted on thefront axle, snow chains must not beused.
The spare wheel must not be repaired.
CAUTION
The vehicle must not be driven with wheels of different dimensions or with a spare tireother than the one that came with the vehi-cle. The use of different size wheels canseriously damage your vehicle's transmis-sion.
Related information
When changing wheels (p. 532)
Recommended tire pressure (p. 527)
Handling spare tires Follow these instructions regarding handling the spare wheel.
This illustration is generic and appearance may vary.
The spare wheel is stored in a bag and should be secured with two straps onto the floor ofthe trunk/cargo compartment when the vehi-cle is being driven. The straps should be strap-ped down crosswise over the wheel, attachedto the load anchoring eyelets and pulled taut. Wheel changing tools are located under the cargo compartment floor.
Polestar EngineeredIf your vehicle is Polestar Engineered,Temporary Spare tires will not fit on the frontwheel axle due to the larger brakes. Tires should only be moved between the front and back, never from right to left or vice versa.
Page 543 of 657

WHEELS AND TIRES
541
Tire sealing system14
The temporary tire sealing system can be used to seal a puncture in a tire or to checkand adjust the pressure in the tire. Models equipped with a spare wheel 15
do not
have the tire sealing system.
WARNING
California Proposition 65 Operating, servicing and maintaining a pas- senger vehicle can expose you to chemi-cals including engine exhaust, carbon mon-oxide, phthalates, and lead, which areknown to the State of California to causecancer and birth defects or other reproduc-tive harm. To minimize exposure, avoidbreathing exhaust, do not idle the engineexcept as necessary, service your vehicle ina well ventilated area and wear gloves orwash your hands frequently when servicingyour vehicle. For more information go towww.P65Warnings.ca.gov/passenger-vehicle.
The tire sealing system consists of a compres- sor and a bottle containing sealing compound.The sealing functions as a temporary repair.
NOTE
The sealing compound effectively seals tires with punctures in the tread but maynot be able to fully seal tires with punctu-res in the sidewall. Do not use the tire seal-ing system on tires with large tears, cracksor similar damage.
NOTE
The compressor is intended for temporary tire sealing and is approved by Volvo.
LocationThe tire sealing system is located in a foam block under the floor of the trunk.
Sealing compound expiration dateThe sealing compound bottle must be replaced if its expiration date has passed (seethe decal on the bottle). Handle the old bottleas hazardous waste.
Related information
Using the tire sealing system (p. 542)
Inflate tires with the compressor includedin the tire sealing system (p. 545)
Tires (p. 518)
14
Certain models only.
15 Not available on all models.
Page 547 of 657

WHEELS AND TIRES
}}
545
16. Check the inflation pressure on the air
pressure gauge.
If the pressure is under 1.3 bar (19 psi), the tire is not sufficiently sealed. Thevehicle should not be driven. Call road-side assistance to have the vehicletowed.
If the inflation pressure is higher than1.3 bar (19 psi), the tire must be inflatedto the inflation pressure specified onthe tire pressure decal on the driver'sside door pillar (1 bar = 100 kPa =14.5 psi). If the inflation pressure is toohigh, use the air release valve to releaseair.
WARNING
Check inflation pressure regularly.
Volvo recommends driving to the nearest authorized Volvo workshop to have the tirereplaced/repaired. Inform the workshop thatthe tire contains sealing compound. The sealing compound bottle and the hose must be replaced after use. Volvo recom-mends contacting an authorized Volvo work-shop for replacement.
WARNING
After using the tire sealing system, the vehicle should not be driven farther thanapproximately 200 km (120 miles).
NOTE
The compressor is an electric device. Fol- low local regulations for disposal.
Related information
Recommended tire pressure (p. 527)
Tire sealing system (p. 541)
Inflate tires with the compressor included in the tire sealing system (p. 545)
Inflate tires with the compressor included in the tire sealing system
The vehicle's original tires can be inflated using the compressor in the tire sealing sys-tem.
1. The compressor must be switched off. Make sure that the switch is in the 0 (Off)
position and take out the electrical cable and the hose.
2. Unscrew the tire's valve cap and screw the hose's valve connector as far as possi-ble onto the valve. Be sure the air release valve on the com- pressor's hose is completely closed.
3. Connect the electrical cable to the nearest 12 V outlet and start the vehicle.
WARNING
Inhaling exhaust fumes could lead to seri- ous injury. Never leave the engine runningin an enclosed space or a space withoutsufficient ventilation.
WARNING
Never leave children unattended in the vehicle while the engine is running.
Page 548 of 657

||
WHEELS AND TIRES
5464. Start the compressor by moving the
switch to the I (On) position.
CAUTION
Risk of overheating. The compressor should not be running for longer than 10minutes at a time.
5. Inflate the tire to the pressure specified on
the tire pressure decal on the driver's side door pillar. If the inflation pressure is toohigh, use the air release valve to releaseair.
6. Switch off the compressor. Remove the hose and the electrical cable.
7. Screw the valve cap back onto the tire.
NOTE
After inflating a tire, always replace the valve cap to help prevent valve damagecaused by gravel, dirt, etc.
Use plastic valve caps only. Metal capscould corrode and become difficult toremove.
NOTE
The compressor is an electric device. Fol- low local regulations for disposal.
Related information
Recommended tire pressure (p. 527)
Using the tire sealing system (p. 542)
Tire sealing system (p. 541)
Determining the vehicle's permitted weight
Properly loading your vehicle will provide maximum return of vehicle design perform-ance.
Weight designationsBefore loading your vehicle, familiarize your- self with the following terms for determiningyour vehicle's weight ratings, with or without atrailer, from the vehicle's Federal/CanadianMotor Vehicle Safety Standards (FMVSS/CMVSS) label, and the vehicle's tire informa-tion placard:
Curb weight
The weight of the vehicle including a full tank of fuel and all standard equipment. It does notinclude passengers, cargo, or optional equip-ment.
Capacity weight
All weight added to the curb weight, including cargo and optional equipment. When towing,towbar weight is also part of cargo weight.
Permissible axle weight
The maximum allowable weight that can be carried by a single axle (front or rear). Thesenumbers are shown on the Federal/CanadianMotor Vehicle Safety Standards (FMVSS/CMVSS) label. The total load on each axlemust never exceed its maximum permissibleweight.
Page 560 of 657

||
LOADING, STORAGE AND PASSENGER COMPARTMENT
* Option/accessory.
558
WARNING
In a head-on collision at a speed of 50 km/h (30 mph), an unsecured objectweighing 20 kg (44 pounds) can reach aprojectile weight equivalent to 1000 kg(2200 pounds).
WARNING
If objects are loaded higher than the upper edge of the side windows, leave a 10 cm(4 in.) space between the objects and thewindow. Objects placed closer to thiscould impede the function of the inflatablecurtain concealed inside the headlining.
WARNING
Always secure the load. Otherwise, it may shift during heavy braking and injure peo-ple in the vehicle. Cover sharp edges and sharp corners with something soft. Turn off the engine and apply the parking brake when loading/unloading longobjects. Otherwise, it is possible for theload to reach the gear lever or gear selectorand move it to a drive position – whichcould cause the vehicle to begin rolling.
Extra cargo space
The rear seat backrests can be folded down *
to increase cargo space in the cargo compart- ment/trunk and simplify loading. If the rear seat backrests are folded down, make surethat no objects loaded into the vehicle preventthe WHIPS system for the front seats fromfunctioning correctly. The ski hatch
* in the rear seat can be folded
down to carry skis or other long, thin objects.
Related information
Load anchoring eyelets (p. 560)
Folding down the rear seat backrests
*
(p. 192)
Rear seat ski hatch
* (p. 560)
Roof loads and load carriers (p. 558)
Leveling control
* and suspension (p. 419)
Weights (p. 629)
Roof loads and load carriers
Volvo-developed load carriers are recom- mended for carrying loads on the roof of thevehicle.
Volvo load carriers are specially designed to help prevent damage to your vehicle and helpensure maximum safety while driving. Volvoload carriers are available from authorizedVolvo retailers. Carefully follow the installation instructions provided with the load carriers. Distribute the load evenly throughout the load carriers. Place heavier cargo at thebottom of the load.
Check periodically to ensure that the loadcarriers and load are properly secured.Secure the load firmly using tie straps orsimilar.
If the load is longer than the vehicle, suchas a canoe or kayak, attach the towingeyelet in its front outlet and secure the tiestraps in it.
The vehicle's wind resistance and fuelconsumption increase with the size of theload.
Drive smoothly. Avoid rapid acceleration,hard braking and fast cornering.