high beam VOLVO S80 2002 Owners Manual
[x] Cancel search | Manufacturer: VOLVO, Model Year: 2002, Model line: S80, Model: VOLVO S80 2002Pages: 111, PDF Size: 2.74 MB
Page 17 of 111
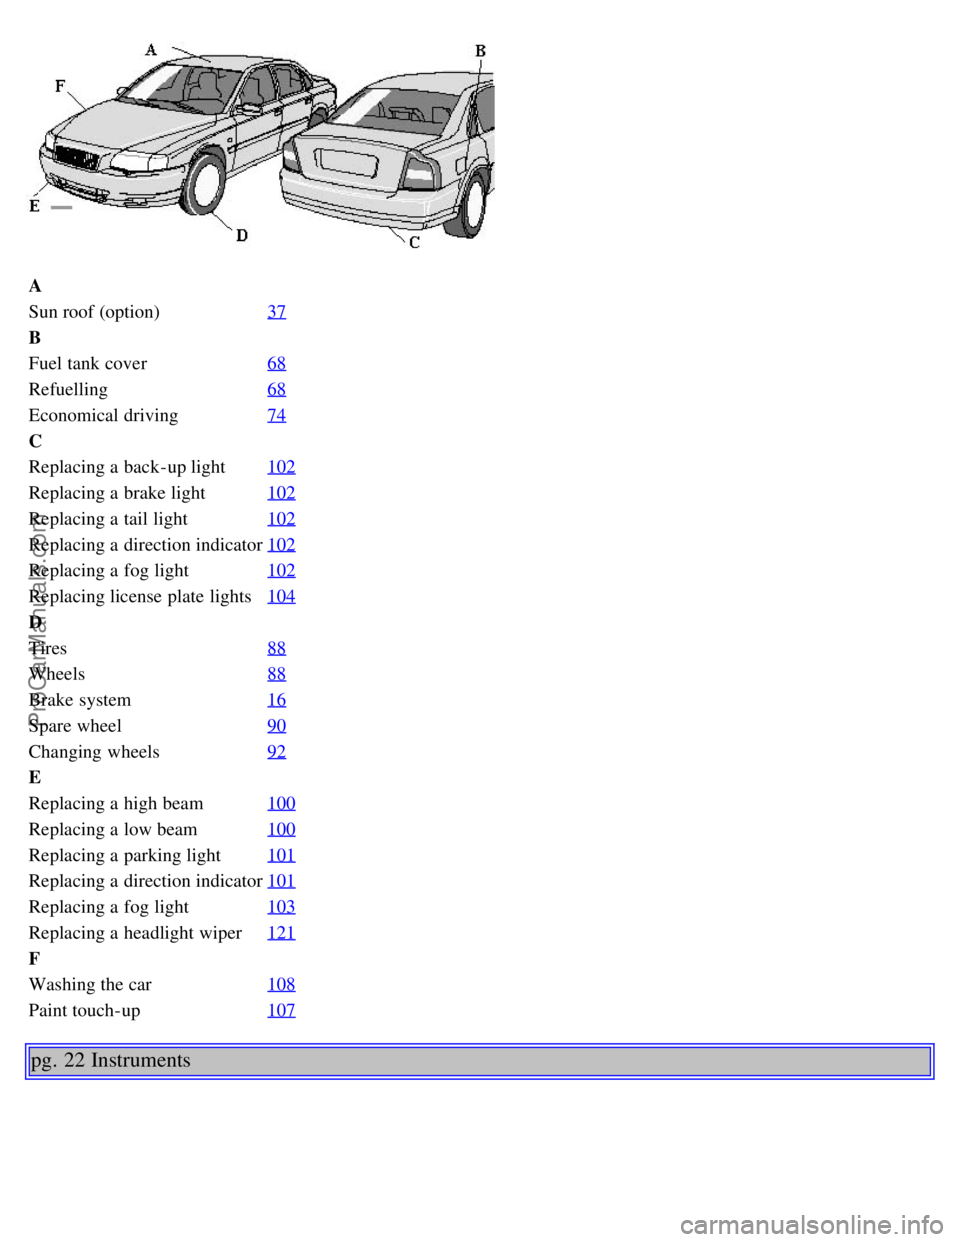
A
Sun roof (option)37
B
Fuel tank cover68
Refuelling68
Economical driving74
C
Replacing a back-up light102
Replacing a brake light102
Replacing a tail light102
Replacing a direction indicator102
Replacing a fog light102
Replacing license plate lights104
D
Tires88
Wheels88
Brake system16
Spare wheel90
Changing wheels92
E
Replacing a high beam100
Replacing a low beam100
Replacing a parking light101
Replacing a direction indicator101
Replacing a fog light103
Replacing a headlight wiper121
F
Washing the car108
Paint touch-up107
pg. 22 Instruments
ProCarManuals.com
Page 18 of 111
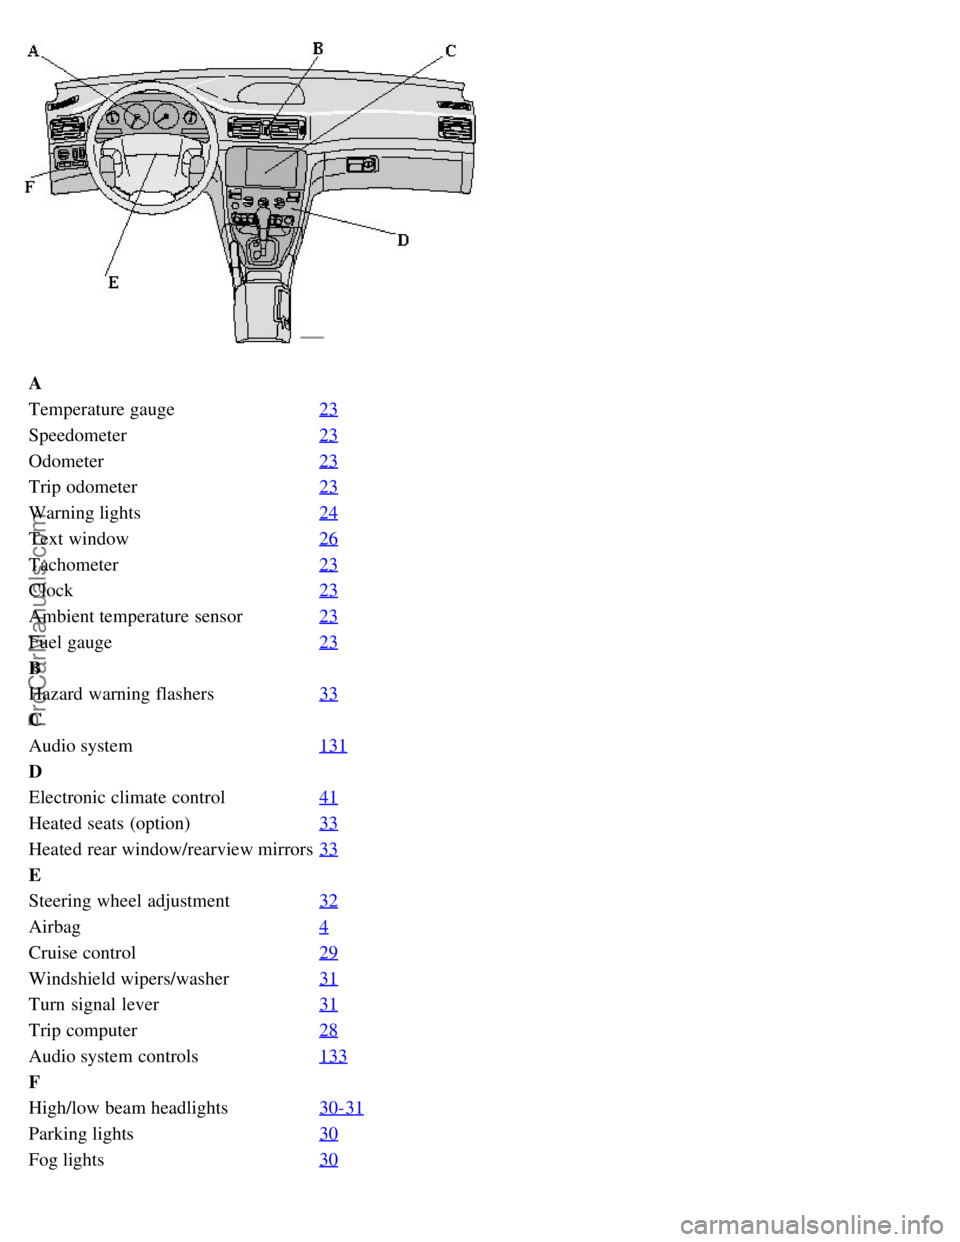
A
Temperature gauge23
Speedometer23
Odometer23
Trip odometer23
Warning lights24
Text window26
Tachometer23
Clock23
Ambient temperature sensor23
Fuel gauge23
B
Hazard warning flashers33
C
Audio system131
D
Electronic climate control41
Heated seats (option)33
Heated rear window/rearview mirrors33
E
Steering wheel adjustment32
Airbag4
Cruise control29
Windshield wipers/washer31
Turn signal lever31
Trip computer28
Audio system controls133
F
High/low beam headlights30-31
Parking lights30
Fog lights30
ProCarManuals.com
Page 19 of 111

Instrument panel lighting30
Button to unlock fuel filler door30
pg. 23 Instrument panel
1 Turn signals
2 Text window
3 Temperature gauge
The pointer should be approximately midway on the gauge when driving.
Do not drive the car if the warning light is on. The text window will provide you with additional information.
If the engine temperature remains high, check coolant level - see page 112
.
4 Trip odometer/reset button
The trip odometer is used for measuring shorter distances. The last digit indicates 1/10 mile/kilometer. Press the button
quickly to toggle between trip odometers 1 and 2. Hold in the button for more than 2 seconds to reset.
5 Odometer
6 Speedometer
7 General warning light (see page 24
).
8 High beam indicator light
9 Tachometer
Indicates engine speed in thousands of rpm. Do not drive for long with the needle in the red section. The engine has an
built-in function preventing too high an engine speed. When this function operates, you may discern some pulsation,
which in that case is quite normal.
10 Gear and driving mode indicator
The currently selected driving mode is displayed here. If you use the geartronic function on the automatic transmission,
the currently selected gear will be displayed.
11 Ambient temperature indicator
This sensor indicates the air temperature outside your car. A "snowflake" symbol in the text window is displayed when
the temperature is in the range of 23 - 36° F (-5 - +2° C).
ProCarManuals.com
Page 69 of 111
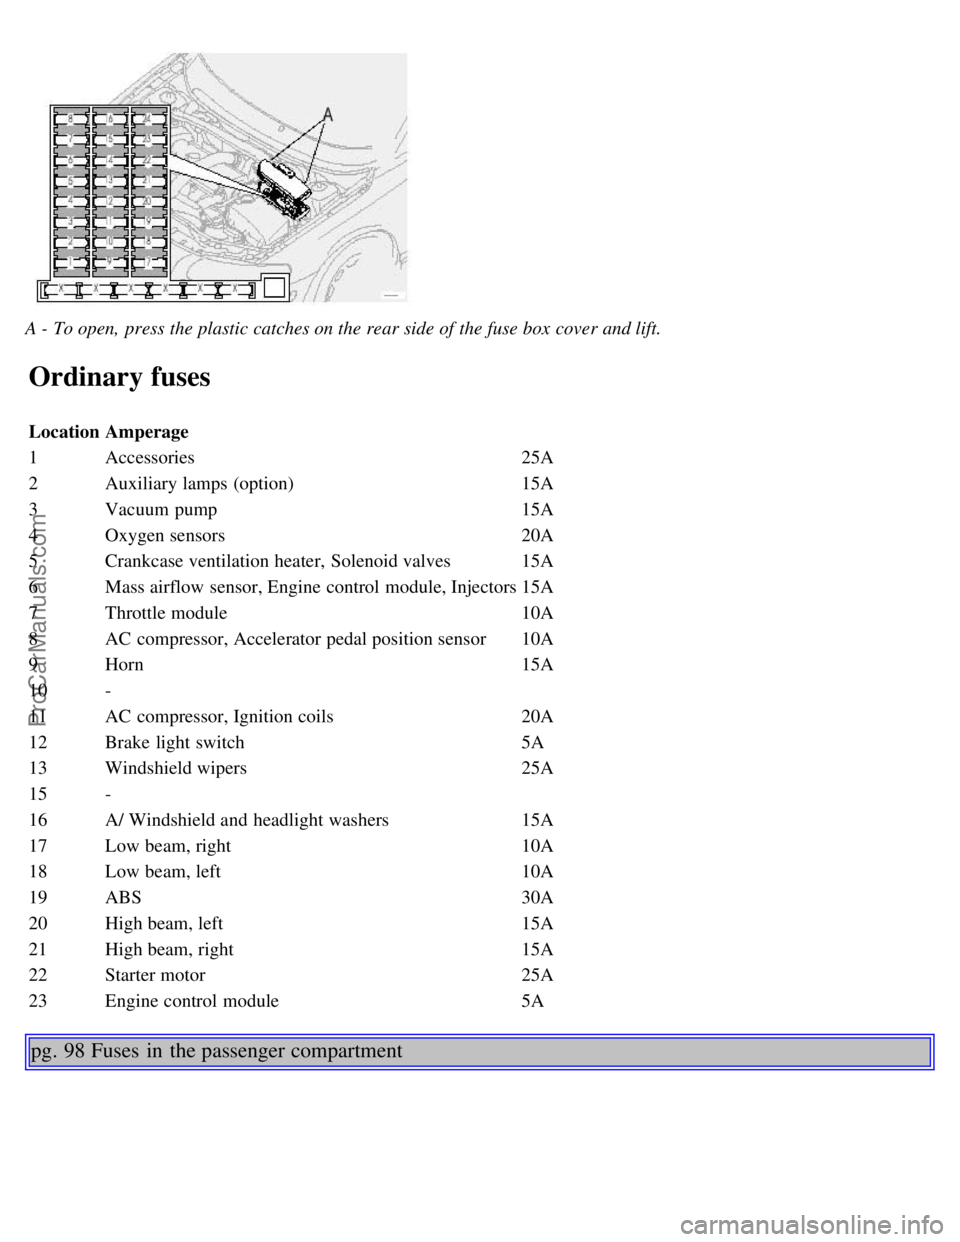
A - To open, press the plastic catches on the rear side of the fuse box cover and lift.
Ordinary fuses
LocationAmperage
1 Accessories 25A
2 Auxiliary lamps (option) 15A
3 Vacuum pump 15A
4 Oxygen sensors 20A
5 Crankcase ventilation heater, Solenoid valves 15A
6 Mass airflow sensor, Engine control module, Injectors 15A
7 Throttle module 10A
8 AC compressor, Accelerator pedal position sensor 10A
9 Horn 15A
10 -
11 AC compressor, Ignition coils 20A
12 Brake light switch 5A
13 Windshield wipers 25A
15 -
16 A/ Windshield and headlight washers 15A
17 Low beam, right 10A
18 Low beam, left 10A
19 ABS 30A
20 High beam, left 15A
21 High beam, right 15A
22 Starter motor 25A
23 Engine control module 5A
pg. 98 Fuses in the passenger compartment
ProCarManuals.com
Page 70 of 111
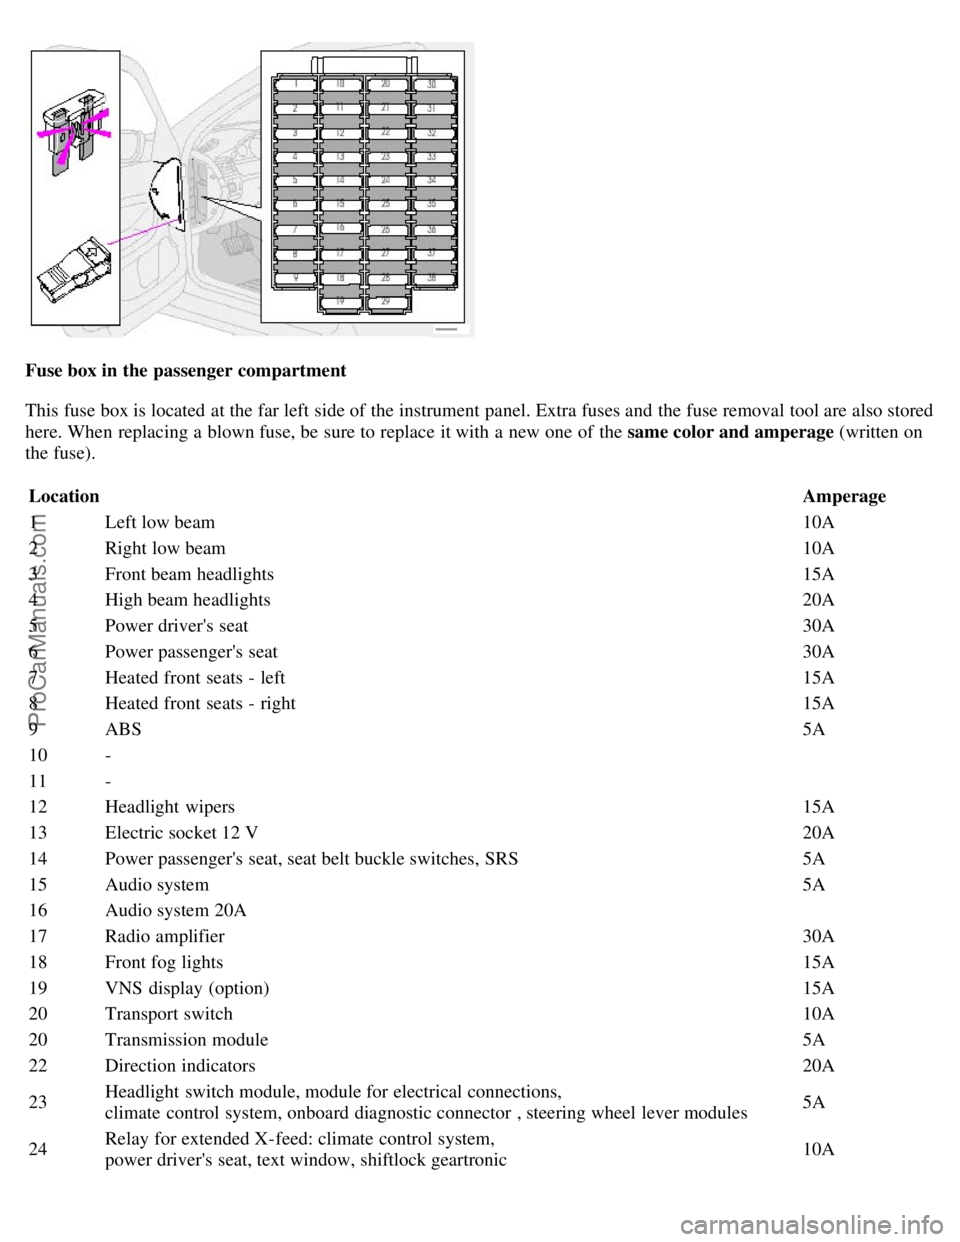
Fuse box in the passenger compartment
This fuse box is located at the far left side of the instrument panel. Extra fuses and the fuse removal tool are also stored
here. When replacing a blown fuse, be sure to replace it with a new one of the same color and amperage (written on
the fuse).
Location Amperage
1 Left low beam 10A
2 Right low beam 10A
3 Front beam headlights 15A
4 High beam headlights 20A
5 Power driver's seat 30A
6 Power passenger's seat 30A
7 Heated front seats - left 15A
8 Heated front seats - right 15A
9 ABS 5A
10 -
11 -
12 Headlight wipers 15A
13 Electric socket 12 V 20A
14 Power passenger's seat, seat belt buckle switches, SRS 5A
15 Audio system 5A
16 Audio system 20A
17 Radio amplifier 30A
18 Front fog lights 15A
19 VNS display (option) 15A
20 Transport switch 10A
20 Transmission module 5A
22 Direction indicators 20A
23 Headlight switch module, module for electrical connections,
climate control system, onboard diagnostic connector , steering wheel lever modules 5A
24 Relay for extended X-feed: climate control system,
power driver's seat, text window, shiftlock geartronic 10A
ProCarManuals.com
Page 72 of 111
6Trunk release 10A
7Folding rear outboard head restraints 10A
8 Central locking system - rear doors/fuel filler door 15A
9 Trailer (30 supply) 15A
10 CD changer, CD ROM, VNS, antenna 10A
11 Electrical module - accesories 15A
12 -
13 -
14 -
15 Trailer (15 supply) 15A
16 -
17 -
18 -
pg. 100 Replacing bulbs
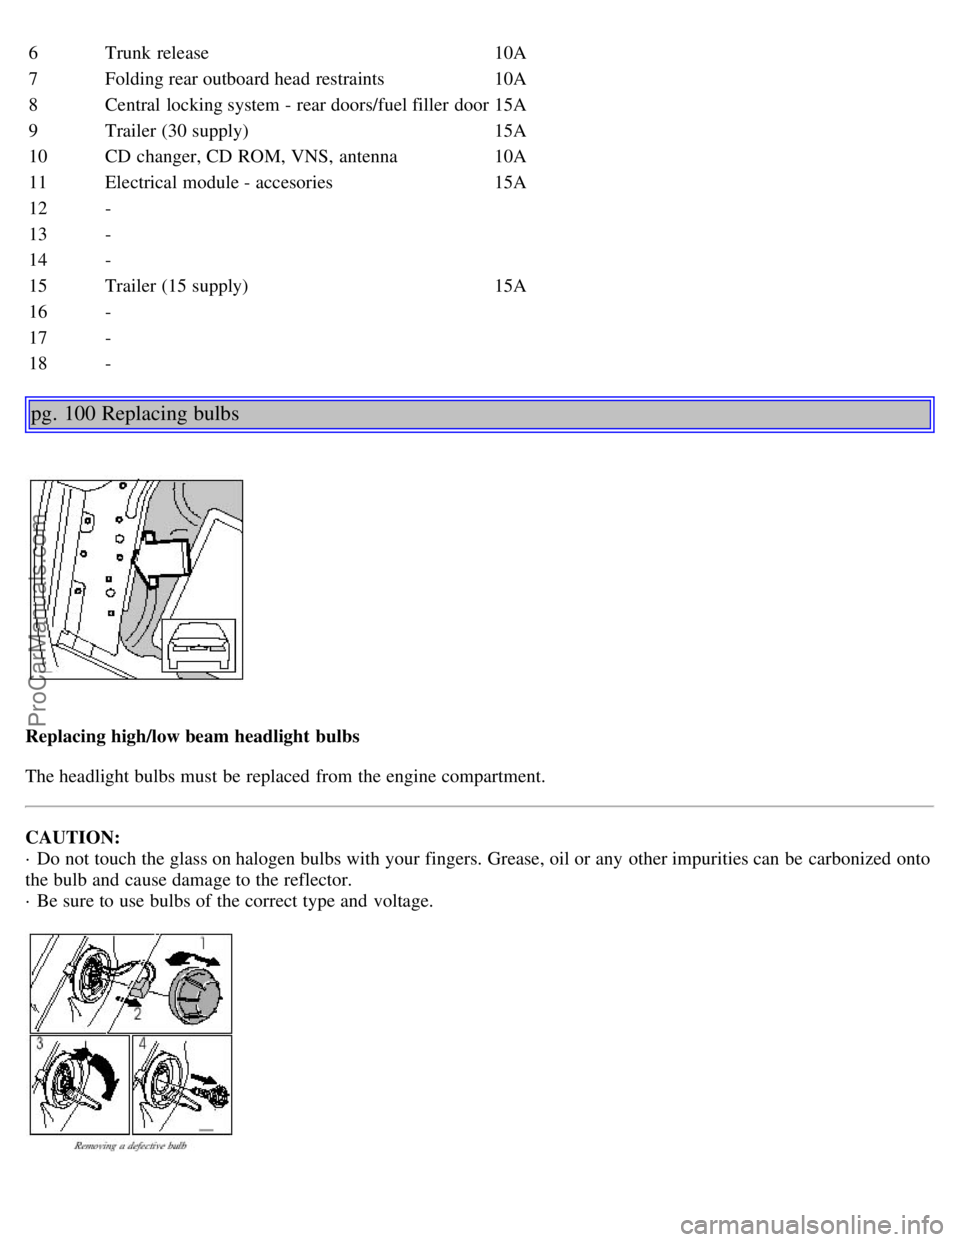
Replacing high/low beam headlight bulbs
The headlight bulbs must be replaced from the engine compartment.
CAUTION:
· Do not touch the glass on halogen bulbs with your fingers. Grease, oil or any other impurities can be carbonized onto
the bulb and cause damage to the reflector.
· Be sure to use bulbs of the correct type and voltage.
ProCarManuals.com
Page 73 of 111
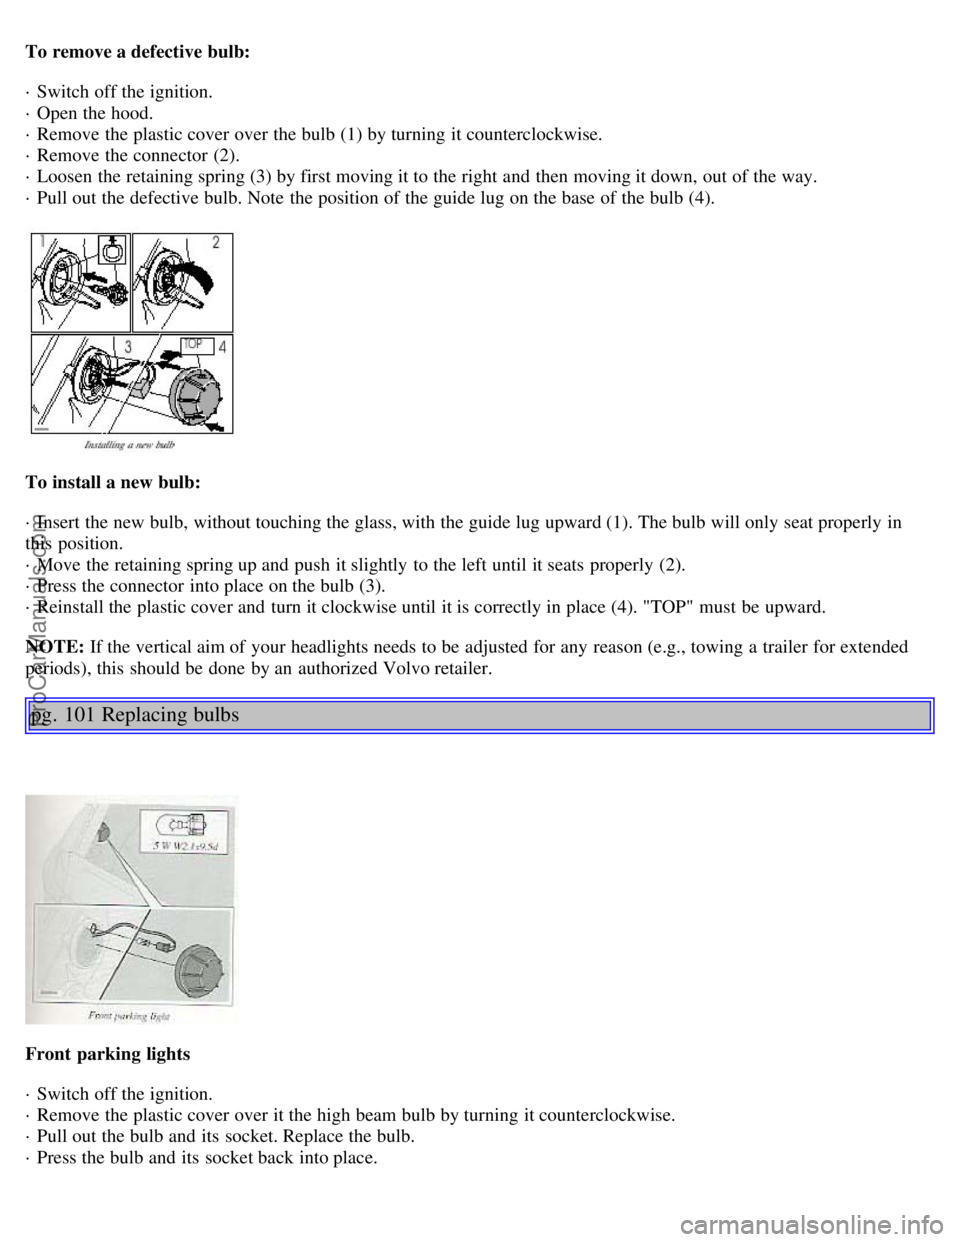
To remove a defective bulb:
· Switch off the ignition.
· Open the hood.
· Remove the plastic cover over the bulb (1) by turning it counterclockwise.
· Remove the connector (2).
· Loosen the retaining spring (3) by first moving it to the right and then moving it down, out of the way.
· Pull out the defective bulb. Note the position of the guide lug on the base of the bulb (4).
To install a new bulb:
· Insert the new bulb, without touching the glass, with the guide lug upward (1). The bulb will only seat properly in
this position.
· Move the retaining spring up and push it slightly to the left until it seats properly (2).
· Press the connector into place on the bulb (3).
· Reinstall the plastic cover and turn it clockwise until it is correctly in place (4). "TOP" must be upward.
NOTE: If the vertical aim of your headlights needs to be adjusted for any reason (e.g., towing a trailer for extended
periods), this should be done by an authorized Volvo retailer.
pg. 101 Replacing bulbs
Front parking lights
· Switch off the ignition.
· Remove the plastic cover over it the high beam bulb by turning it counterclockwise.
· Pull out the bulb and its socket. Replace the bulb.
· Press the bulb and its socket back into place.
ProCarManuals.com
Page 85 of 111
Generator
Rated output: max. current: 140 A
Starter motor:
Output: 1.7 kW
BulbsBulb US no.Power Socket
Headlights
High beam H755W -
Low beam H755W -
Front parking lights/ 5WW 2.1x9.5d
Front direction indicators -21 W BAU 15d
Front fog lights H155 W -
Side marker lights -3 W W2.1x9.5d
Rear direction indicators -21W BAU 15 s
Tail lights 675W/4cp BA 15 s
Brake lights 115621W/32cp BA 15 s
Backup lights 115621W/32cp BA 15 s
Rear fog light 115621W/32cp BA 15 s
License plate light -5 W W 2.1x9.5d
Door step courtesy lights
Front -5W SV 8.5
Rear -5W W 2.1x9.5d
Trunk lights -10 W SV 8.5
Glove compartment light -2 W BA 9s
Vanity mirror lights -1.2 W SV 5.5
Instrument lighting -3 W W 2.1x9.5d
Rear ashtray -1.2 W W 2x4.6d
Front courtesy lights -10 W SV 8.5
Rear reading lights -5 W W2.1x9.5d
Sideview mirror -5W W2.1x9.5d
All specifications are subject to change without prior notice.
pg. 130 Volvo On Call
Your new Volvo comes with a four year ON CALL road assistance. Additional information, features, and benefits are
ProCarManuals.com