display VOLVO S80 2003 Owners Manual
[x] Cancel search | Manufacturer: VOLVO, Model Year: 2003, Model line: S80, Model: VOLVO S80 2003Pages: 109, PDF Size: 2 MB
Page 20 of 109
Instrument panel lighting32
Button to unlock fuel filler door32
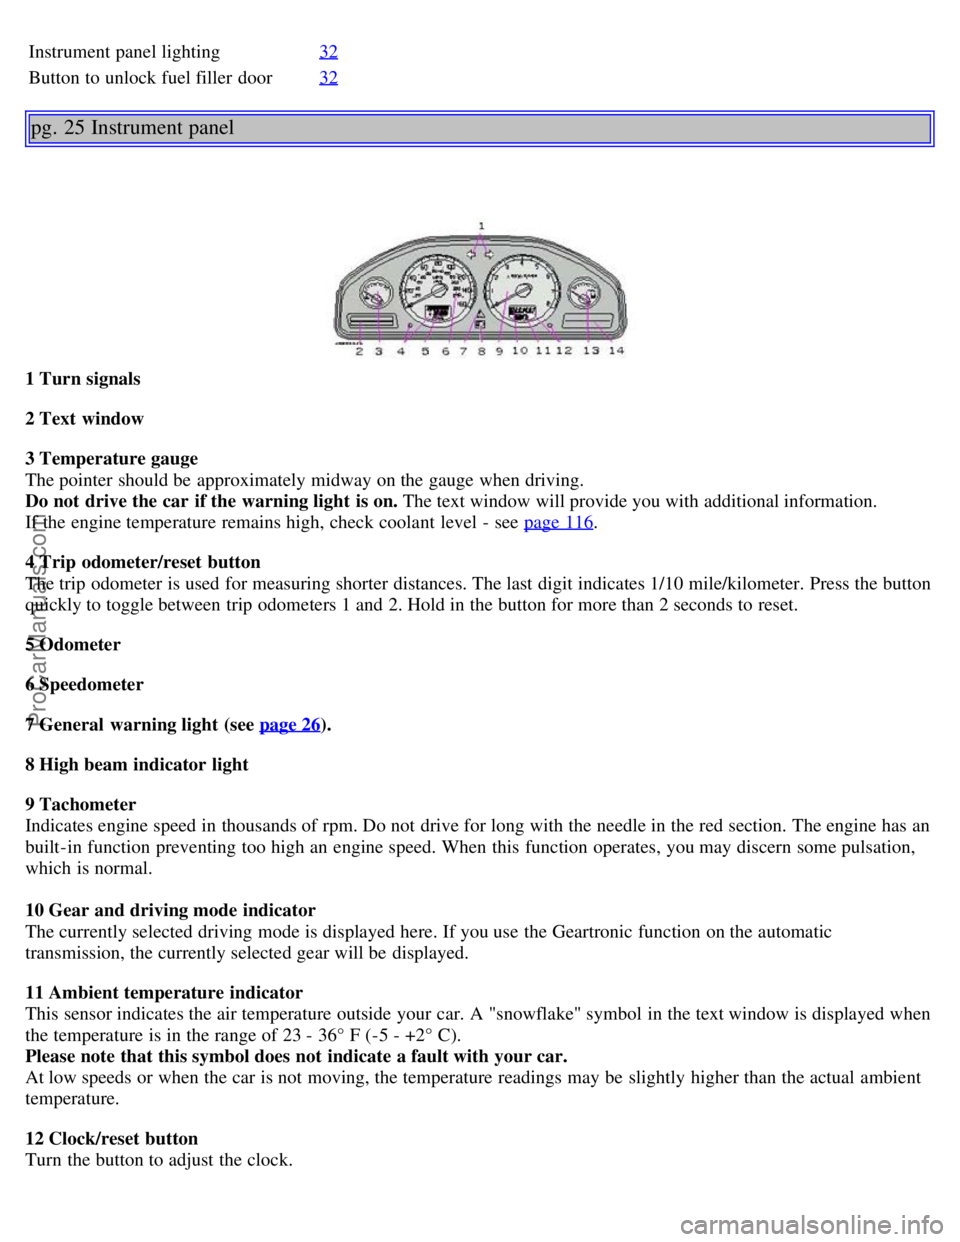
pg. 25 Instrument panel
1 Turn signals
2 Text window
3 Temperature gauge
The pointer should be approximately midway on the gauge when driving.
Do not drive the car if the warning light is on. The text window will provide you with additional information.
If the engine temperature remains high, check coolant level - see page 116
.
4 Trip odometer/reset button
The trip odometer is used for measuring shorter distances. The last digit indicates 1/10 mile/kilometer. Press the button
quickly to toggle between trip odometers 1 and 2. Hold in the button for more than 2 seconds to reset.
5 Odometer
6 Speedometer
7 General warning light (see page 26
).
8 High beam indicator light
9 Tachometer
Indicates engine speed in thousands of rpm. Do not drive for long with the needle in the red section. The engine has an
built-in function preventing too high an engine speed. When this function operates, you may discern some pulsation,
which is normal.
10 Gear and driving mode indicator
The currently selected driving mode is displayed here. If you use the Geartronic function on the automatic
transmission, the currently selected gear will be displayed.
11 Ambient temperature indicator
This sensor indicates the air temperature outside your car. A "snowflake" symbol in the text window is displayed when
the temperature is in the range of 23 - 36° F (-5 - +2° C).
Please note that this symbol does not indicate a fault with your car.
At low speeds or when the car is not moving, the temperature readings may be slightly higher than the actual ambient
temperature.
12 Clock/reset button
Turn the button to adjust the clock.
ProCarManuals.com
Page 47 of 109
NOTE: This button will NOT unlock the car.
pg. 66 Alarm
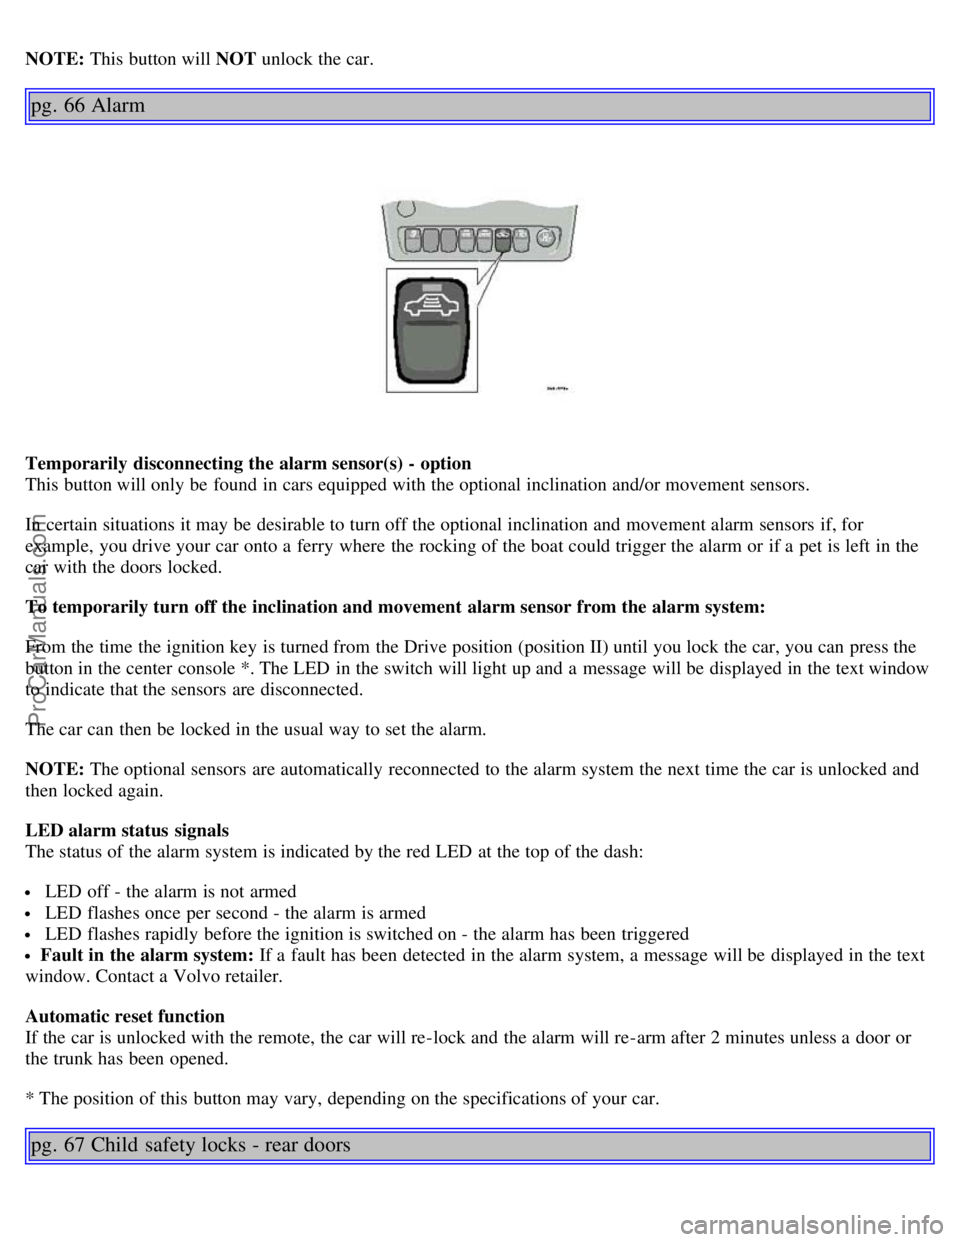
Temporarily disconnecting the alarm sensor(s) - option
This button will only be found in cars equipped with the optional inclination and/or movement sensors.
In certain situations it may be desirable to turn off the optional inclination and movement alarm sensors if, for
example, you drive your car onto a ferry where the rocking of the boat could trigger the alarm or if a pet is left in the
car with the doors locked.
To temporarily turn off the inclination and movement alarm sensor from the alarm system:
From the time the ignition key is turned from the Drive position (position II) until you lock the car, you can press the
button in the center console *. The LED in the switch will light up and a message will be displayed in the text window
to indicate that the sensors are disconnected.
The car can then be locked in the usual way to set the alarm.
NOTE: The optional sensors are automatically reconnected to the alarm system the next time the car is unlocked and
then locked again.
LED alarm status signals
The status of the alarm system is indicated by the red LED at the top of the dash:
LED off - the alarm is not armed
LED flashes once per second - the alarm is armed
LED flashes rapidly before the ignition is switched on - the alarm has been triggered
Fault in the alarm system: If a fault has been detected in the alarm system, a message will be displayed in the text
window. Contact a Volvo retailer.
Automatic reset function
If the car is unlocked with the remote, the car will re-lock and the alarm will re-arm after 2 minutes unless a door or
the trunk has been opened.
* The position of this button may vary, depending on the specifications of your car.
pg. 67 Child safety locks - rear doors
ProCarManuals.com
Page 55 of 109
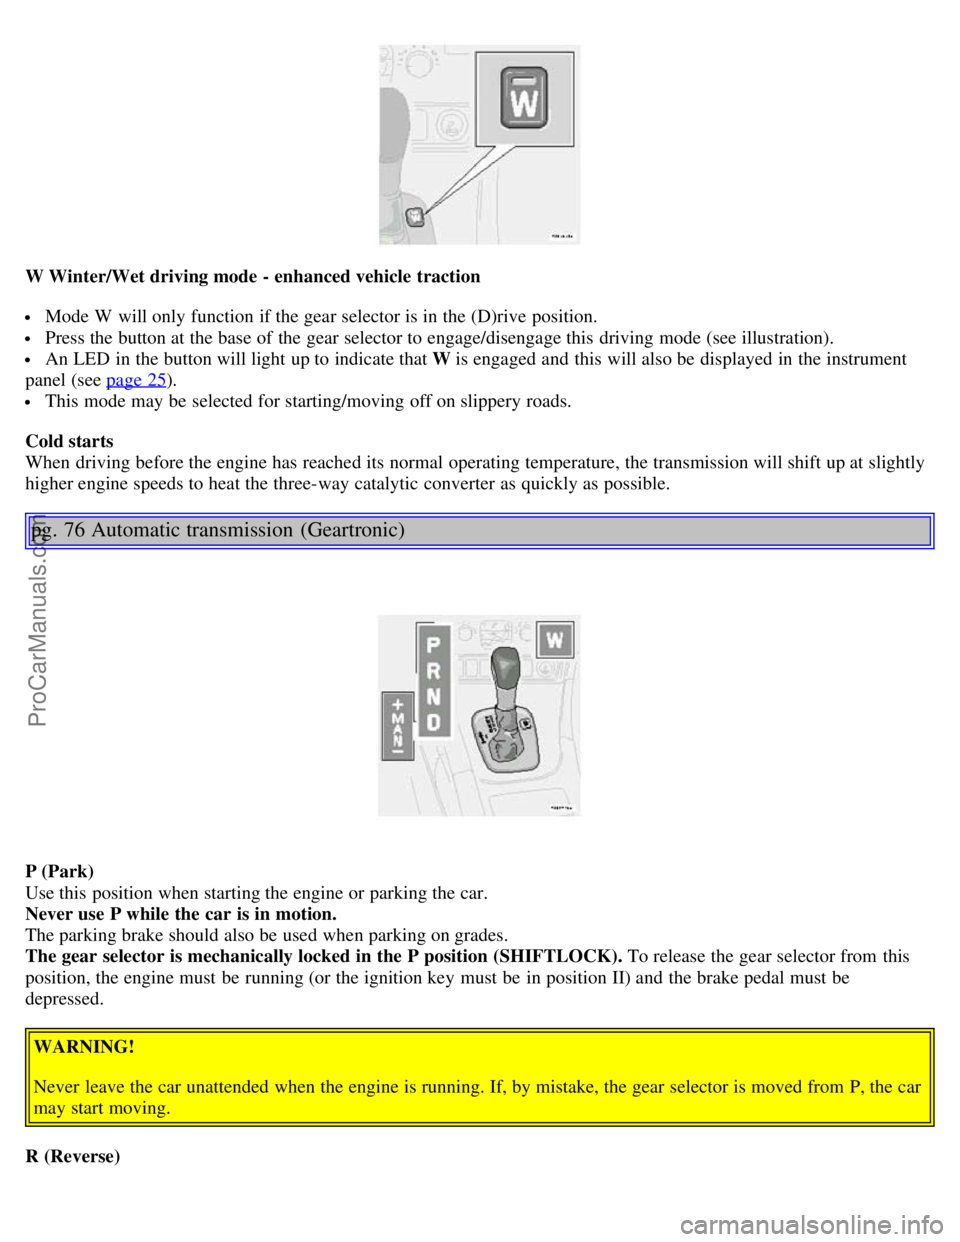
W Winter/Wet driving mode - enhanced vehicle traction
Mode W will only function if the gear selector is in the (D)rive position.
Press the button at the base of the gear selector to engage/disengage this driving mode (see illustration).
An LED in the button will light up to indicate that W is engaged and this will also be displayed in the instrument
panel (see page 25
).
This mode may be selected for starting/moving off on slippery roads.
Cold starts
When driving before the engine has reached its normal operating temperature, the transmission will shift up at slightly
higher engine speeds to heat the three-way catalytic converter as quickly as possible.
pg. 76 Automatic transmission (Geartronic)
P (Park)
Use this position when starting the engine or parking the car.
Never use P while the car is in motion.
The parking brake should also be used when parking on grades.
The gear selector is mechanically locked in the P position (SHIFTLOCK). To release the gear selector from this
position, the engine must be running (or the ignition key must be in position II) and the brake pedal must be
depressed.
WARNING!
Never leave the car unattended when the engine is running. If, by mistake, the gear selector is moved from P, the car
may start moving.
R (Reverse)
ProCarManuals.com
Page 56 of 109
Never engage R while the car is moving forward.
N (Neutral)
Neutral - no gear engaged. Use the parking brake.
D (Drive)
D is the normal driving position and should be used as often as possible to help improve fuel economy. The car should
not be moving when shifting from R to the D position.
Kickdown
Automatic shift to a lower gear (kickdown) is achieved by depressing the accelerator pedal fully and briskly. An
upshift will occur when approaching the top speed for a particular gear or by releasing the accelerator pedal slightly.
Kickdown can be used for maximum acceleration or when passing at highway speeds. Kickdown does not function
when the transmission is in the manual shift (geartronic) mode (see next page).
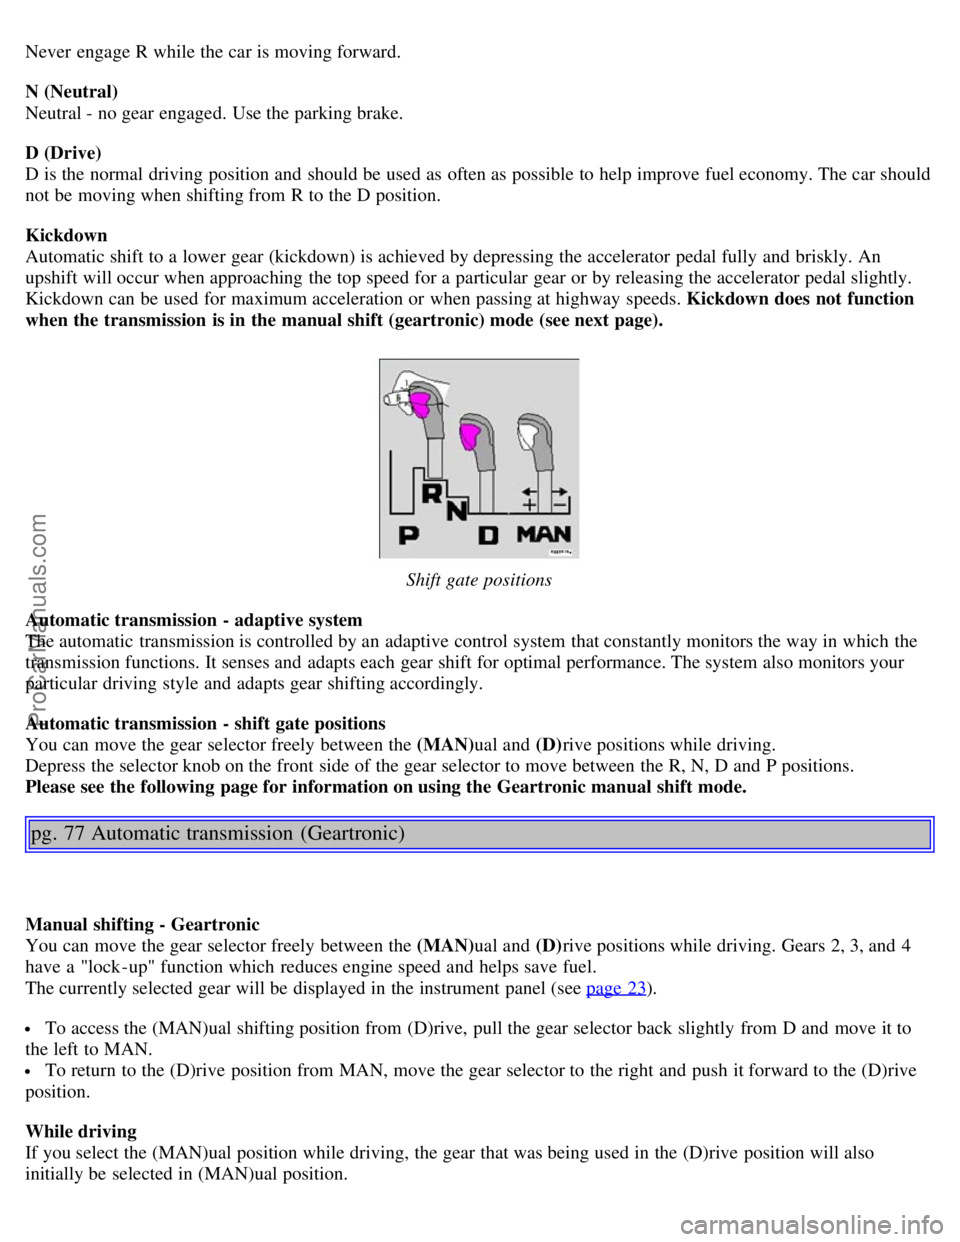
Shift gate positions
Automatic transmission - adaptive system
The automatic transmission is controlled by an adaptive control system that constantly monitors the way in which the
transmission functions. It senses and adapts each gear shift for optimal performance. The system also monitors your
particular driving style and adapts gear shifting accordingly.
Automatic transmission - shift gate positions
You can move the gear selector freely between the (MAN) ual and (D)rive positions while driving.
Depress the selector knob on the front side of the gear selector to move between the R, N, D and P positions.
Please see the following page for information on using the Geartronic manual shift mode.
pg. 77 Automatic transmission (Geartronic)
Manual shifting - Geartronic
You can move the gear selector freely between the (MAN) ual and (D)rive positions while driving. Gears 2, 3, and 4
have a "lock -up" function which reduces engine speed and helps save fuel.
The currently selected gear will be displayed in the instrument panel (see page 23
).
To access the (MAN)ual shifting position from (D)rive, pull the gear selector back slightly from D and move it to
the left to MAN.
To return to the (D)rive position from MAN, move the gear selector to the right and push it forward to the (D)rive
position.
While driving
If you select the (MAN)ual position while driving, the gear that was being used in the (D)rive position will also
initially be selected in (MAN)ual position.
ProCarManuals.com
Page 57 of 109
Move the gear selector forward (toward "+") to shift to a higher gear or rearward (toward "-") to shift to a lower
gear.
If you hold the gear selector toward "-", the transmission will downshift one gear , and will utilize the braking power
of the engine. If the current speed is too high for using a lower gear, the downshift will not occur until the speed has
decreased enough to allow the lower gear to be used.
If you slow down to a very low speed, the transmission will automatically shift down.
When starting in the (MAN)ual position, 3rd gear is the highest gear that may be selected.
NOTE: Kickdown (see previous page) does not function when the transmission is in the manual shift (geartronic)
mode. The gear selector must be in D (Drive) position.
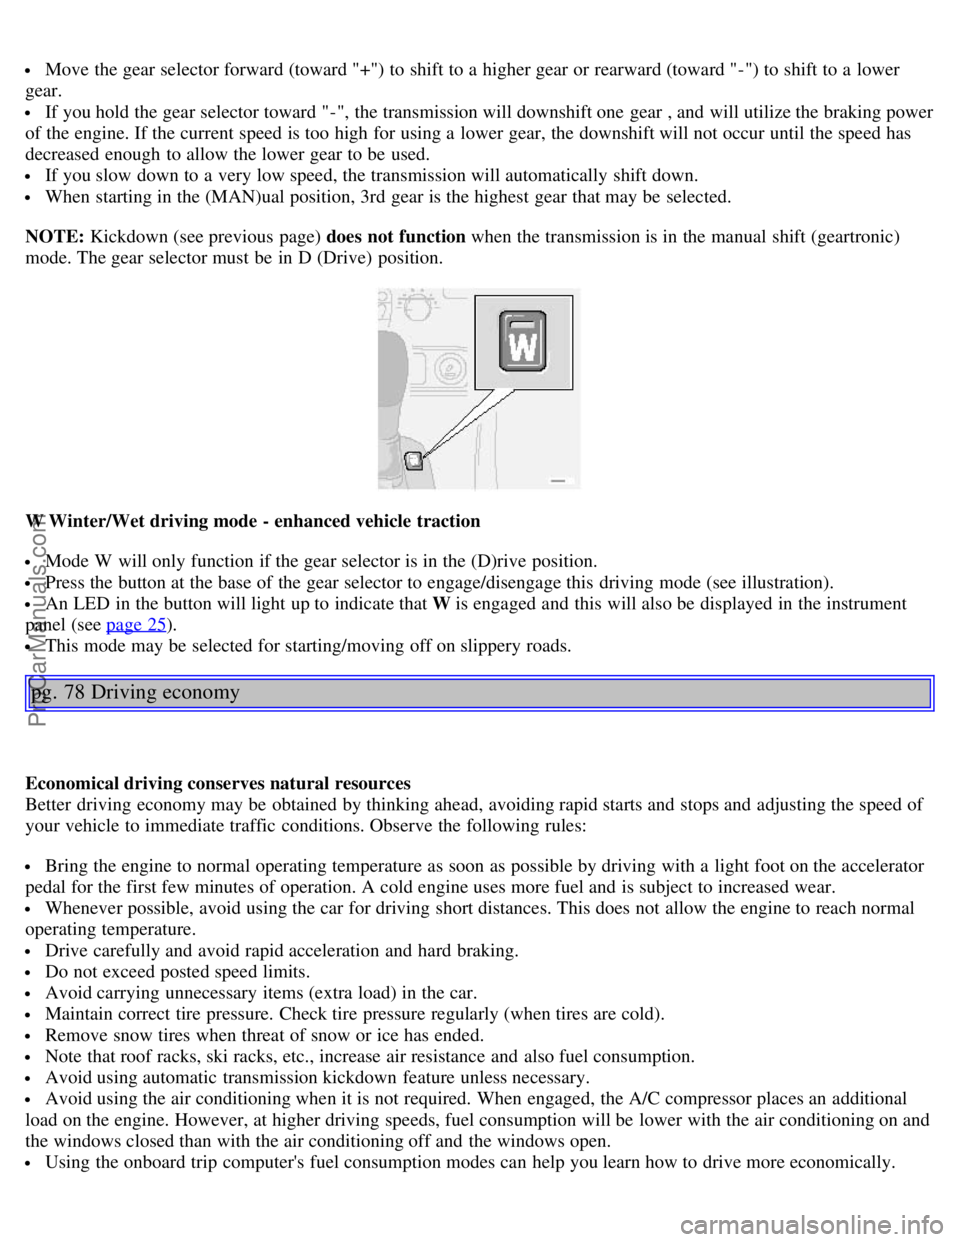
W Winter/Wet driving mode - enhanced vehicle traction
Mode W will only function if the gear selector is in the (D)rive position.
Press the button at the base of the gear selector to engage/disengage this driving mode (see illustration).
An LED in the button will light up to indicate that W is engaged and this will also be displayed in the instrument
panel (see page 25
).
This mode may be selected for starting/moving off on slippery roads.
pg. 78 Driving economy
Economical driving conserves natural resources
Better driving economy may be obtained by thinking ahead, avoiding rapid starts and stops and adjusting the speed of
your vehicle to immediate traffic conditions. Observe the following rules:
Bring the engine to normal operating temperature as soon as possible by driving with a light foot on the accelerator
pedal for the first few minutes of operation. A cold engine uses more fuel and is subject to increased wear.
Whenever possible, avoid using the car for driving short distances. This does not allow the engine to reach normal
operating temperature.
Drive carefully and avoid rapid acceleration and hard braking.
Do not exceed posted speed limits.
Avoid carrying unnecessary items (extra load) in the car.
Maintain correct tire pressure. Check tire pressure regularly (when tires are cold).
Remove snow tires when threat of snow or ice has ended.
Note that roof racks, ski racks, etc., increase air resistance and also fuel consumption.
Avoid using automatic transmission kickdown feature unless necessary.
Avoid using the air conditioning when it is not required. When engaged, the A/C compressor places an additional
load on the engine. However, at higher driving speeds, fuel consumption will be lower with the air conditioning on and
the windows closed than with the air conditioning off and the windows open.
Using the onboard trip computer's fuel consumption modes can help you learn how to drive more economically.
ProCarManuals.com
Page 58 of 109
Other factors that decrease gas mileage are:
Dirty air cleaner
Dirty engine oil and clogged oil filter
Dragging brakes
Incorrect front end alignment
Some of the above mentioned items and others are checked at the standard Maintenance Service intervals.
NOTE : Vehicles equipped with automatic transmissions should use (D)rive as often as possible and avoid using
"kickdown" to help improve fuel economy.
Cooling system
The risk for engine overheating is greatest, especially in hot weather, when:
Towing a trailer up steep inclines for prolonged periods at wide open throttle and low engine rpm.
Stopping the engine suddenly after high speed driving (so-called "after-boiling" can occur).
To avoid overheating, the following rules should be followed:
Do not drive for prolonged periods at engine speeds above 4500 rpm if you are towing a trailer in hilly terrain.
Reduce speed when towing a trailer up long, steep inclines. The risk of overheating can be reduced by switching off
the air conditioning system for a short time.
Do not let the engine idle unnecessarily for prolonged periods.
Do not mount auxiliary lamps in front of the grill.
When the risk of overheating is imminent, or in the event of overheating (the temperature gauge goes repeatedly into,
or stays continually in, the red section), the following precautions should be taken:
Switch off the air conditioning system.
Pull off the road, away from traffic, stop the car and put the gear selector into Park. Do not stop the engine!
Switch the heater to full (maximum) position. Increase the engine speed to approx. 2000 rpm (twice idling speed)
until the temperature begins to drop.
If the warning light in the center of the instrument panel is red, and the message "Coolant level lo stop engine" is
displayed, switch off the engine as soon as possible.
WARNING!
Do not remove coolant expansion tank cap. The coolant will be extremely hot.
If necessary, see page 116
for information on checking and topping-up the coolant level.
Contents | Top of Page
ProCarManuals.com
Page 69 of 109
Fuse box in the passenger compartment
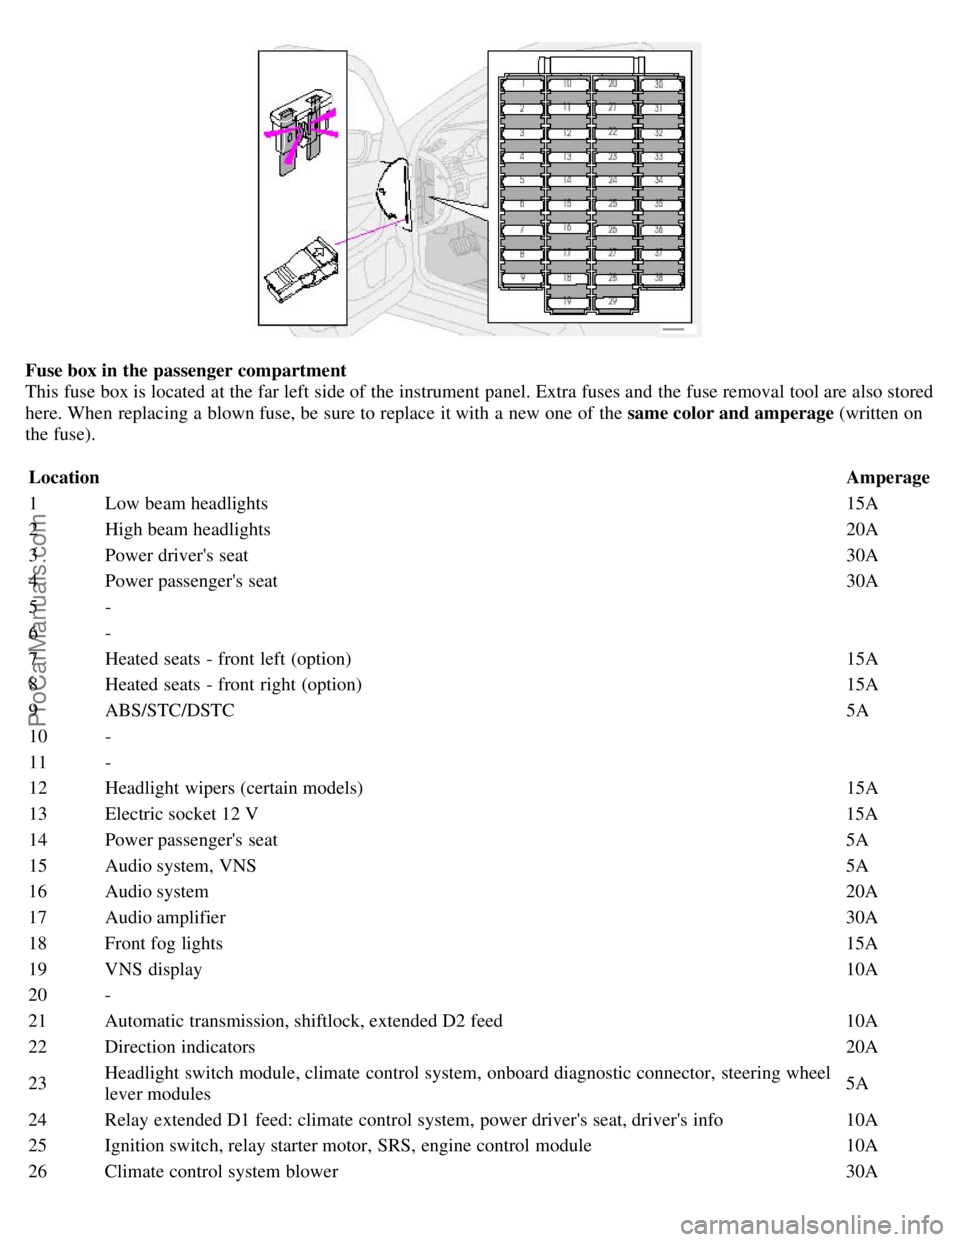
This fuse box is located at the far left side of the instrument panel. Extra fuses and the fuse removal tool are also stored
here. When replacing a blown fuse, be sure to replace it with a new one of the same color and amperage (written on
the fuse).
Location Amperage
1 Low beam headlights 15A
2 High beam headlights 20A
3 Power driver's seat 30A
4 Power passenger's seat 30A
5 -
6 -
7 Heated seats - front left (option) 15A
8 Heated seats - front right (option) 15A
9 ABS/STC/DSTC 5A
10 -
11 -
12 Headlight wipers (certain models) 15A
13 Electric socket 12 V 15A
14 Power passenger's seat 5A
15 Audio system, VNS 5A
16 Audio system 20A
17 Audio amplifier 30A
18 Front fog lights 15A
19 VNS display 10A
20 -
21 Automatic transmission, shiftlock, extended D2 feed 10A
22 Direction indicators 20A
23 Headlight switch module, climate control system, onboard diagnostic connector, steering wheel
lever modules 5A
24 Relay extended D1 feed: climate control system, power driver's seat, driver's info 10A
25 Ignition switch, relay starter motor, SRS, engine control module 10A
26 Climate control system blower 30A
ProCarManuals.com
Page 87 of 109
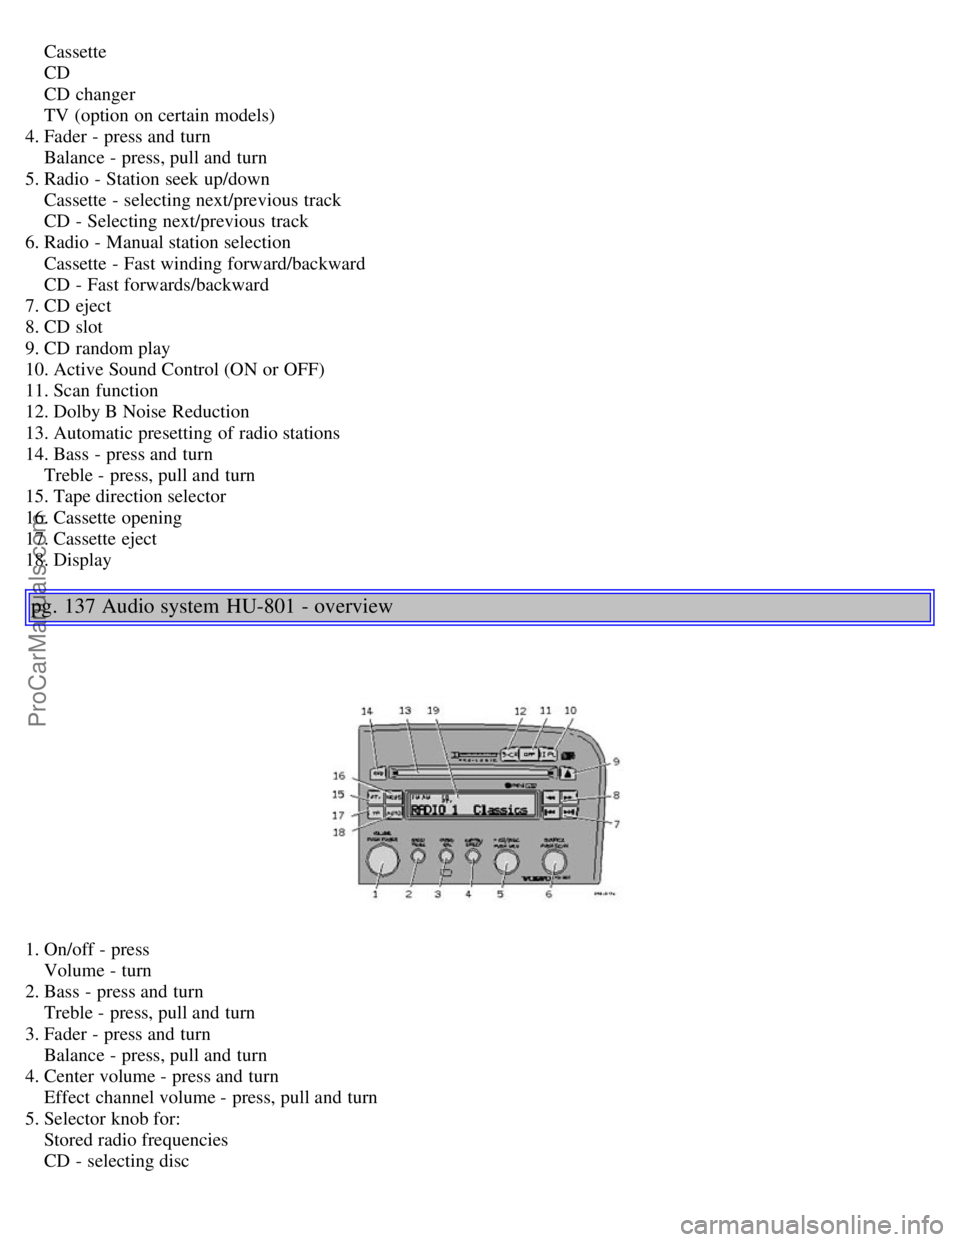
Cassette
CD
CD changer
TV (option on certain models)
4. Fader - press and turn
Balance - press, pull and turn
5. Radio - Station seek up/down
Cassette - selecting next/previous track
CD - Selecting next/previous track
6. Radio - Manual station selection
Cassette - Fast winding forward/backward
CD - Fast forwards/backward
7. CD eject
8. CD slot
9. CD random play
10. Active Sound Control (ON or OFF)
11. Scan function
12. Dolby B Noise Reduction
13. Automatic presetting of radio stations
14. Bass - press and turn
Treble - press, pull and turn
15. Tape direction selector
16. Cassette opening
17. Cassette eject
18. Display
pg. 137 Audio system HU-801 - overview
1. On/off - press
Volume - turn
2. Bass - press and turn
Treble - press, pull and turn
3. Fader - press and turn
Balance - press, pull and turn
4. Center volume - press and turn
Effect channel volume - press, pull and turn
5. Selector knob for:
Stored radio frequencies
CD - selecting disc
ProCarManuals.com
Page 88 of 109
6. Selector knob:
Radio
Internal CD changer
CD
Station scan - press
TV (option on certain models)
External CD changer (option)
7. Radio - Station seek up/down
CD - Selecting next/previous track
8. Radio - Manual station selection
CD - Fast forward/backward
9. CD eject
10. Dolby Pro Logic - switching on
11. 2 channel stereo
12 3 channel stereo
13. CD slot
14. CD random play
15. Program type
16. News
17. Traffic information
18. Automatic presetting of radio stations
19. Display
pg. 138 Audio systems HU-611/HU-801
Switch on/off
Press the knob to switch on or turn off the radio.
Volume control
Turn the knob clockwise to increase volume. Volume control is electronic and does not have an end stop. If you have
a key pad in the steering wheel, increase or decrease the volume with the + or- buttons.
Bass
Adjust the bass by pressing the button to extend the control and turning it to the left (less bass) or to the right (more
ProCarManuals.com
Page 89 of 109
bass). A "detent" indicates "equalized" bass. Press the button back in when you have made the adjustment.
Treble
Adjust the treble by pressing the button to extend the control, pulling it out as far as possible, and then turning it to the
left (less treble) or to the right (more treble). A "detent" indicates "equalized" treble. Press the button back in when you
have made the adjustment.
Band selector
Turn "SOURCE" knob to select FM or AM. The station and wavelength are displayed. You can also select cassette
deck, CD or optional CD changer with this knob.
Active sound control (ASC)
The ASC (Active Sound Control) automatically adapts volume to vehicle speed.
Press the ASC button (HU-611) or the PTY button (HU-801) for several seconds to switch this function ON or OFF.
This function is included in the Advanced User Mode on the HU -801 equipped with this feature. "ASC ON" or "ASC
OFF" will be shown in the display for several seconds.
pg. 139 Audio systems HU-611/HU-801
Fader - Balance front/rear
Adjust front/rear speaker balance by pressing the button to extend the control and turning it to the left (more sound
from the rear speakers) or to the right (more sound from the front speakers). A "detent" indicates "equalized" balance.
Press the button back in when you have made the adjustment.
Balance right/left
Adjust left/right speaker balance by pressing the button to extend the control, pulling it out as far as possible and then
turning it to the left (more sound from the left speakers) or to the right (more sound from the right speakers). A
"detent" indicates "equalized" balance. Press the button back in when you have made the adjustment.
ProCarManuals.com