trailer VOLVO S80 2005 Owners Manual
[x] Cancel search | Manufacturer: VOLVO, Model Year: 2005, Model line: S80, Model: VOLVO S80 2005Pages: 123, PDF Size: 2.33 MB
Page 22 of 123
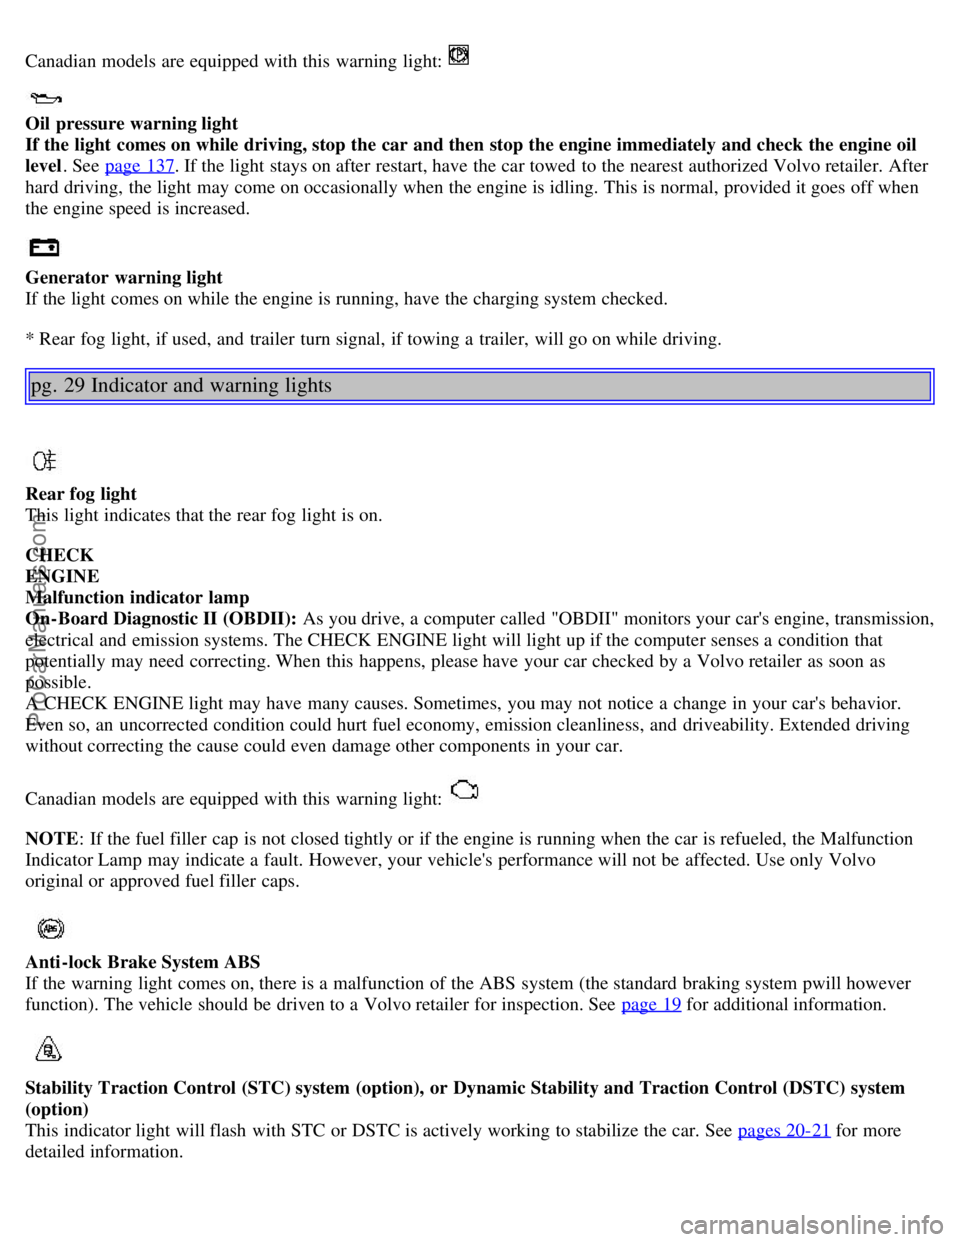
Canadian models are equipped with this warning light:
Oil pressure warning light
If the light comes on while driving, stop the car and then stop the engine immediately and check the engine oil
level . See page 137
. If the light stays on after restart, have the car towed to the nearest authorized Volvo retailer. After
hard driving, the light may come on occasionally when the engine is idling. This is normal, provided it goes off when
the engine speed is increased.
Generator warning light
If the light comes on while the engine is running, have the charging system checked.
* Rear fog light, if used, and trailer turn signal, if towing a trailer, will go on while driving.
pg. 29 Indicator and warning lights
Rear fog light
This light indicates that the rear fog light is on.
CHECK
ENGINE
Malfunction indicator lamp
On-Board Diagnostic II (OBDII): As you drive, a computer called "OBDII" monitors your car's engine, transmission,
electrical and emission systems. The CHECK ENGINE light will light up if the computer senses a condition that
potentially may need correcting. When this happens, please have your car checked by a Volvo retailer as soon as
possible.
A CHECK ENGINE light may have many causes. Sometimes, you may not notice a change in your car's behavior.
Even so, an uncorrected condition could hurt fuel economy, emission cleanliness, and driveability. Extended driving
without correcting the cause could even damage other components in your car.
Canadian models are equipped with this warning light:
NOTE : If the fuel filler cap is not closed tightly or if the engine is running when the car is refueled, the Malfunction
Indicator Lamp may indicate a fault. However, your vehicle's performance will not be affected. Use only Volvo
original or approved fuel filler caps.
Anti-lock Brake System ABS
If the warning light comes on, there is a malfunction of the ABS system (the standard braking system pwill however
function). The vehicle should be driven to a Volvo retailer for inspection. See page 19
for additional information.
Stability Traction Control (STC) system (option), or Dynamic Stability and Traction Control (DSTC) system
(option)
This indicator light will flash with STC or DSTC is actively working to stabilize the car. See pages 20-21
for more
detailed information.
ProCarManuals.com
Page 23 of 123
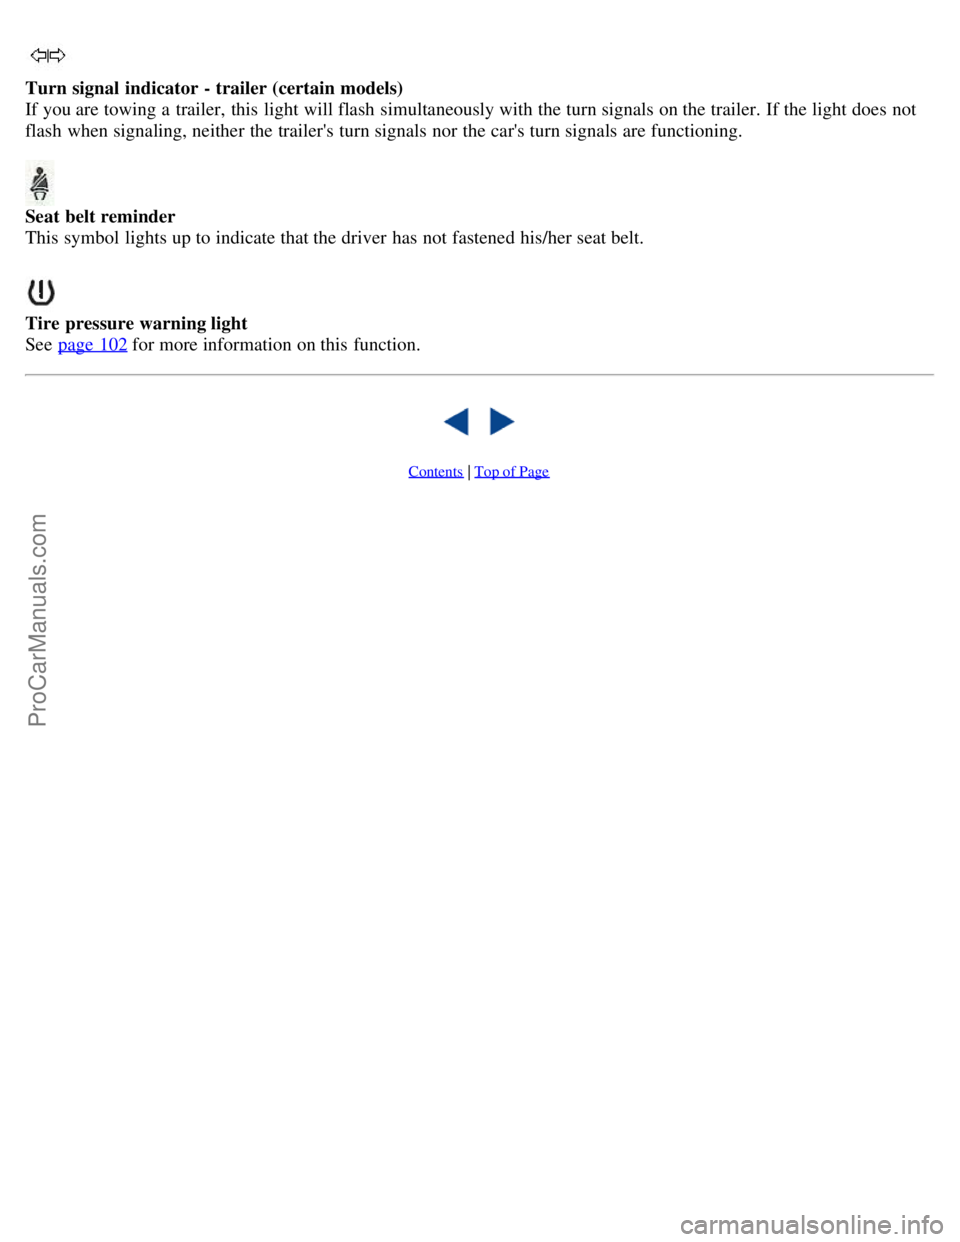
Turn signal indicator - trailer (certain models)
If you are towing a trailer, this light will flash simultaneously with the turn signals on the trailer. If the light does not
flash when signaling, neither the trailer's turn signals nor the car's turn signals are functioning.
Seat belt reminder
This symbol lights up to indicate that the driver has not fastened his/her seat belt.
Tire pressure warning light
See page 102
for more information on this function.
Contents | Top of Page
ProCarManuals.com
Page 50 of 123
2 0 0 5
VOLVO S80
Chapter 6 - Starting and driving
pg. 71 Starting and driving
Fuel requirements72
Refueling74
Starting the engine75
Automatic transmission76
Four-C active chassis system82
Front/rear park assist83
Driving economy84
Points to remember85
Roof racks/load carriers86
Emergency towing87
Vehicle towing information88
Towing a trailer89
Detachable trailer hitch90
Jump starting92
Winter driving93
Long distance trips94
Three-way catalytic converter95
All Wheel Drive (AWD)96
pg. 72 Fuel requirements
Fuel requirements
ProCarManuals.com
Page 55 of 123
Never engage R while the car is moving.
N (Neutral)
Neutral - no gear engaged. Use the parking brake.
D (Drive)
D is the normal driving position and should be used as often as possible to help improve fuel economy. The car should
not be moving when shifting from R to the D position.
3 (Intermediate gear)
The transmission will shift automatically between gears 3, 2 or 1 from this position. The transmission cannot shift up
to (D)rive from third gear.
2 (Intermediate gear)
The transmission will shift automatically between gears 2 and 1 from this position. The transmission cannot shift up
to third gear from second gear.
1 (Low gear)
If you select this gear at speeds above 30 mph (50 km/h), the transmission will first shift to second gear and then to
first gear at lower speeds.
NOTE: The intermediate and low gears can be used for:
Driving in a mountainous area
Towing a trailer
Increasing the braking effect of the engine.
The transmission has a built-in limiter designed to help prevent excessive engine speeds (high rpm) when gears 3, 2
or 1 are selected.
Kickdown
Automatic shift to a lower gear (kickdown) is achieved by depressing the accelerator pedal fully and briskly. An
upshift will occur when approaching the top speed for a particular gear or by releasing the accelerator pedal slightly.
Kickdown can be used for maximum acceleration or when passing at highway speeds.
Automatic transmission - adaptive system
The automatic transmission is controlled by an adaptive system that constantly monitors the way in which the
transmission functions. It senses and adapts each gear shift for optimal performance.
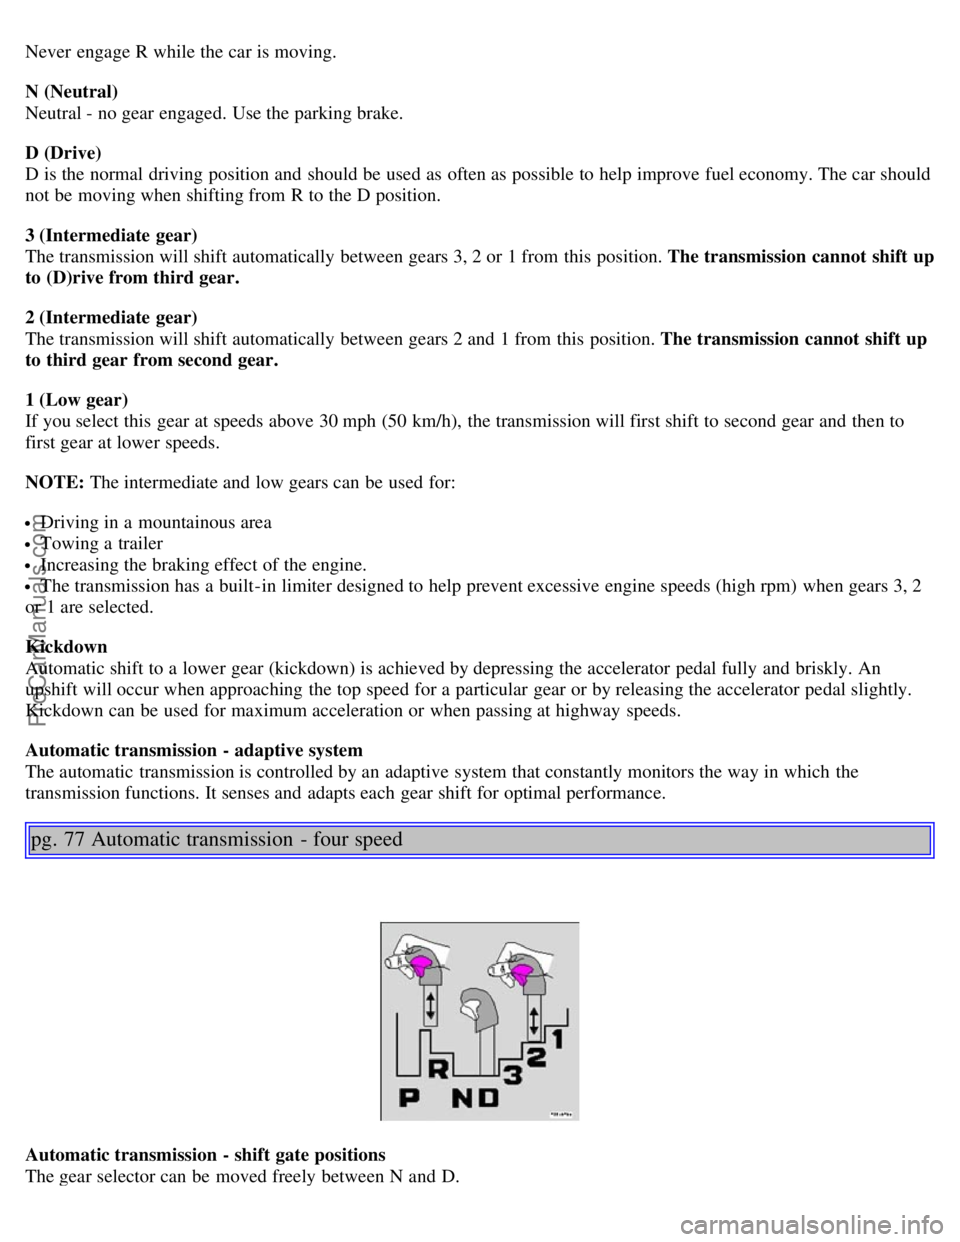
pg. 77 Automatic transmission - four speed
Automatic transmission - shift gate positions
The gear selector can be moved freely between N and D.
ProCarManuals.com
Page 57 of 123
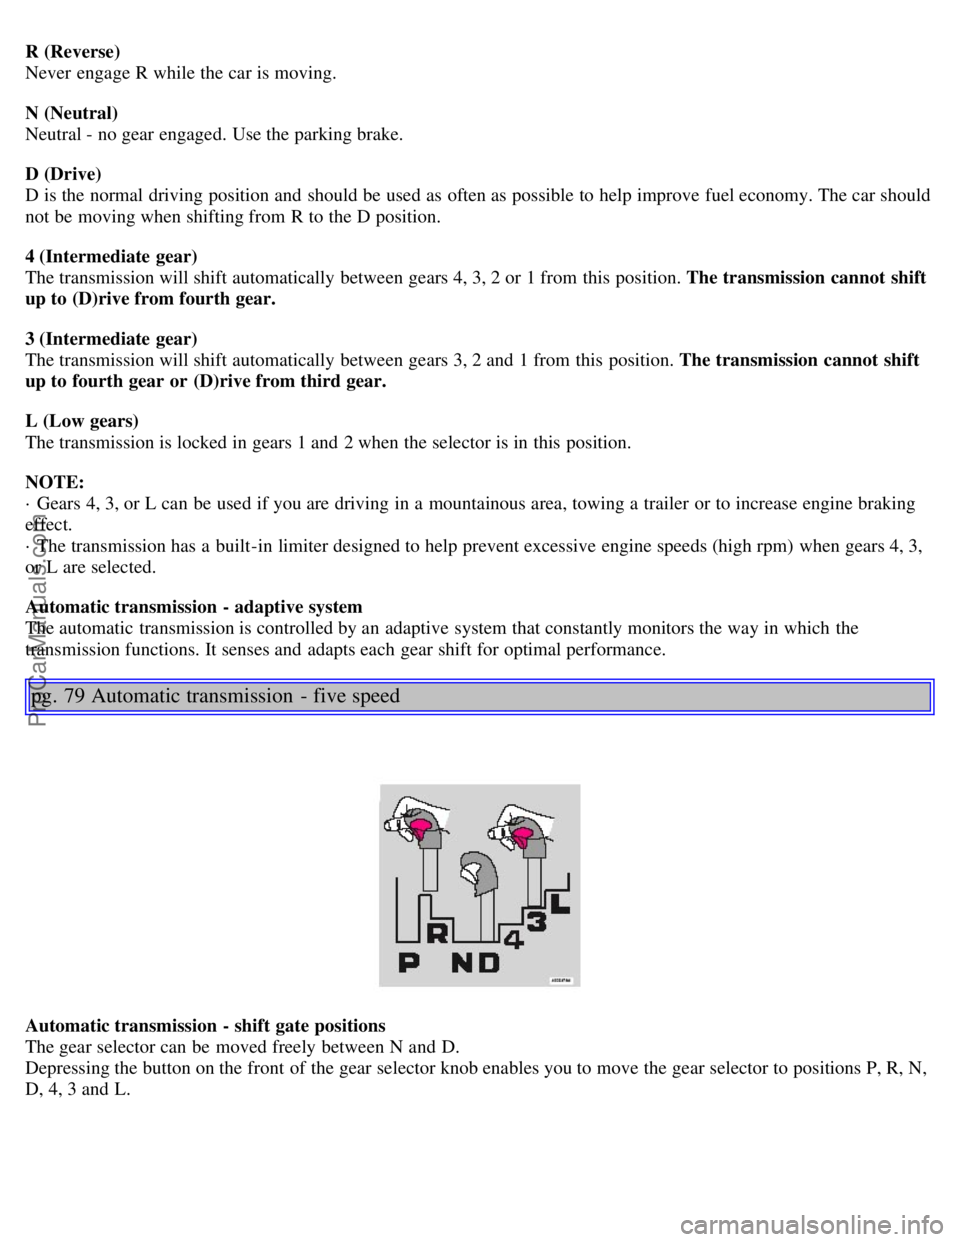
R (Reverse)
Never engage R while the car is moving.
N (Neutral)
Neutral - no gear engaged. Use the parking brake.
D (Drive)
D is the normal driving position and should be used as often as possible to help improve fuel economy. The car should
not be moving when shifting from R to the D position.
4 (Intermediate gear)
The transmission will shift automatically between gears 4, 3, 2 or 1 from this position. The transmission cannot shift
up to (D)rive from fourth gear.
3 (Intermediate gear)
The transmission will shift automatically between gears 3, 2 and 1 from this position. The transmission cannot shift
up to fourth gear or (D)rive from third gear.
L (Low gears)
The transmission is locked in gears 1 and 2 when the selector is in this position.
NOTE:
· Gears 4, 3, or L can be used if you are driving in a mountainous area, towing a trailer or to increase engine braking
effect.
· The transmission has a built-in limiter designed to help prevent excessive engine speeds (high rpm) when gears 4, 3,
or L are selected.
Automatic transmission - adaptive system
The automatic transmission is controlled by an adaptive system that constantly monitors the way in which the
transmission functions. It senses and adapts each gear shift for optimal performance.
pg. 79 Automatic transmission - five speed
Automatic transmission - shift gate positions
The gear selector can be moved freely between N and D.
Depressing the button on the front of the gear selector knob enables you to move the gear selector to positions P, R, N,
D, 4, 3 and L.
ProCarManuals.com
Page 62 of 123
· Press the Park assist button on the center console (see page 31) to temporarily deactivate the system(s).
· The indicator light in the button will go out when the system(s) have been deactivated.
· If the vehicle is equipped with front and rear park assist, both systems will be deactivated by pressing the button.
NOTE:
It may be necessary to deactivate one or both of the park assist systems in certain cases.
· Rear park assist: towing a trailer, carrying bicycles in a rear-mounted carrier, etc, could trigger the rear park assist
system's sensors.
· Front park assist: it may not be possible to combine auxiliary headlights and front park assist since these lights
could trigger the system's sensors.
Faults in the system
If a fault should occur in the system, the LED in the button will be switched off and a message will be displayed in the
text window.
Cleaning the sensors
For the system to function properly, the sensors in the front and/or rear bumpers should be kept clean. They can be
cleaned with car washing detergent and a sponge.
WARNING!
These systems are designed to be a supplementary aid when parking the vehicle. They are not, however, intended to
replace the driver's attention and judgement.
pg. 84 Driving economy
Economical driving conserves natural resources
Better driving economy may be obtained by thinking ahead, avoiding rapid starts and stops and adjusting the speed of
your vehicle to immediate traffic conditions. Observe the following rules:
Bring the engine to normal operating temperature as soon as possible by driving with a light foot on the accelerator
pedal for the first few minutes of operation. A cold engine uses more fuel and is subject to increased wear.
Whenever possible, avoid using the car for driving short distances. This does not allow the engine to reach normal
operating temperature.
Drive carefully and avoid rapid acceleration and hard braking.
Do not exceed posted speed limits.
Avoid carrying unnecessary items (extra load) in the car.
Maintain correct tire pressure. Check tire pressure regularly (when tires are cold).
Remove snow tires when threat of snow or ice has ended.
Note that roof racks, ski racks, etc., increase air resistance and also fuel consumption.
Avoid using automatic transmission kickdown feature unless necessary.
Avoid using the air conditioning when it is not required. When engaged, the A/C compressor places an additional
load on the engine. However, at higher driving speeds, fuel consumption will be lower with the air conditioning on and
the windows closed than with the air conditioning off and the windows open.
Using the onboard trip computer's fuel consumption modes can help you learn how to drive more economically.
Other factors that decrease gas mileage are:
Dirty air cleaner
Dirty engine oil and clogged oil filter
Dragging brakes
Incorrect front end alignment
Some of the above mentioned items and others are checked at the standard Maintenance Service intervals.
ProCarManuals.com
Page 63 of 123
NOTE: Vehicles equipped with automatic transmissions should use (D)rive as often as possible and avoid using
"kickdown" to help improve fuel economy.
Cooling system
The risk for engine overheating is greatest, especially in hot weather, when:
Towing a trailer up steep inclines for prolonged periods at wide open throttle and low engine rpm.
Stopping the engine suddenly after high speed driving (so-called "after-boiling" can occur).
To avoid overheating, the following rules should be followed:
Do not drive for prolonged periods at engine speeds above 4500 rpm if you are towing a trailer in hilly terrain.
Reduce speed when towing a trailer up long, steep inclines. The risk of overheating can be reduced by switching off
the air conditioning system for a short time.
Do not let the engine idle unnecessarily for prolonged periods.
Do not mount auxiliary lamps in front of the grill.
When the risk of overheating is imminent, or in the event of overheating (the temperature gauge goes repeatedly into,
or stays continually in, the red section), the following precautions should be taken:
Switch off the air conditioning system.
Pull off the road, away from traffic, stop the car and put the gear selector into Park. Do not stop the engine!
Switch the heater to full (maximum) position. Increase the engine speed to approx. 2000 rpm (twice idling speed)
until the temperature begins to drop.
If the warning light in the center of the instrument panel is red, and the message "Coolant level low stop engine" is
displayed, switch off the engine as soon as possible.
WARNING!
Do not remove coolant expansion tank cap. The coolant will be extremely hot.
If necessary, see page 132
for information on checking and topping-up the coolant level.
Contents | Top of Page
ProCarManuals.com
Page 72 of 123
![VOLVO S80 2005 Owners Manual Metric tires]. Increasing the inflation pressure beyond this pressure will not increase the tires load carrying capability.
• Extra load: A class of P-metric or Metric tires designed to carry a VOLVO S80 2005 Owners Manual Metric tires]. Increasing the inflation pressure beyond this pressure will not increase the tires load carrying capability.
• Extra load: A class of P-metric or Metric tires designed to carry a](/img/45/58528/w960_58528-71.png)
Metric tires]. Increasing the inflation pressure beyond this pressure will not increase the tires load carrying capability.
• Extra load: A class of P-metric or Metric tires designed to carry a heavier maximum load at 41 psi [43 psi (2.9 bar)
for Metric tires]. Increasing the inflation pressure beyond this pressure will not increase the tires load carrying
capability.
• kPa: Kilopascal, a metric unit of air pressure.
• PSI: Pounds per square inch, a standard unit of air pressure.
• B-pillar: The structural member at the side of the vehicle behind the front door.
• Bead area of the tire: Area of the tire next to the rim.
• Sidewall of the tire: Area between the bead area and the tread.
• Tread area of the tire: Area of the perimeter of the tire that contacts the road when mounted on the vehicle.
• Rim: The metal support (wheel) for a tire or a tire and tube assembly upon which the tire beads are seated.
• Maximum load rating: a figure indicating the maximum load in pounds and kilograms that can be carried by the
tire. This rating is established by the tire manufacturer.
• Maximum permissible inflation pressure: the greatest amount of air pressure that should ever be put in the tire.
This limit is set by the tire manufacturer.
• Recommended tire inflation pressure: inflation pressure, established by Volvo, which is based on the type of tires
that are mounted on a vehicle at the factory. This inflation pressure is affected by the number of occupants in the car,
the amount of cargo, and the speed at which the vehicle will be driven for a prolonged period. This information can be
found on the tire inflation placard(s) located on the driver's side B-pillar or on the inside of the fuel filler door on
Canadian models, and in the tire inflation table in this chapter.
• Cold tires: The tires are considered to be cold when they have the same temperature as the surrounding (ambient)
air. This temperature is normally reached after the car has been parked for at least 3 hours.
pg. 106 Wheels and tires
Vehicle loading
Properly loading your vehicle will provide maximum return of vehicle design performance.
Before loading your vehicle, familiarize yourself with the following terms for determining your vehicle's weight
ratings, with or without a trailer, from the vehicle's Federal/Canadian Motor Vehicle Safety Standards
(FMVSS/CMVSS) label, and the vehicle's tire information placard:
Curb weight
The weight of the vehicle including a full tank of fuel and all standard equipment. It does not include passengers,
cargo, or optional equipment.
Capacity weight
All weight added to the curb weight, including cargo and optional equipment. When towing, trailer hitch tongue load
is also part of cargo weight.
ProCarManuals.com
Page 73 of 123
NOTE: For trailer towing information, please refer to the section "Towing a trailer" on page 89.
Permissible axle weight
The maximum allowable weight that can be carried by a single axle (front or rear). These numbers are shown on the
Federal/Canadian Motor Vehicle Safety Standards (FMVSS/CMVSS) label. The total load on each axle must never
exceed its maximum permissible weight.
Gross vehicle weight (GVW)
The vehicle's curb weight + cargo + passengers.
NOTE:
• The location of the various labels in your vehicle can be found on page 144
.
• A table listing important weight limits for your vehicle can be found on page 145
.
Steps for Determining Correct Load Limit
(1) Locate the statement "the combined weight of occupants and cargo should never exceed XXX pounds" on your
vehicle's placard.
(2) Determine the combined weight of the driver and passengers that will be riding in your vehicle.
(3) Subtract the combined weight of the driver and passengers from XXX kilograms or XXX pounds.
(4) The resulting figure equals the available amount of cargo and luggage load capacity. For example, if the "XXX"
amount equals 1400 lbs. and there will be five 150 lb. passengers in your vehicle, the amount of available cargo and
luggage load capacity is 650 lbs. (1400-750 (5 x 150) = 650 lbs.)
(5) Determine the combined weight of luggage and cargo being loaded on the vehicle. That weight may not safely
exceed the available cargo and luggage load capacity calculated in Step 4.
(6) If your vehicle will be towing a trailer, load from your trailer will be transferred to your vehicle. Consult this
manual
1 to determine how this reduces the available cargo and luggage load capacity of your vehicle.
WARNING!
- Exceeding the permissible axle weight, gross vehicle weight, or any other weight rating limits can cause tire
overheating resulting in permanent deformation or catastrophic failure.
- Do not use replacement tires with lower load carrying capacities than the tires that were original equipment on the
vehicle because this will lower the vehicle's GVW rating. Replacement tires with a higher limit than the originals do
not increase the vehicle's GVW rating limitations.
1 See "Towing a trailer" on page 89.
pg. 107 Wheels and tires
Uniform tire quality grading
ALL PASSENGER VEHICLE TIRES MUST CONFORM TO FEDERAL SAFETY REQUIREMENTS IN
ProCarManuals.com
Page 84 of 123
29-
30-
31 -
32 -
33 Vacuum pump 20A
34 Washer pump - headlight wipers (certain models) 15A
35 -
36 -
pg. 118 Fuses in the trunk
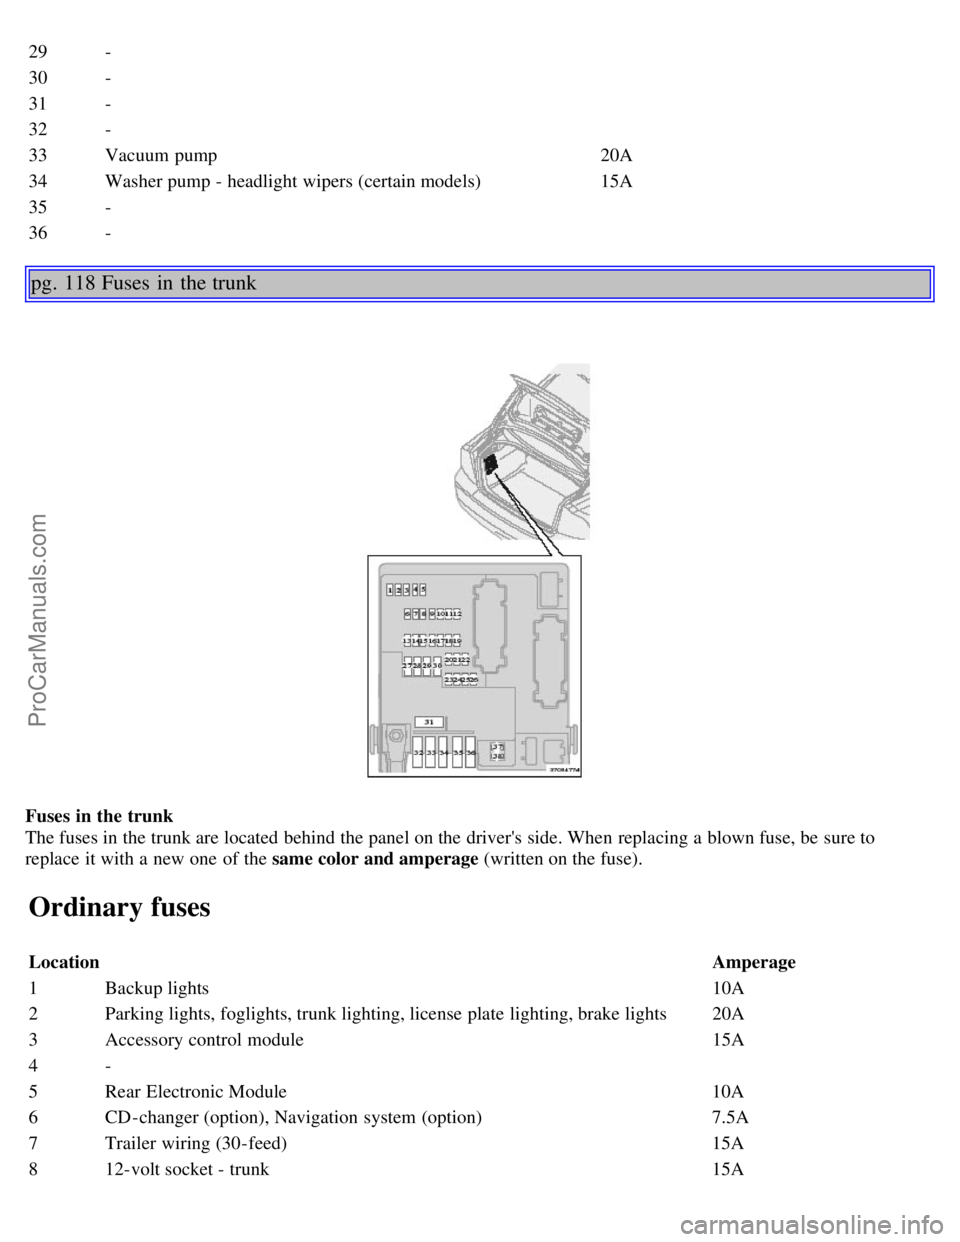
Fuses in the trunk
The fuses in the trunk are located behind the panel on the driver's side. When replacing a blown fuse, be sure to
replace it with a new one of the same color and amperage (written on the fuse).
Ordinary fuses
Location Amperage
1 Backup lights 10A
2 Parking lights, foglights, trunk lighting, license plate lighting, brake lights 20A
3 Accessory control module 15A
4 -
5 Rear Electronic Module 10A
6 CD-changer (option), Navigation system (option) 7.5A
7 Trailer wiring (30-feed) 15A
8 12-volt socket - trunk 15A
ProCarManuals.com