ECU VOLVO S80 2006 Owners Manual
[x] Cancel search | Manufacturer: VOLVO, Model Year: 2006, Model line: S80, Model: VOLVO S80 2006Pages: 122, PDF Size: 2.33 MB
Page 8 of 122
could cause injury in the event of an accident.
Seat belts lose much of their strength when exposed to violent stretching and should be replaced after any
collision, even if they appear to be undamaged.
Never repair the belt yourself; have this work done by an authorized Volvo service technician only.
Any device used to induce slack into the shoulder belt portion of the three-point belt system will have a
detrimental effect on the amount of protection available to you in the event of a collision.
The seat back should not be tilted too far back. The shoulder belt must be taut in order to function properly.
Do not use child safety seats or child booster cushions/backrests in the front passengerÕs seat. We also
recommend that children who have outgrown these devices sit in the rear seat with the seat belt properly fastened.
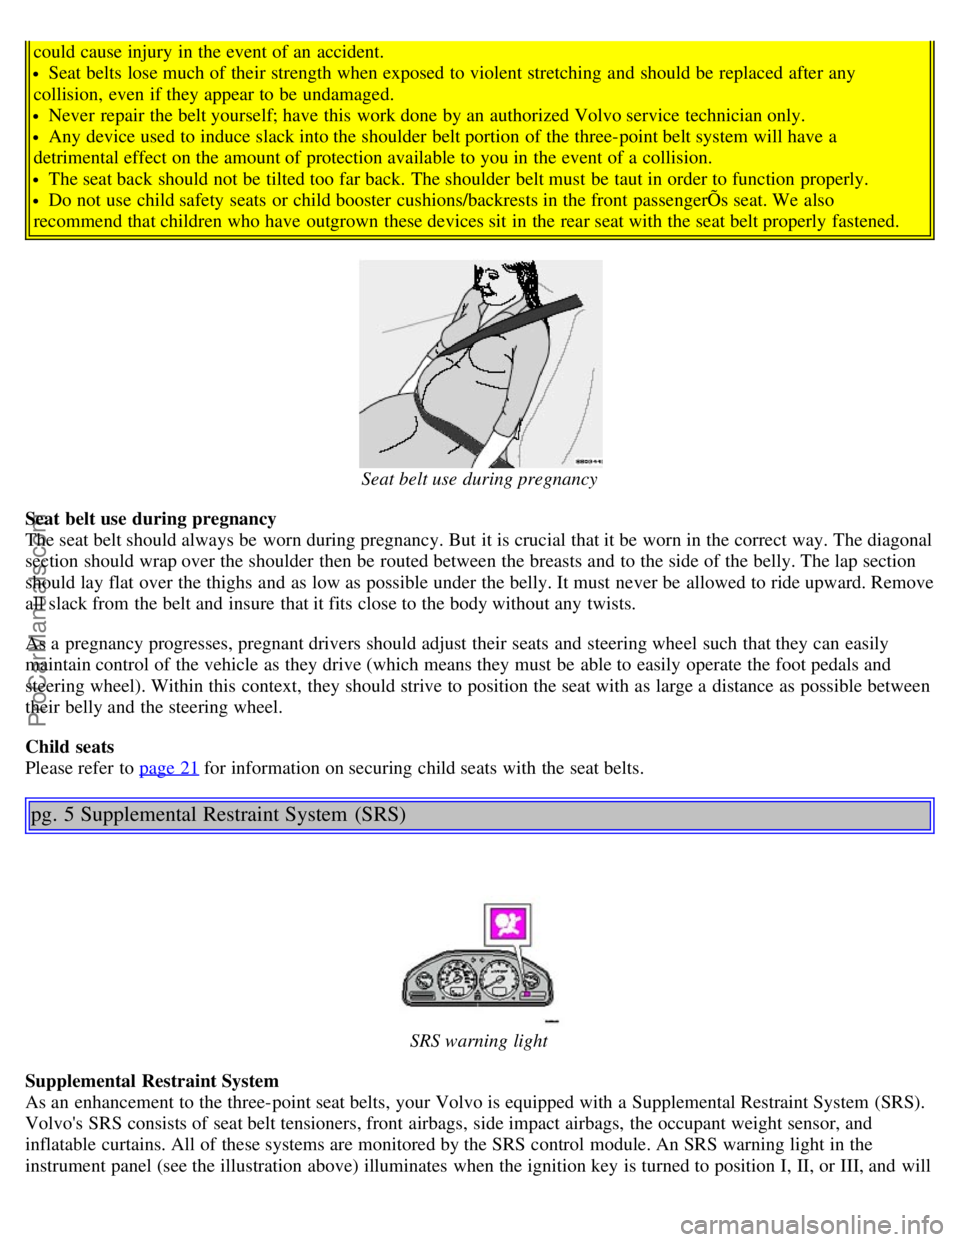
Seat belt use during pregnancy
Seat belt use during pregnancy
The seat belt should always be worn during pregnancy. But it is crucial that it be worn in the correct way. The diagonal
section should wrap over the shoulder then be routed between the breasts and to the side of the belly. The lap section
should lay flat over the thighs and as low as possible under the belly. It must never be allowed to ride upward. Remove
all slack from the belt and insure that it fits close to the body without any twists.
As a pregnancy progresses, pregnant drivers should adjust their seats and steering wheel such that they can easily
maintain control of the vehicle as they drive (which means they must be able to easily operate the foot pedals and
steering wheel). Within this context, they should strive to position the seat with as large a distance as possible between
their belly and the steering wheel.
Child seats
Please refer to page 21
for information on securing child seats with the seat belts.
pg. 5 Supplemental Restraint System (SRS)
SRS warning light
Supplemental Restraint System
As an enhancement to the three-point seat belts, your Volvo is equipped with a Supplemental Restraint System (SRS).
Volvo's SRS consists of seat belt tensioners, front airbags, side impact airbags, the occupant weight sensor, and
inflatable curtains. All of these systems are monitored by the SRS control module. An SRS warning light in the
instrument panel (see the illustration above) illuminates when the ignition key is turned to position I, II, or III, and will
ProCarManuals.com
Page 34 of 122
Adjust the backrest tilt to the most upright position
Lift the catches on the lower rear side of the backrest
Without releasing the catches, push the backrest forward
Move the seat as far forward as possible so that the head restraint slides under the glove compartment.
WARNING!
Cover sharp edges on the load to help prevent injury to occupants. Secure the load to help prevent shifting during
sudden stops.
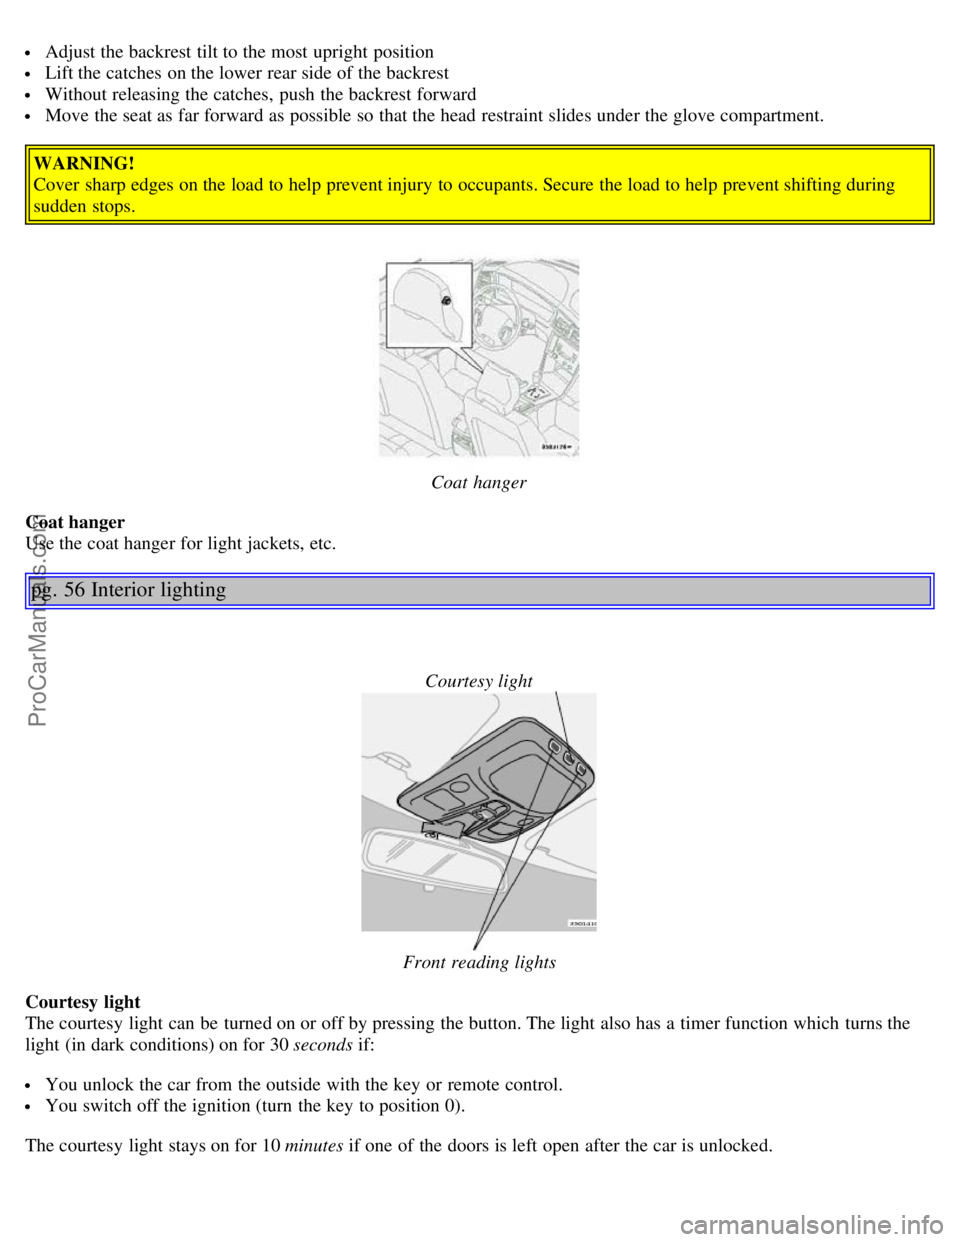
Coat hanger
Coat hanger
Use the coat hanger for light jackets, etc.
pg. 56 Interior lighting
Courtesy light
Front reading lights
Courtesy light
The courtesy light can be turned on or off by pressing the button. The light also has a timer function which turns the
light (in dark conditions) on for 30 seconds if:
You unlock the car from the outside with the key or remote control.
You switch off the ignition (turn the key to position 0).
The courtesy light stays on for 10 minutes if one of the doors is left open after the car is unlocked.
ProCarManuals.com
Page 37 of 122
Press button B to open the storage space in the center console for cassettes, accessory coin holder, etc.
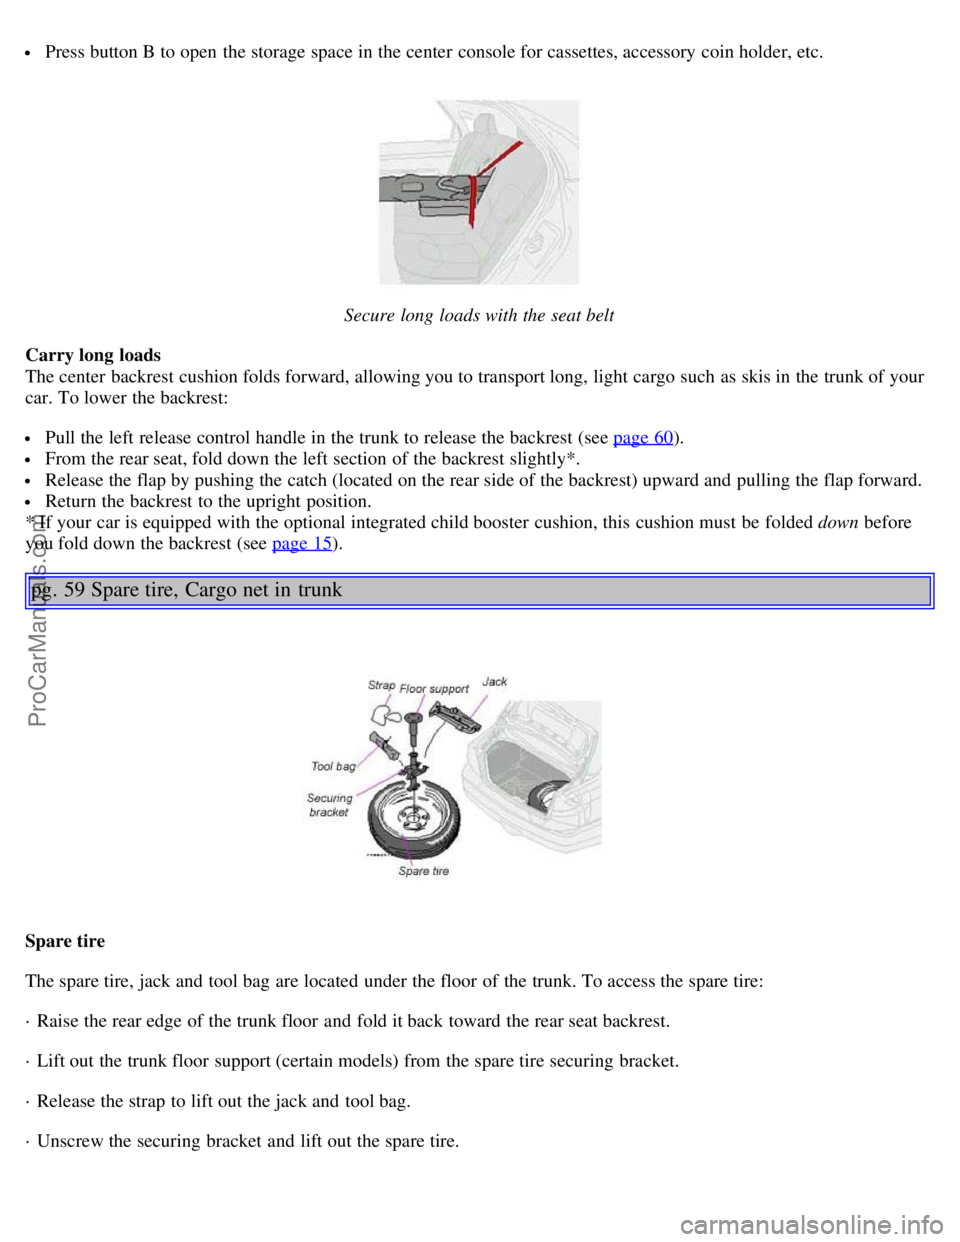
Secure long loads with the seat belt
Carry long loads
The center backrest cushion folds forward, allowing you to transport long, light cargo such as skis in the trunk of your
car. To lower the backrest:
Pull the left release control handle in the trunk to release the backrest (see page 60).
From the rear seat, fold down the left section of the backrest slightly*.
Release the flap by pushing the catch (located on the rear side of the backrest) upward and pulling the flap forward.
Return the backrest to the upright position.
* If your car is equipped with the optional integrated child booster cushion, this cushion must be folded down before
you fold down the backrest (see page 15
).
pg. 59 Spare tire, Cargo net in trunk
Spare tire
The spare tire, jack and tool bag are located under the floor of the trunk. To access the spare tire:
· Raise the rear edge of the trunk floor and fold it back toward the rear seat backrest.
· Lift out the trunk floor support (certain models) from the spare tire securing bracket.
· Release the strap to lift out the jack and tool bag.
· Unscrew the securing bracket and lift out the spare tire.
ProCarManuals.com
Page 38 of 122
· To return the spare tire to the trunk, follow the reverse procedure.
WARNING!
Make sure that the spare tire, jack and tool bag are properly secured with the securing bracket and strap to help keep
these components in place in the event of a sudden stop.
NOTE: See page 116
for information on how the jack should be used.
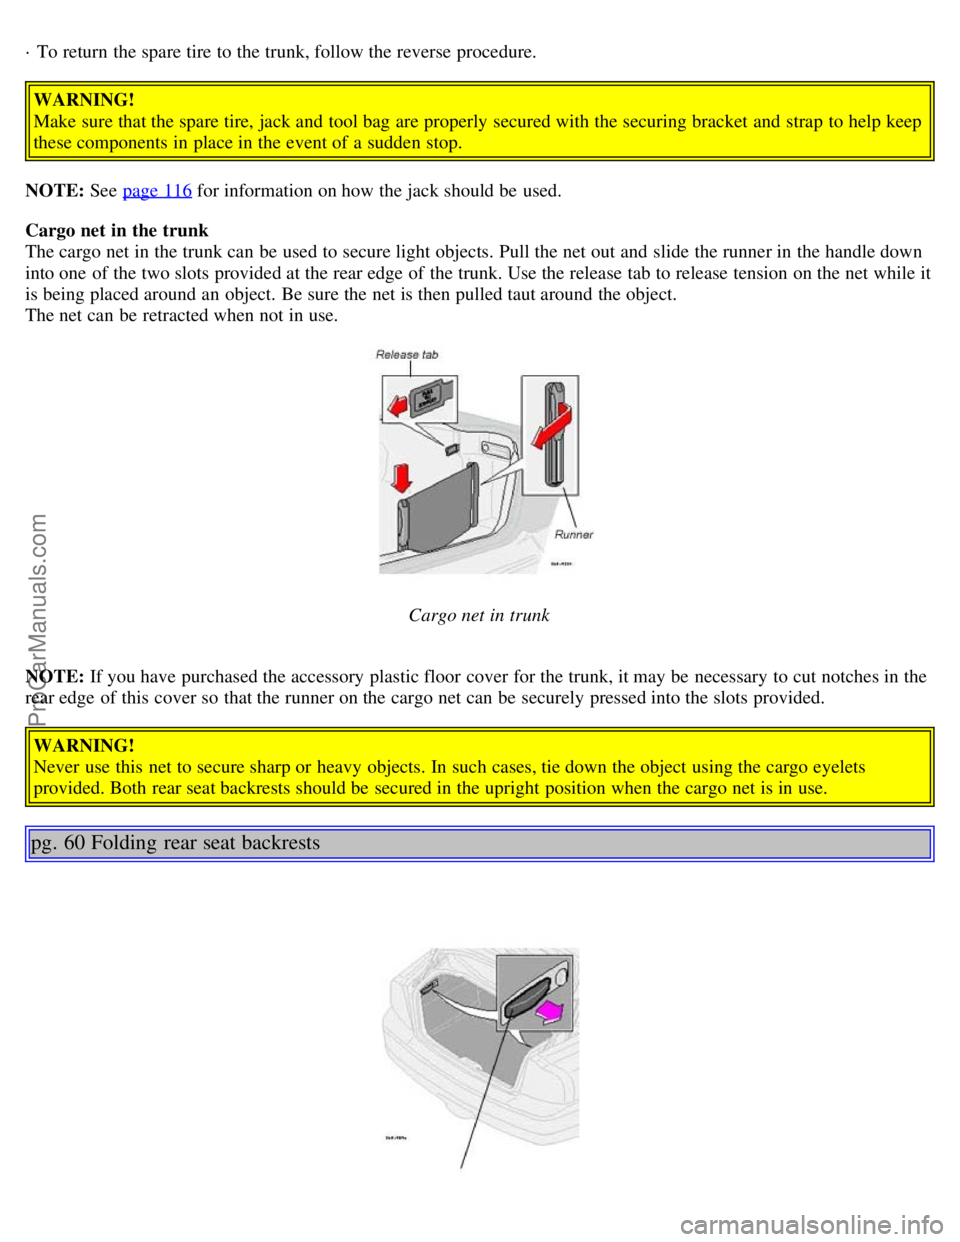
Cargo net in the trunk
The cargo net in the trunk can be used to secure light objects. Pull the net out and slide the runner in the handle down
into one of the two slots provided at the rear edge of the trunk. Use the release tab to release tension on the net while it
is being placed around an object. Be sure the net is then pulled taut around the object.
The net can be retracted when not in use.
Cargo net in trunk
NOTE: If you have purchased the accessory plastic floor cover for the trunk, it may be necessary to cut notches in the
rear edge of this cover so that the runner on the cargo net can be securely pressed into the slots provided.
WARNING!
Never use this net to secure sharp or heavy objects. In such cases, tie down the object using the cargo eyelets
provided. Both rear seat backrests should be secured in the upright position when the cargo net is in use.
pg. 60 Folding rear seat backrests
ProCarManuals.com
Page 39 of 122
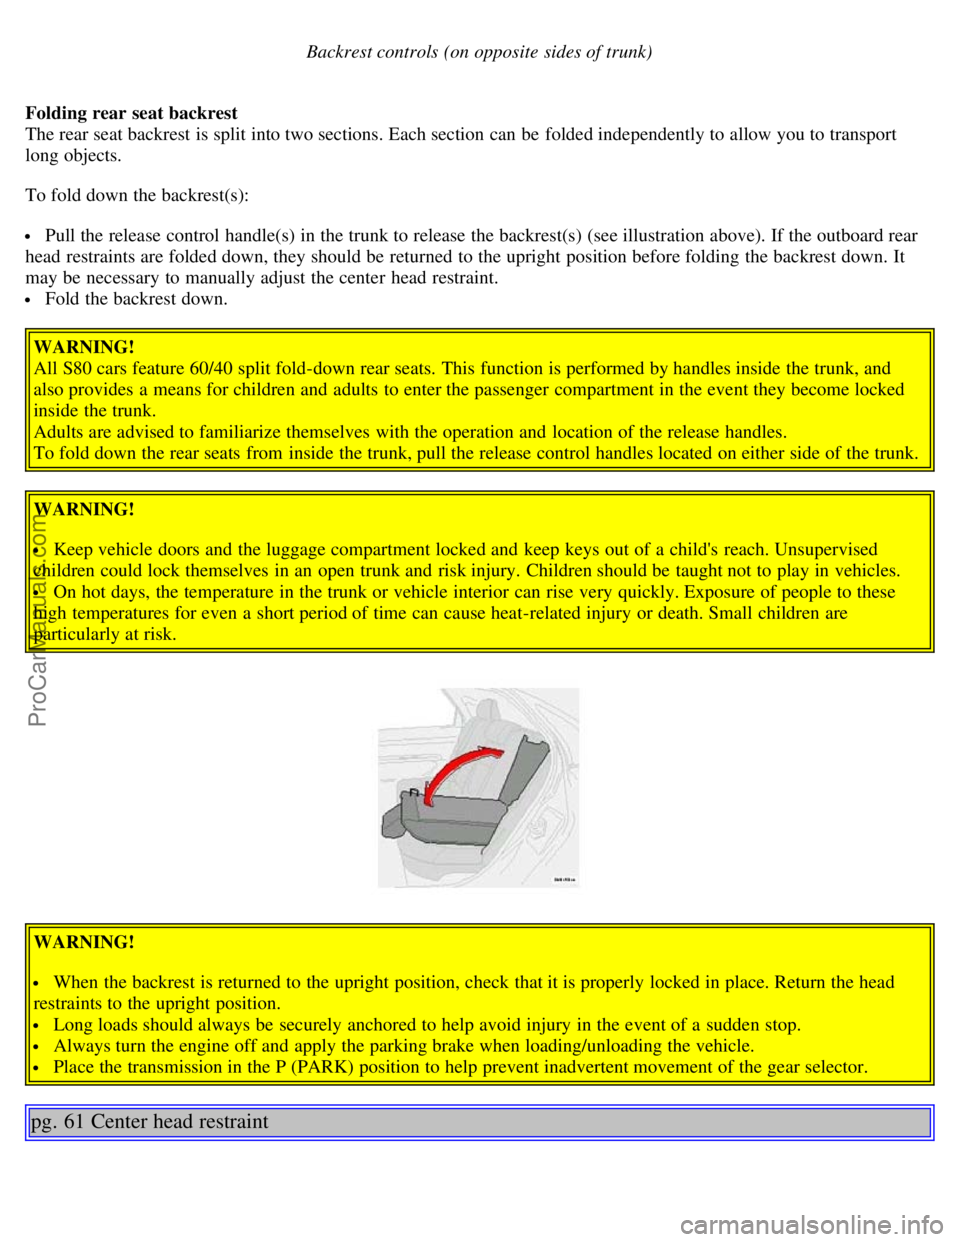
Backrest controls (on opposite sides of trunk)
Folding rear seat backrest
The rear seat backrest is split into two sections. Each section can be folded independently to allow you to transport
long objects.
To fold down the backrest(s):
Pull the release control handle(s) in the trunk to release the backrest(s) (see illustration above). If the outboard rear
head restraints are folded down, they should be returned to the upright position before folding the backrest down. It
may be necessary to manually adjust the center head restraint.
Fold the backrest down.
WARNING!
All S80 cars feature 60/40 split fold-down rear seats. This function is performed by handles inside the trunk, and
also provides a means for children and adults to enter the passenger compartment in the event they become locked
inside the trunk.
Adults are advised to familiarize themselves with the operation and location of the release handles.
To fold down the rear seats from inside the trunk, pull the release control handles located on either side of the trunk.
WARNING!
Keep vehicle doors and the luggage compartment locked and keep keys out of a child's reach. Unsupervised
children could lock themselves in an open trunk and risk injury. Children should be taught not to play in vehicles.
On hot days, the temperature in the trunk or vehicle interior can rise very quickly. Exposure of people to these
high temperatures for even a short period of time can cause heat-related injury or death. Small children are
particularly at risk.
WARNING!
When the backrest is returned to the upright position, check that it is properly locked in place. Return the head
restraints to the upright position.
Long loads should always be securely anchored to help avoid injury in the event of a sudden stop.
Always turn the engine off and apply the parking brake when loading/unloading the vehicle.
Place the transmission in the P (PARK) position to help prevent inadvertent movement of the gear selector.
pg. 61 Center head restraint
ProCarManuals.com
Page 46 of 122
particularly at risk.
pg. 68 Locking and unlocking the car
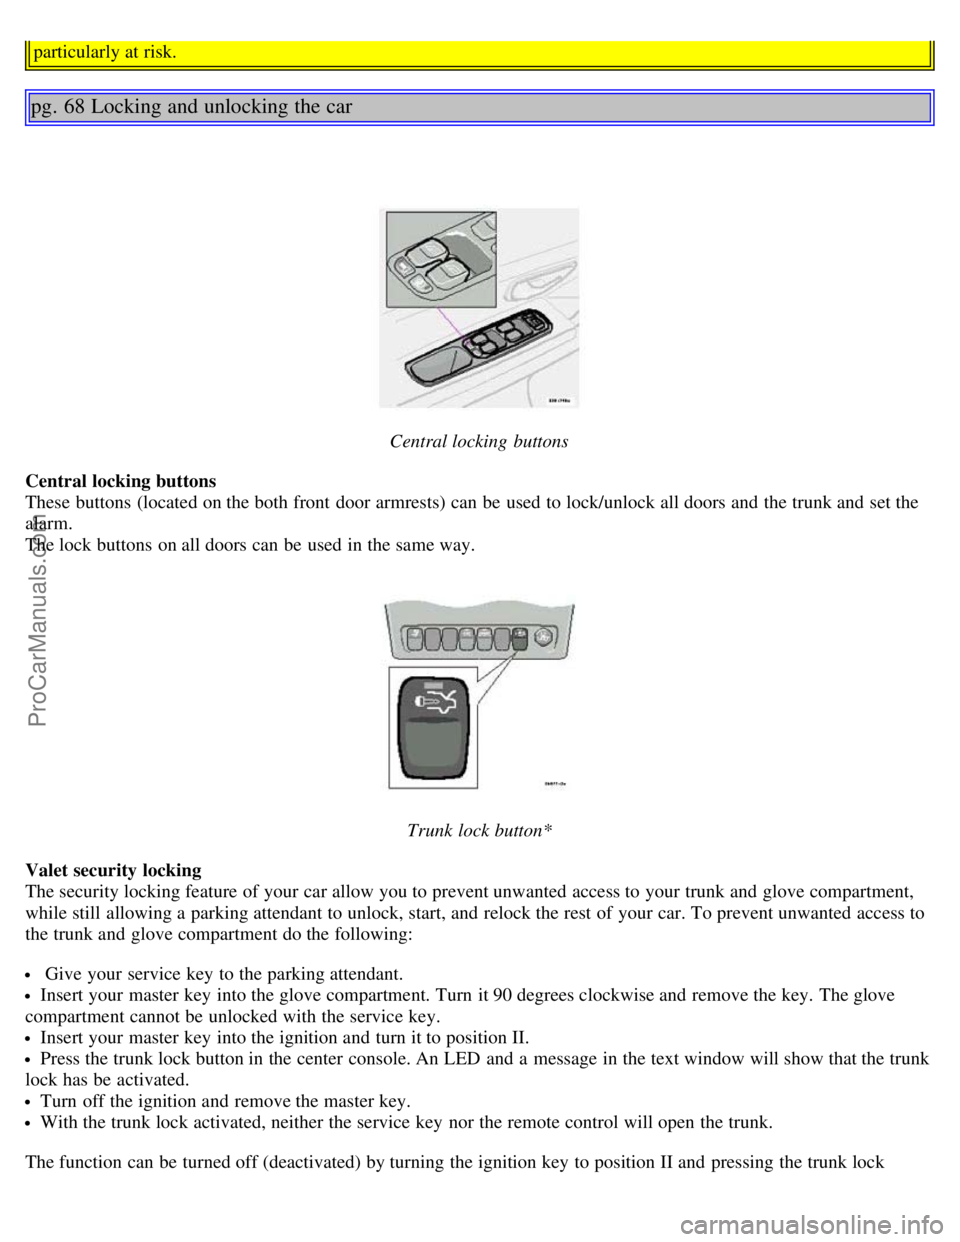
Central locking buttons
Central locking buttons
These buttons (located on the both front door armrests) can be used to lock/unlock all doors and the trunk and set the
alarm.
The lock buttons on all doors can be used in the same way.
Trunk lock button*
Valet security locking
The security locking feature of your car allow you to prevent unwanted access to your trunk and glove compartment,
while still allowing a parking attendant to unlock, start, and relock the rest of your car. To prevent unwanted access to
the trunk and glove compartment do the following:
Give your service key to the parking attendant.
Insert your master key into the glove compartment. Turn it 90 degrees clockwise and remove the key. The glove
compartment cannot be unlocked with the service key.
Insert your master key into the ignition and turn it to position II.
Press the trunk lock button in the center console. An LED and a message in the text window will show that the trunk
lock has be activated.
Turn off the ignition and remove the master key.
With the trunk lock activated, neither the service key nor the remote control will open the trunk.
The function can be turned off (deactivated) by turning the ignition key to position II and pressing the trunk lock
ProCarManuals.com
Page 75 of 122
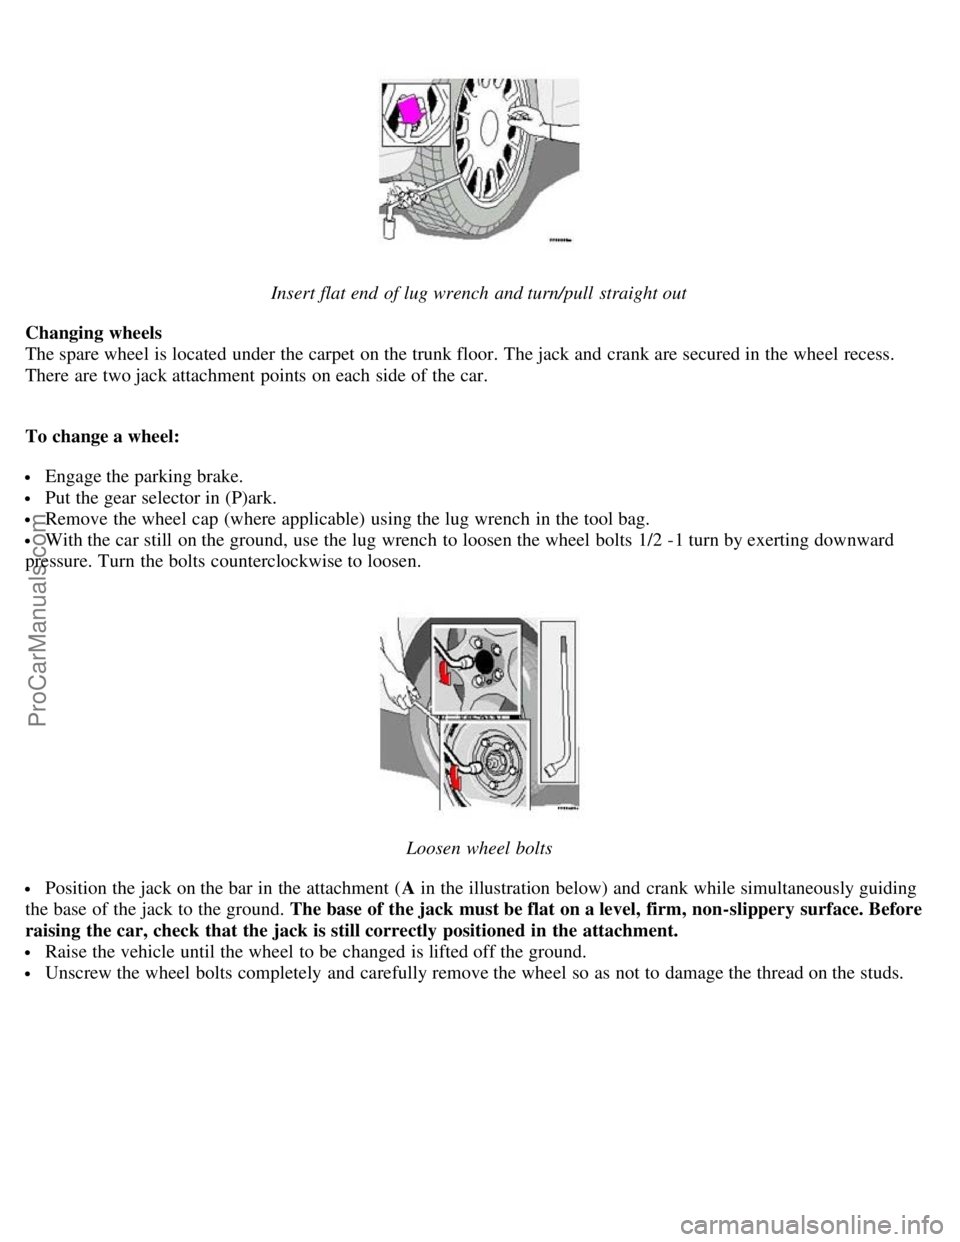
Insert flat end of lug wrench and turn/pull straight out
Changing wheels
The spare wheel is located under the carpet on the trunk floor. The jack and crank are secured in the wheel recess.
There are two jack attachment points on each side of the car.
To change a wheel:
Engage the parking brake.
Put the gear selector in (P)ark.
Remove the wheel cap (where applicable) using the lug wrench in the tool bag.
With the car still on the ground, use the lug wrench to loosen the wheel bolts 1/2 -1 turn by exerting downward
pressure. Turn the bolts counterclockwise to loosen.
Loosen wheel bolts
Position the jack on the bar in the attachment ( A in the illustration below) and crank while simultaneously guiding
the base of the jack to the ground. The base of the jack must be flat on a level, firm, non-slippery surface. Before
raising the car, check that the jack is still correctly positioned in the attachment.
Raise the vehicle until the wheel to be changed is lifted off the ground.
Unscrew the wheel bolts completely and carefully remove the wheel so as not to damage the thread on the studs.
ProCarManuals.com
Page 108 of 122
2 0 0 6
VOLVO S80
HomeLink® Universal Transceiver (option)
pg. 175 HomeLink® Universal Transceiver (option)
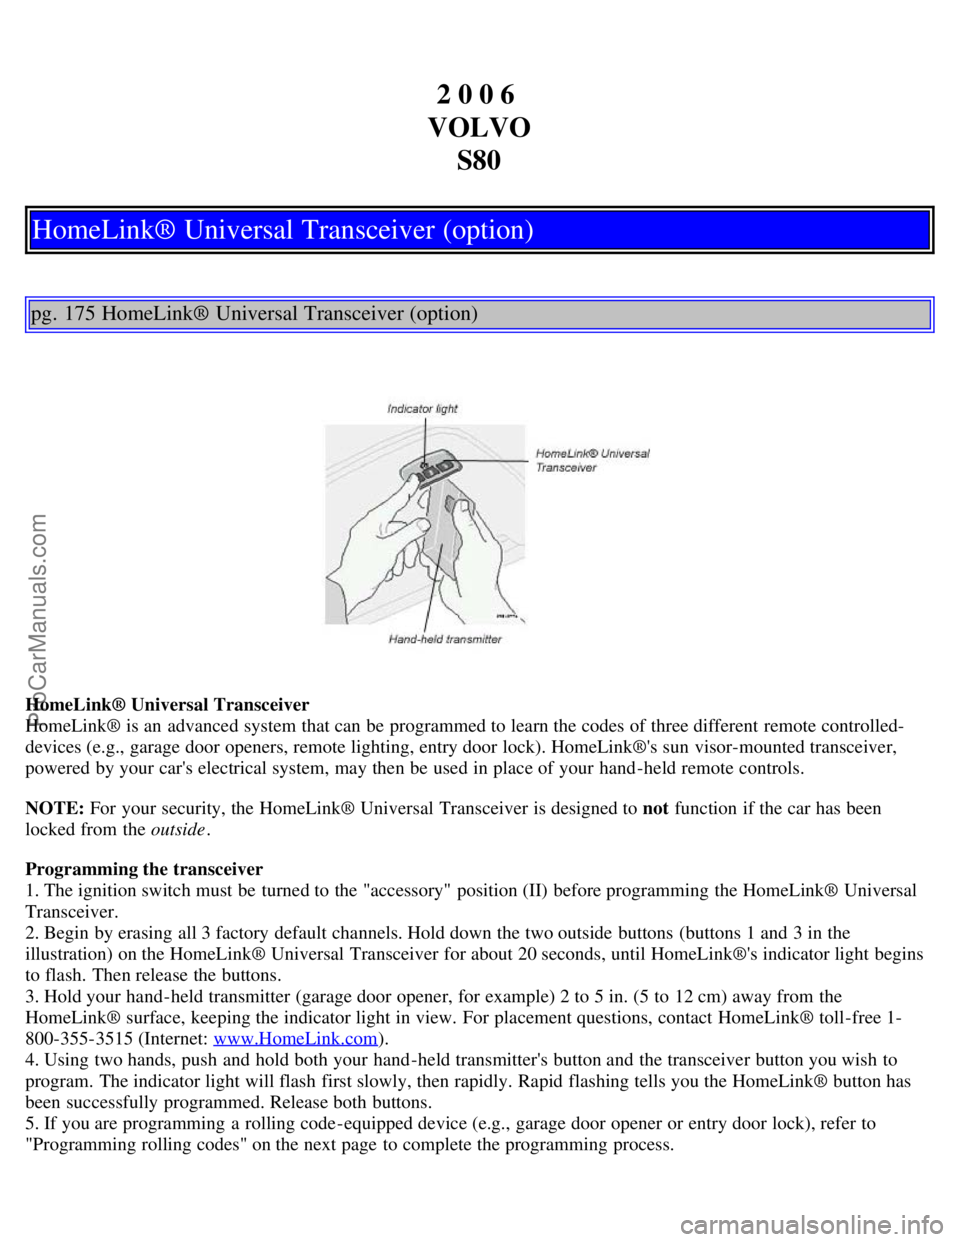
HomeLink® Universal Transceiver
HomeLink® is an advanced system that can be programmed to learn the codes of three different remote controlled-
devices (e.g., garage door openers, remote lighting, entry door lock). HomeLink®'s sun visor-mounted transceiver,
powered by your car's electrical system, may then be used in place of your hand -held remote controls.
NOTE: For your security, the HomeLink® Universal Transceiver is designed to not function if the car has been
locked from the outside .
Programming the transceiver
1. The ignition switch must be turned to the "accessory" position (II) before programming the HomeLink® Universal
Transceiver.
2. Begin by erasing all 3 factory default channels. Hold down the two outside buttons (buttons 1 and 3 in the
illustration) on the HomeLink® Universal Transceiver for about 20 seconds, until HomeLink®'s indicator light begins
to flash. Then release the buttons.
3. Hold your hand -held transmitter (garage door opener, for example) 2 to 5 in. (5 to 12 cm) away from the
HomeLink® surface, keeping the indicator light in view. For placement questions, contact HomeLink® toll-free 1-
800-355-3515 (Internet: www.HomeLink.com
).
4. Using two hands, push and hold both your hand -held transmitter's button and the transceiver button you wish to
program. The indicator light will flash first slowly, then rapidly. Rapid flashing tells you the HomeLink® button has
been successfully programmed. Release both buttons.
5. If you are programming a rolling code-equipped device (e.g., garage door opener or entry door lock), refer to
"Programming rolling codes" on the next page to complete the programming process.
ProCarManuals.com
Page 110 of 122
programming the HomeLink® Universal Transceiver, call toll-free 1-800-355-3515 (Internet: www.HomeLink.com).
Operating the HomeLink® Universal Transceiver
Once programmed, the HomeLink® Universal Transceiver can be used in place of hand -held transmitters.
To operate, the key must be turned to the "accessory" position (II) or the engine must be running. Press the
programmed HomeLink® button to activate the garage door, driveway gate, security lighting, home security system,
etc.
Your original hand -held transmitters may, of course, be used at any time.
pg. 177 HomeLink® Universal Transceiver (option)
Erasing programmed buttons
Individual buttons cannot be erased. To erase all three programmed buttons:
1. Turn the ignition key to the "accessory" position (II).
2. Hold down the two outside buttons on the HomeLink® Universal Transceiver for about 20 seconds, until
HomeLink®'s indicator light begins to flash.
3. Release both buttons.
The HomeLink® buttons can be reprogrammed using the procedures described on the previous pages.
Reprogramming a single HomeLink® button
1. Press and hold the desired HomeLink® button. Do not release the button until step 3 has been completed.
2. When the indicator light begins to flash slowly (after approximately 20 seconds), position the hand -held transmitter
2 to 5 in. (5 to 12 cm) away from the HomeLink® surface.
3. Press and hold the hand -held transmitter button. The HomeLink® indicator light will flash first slowly, then rapidly.
When the indicator light flashes rapidly, release both buttons.
The previously programmed device has now been erased and the new device can be activated by pressing the
HomeLink® button that has just been programmed. This procedure will not affect any other programmed HomeLink®
buttons.
NOTE:
Retain the original transmitter(s) for future programming procedures (i.e., if you purchase a new car).
For your own security, erase all programmed buttons on the HomeLink® Universal Transceiver when you sell your
car.
Metallic sun protection films should not be used on any windows in a car equipped with HomeLink® Universal
Transceiver. This could interfere with the transceiver's function.
Contents | Top of Page
ProCarManuals.com