bulb VOLVO S80 2006 Owners Manual
[x] Cancel search | Manufacturer: VOLVO, Model Year: 2006, Model line: S80, Model: VOLVO S80 2006Pages: 122, PDF Size: 2.33 MB
Page 21 of 122
13 Fuel gauge
The fuel tank holds approximately 18 US gal. (68 liters).
A warning light in the gauge comes on there are approximately 1.8 US gal. (8 liters) of fuel remaining in the tank.
14 Indicator and warning lights
pg. 28 Indicator and warning lights
The indicator and warning lights described on pages 28 and 29 should never stay on when driving*
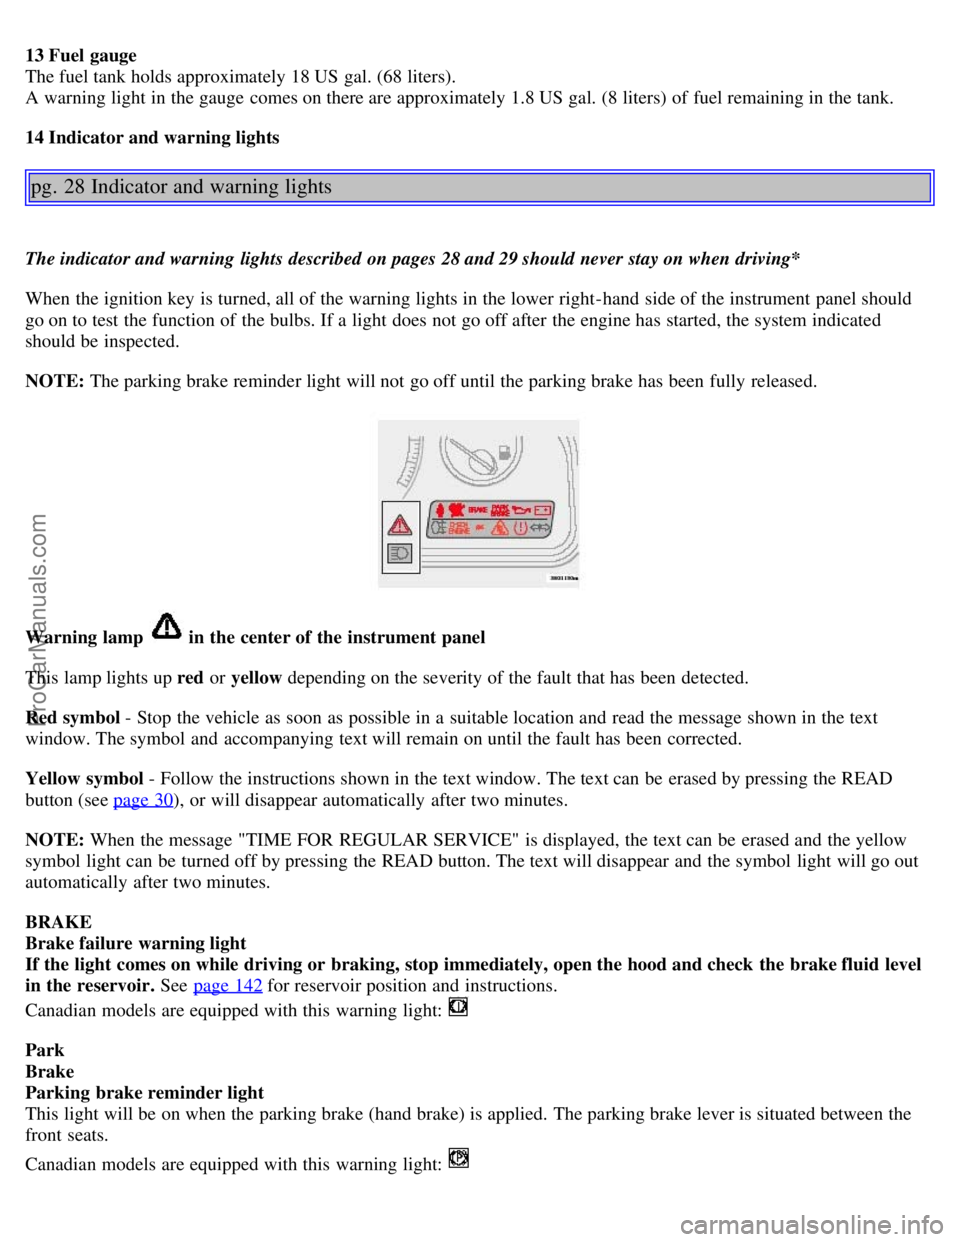
When the ignition key is turned, all of the warning lights in the lower right-hand side of the instrument panel should
go on to test the function of the bulbs. If a light does not go off after the engine has started, the system indicated
should be inspected.
NOTE: The parking brake reminder light will not go off until the parking brake has been fully released.
Warning lamp in the center of the instrument panel
This lamp lights up red or yellow depending on the severity of the fault that has been detected.
Red symbol - Stop the vehicle as soon as possible in a suitable location and read the message shown in the text
window. The symbol and accompanying text will remain on until the fault has been corrected.
Yellow symbol - Follow the instructions shown in the text window. The text can be erased by pressing the READ
button (see page 30
), or will disappear automatically after two minutes.
NOTE: When the message "TIME FOR REGULAR SERVICE" is displayed, the text can be erased and the yellow
symbol light can be turned off by pressing the READ button. The text will disappear and the symbol light will go out
automatically after two minutes.
BRAKE
Brake failure warning light
If the light comes on while driving or braking, stop immediately, open the hood and check the brake fluid level
in the reservoir. See page 142
for reservoir position and instructions.
Canadian models are equipped with this warning light:
Park
Brake
Parking brake reminder light
This light will be on when the parking brake (hand brake) is applied. The parking brake lever is situated between the
front seats.
Canadian models are equipped with this warning light:
ProCarManuals.com
Page 78 of 122
2 0 0 6
VOLVO S80
Chapter 8 - Maintenance/Servicing
pg. 119 Maintenance/Servicing
Fuses120
Replacing bulbs125
Paint touch up132
Washing the car133
Cleaning the upholstery135
Maintenance service, Warranty136
Fuel/emissions systems137
Drive belt, Coolant138
Maintaining your car139
Servicing141
Opening the hood, Engine compartment142
Engine oil143
Power steering/Brake fluid reservoirs145
Replacing the battery146
Battery maintenance147
Replacing wiper blades148
pg. 120 Fuses
ProCarManuals.com
Page 84 of 122
13-
14-
15 -
16 -
17 Accessory audio 5A
18 -
19 Folding head restraints (option) 15A
20 Trailer wiring (15-feed) 20A
21 -
22 -
23 All Wheel Drive (option) 7.5A
24 Four-C chassis system (option) 15A
25 -
26 Park assist (option) 5A
27 Main fuse: trailer wiring, Four-C, park assist, All Wheel Drive 30A
28 Central locking system 15A
29 Driver's side trailer lighting: parking lights, turn signal 25A
30 Passenger's side trailer lighting: parking light, brake light, fog light, turn signal 25A
31 Main fuse: fuses 37 and 38 40A
32 -
33 -
34 -
35 -
36 -
37 Heated rear window 20A
38 Heated rear window 20A
pg. 125 Replacing bulbs
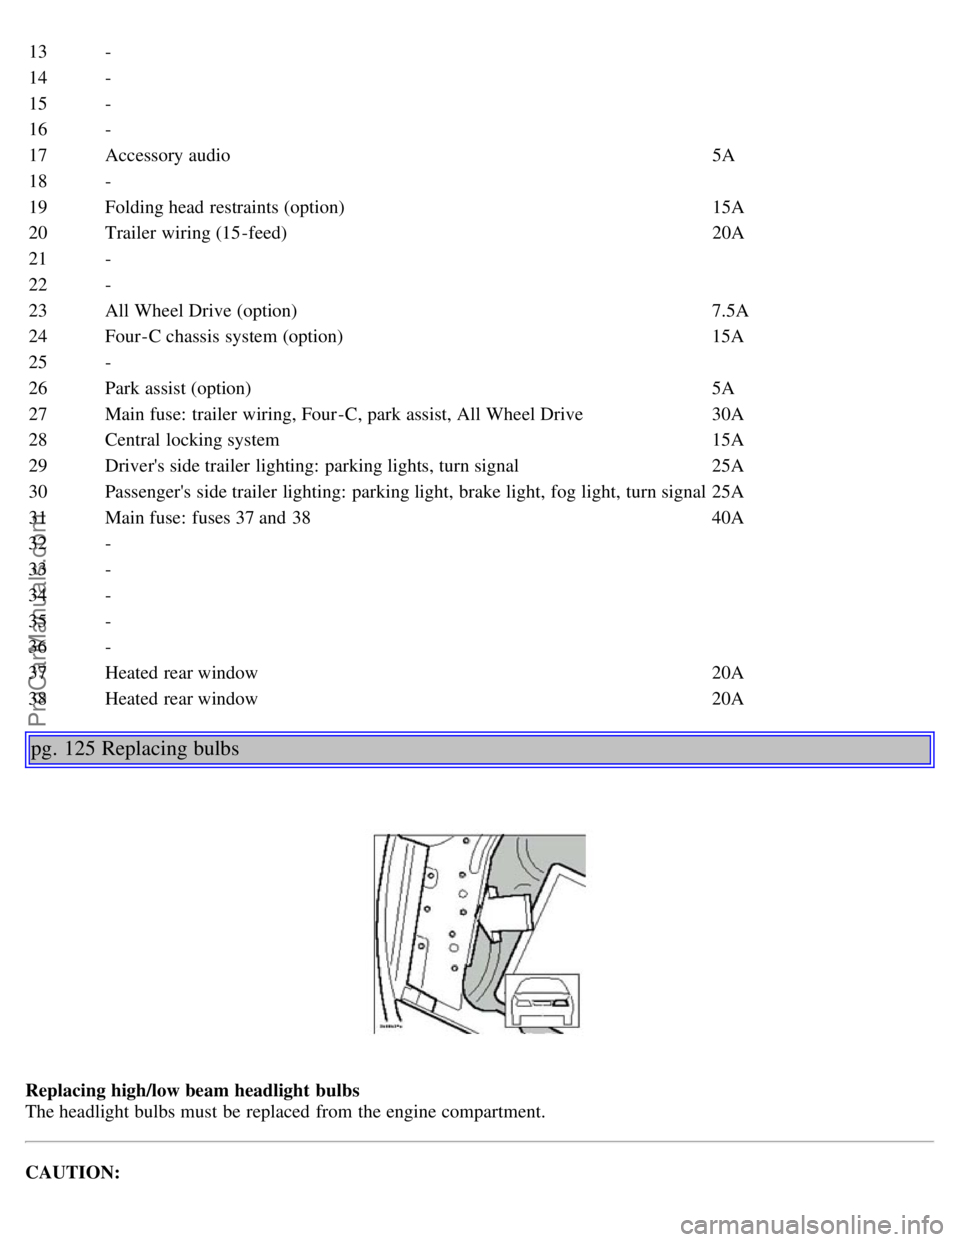
Replacing high/low beam headlight bulbs
The headlight bulbs must be replaced from the engine compartment.
CAUTION:
ProCarManuals.com
Page 85 of 122
Do not touch the glass on halogen bulbs with your fingers. Grease, oil or any other impurities can be carbonized
onto the bulb and cause damage to the reflector.
Be sure to use bulbs of the correct type and voltage.
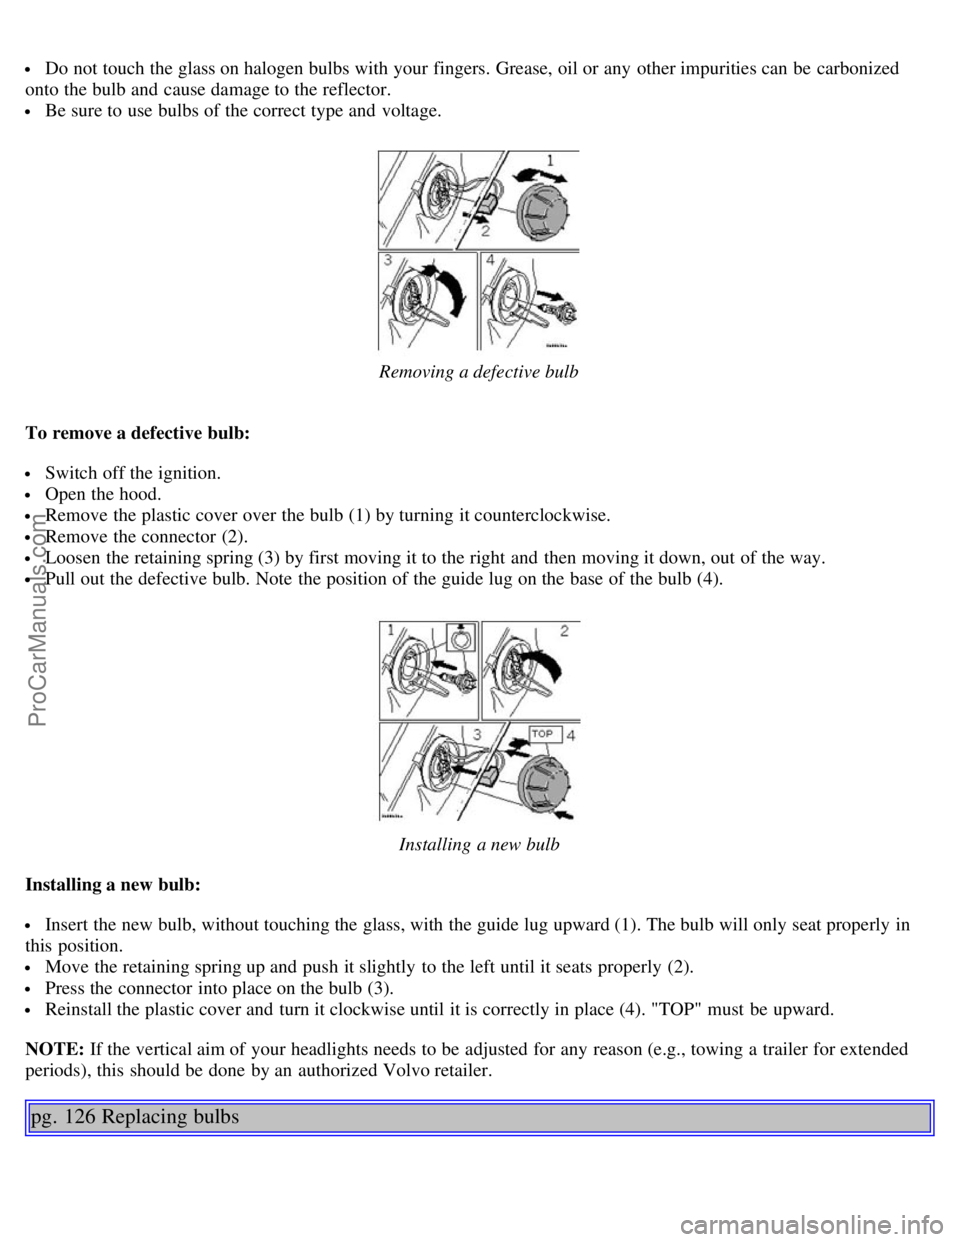
Removing a defective bulb
To remove a defective bulb:
Switch off the ignition.
Open the hood.
Remove the plastic cover over the bulb (1) by turning it counterclockwise.
Remove the connector (2).
Loosen the retaining spring (3) by first moving it to the right and then moving it down, out of the way.
Pull out the defective bulb. Note the position of the guide lug on the base of the bulb (4).
Installing a new bulb
Installing a new bulb:
Insert the new bulb, without touching the glass, with the guide lug upward (1). The bulb will only seat properly in
this position.
Move the retaining spring up and push it slightly to the left until it seats properly (2).
Press the connector into place on the bulb (3).
Reinstall the plastic cover and turn it clockwise until it is correctly in place (4). "TOP" must be upward.
NOTE: If the vertical aim of your headlights needs to be adjusted for any reason (e.g., towing a trailer for extended
periods), this should be done by an authorized Volvo retailer.
pg. 126 Replacing bulbs
ProCarManuals.com
Page 86 of 122
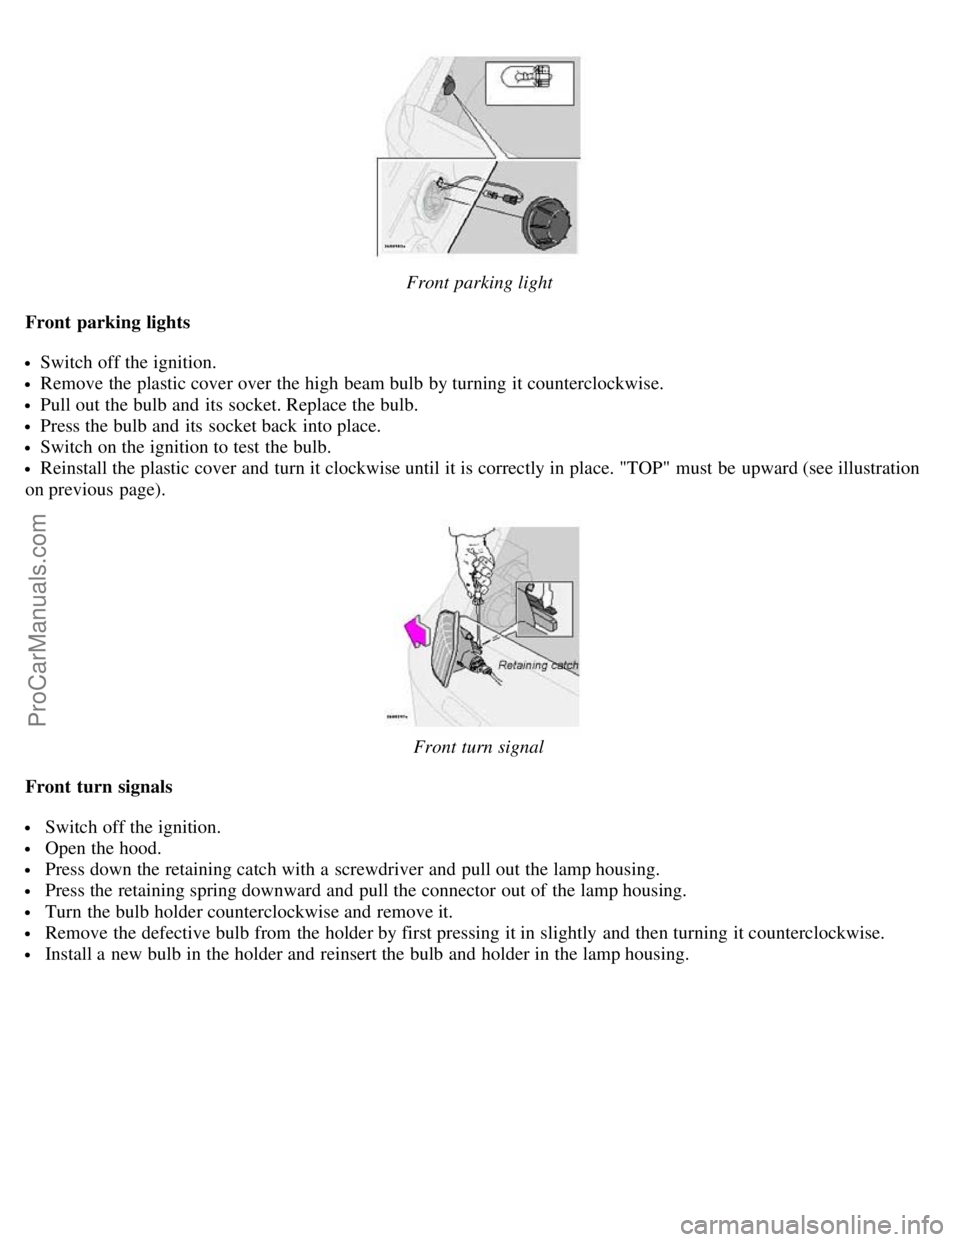
Front parking light
Front parking lights
Switch off the ignition.
Remove the plastic cover over the high beam bulb by turning it counterclockwise.
Pull out the bulb and its socket. Replace the bulb.
Press the bulb and its socket back into place.
Switch on the ignition to test the bulb.
Reinstall the plastic cover and turn it clockwise until it is correctly in place. "TOP" must be upward (see illustration
on previous page).
Front turn signal
Front turn signals
Switch off the ignition.
Open the hood.
Press down the retaining catch with a screwdriver and pull out the lamp housing.
Press the retaining spring downward and pull the connector out of the lamp housing.
Turn the bulb holder counterclockwise and remove it.
Remove the defective bulb from the holder by first pressing it in slightly and then turning it counterclockwise.
Install a new bulb in the holder and reinsert the bulb and holder in the lamp housing.
ProCarManuals.com
Page 87 of 122
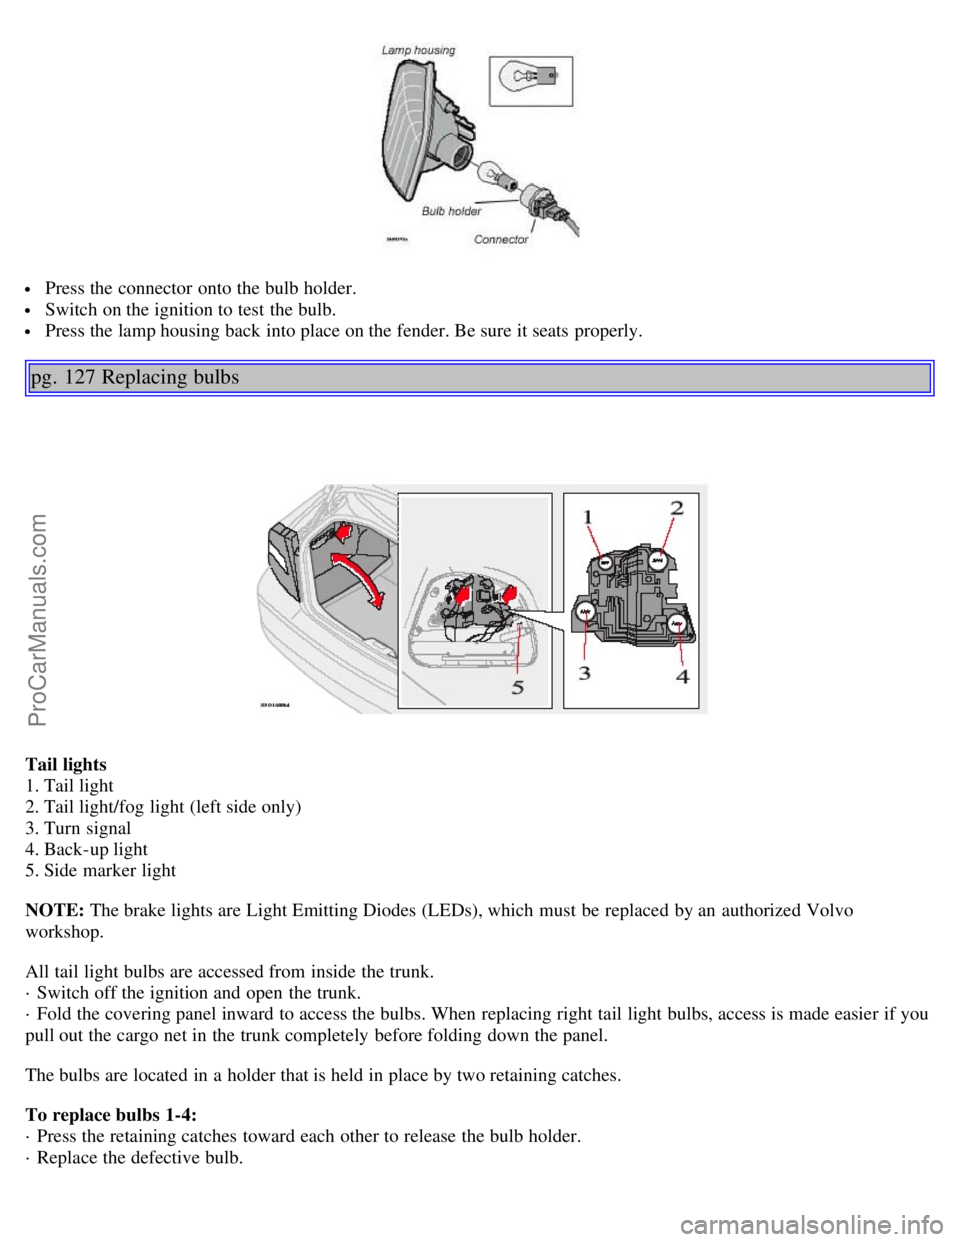
Press the connector onto the bulb holder.
Switch on the ignition to test the bulb.
Press the lamp housing back into place on the fender. Be sure it seats properly.
pg. 127 Replacing bulbs
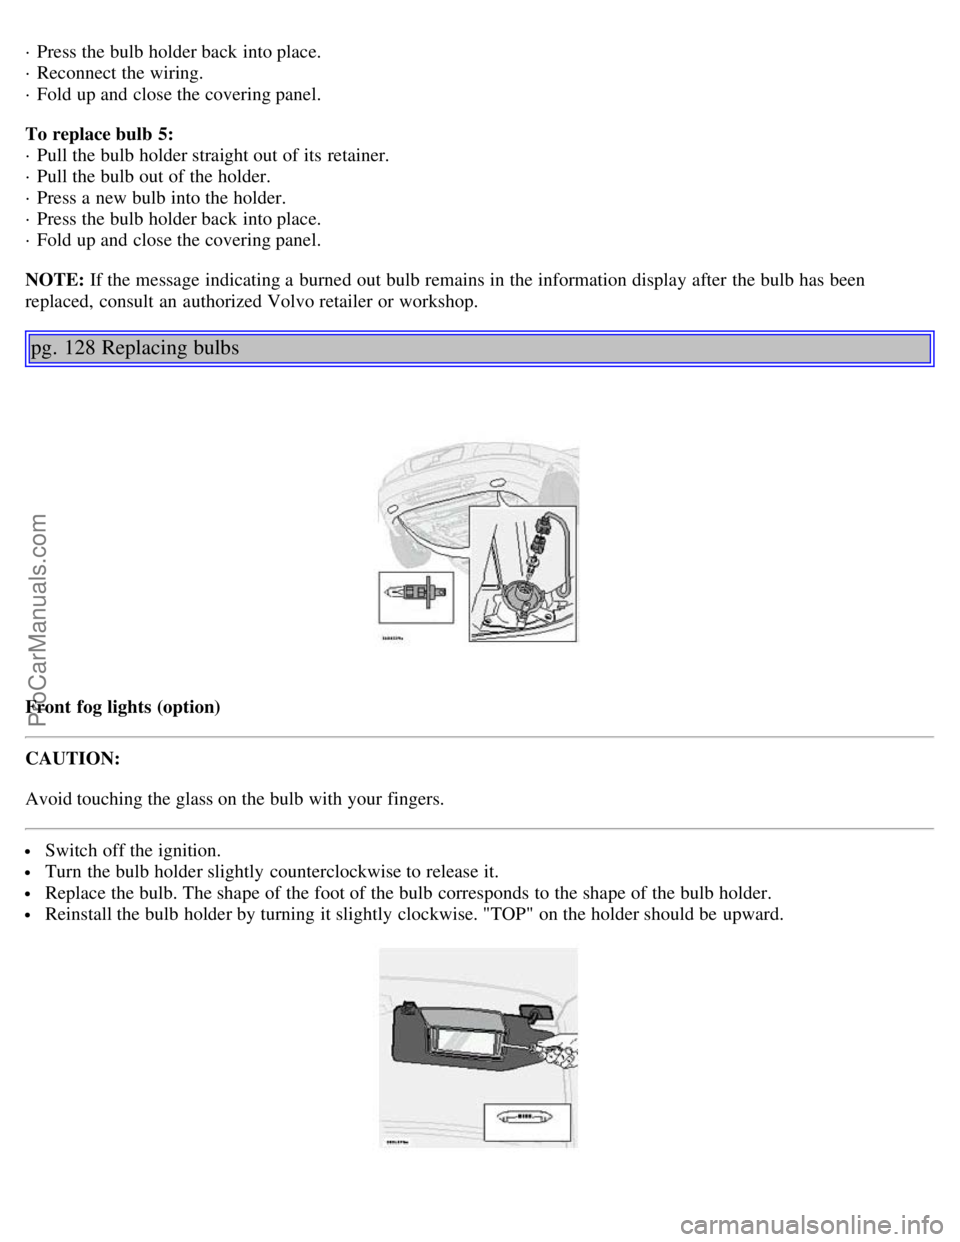
Tail lights
1. Tail light
2. Tail light/fog light (left side only)
3. Turn signal
4. Back-up light
5. Side marker light
NOTE: The brake lights are Light Emitting Diodes (LEDs), which must be replaced by an authorized Volvo
workshop.
All tail light bulbs are accessed from inside the trunk.
· Switch off the ignition and open the trunk.
· Fold the covering panel inward to access the bulbs. When replacing right tail light bulbs, access is made easier if you
pull out the cargo net in the trunk completely before folding down the panel.
The bulbs are located in a holder that is held in place by two retaining catches.
To replace bulbs 1-4:
· Press the retaining catches toward each other to release the bulb holder.
· Replace the defective bulb.
ProCarManuals.com
Page 88 of 122
· Press the bulb holder back into place.
· Reconnect the wiring.
· Fold up and close the covering panel.
To replace bulb 5:
· Pull the bulb holder straight out of its retainer.
· Pull the bulb out of the holder.
· Press a new bulb into the holder.
· Press the bulb holder back into place.
· Fold up and close the covering panel.
NOTE: If the message indicating a burned out bulb remains in the information display after the bulb has been
replaced, consult an authorized Volvo retailer or workshop.
pg. 128 Replacing bulbs
Front fog lights (option)
CAUTION:
Avoid touching the glass on the bulb with your fingers.
Switch off the ignition.
Turn the bulb holder slightly counterclockwise to release it.
Replace the bulb. The shape of the foot of the bulb corresponds to the shape of the bulb holder.
Reinstall the bulb holder by turning it slightly clockwise. "TOP" on the holder should be upward.
ProCarManuals.com
Page 89 of 122
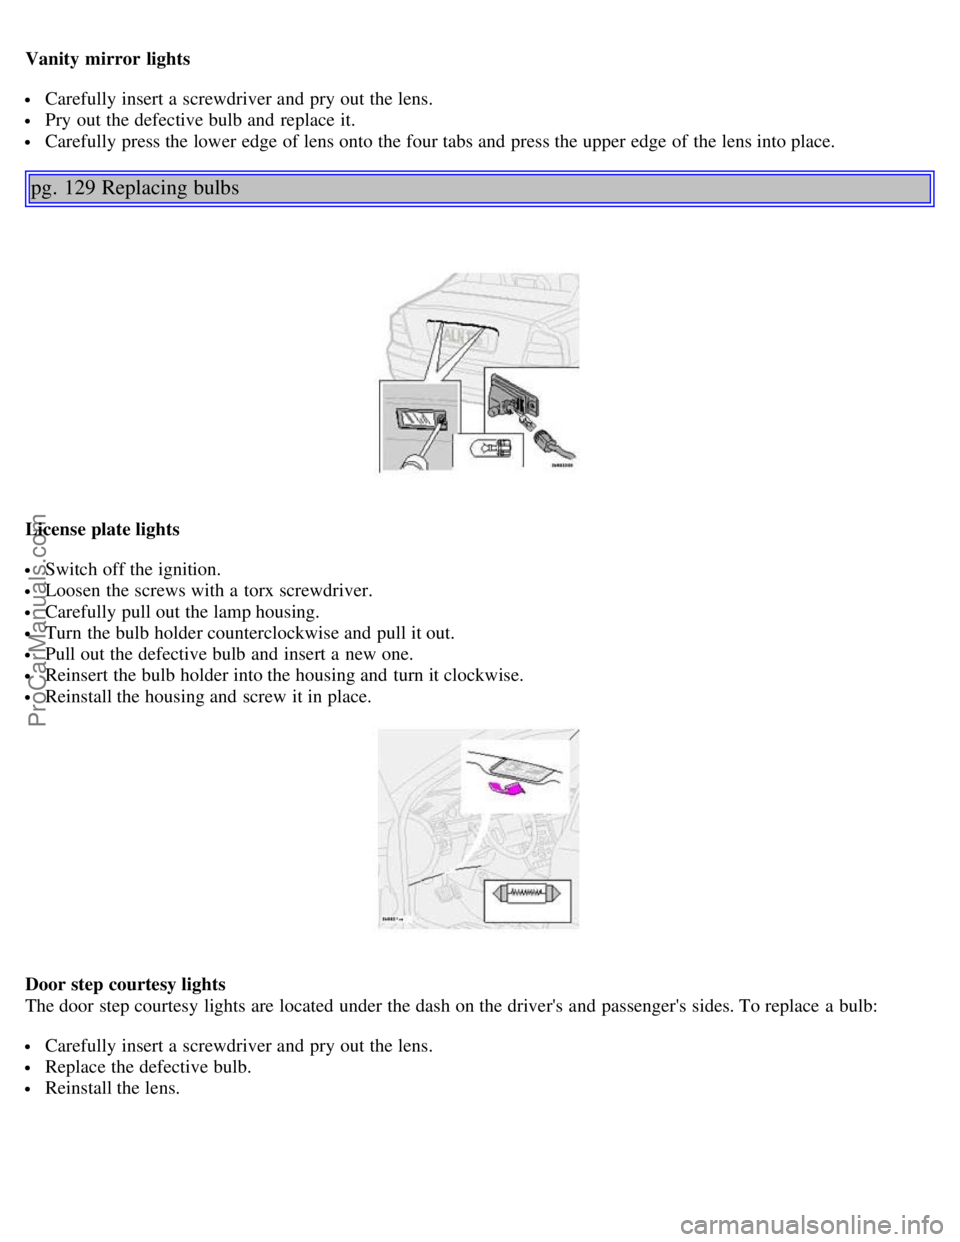
Vanity mirror lights
Carefully insert a screwdriver and pry out the lens.
Pry out the defective bulb and replace it.
Carefully press the lower edge of lens onto the four tabs and press the upper edge of the lens into place.
pg. 129 Replacing bulbs
License plate lights
Switch off the ignition.
Loosen the screws with a torx screwdriver.
Carefully pull out the lamp housing.
Turn the bulb holder counterclockwise and pull it out.
Pull out the defective bulb and insert a new one.
Reinsert the bulb holder into the housing and turn it clockwise.
Reinstall the housing and screw it in place.
Door step courtesy lights
The door step courtesy lights are located under the dash on the driver's and passenger's sides. To replace a bulb:
Carefully insert a screwdriver and pry out the lens.
Replace the defective bulb.
Reinstall the lens.
ProCarManuals.com
Page 90 of 122
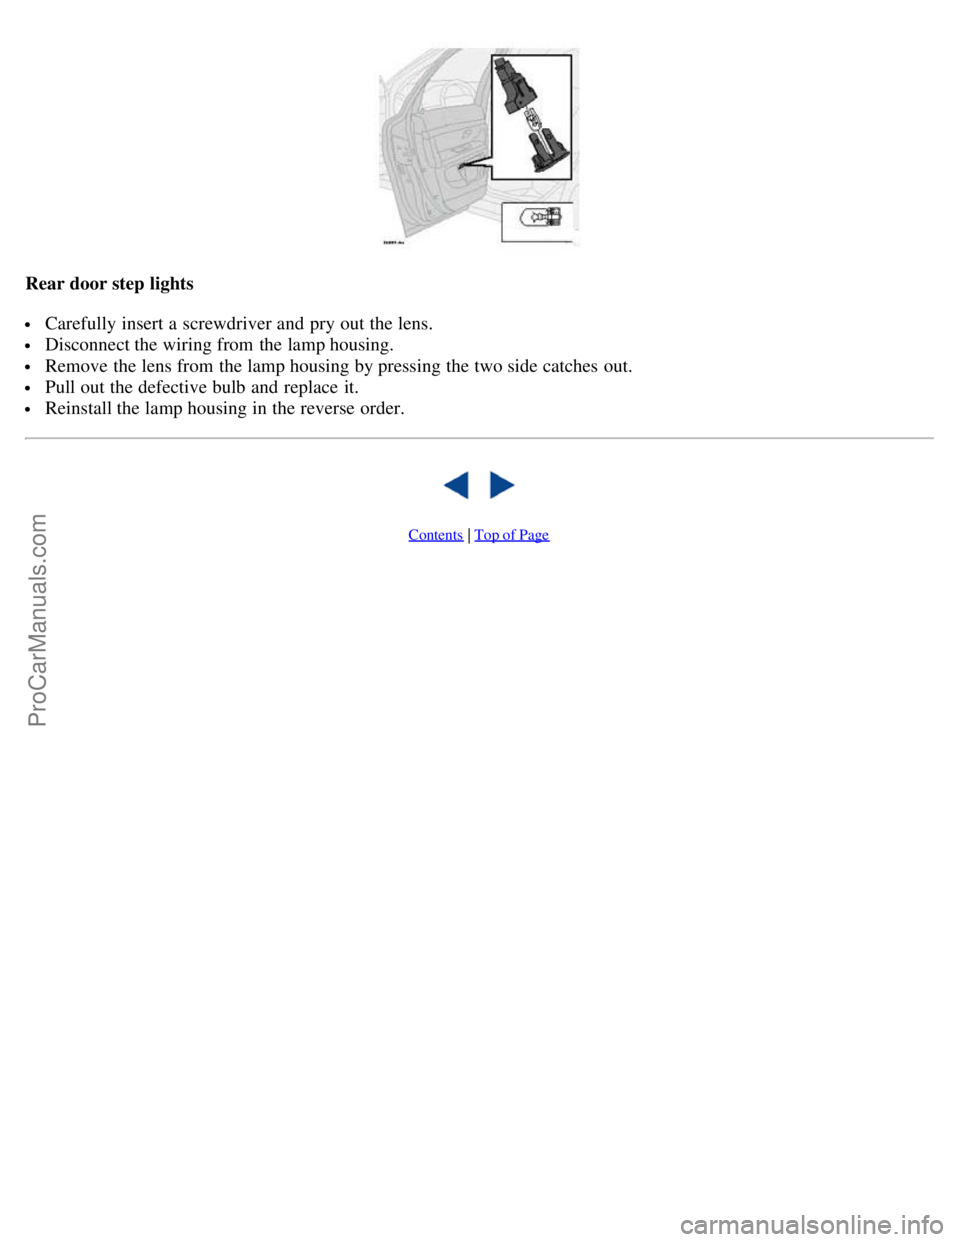
Rear door step lights
Carefully insert a screwdriver and pry out the lens.
Disconnect the wiring from the lamp housing.
Remove the lens from the lamp housing by pressing the two side catches out.
Pull out the defective bulb and replace it.
Reinstall the lamp housing in the reverse order.
Contents | Top of Page
ProCarManuals.com
Page 95 of 122
WARNING!
The distributor ignition system operates at very high voltages. Special safety precautions must be followed to
prevent injury. Always turn the ignition off when:
Replacing distributor ignition components e.g. plugs, coil, etc.
Do not touch any part of the distributor ignition system while the engine is running. This may result in unintended
movements and body injury.
Front suspension
Spring strut suspension with integrated shock absorbers and control arms linked to the support frame. Power-assisted
rack and pinion steering. Safety type steering column.
The alignment specifications apply to an unladen car but include fuel, coolant and spare wheel.
Rear suspension
Individual rear wheel suspension with longitudinal support arms, double link arms and track rods.
Vehicle loading
The tires on your Volvo should perform to specifications at all normal loads when inflated as recommended on the tire
information label. The label is located on the inside of the fuel filler door and lists vehicle design limits. Do not load
your car beyond the load limits indicated.
WARNING!
Improperly inflated tires will reduce tire life, adversely affect vehicle handling and can possibly lead to failure
resulting in loss of vehicle control without prior warning.
All specifications are subject to change without prior notice.
pg. 155 Electrical system
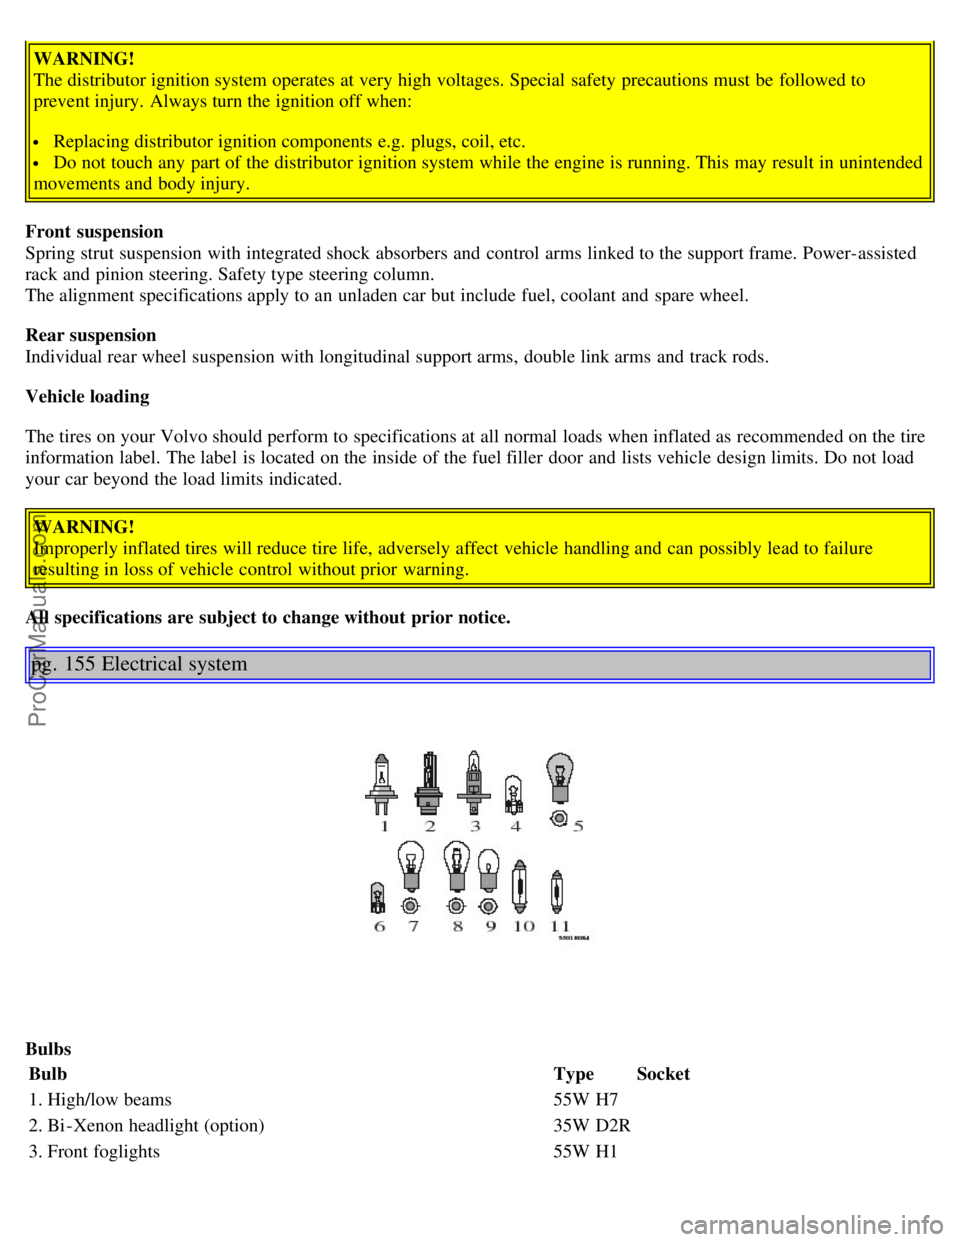
Bulbs Bulb TypeSocket
1. High/low beams 55W H7
2. Bi -Xenon headlight (option) 35W D2R
3. Front foglights 55W H1
ProCarManuals.com