keyless VOLVO S80 2007 User Guide
[x] Cancel search | Manufacturer: VOLVO, Model Year: 2007, Model line: S80, Model: VOLVO S80 2007Pages: 251, PDF Size: 5.7 MB
Page 96 of 251
1Does not apply to vehicles with the optional keyless drive.
103 03 Your driving environment
Starting the engine
CAUTION
When starting in cold weather, the automatic transmission may shift up at slightly higher engine speeds than
normal until the automatic transmission fluid reaches normal operating temperature.
Do not race a cold engine immediately after starting. Oil flow may not reach some lubrication points fast enough
to prevent engine damage.
The engine should be idling when you move the gear selector. Never accelerate until after you feel the
transmission engage. Accelerating immediately after selecting a gear will cause harsh engagement and premature
transmission wear.
Selecting P or N when idling at a standstill for prolonged periods of time will help prevent overheating of the
automatic transmission fluid.
Keyless drive (option)
Follow steps 2-3 for starting the engine.
NOTE
For the vehicle to start, one of the vehicle's remote keys must be in the passenger compartment.
Steering wheel lock
The steering wheel lock is deactivated when the remote key is inserted into the ignition slot
1 and activated when the
remote key is removed from the ignition slot.
Always take the remote key or keyless drive remote when leaving the vehicle to help reduce the risk of theft.
1On vehicles with the optional keyless drive, the steering lock is deactivated when the start button is pressed for the first time (assuming that a
remote control is in the passenger's compartment). It is activated when the ignition is switched off and the driver's door is opened.
104 03 Your driving environment
Starting the engine
Jump starting
ProCarManuals.com
Page 104 of 251
2. Press the control.
3. Release the brake pedal and ensure that the vehicle is at a standstill.
4. When the vehicle is parked, the gear selector must be in position P.
The
symbol in the instrument panel flashes while the parking bake is being applied, and glows steadily when
the parking brake has been fully applied.
NOTE
In an emergency the parking brake can be applied when the vehicle is moving by holding in the control. Braking
will be interrupted when the accelerator pedal is depressed or the control is released.
An audible signal will sound during this procedure if the vehicle is moving at speeds above 6 mph (10 km/h).
Parking on a hill
If the vehicle is pointing uphill, turn the front wheels so that they point away from the curb.
If the vehicle is pointing downhill, turn the front wheels so that they point toward the curb.
Releasing the electric parking brake
Manual release
1. Insert the remote key in the ignition slot.
2. Press firmly on the brake pedal.
3. Pull the parking brake control.
Vehicles with Keyless drive (option)
1. Press the START/STOP button.
2. Press firmly on the brake pedal.
3. Pull the parking brake control.
Automatic release
1. Start the engine.
111 03 Your driving environment
Parking brake
2. Fasten the seat belt.
NOTE
For safety reasons, the parking brake is only released automatically if the engine is running and the driver is
wearing a seat belt.
The electric parking brake will be released immediately when the accelerator pedal is pressed and the gear selector
ProCarManuals.com
Page 120 of 251
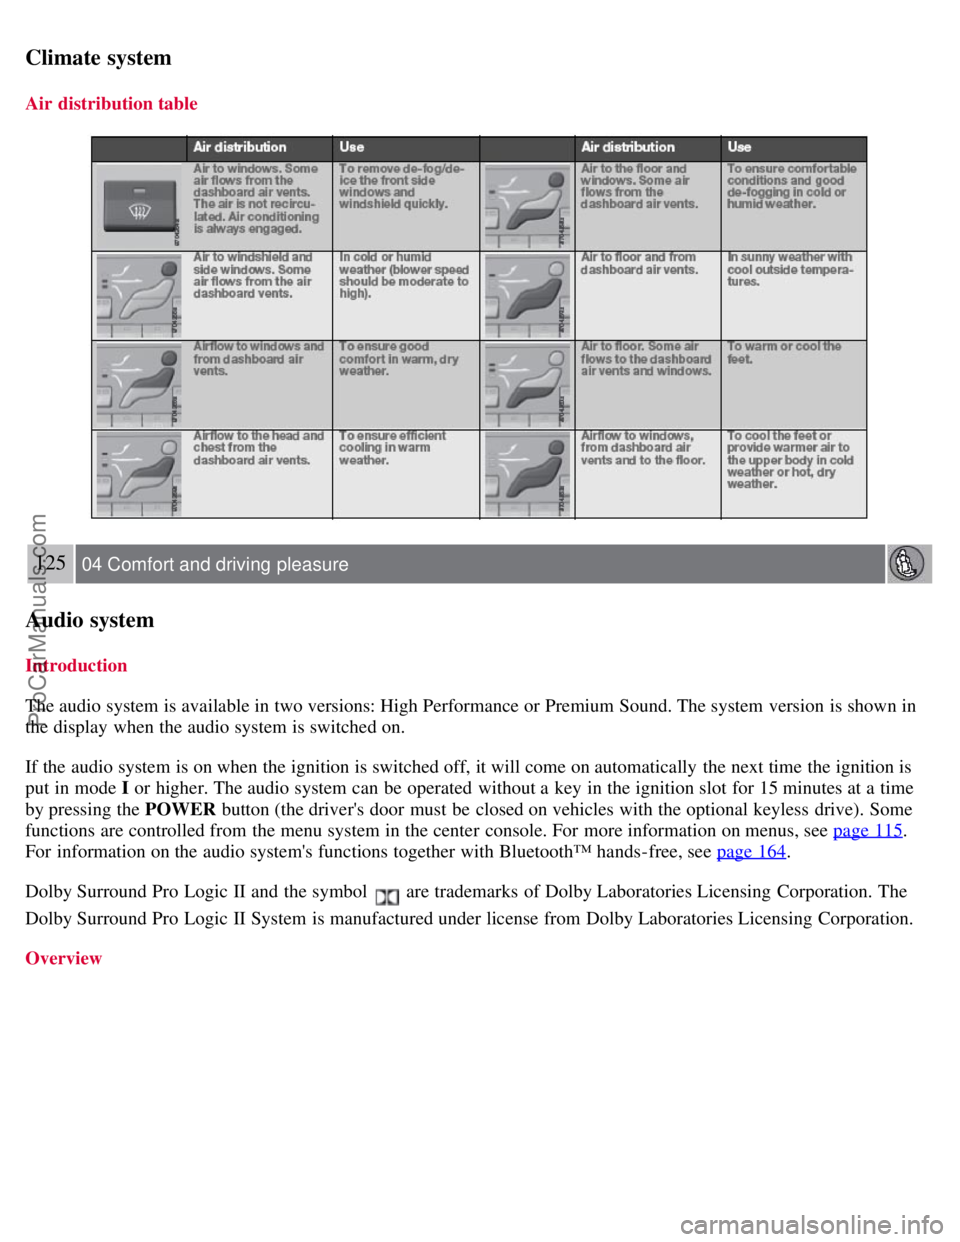
Climate system
Air distribution table
125 04 Comfort and driving pleasure
Audio system
Introduction
The audio system is available in two versions: High Performance or Premium Sound. The system version is shown in
the display when the audio system is switched on.
If the audio system is on when the ignition is switched off, it will come on automatically the next time the ignition is
put in mode I or higher. The audio system can be operated without a key in the ignition slot for 15 minutes at a time
by pressing the POWER button (the driver's door must be closed on vehicles with the optional keyless drive). Some
functions are controlled from the menu system in the center console. For more information on menus, see page 115
.
For information on the audio system's functions together with Bluetooth™ hands-free, see page 164
.
Dolby Surround Pro Logic II and the symbol
are trademarks of Dolby Laboratories Licensing Corporation. The
Dolby Surround Pro Logic II System is manufactured under license from Dolby Laboratories Licensing Corporation.
Overview
ProCarManuals.com
Page 161 of 251
2. Activate the hands-free function with PHONE.
The menu option Add phone is shown in the display. If one or more cell phones have already been registered, these
phones will also be displayed.
3. Select Add phone .
The audio system searches for cell phones in the vicinity. The search takes approximately 30 seconds. The cell phones
detected are specified with their respective Bluetooth™ name in the display. The hands-free function's device name
( My Car ) is shown in the cell phone's display.
4. Choose one of the cell phones in the audio system display.
5. Enter the number series shown in the audio system display via the cell phone keypad.
The cell phone is registered and connected automatically to the audio system while the text Synchronizing is shown in
the display. For more information on how cell phones are registered, see page 165
.
When the connection is established the symbol
is shown and the cell phone Bluetooth™ name is shown in the
display. The cell phone can now be controlled from the audio system and the steering wheel keypad.
To call
1. Make sure that the text PHONE is shown at the top of the display and that the
symbol is visible.
2. Dial the number or use the phone book, see page 165
.
3. Press ENTER .
The call can be interrupted with EXIT .
Disconnect and connect cell phone
Automatic disconnection takes place if the cell phone moves out of the audio system's range. When the cell phone
returns within range it is connected automatically. For more information on connection, see page 165
.
Manual disconnection takes place by deactivating the hands-free function with one long press on PHONE . The hands-
free function is also deactivated when the engine is switched off or when a door is opened
1.
When the cell phone has been disconnected an ongoing call can be continued with the cell phone's built-in
microphone and speaker.
1Only Keyless Drive
NOTE
Some cell phones require that the changeover from hands-free is confirmed from the phone's keypad.
164 04 Comfort and driving pleasure
Bluetooth hands-free (option)
Making and receiving calls
ProCarManuals.com
Page 180 of 251
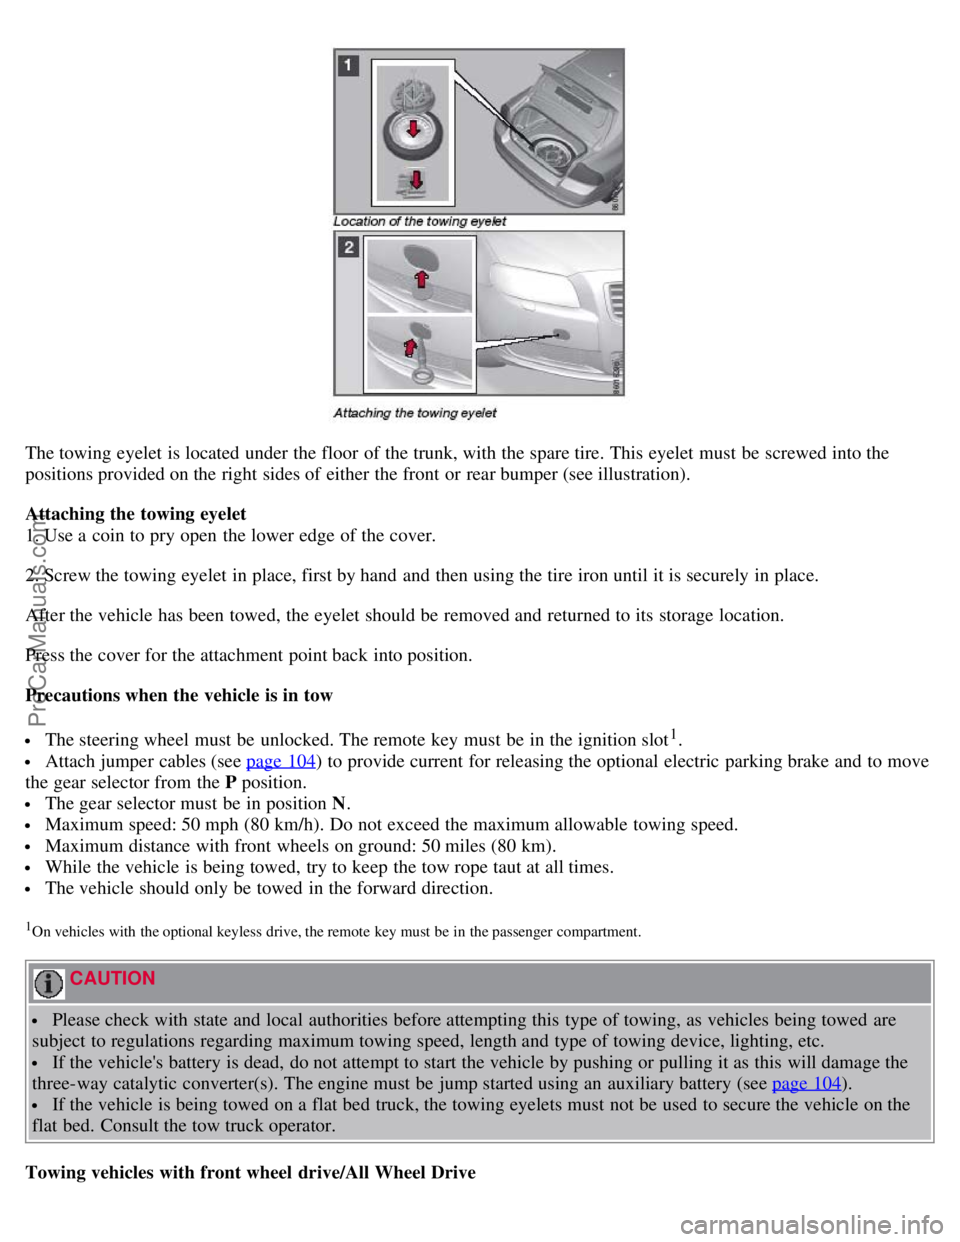
The towing eyelet is located under the floor of the trunk, with the spare tire. This eyelet must be screwed into the
positions provided on the right sides of either the front or rear bumper (see illustration).
Attaching the towing eyelet
1. Use a coin to pry open the lower edge of the cover.
2. Screw the towing eyelet in place, first by hand and then using the tire iron until it is securely in place.
After the vehicle has been towed, the eyelet should be removed and returned to its storage location.
Press the cover for the attachment point back into position.
Precautions when the vehicle is in tow
The steering wheel must be unlocked. The remote key must be in the ignition slot1.
Attach jumper cables (see page 104) to provide current for releasing the optional electric parking brake and to move
the gear selector from the P position.
The gear selector must be in position N .
Maximum speed: 50 mph (80 km/h). Do not exceed the maximum allowable towing speed.
Maximum distance with front wheels on ground: 50 miles (80 km).
While the vehicle is being towed, try to keep the tow rope taut at all times.
The vehicle should only be towed in the forward direction.
1On vehicles with the optional keyless drive, the remote key must be in the passenger compartment.
CAUTION
Please check with state and local authorities before attempting this type of towing, as vehicles being towed are
subject to regulations regarding maximum towing speed, length and type of towing device, lighting, etc.
If the vehicle's battery is dead, do not attempt to start the vehicle by pushing or pulling it as this will damage the
three-way catalytic converter(s). The engine must be jump started using an auxiliary battery (see page 104
).
If the vehicle is being towed on a flat bed truck, the towing eyelets must not be used to secure the vehicle on the
flat bed. Consult the tow truck operator.
Towing vehicles with front wheel drive/All Wheel Drive
ProCarManuals.com
Page 191 of 251
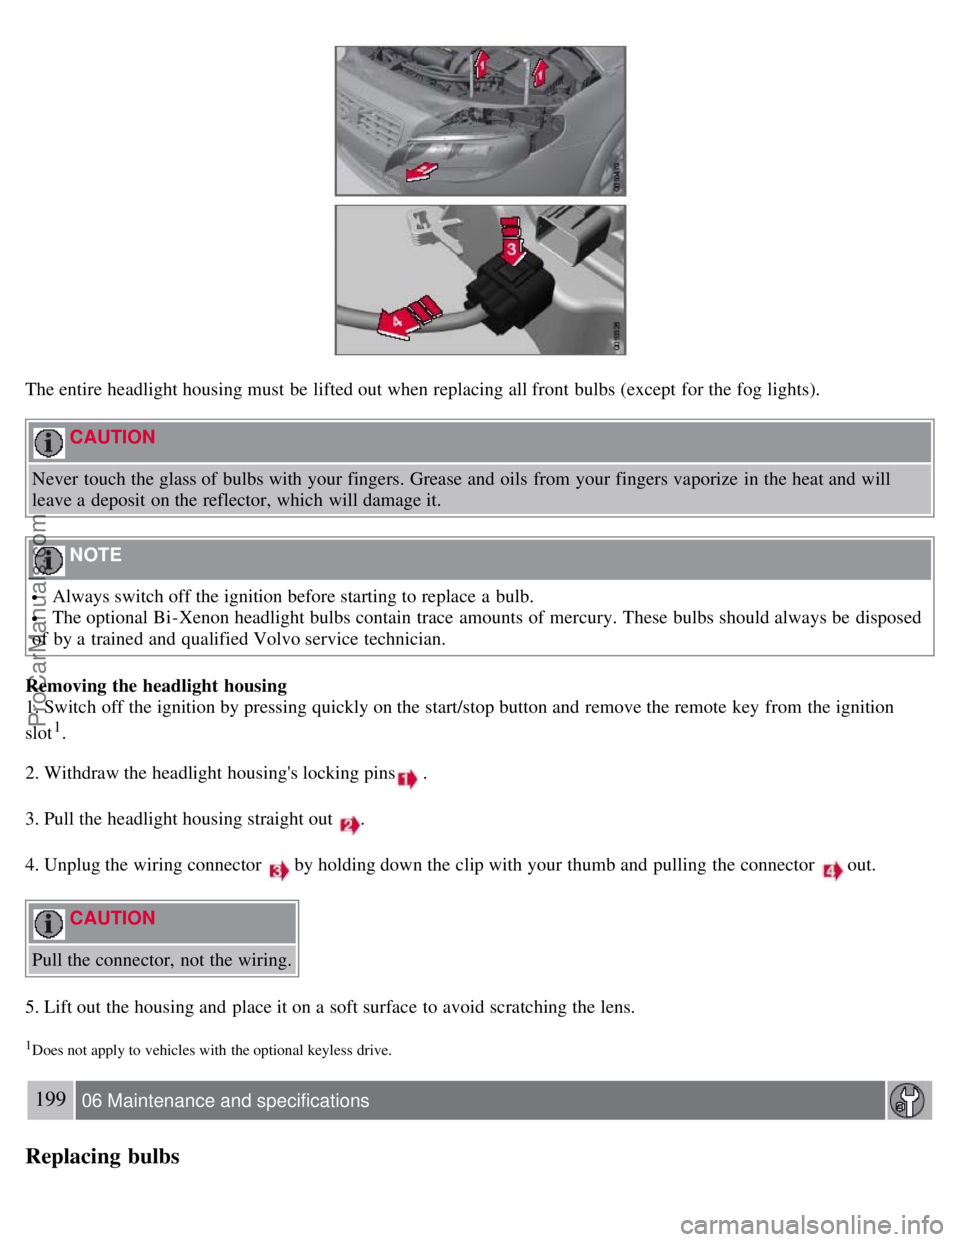
The entire headlight housing must be lifted out when replacing all front bulbs (except for the fog lights).
CAUTION
Never touch the glass of bulbs with your fingers. Grease and oils from your fingers vaporize in the heat and will
leave a deposit on the reflector, which will damage it.
NOTE
Always switch off the ignition before starting to replace a bulb.
The optional Bi -Xenon headlight bulbs contain trace amounts of mercury. These bulbs should always be disposed
of by a trained and qualified Volvo service technician.
Removing the headlight housing
1. Switch off the ignition by pressing quickly on the start/stop button and remove the remote key from the ignition
slot
1.
2. Withdraw the headlight housing's locking pins
.
3. Pull the headlight housing straight out
.
4. Unplug the wiring connector
by holding down the clip with your thumb and pulling the connector out.
CAUTION
Pull the connector, not the wiring.
5. Lift out the housing and place it on a soft surface to avoid scratching the lens.
1Does not apply to vehicles with the optional keyless drive.
199 06 Maintenance and specifications
Replacing bulbs
ProCarManuals.com
Page 199 of 251
205 06 Maintenance and specifications
Wiper blades and washer fluid
Wiper blades
Service position
The wiper blades must be in the service (vertical) position for replacement or washing.
1. Switch off the ignition (ignition mode 0, see page 75
) and keep the remote key in the ignition slot1.
2. Move the right steering wheel lever up and hold it for at least 1 second. The wipers will then move to the vertical
position on the windshield.
The wipers return to the starting position when the vehicle is started.
1Does not apply to vehicles with the optional keyless drive.
Replacing the wiper blades
ProCarManuals.com
Page 243 of 251
ECC120-124
Economical driving170
Electric parking brake110
Electronic Climate Control120-123
air distribution table124
Interior Air Quality System123
ventilated seats121
Emergency brake lights86
Emergency locking retractor31
Emergency starting104
Emergency towing185-186
Emission inspection readiness192
Engine
specifications245
starting102
starting with keyless drive103
Engine compartment overview193
Engine oil
checking194
low pressure warning light72
specifications246
volumes247
Environment9
Eyelets for anchoring loads179
F
Federal Clean Air Act190
Fluid specifications248
Fog lights
front72
front, changing bulbs201
front/rear86
Four C (active chassis system)141
Front airbags18-20
disconnecting passenger's side airbag21-23
Front fog lights72, 86
changing bulbs201
Front park assist153-154
Front seats79
heated121
Fuel filler cap177
Fuel filler door, opening176
Fuel level warning light72
Fuel requirements174-175
Fuses210-215
ProCarManuals.com
Page 245 of 251
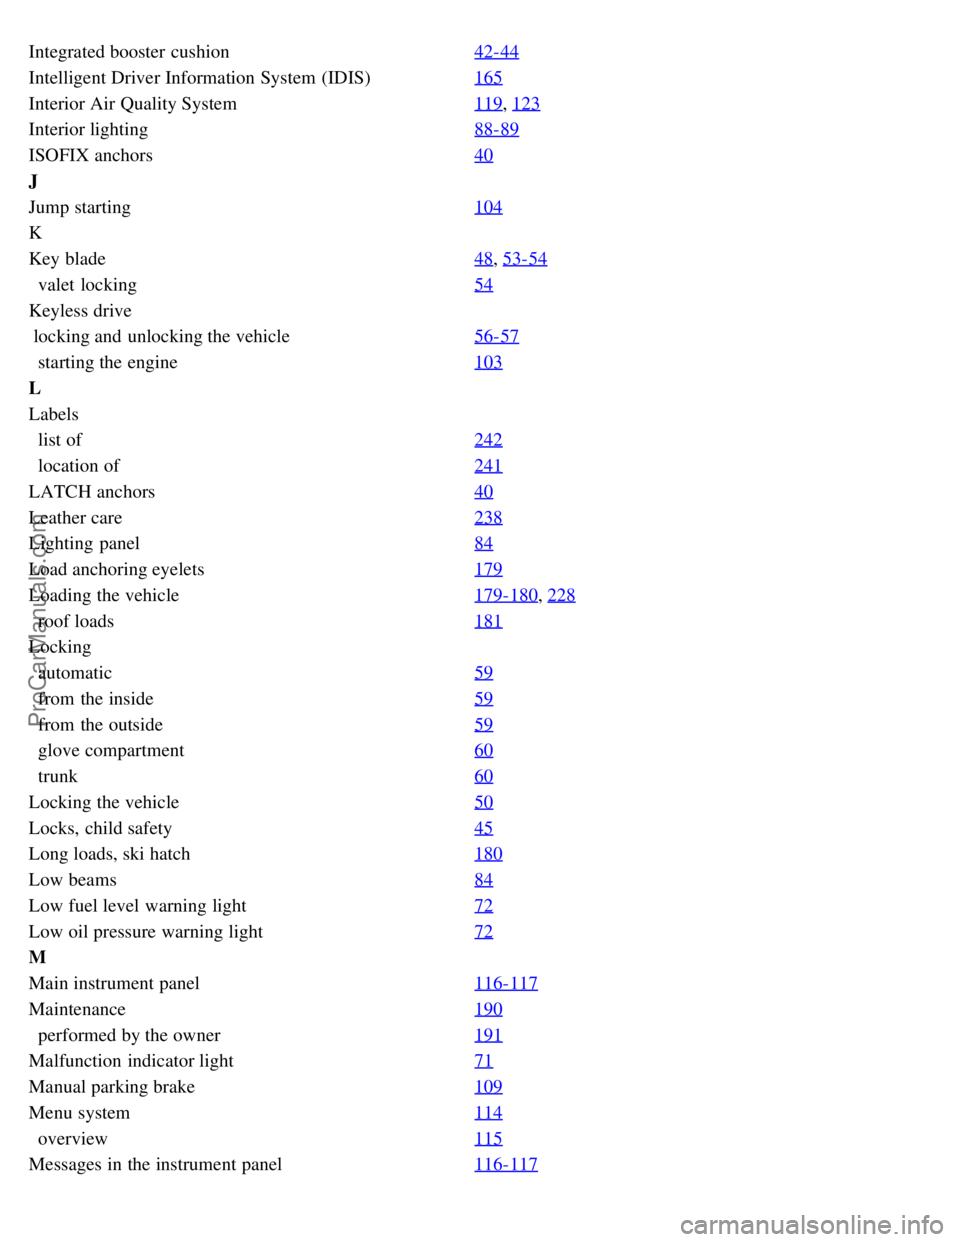
Integrated booster cushion42-44
Intelligent Driver Information System (IDIS)165
Interior Air Quality System119, 123
Interior lighting88-89
ISOFIX anchors40
J
Jump starting104
K
Key blade48
, 53-54
valet locking54
Keyless drive
locking and unlocking the vehicle56-57
starting the engine103
L
Labels
list of242
location of241
LATCH anchors40
Leather care238
Lighting panel84
Load anchoring eyelets179
Loading the vehicle179-180, 228
roof loads181
Locking
automatic59
from the inside59
from the outside59
glove compartment60
trunk60
Locking the vehicle50
Locks, child safety45
Long loads, ski hatch180
Low beams84
Low fuel level warning light72
Low oil pressure warning light72
M
Main instrument panel116-117
Maintenance190
performed by the owner191
Malfunction indicator light71
Manual parking brake109
Menu system114
overview115
Messages in the instrument panel116-117
ProCarManuals.com
Page 246 of 251
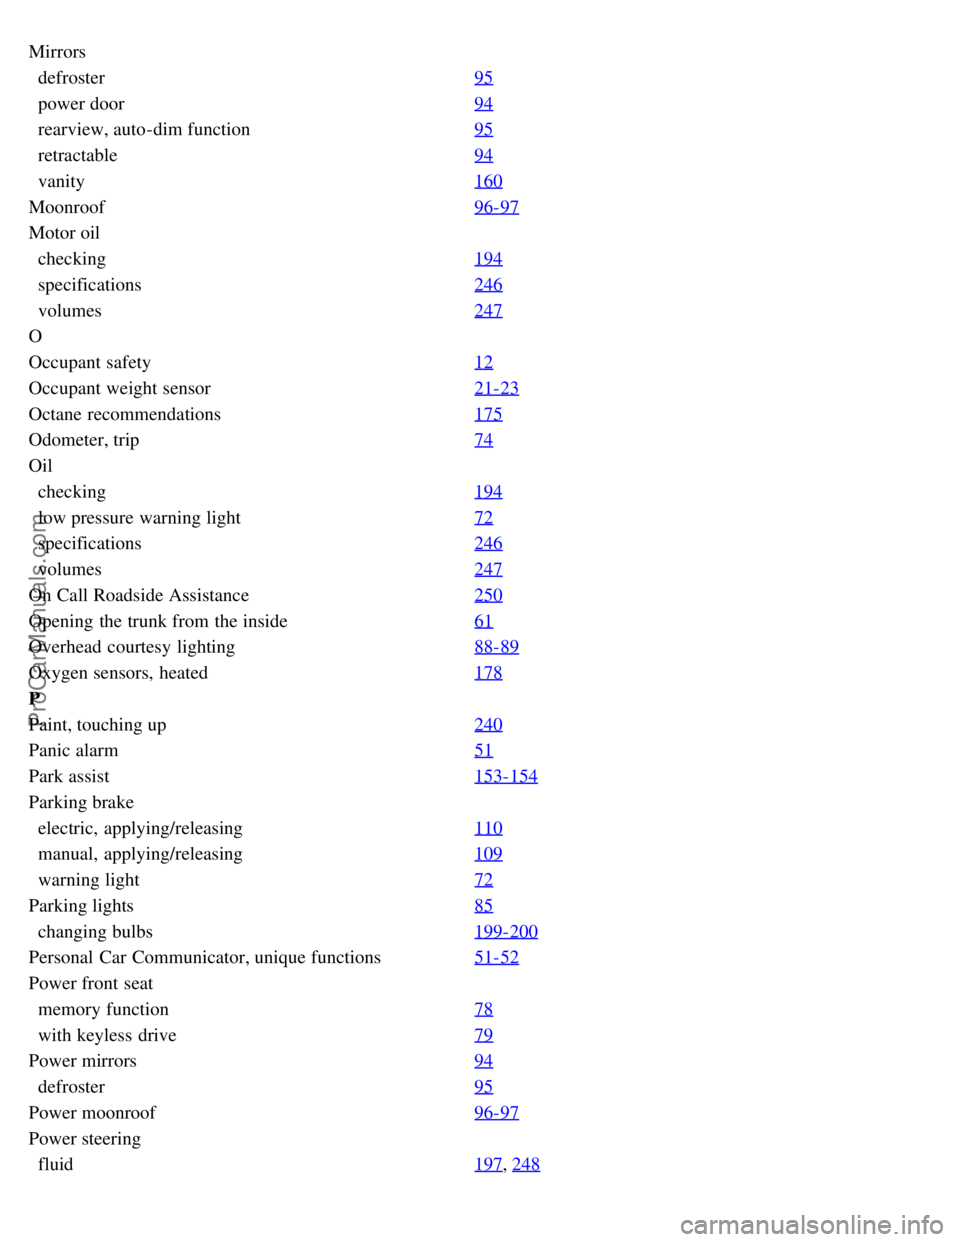
Mirrors
defroster95
power door94
rearview, auto-dim function95
retractable94
vanity160
Moonroof96-97
Motor oil
checking194
specifications246
volumes247
O
Occupant safety12
Occupant weight sensor21-23
Octane recommendations175
Odometer, trip74
Oil
checking194
low pressure warning light72
specifications246
volumes247
On Call Roadside Assistance250
Opening the trunk from the inside61
Overhead courtesy lighting88-89
Oxygen sensors, heated178
P
Paint, touching up240
Panic alarm51
Park assist153-154
Parking brake
electric, applying/releasing110
manual, applying/releasing109
warning light72
Parking lights85
changing bulbs199-200
Personal Car Communicator, unique functions51-52
Power front seat
memory function78
with keyless drive79
Power mirrors94
defroster95
Power moonroof96-97
Power steering
fluid197
, 248
ProCarManuals.com