stop start VOLVO S80 2007 User Guide
[x] Cancel search | Manufacturer: VOLVO, Model Year: 2007, Model line: S80, Model: VOLVO S80 2007Pages: 251, PDF Size: 5.7 MB
Page 135 of 251
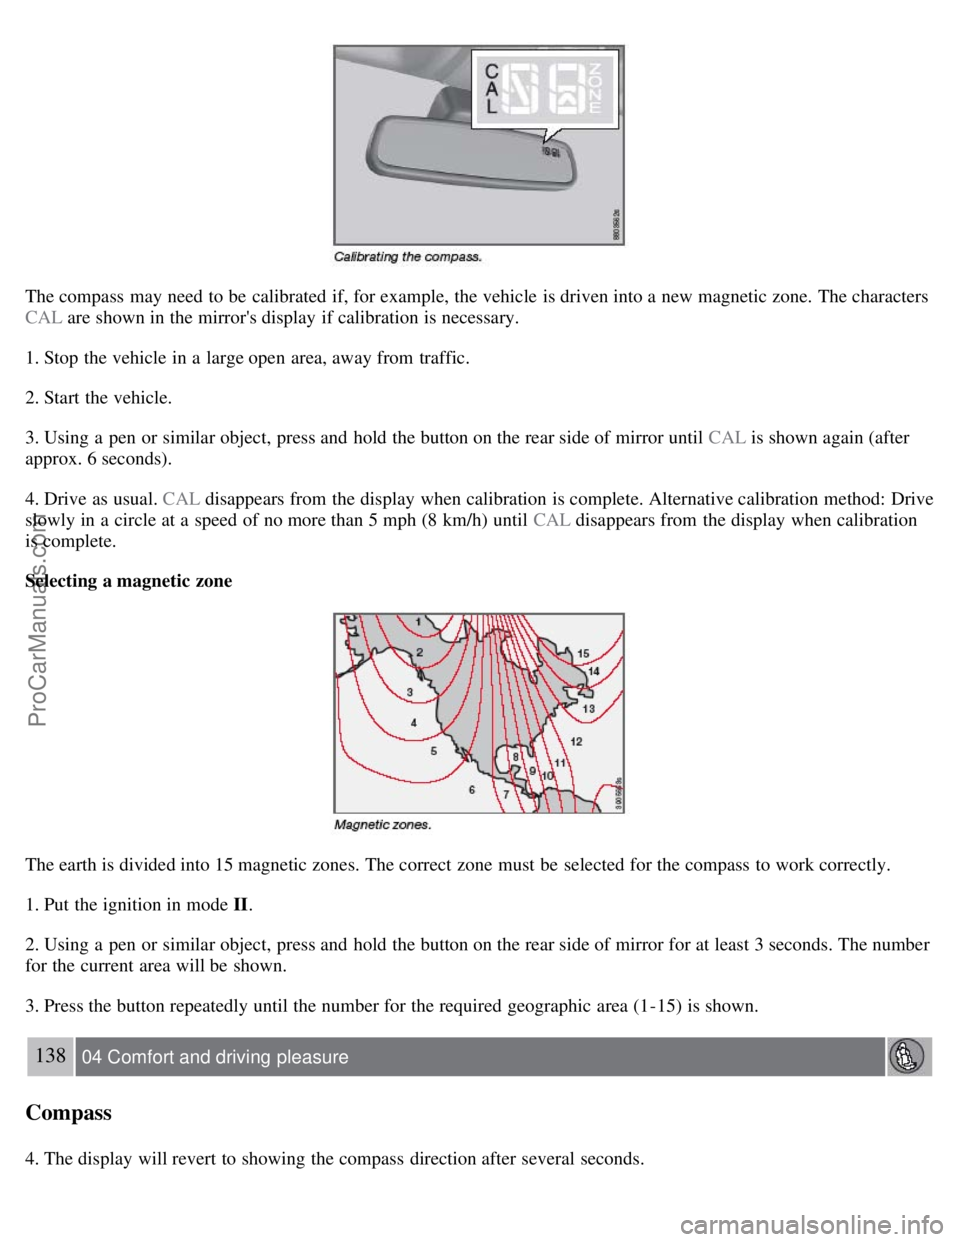
The compass may need to be calibrated if, for example, the vehicle is driven into a new magnetic zone. The characters
CAL are shown in the mirror's display if calibration is necessary.
1. Stop the vehicle in a large open area, away from traffic.
2. Start the vehicle.
3. Using a pen or similar object, press and hold the button on the rear side of mirror until CAL is shown again (after
approx. 6 seconds).
4. Drive as usual. CAL disappears from the display when calibration is complete. Alternative calibration method: Drive
slowly in a circle at a speed of no more than 5 mph (8 km/h) until CAL disappears from the display when calibration
is complete.
Selecting a magnetic zone
The earth is divided into 15 magnetic zones. The correct zone must be selected for the compass to work correctly.
1. Put the ignition in mode II.
2. Using a pen or similar object, press and hold the button on the rear side of mirror for at least 3 seconds. The number
for the current area will be shown.
3. Press the button repeatedly until the number for the required geographic area (1-15) is shown.
138 04 Comfort and driving pleasure
Compass
4. The display will revert to showing the compass direction after several seconds.
ProCarManuals.com
Page 137 of 251
2. Hold down the RESET button to toggle between DSTC SPIN CONTROL ON or OFF.
Messages in the information display
DSTC Temporarily OFF - system function has been temporarily reduced due to high brake disc temperature. The
function is activated automatically when the brakes have cooled.
DSTC Service required - the system has been disabled due to a fault. If this occurs:
140 04 Comfort and driving pleasure
Stability system
1. Stop the vehicle in a safe place and turn off the engine.
2. Restart the engine.
If the message remains when the engine is restarted, drive to an authorized Volvo workshop to have the system
inspected.
Symbols in the instrument panel
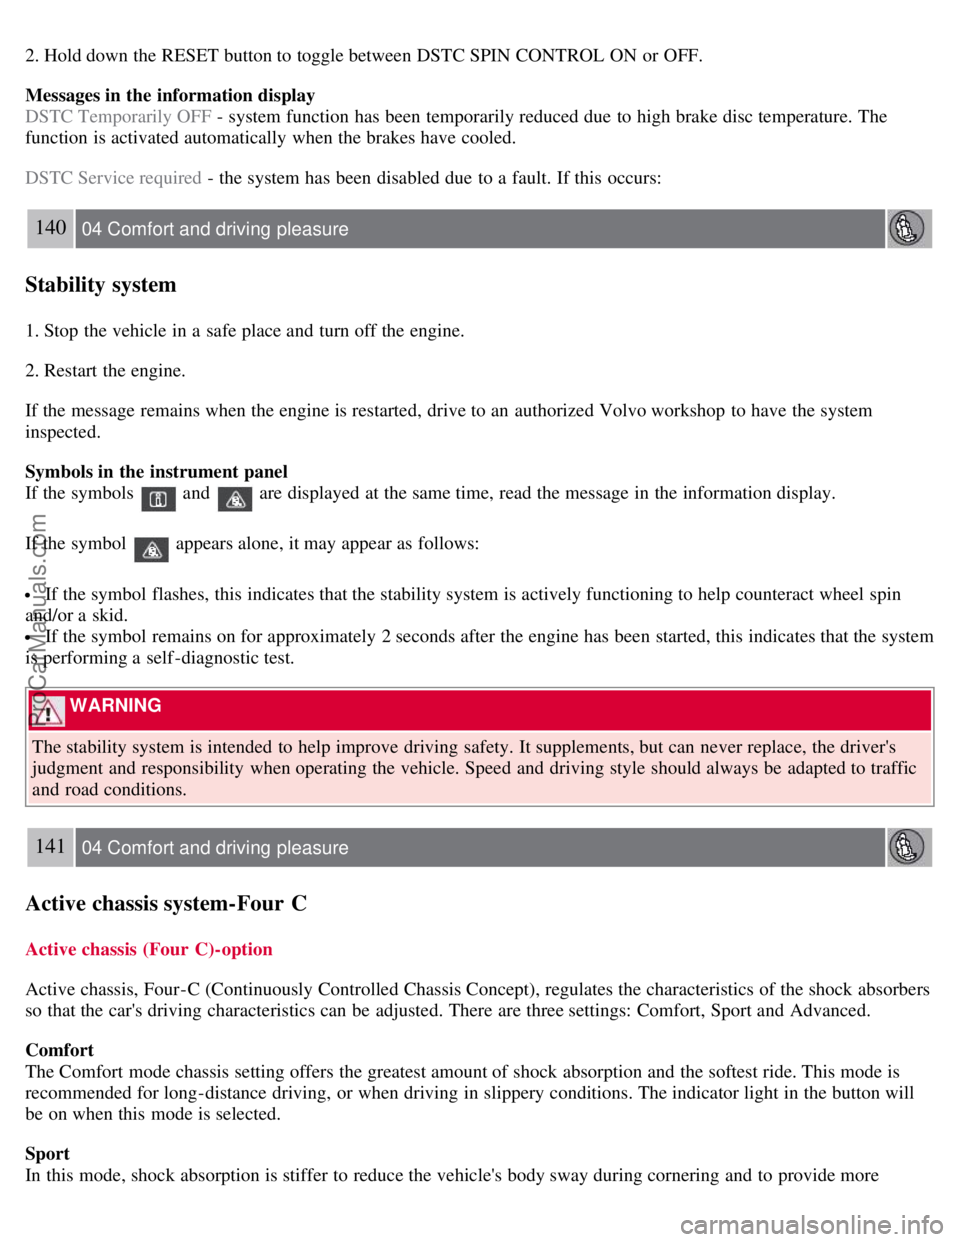
If the symbols
and are displayed at the same time, read the message in the information display.
If the symbol
appears alone, it may appear as follows:
If the symbol flashes, this indicates that the stability system is actively functioning to help counteract wheel spin
and/or a skid.
If the symbol remains on for approximately 2 seconds after the engine has been started, this indicates that the system
is performing a self -diagnostic test.
WARNING
The stability system is intended to help improve driving safety. It supplements, but can never replace, the driver's
judgment and responsibility when operating the vehicle. Speed and driving style should always be adapted to traffic
and road conditions.
141 04 Comfort and driving pleasure
Active chassis system-Four C
Active chassis (Four C)-option
Active chassis, Four-C (Continuously Controlled Chassis Concept), regulates the characteristics of the shock absorbers
so that the car's driving characteristics can be adjusted. There are three settings: Comfort, Sport and Advanced.
Comfort
The Comfort mode chassis setting offers the greatest amount of shock absorption and the softest ride. This mode is
recommended for long-distance driving, or when driving in slippery conditions. The indicator light in the button will
be on when this mode is selected.
Sport
In this mode, shock absorption is stiffer to reduce the vehicle's body sway during cornering and to provide more
ProCarManuals.com
Page 166 of 251
2 0 0 7
VOLVO S80
168 05 During your trip
Driving recommendations 170
Refueling174
Loading179
Towing a trailer182
Emergency towing185
169 05 During your trip
170 05 During your trip
Driving recommendations
General information
Economical driving conserves natural resources
Better driving economy may be obtained by thinking ahead, avoiding rapid starts and stops and adjusting the speed of
your vehicle to immediate traffic conditions.
Observe the following rules:
Bring the engine to normal operating temperature as soon as possible by driving with a light foot on the accelerator
pedal for the first few minutes of operation. A cold engine uses more fuel and is subject to increased wear.
Whenever possible, avoid using the vehicle for driving short distances. This does not allow the engine to reach
normal operating temperature.
Drive carefully and avoid rapid acceleration and hard braking.
Use the transmission's (D)rive position as often as possible and avoid using kickdown.
Do not exceed posted speed limits.
Avoid carrying unnecessary items (extra load) in the vehicle.
Maintain correct tire pressure. Check tire pressure regularly (when tires are cold).
Remove snow tires when threat of snow or ice has ended.
Note that roof racks, ski racks, etc, increase air resistance and also fuel consumption.
ProCarManuals.com
Page 168 of 251
CAUTION
Engine damage will occur if water is drawn into the air cleaner.
If the vehicle is driven through water deeper than 9 in (25 cm), water may enter the differential and the
transmission. This reduces the oil's lubricating capacity and may shorten the service life of these components.
Do not allow the vehicle to stand in water up to the door sills longer than absolutely necessary. This could result
in electrical malfunctions.
If the engine has been stopped while the vehicle is in water, do not attempt to restart the engine. Have the vehicle
towed out of the water.
Engine and cooling system
Under special conditions, for example when driving in hilly terrain, extreme heat or with heavy loads, there is a risk
that the engine and cooling system will overheat. Proceed as follows to avoid overheating the engine.
Maintain a low speed when driving with a trailer up long, steep hills.
Do not turn the engine off immediately you stop after a hard drive.
Remove any auxiliary lights from in front of the grille when driving in hot weather conditions.
Do not exceed engine speeds of 4500 rpm if driving with a trailer in hilly terrain. The oil temperature could become
too high.
Conserving electrical current
Keep the following in mind to help minimize battery drain:
When the engine is not running, avoid using ignition mode II. Many electrical systems (the audio system, the
optional navigation system, power windows, etc) will function in ignition modes 0 and I. These modes reduce drain on
the battery.
Please keep in mind that using systems, accessories, etc., that consume a great deal of current when the engine is not
running could result in the battery being completely drained.
The optional 12 volt socket in the trunk provides electrical current even with the ignition switched off, which drains
the battery.
Before a long distance trip
It is always worthwhile to have your vehicle checked by a trained and qualified Volvo service technician before
driving long distances. Your retailer will also be able to supply you with bulbs, fuses, spark plugs and wiper blades for
your use in the event that problems occur.
172 05 During your trip
Driving recommendations
As a minimum, the following items should be checked before any long trip:
Check that engine runs smoothly and that fuel consumption is normal.
Check for fuel, oil, and fluid leakage
Have the transmission oil level checked.
Check condition of drive belts.
Check state of the battery's charge.
Examine tires carefully (the spare tire as well), and replace those that are worn. Check tire pressures.
The brakes, front wheel alignment, and steering gear should be checked by a trained and qualified Volvo service
technician only.
Check all lights, including high beams.
Reflective warning triangles are legally required in some states/provinces.
ProCarManuals.com
Page 178 of 251
Hauling a trailer affects handling, durability, and economy.
It is necessary to balance trailer brakes with the towing vehicle brakes to provide a safe stop (check and observe
state/local regulations).
Do not connect the trailer's brake system directly to the vehicle's brake system.
More frequent vehicle maintenance is required.
Remove the ball and drawbar assembly when the hitch is not being used.
Volvo recommends the use of synthetic engine oil when towing a trailer over long distances or in mountainous
areas.
WARNING
Bumper-attached trailer hitches must not be used on Volvos, nor should safety chains be attached to the bumper.
Trailer hitches attaching to the vehicle rear axle must not be used.
Never connect a trailer's hydraulic brake system directly to the vehicle brake system, nor a trailer's lighting system
directly to the vehicle lighting system. Consult your nearest authorized Volvo retailer for correct installation.
When towing a trailer, the trailer's safety wire must be correctly fastened to the hole or hook provided in the
trailer hitch on the vehicle. The safety wire should never be fastened to or wound around the drawbar ball.
183 05 During your trip
Towing a trailer
NOTE
When parking the vehicle with a trailer on a hill, apply the parking brake before putting the gear selector in P .
Always follow the trailer manufacturer's recommendations for wheel chocking.
When starting on a hill, put the gear selector in D before releasing the parking brake. See also page 111 for more
detailed information about starting off on a hill while towing a trailer.
If you use the manual (Geartronic) shift positions while towing a trailer, make sure the gear you select does not
put too much strain on the engine (using too high a gear).
The drawbar assembly/trailer hitch may be rated for trailers heavier than the vehicle is designed to tow. Please
adhere to Volvo's recommended trailer weights.
Avoid driving with a trailer on inclines of more than 15 %.
Trailer cable
An adapter is required if the vehicle's trailer hitch has a 13-pin connector and the trailer has 7 pins. Use an adapter
cable approved by Volvo. Make sure the cable does not drag on the ground.
184 05 During your trip
Towing a trailer
Detachable trailer hitch (accessory)
ProCarManuals.com
Page 191 of 251
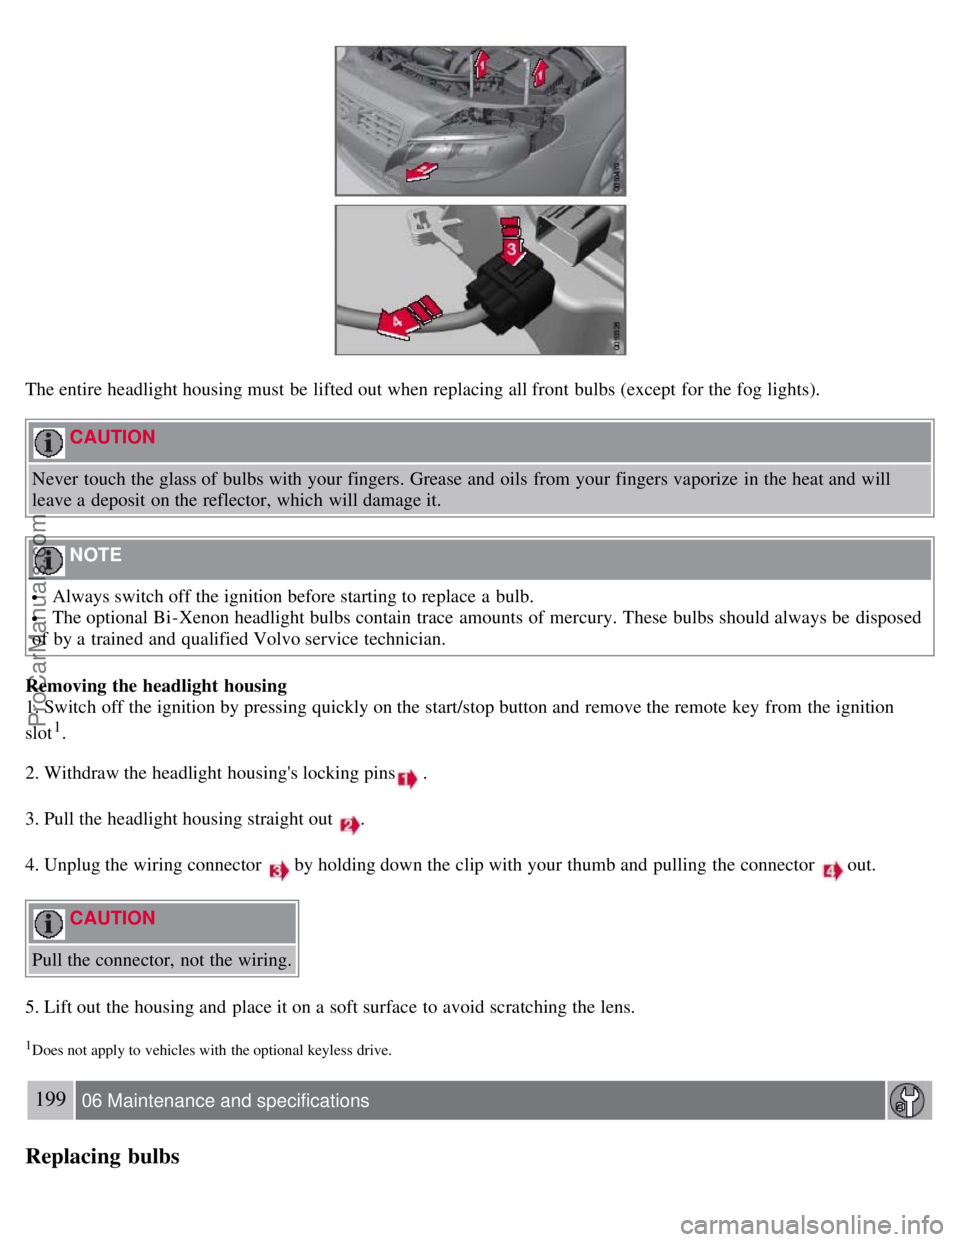
The entire headlight housing must be lifted out when replacing all front bulbs (except for the fog lights).
CAUTION
Never touch the glass of bulbs with your fingers. Grease and oils from your fingers vaporize in the heat and will
leave a deposit on the reflector, which will damage it.
NOTE
Always switch off the ignition before starting to replace a bulb.
The optional Bi -Xenon headlight bulbs contain trace amounts of mercury. These bulbs should always be disposed
of by a trained and qualified Volvo service technician.
Removing the headlight housing
1. Switch off the ignition by pressing quickly on the start/stop button and remove the remote key from the ignition
slot
1.
2. Withdraw the headlight housing's locking pins
.
3. Pull the headlight housing straight out
.
4. Unplug the wiring connector
by holding down the clip with your thumb and pulling the connector out.
CAUTION
Pull the connector, not the wiring.
5. Lift out the housing and place it on a soft surface to avoid scratching the lens.
1Does not apply to vehicles with the optional keyless drive.
199 06 Maintenance and specifications
Replacing bulbs
ProCarManuals.com
Page 217 of 251
Tire Pressure Monitoring System (TPMS) -U.S models only
The tire pressure monitoring system uses sensors mounted in the tire valves to check inflation pressure levels. When
the vehicle is moving at a speed of approximately 20 mph (30 km/h) or faster, these sensors transmit inflation pressure
data to a receiver located in the vehicle.
NOTE
USA - FCC ID: KR5S122780002
This device complies with part 15 of the FCC rules. Operation is subject to the following conditions: (1) This device
may not cause harmful interference, and (2) this device must accept any interference received, including interference
that may cause undesired operation.
When low inflation pressure is detected, TPMS will light up the tire pressure warning light (
) (also referred to as a
telltale) in the instrument panel, and will display a message in the text window. The wording of this message is
determined by the degree of inflation pressure loss.
NOTE
If a fault occurs in TPMS, the tire pressure warning light will flash for approximately 1 minute and TIRE PRESS
SYST SERVICE REQUIRED will be displayed.
Each tire, including the spare (if provided), should be checked monthly when cold and inflated to the inflation pressure
recommended by the vehicle manufacturer on the vehicle placard or tire inflation pressure label. (If your vehicle has
tires of a different size than the size indicated on the vehicle placard or tire inflation pressure label, you should
determine the proper tire inflation pressure for those tires.)
As an added safety feature, your vehicle has been equipped with a tire pressure monitoring system (TPMS) that
illuminates a low tire pressure telltale when one or more of your tires is significantly under-inflated. Accordingly,
when the low tire pressure telltale illuminates, you should stop and check your tires as soon as possible, and inflate
them to the proper pressure. Driving on a significantly under-inflated tire causes the tire to overheat and can lead to
tire failure. Under-inflation also reduces fuel efficiency and tire tread life, and may affect the vehicle's handling and
stopping ability.
Please note that the TPMS is not a substitute for proper tire maintenance, and it is the driver's responsibility to
maintain correct tire pressure, even if under-inflation has not reached the level to trigger illumination of the TPMS low
tire pressure telltale.
Your vehicle has also been equipped with a TPMS malfunction indicator to indicate when the system is not operating
properly. The TPMS malfunction indicator is combined with the low tire pressure telltale. When the system detects a
malfunction, the telltale will flash for approximately one minute and then remain continuously illuminated. This
sequence will continue upon subsequent vehicle start-ups as long as the malfunction exists. When the malfunction
indicator is illuminated, the system may not be able to detect or signal low tire pressure as intended. TPMS
malfunctions may occur for a variety of reasons, including the installation of replacement or alternate tires or wheels
on the vehicle that prevent the TPMS from functioning properly. Always check the TPMS malfunction telltale after
replacing one or more tires or wheels on your vehicle to ensure that the replacement or alternate tires and wheels allow
the TPMS to continue to function properly.
224 06 Maintenance and specifications
Wheels and tires
ProCarManuals.com