jump start VOLVO S80 2007 Owners Manual
[x] Cancel search | Manufacturer: VOLVO, Model Year: 2007, Model line: S80, Model: VOLVO S80 2007Pages: 251, PDF Size: 5.7 MB
Page 96 of 251

1Does not apply to vehicles with the optional keyless drive.
103 03 Your driving environment
Starting the engine
CAUTION
When starting in cold weather, the automatic transmission may shift up at slightly higher engine speeds than
normal until the automatic transmission fluid reaches normal operating temperature.
Do not race a cold engine immediately after starting. Oil flow may not reach some lubrication points fast enough
to prevent engine damage.
The engine should be idling when you move the gear selector. Never accelerate until after you feel the
transmission engage. Accelerating immediately after selecting a gear will cause harsh engagement and premature
transmission wear.
Selecting P or N when idling at a standstill for prolonged periods of time will help prevent overheating of the
automatic transmission fluid.
Keyless drive (option)
Follow steps 2-3 for starting the engine.
NOTE
For the vehicle to start, one of the vehicle's remote keys must be in the passenger compartment.
Steering wheel lock
The steering wheel lock is deactivated when the remote key is inserted into the ignition slot
1 and activated when the
remote key is removed from the ignition slot.
Always take the remote key or keyless drive remote when leaving the vehicle to help reduce the risk of theft.
1On vehicles with the optional keyless drive, the steering lock is deactivated when the start button is pressed for the first time (assuming that a
remote control is in the passenger's compartment). It is activated when the ignition is switched off and the driver's door is opened.
104 03 Your driving environment
Starting the engine
Jump starting
ProCarManuals.com
Page 97 of 251

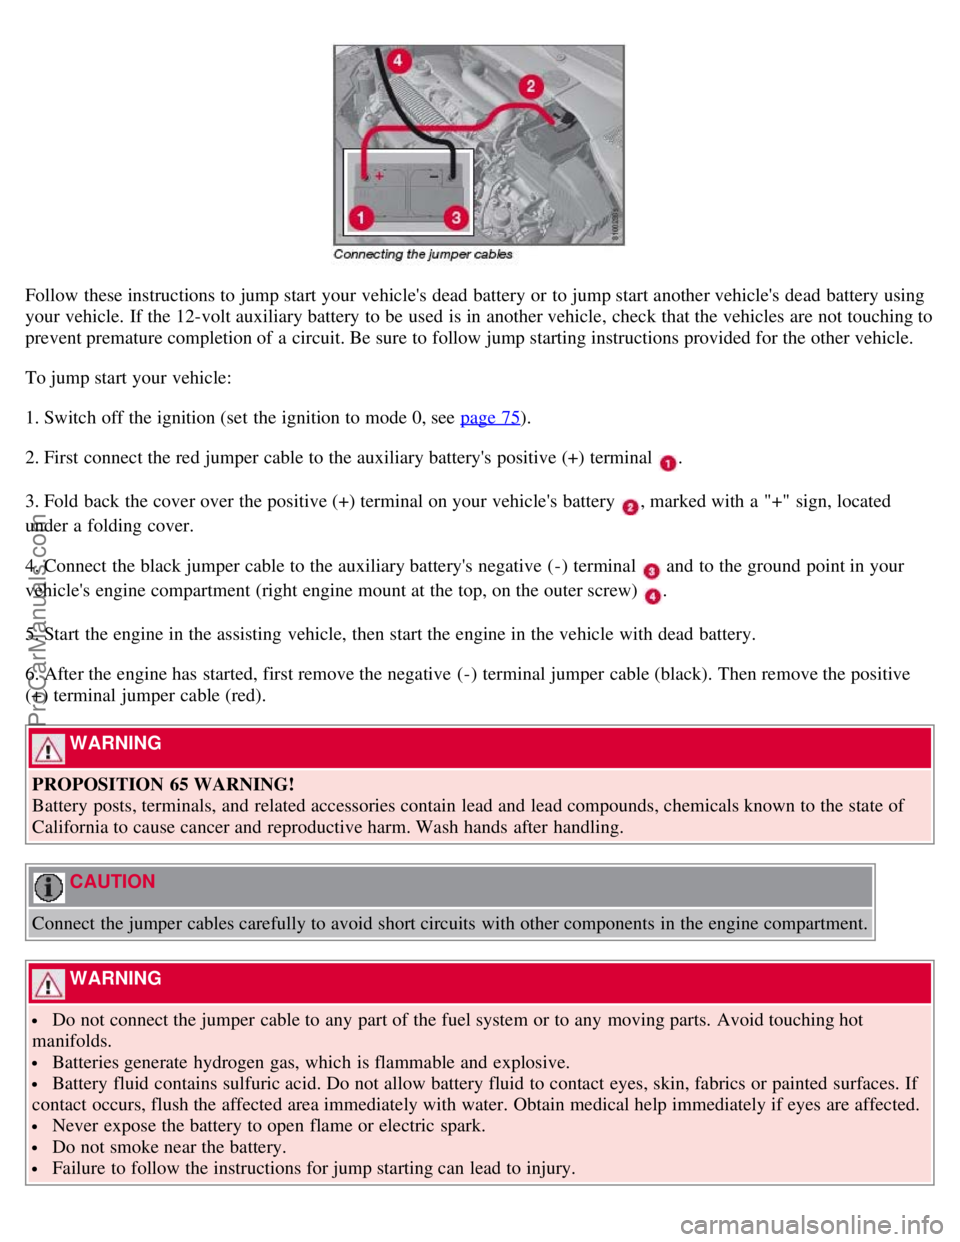
Follow these instructions to jump start your vehicle's dead battery or to jump start another vehicle's dead battery using
your vehicle. If the 12-volt auxiliary battery to be used is in another vehicle, check that the vehicles are not touching to
prevent premature completion of a circuit. Be sure to follow jump starting instructions provided for the other vehicle.
To jump start your vehicle:
1. Switch off the ignition (set the ignition to mode 0, see page 75
).
2. First connect the red jumper cable to the auxiliary battery's positive (+) terminal
.
3. Fold back the cover over the positive (+) terminal on your vehicle's battery
, marked with a "+" sign, located
under a folding cover.
4. Connect the black jumper cable to the auxiliary battery's negative (-) terminal
and to the ground point in your
vehicle's engine compartment (right engine mount at the top, on the outer screw)
.
5. Start the engine in the assisting vehicle, then start the engine in the vehicle with dead battery.
6. After the engine has started, first remove the negative (-) terminal jumper cable (black). Then remove the positive
(+) terminal jumper cable (red).
WARNING
PROPOSITION 65 WARNING!
Battery posts, terminals, and related accessories contain lead and lead compounds, chemicals known to the state of
California to cause cancer and reproductive harm. Wash hands after handling.
CAUTION
Connect the jumper cables carefully to avoid short circuits with other components in the engine compartment.
WARNING
Do not connect the jumper cable to any part of the fuel system or to any moving parts. Avoid touching hot
manifolds.
Batteries generate hydrogen gas, which is flammable and explosive.
Battery fluid contains sulfuric acid. Do not allow battery fluid to contact eyes, skin, fabrics or painted surfaces. If
contact occurs, flush the affected area immediately with water. Obtain medical help immediately if eyes are affected.
Never expose the battery to open flame or electric spark.
Do not smoke near the battery.
Failure to follow the instructions for jump starting can lead to injury.
ProCarManuals.com
Page 180 of 251

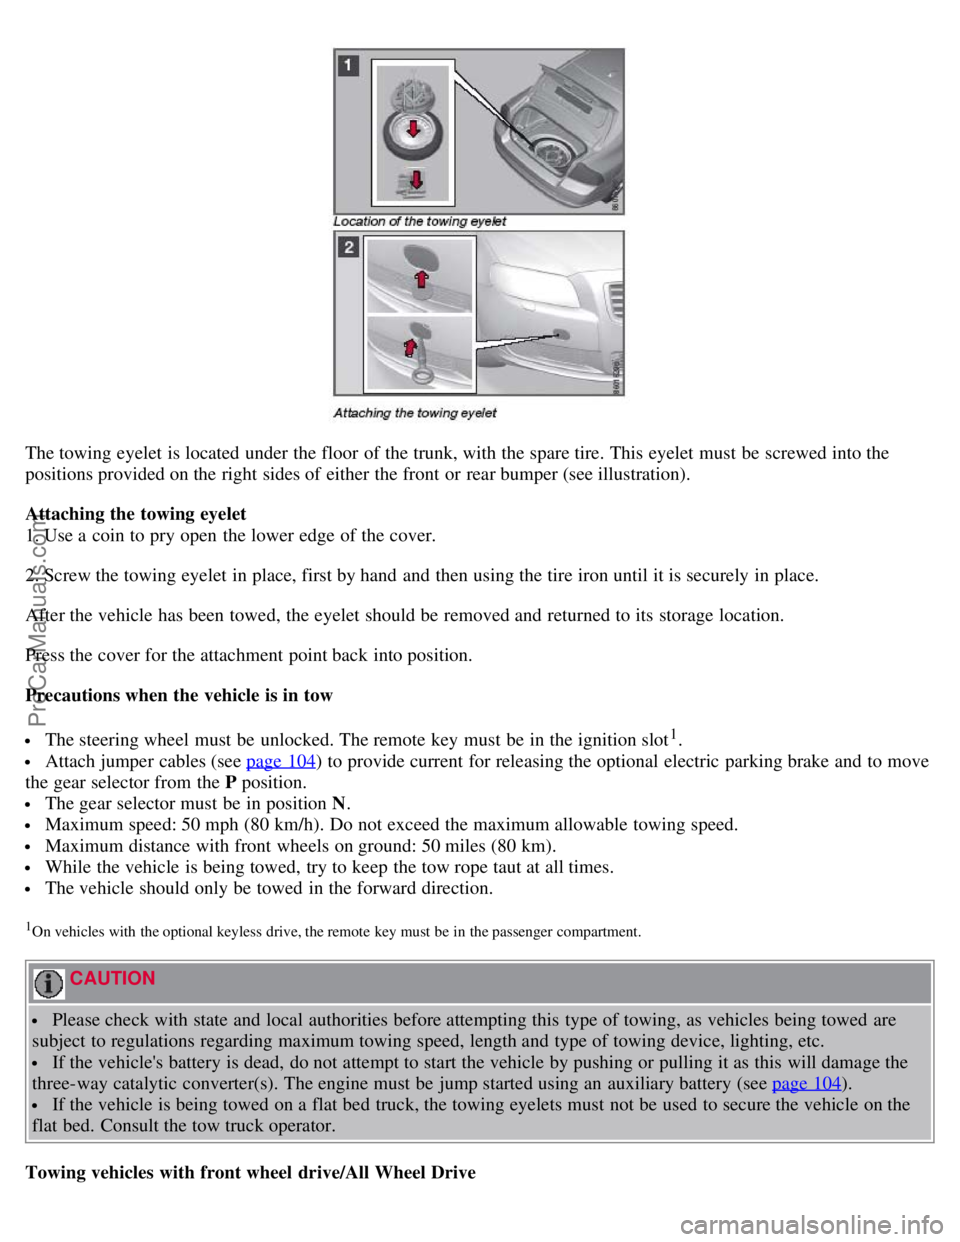
The towing eyelet is located under the floor of the trunk, with the spare tire. This eyelet must be screwed into the
positions provided on the right sides of either the front or rear bumper (see illustration).
Attaching the towing eyelet
1. Use a coin to pry open the lower edge of the cover.
2. Screw the towing eyelet in place, first by hand and then using the tire iron until it is securely in place.
After the vehicle has been towed, the eyelet should be removed and returned to its storage location.
Press the cover for the attachment point back into position.
Precautions when the vehicle is in tow
The steering wheel must be unlocked. The remote key must be in the ignition slot1.
Attach jumper cables (see page 104) to provide current for releasing the optional electric parking brake and to move
the gear selector from the P position.
The gear selector must be in position N .
Maximum speed: 50 mph (80 km/h). Do not exceed the maximum allowable towing speed.
Maximum distance with front wheels on ground: 50 miles (80 km).
While the vehicle is being towed, try to keep the tow rope taut at all times.
The vehicle should only be towed in the forward direction.
1On vehicles with the optional keyless drive, the remote key must be in the passenger compartment.
CAUTION
Please check with state and local authorities before attempting this type of towing, as vehicles being towed are
subject to regulations regarding maximum towing speed, length and type of towing device, lighting, etc.
If the vehicle's battery is dead, do not attempt to start the vehicle by pushing or pulling it as this will damage the
three-way catalytic converter(s). The engine must be jump started using an auxiliary battery (see page 104
).
If the vehicle is being towed on a flat bed truck, the towing eyelets must not be used to secure the vehicle on the
flat bed. Consult the tow truck operator.
Towing vehicles with front wheel drive/All Wheel Drive
ProCarManuals.com
Page 245 of 251

Integrated booster cushion42-44
Intelligent Driver Information System (IDIS)165
Interior Air Quality System119, 123
Interior lighting88-89
ISOFIX anchors40
J
Jump starting104
K
Key blade48
, 53-54
valet locking54
Keyless drive
locking and unlocking the vehicle56-57
starting the engine103
L
Labels
list of242
location of241
LATCH anchors40
Leather care238
Lighting panel84
Load anchoring eyelets179
Loading the vehicle179-180, 228
roof loads181
Locking
automatic59
from the inside59
from the outside59
glove compartment60
trunk60
Locking the vehicle50
Locks, child safety45
Long loads, ski hatch180
Low beams84
Low fuel level warning light72
Low oil pressure warning light72
M
Main instrument panel116-117
Maintenance190
performed by the owner191
Malfunction indicator light71
Manual parking brake109
Menu system114
overview115
Messages in the instrument panel116-117
ProCarManuals.com