buttons VOLVO S80 2014 Owner´s Manual
[x] Cancel search | Manufacturer: VOLVO, Model Year: 2014, Model line: S80, Model: VOLVO S80 2014Pages: 380, PDF Size: 10.83 MB
Page 198 of 380
05 Comfort and driving pleasure
The MY CAR menus
05
196
Medium Low
See page 216 for more information. Reset car settings This feature returns the "Car settings" menu to the original factory settings.
MY CARSettingsDriver support
systems
Collision Warning
Collision Warning Warning distanceLongNormalShort
Warning sound
See page 164 for more information. Lane Departure Warning
Lane Departure Warning On at start-upIncreased sensitivity See page 173 for more information.
Road Sign Information OnOff
Speed alert OnOff
DSTC See page 136 for more information. City Safety See page 156 for more information. BLIS See page 184 for more information. Distance Alert See page 153 for more information. Driver Alert See page 170 for more information.
MY CARSettingsSystem options
Set/change time See page 83 for more information. Time format
12 h 24 h
Screen saver The contents of the screen are replaced by another image if this selection is marked. Thecontents of the screen will be displayed againif one of the buttons (1-4) is pressed, seepage 193. Uncheck the selection to turn the screen saver off. Language Select the language for menu texts. Show help text This displays help texts for the current menu. Distance and fuel units
MPG (UK) MPG (US)km/ll/100km
Page 206 of 380
05 Comfort and driving pleasure
Climate system
05
204
Blower controlTurn the control clockwise to increase or counterclockwiseto decrease the blowerspeed. If AUTO is selected,
blower speed will be regula-ted automatically and thiswill override manual adjust-
ment.
NOTE
If the blower is turned off completely, the air conditioning is disengaged, which mayresult in fogging on the windows.
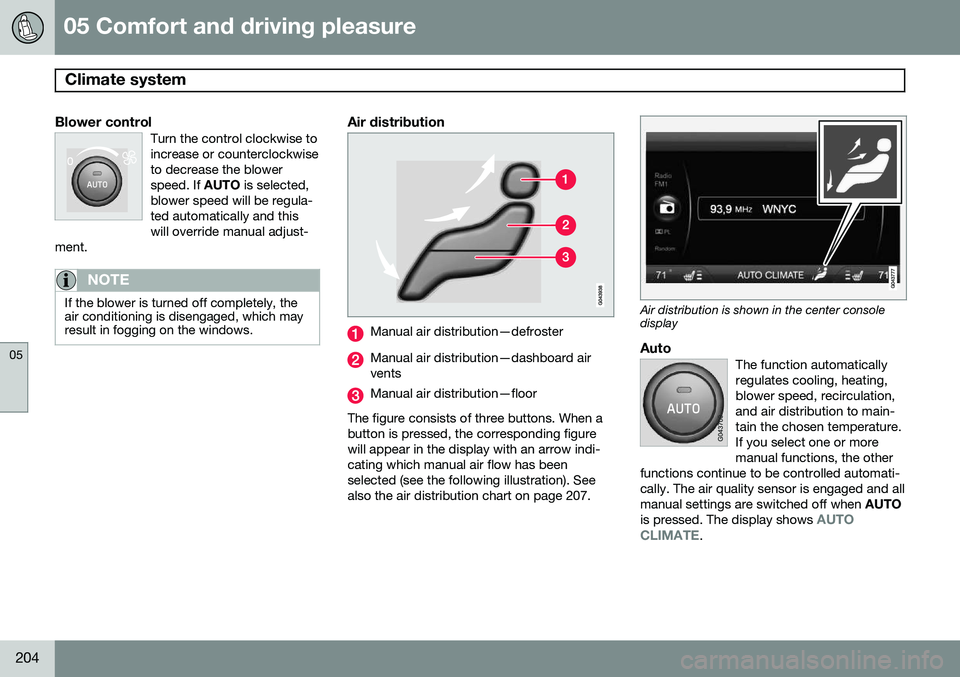
Air distribution
Manual air distribution—defroster
Manual air distribution—dashboard air vents
Manual air distribution—floor
The figure consists of three buttons. When a button is pressed, the corresponding figurewill appear in the display with an arrow indi-cating which manual air flow has beenselected (see the following illustration). Seealso the air distribution chart on page 207.
Air distribution is shown in the center console display
AutoThe function automatically regulates cooling, heating,blower speed, recirculation,and air distribution to main-tain the chosen temperature.If you select one or moremanual functions, the other
functions continue to be controlled automati-cally. The air quality sensor is engaged and allmanual settings are switched off when AUTO
is pressed. The display shows
AUTO
CLIMATE.
Page 218 of 380
05 Comfort and driving pleasure
Active chassis system–Four C*
05
216* Option/accessory, for more information, see Introduction.
Active chassis (Four C)
Active chassis, Four-C (Continuously Con- trolled Chassis Concept), regulates the cha-racteristics of the shock absorbers so that thecar's driving characteristics can be adjusted.There are three settings: Comfort, Sport andAdvanced.
ComfortComfort mode offers a somewhat softer rideand the transmission shifts gears at lowerrpm. This mode is particularly suitable forlong-distance highway driving. The indicatorlight in the button will be on when this modeis selected.
SportIn this mode, the vehicle's body sway isreduced during cornering and steeringresponse is more immediate. The transmis-sion shifts up at higher rpm for sportier driv-ing. The indicator light in the button will be onto indicate that Sport mode has beenselected.
AdvancedIn this mode, body sway in curves is minimaland steering response is very direct. Gearshifting is done at high rpm in each gear fordynamic and active driving.
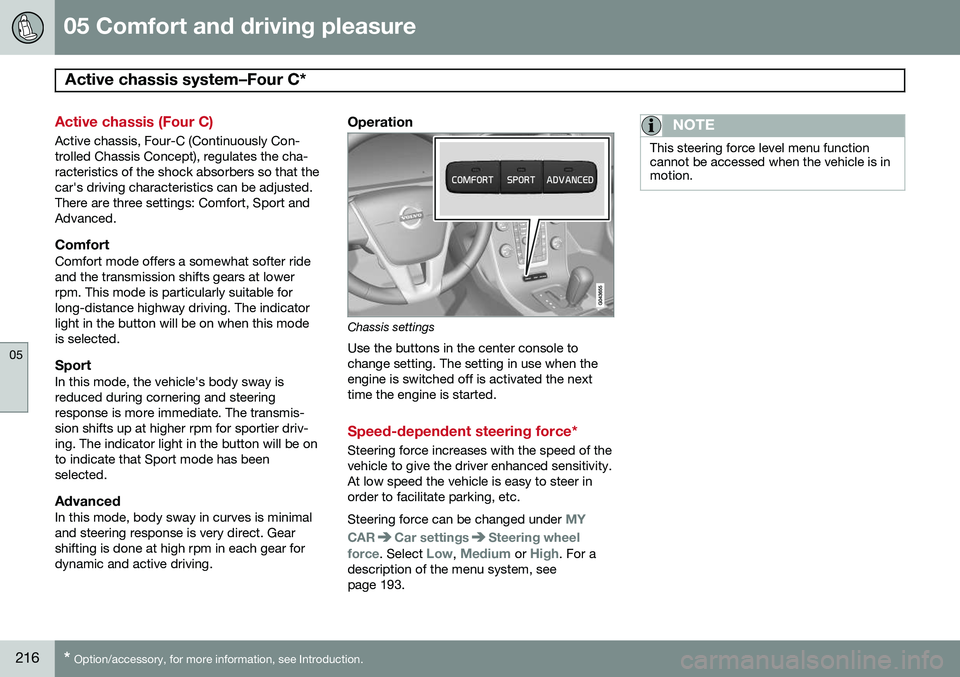
Operation
Chassis settings
Use the buttons in the center console to change setting. The setting in use when theengine is switched off is activated the nexttime the engine is started.
Speed-dependent steering force*
Steering force increases with the speed of the vehicle to give the driver enhanced sensitivity.At low speed the vehicle is easy to steer inorder to facilitate parking, etc. Steering force can be changed under
MY
CAR
Car settingsSteering wheel
force
. Select Low, Medium or High. For a
description of the menu system, see page 193.
NOTE
This steering force level menu function cannot be accessed when the vehicle is inmotion.
Page 226 of 380
06 Infotainment
Introduction
06
224* Option/accessory, for more information, see Introduction.
General information
The infotainment system consists of radio and media player features and also makes itpossible to communicate via a cell phone.The information is displayed on a 7" screen inthe center console. Infotainment functionscan be controlled from the center console orvia the buttons on the steering wheel keypad.On models equipped with the navigation sys-tem*, voice commands can also be used toe.g., set destinations, make calls from a Bluetooth ®
-connected cell phone, etc.
If the infotainment system was on when the ignition was switched off, the most recently used source (
FM1, etc.) will restart the next
time the ignition is put in mode I or higher.
The driver's door must also be closed on vehicles with keyless drive*. The infotainment system can be operated for 15 minutes at a time while the engine isswitched off by pressing the On/Off button. While the engine is being started, the infotain- ment system will be temporarily interruptedand will resume when the engine has started.
NOTE
To help avoid excessive battery drain, remove the remote key from the ignitionslot if the infotainment system is usedwhile the engine is switched off.
Dolby Pro Logic
The system is manufactured under license from Dolby Laboratories LicensingCorporation. Dolby Pro Logic II and the
symbol are
trademarks of Dolby Laboratories Licensing Corporation.
Audyssey MultEQ 1
The Audyssey MultEQ system has been used to optimize sound quality to help ensure aworld-class listening experience.
1
Applies only to models with Premium Sound Multimedia.
Page 227 of 380
06 Infotainment
Introduction
06
}}
* Option/accessory, for more information, see Introduction.225
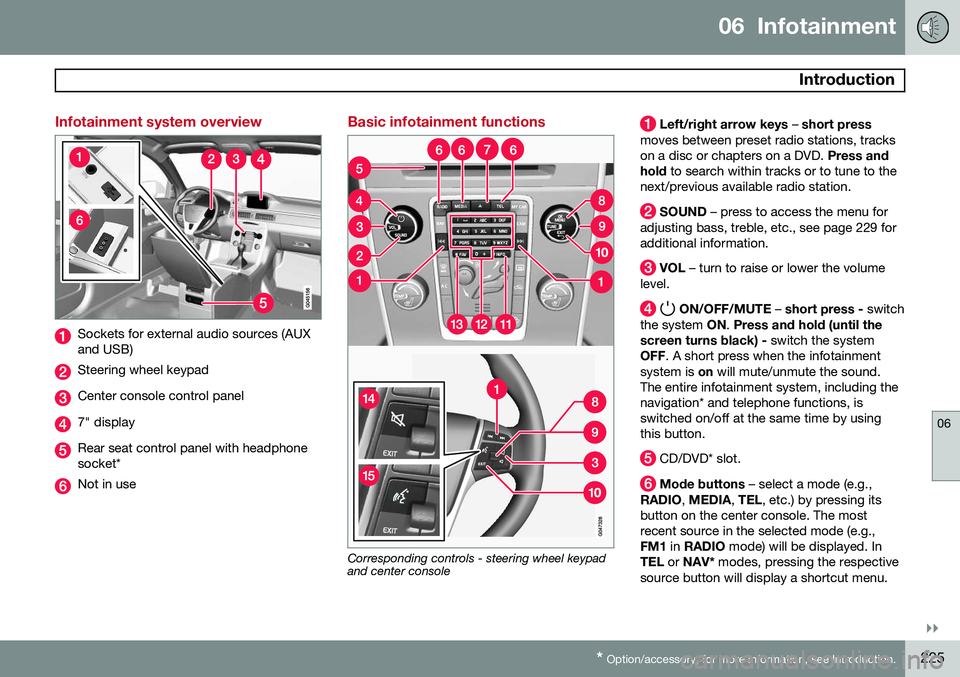
Infotainment system overview
Sockets for external audio sources (AUX and USB)
Steering wheel keypad
Center console control panel
7" display
Rear seat control panel with headphone socket*
Not in use
Basic infotainment functions
Corresponding controls - steering wheel keypad and center console
Left/right arrow keys – short press
moves between preset radio stations, tracks on a disc or chapters on a DVD. Press and
hold to search within tracks or to tune to the
next/previous available radio station.
SOUND – press to access the menu for
adjusting bass, treble, etc., see page 229 for additional information.
VOL – turn to raise or lower the volume
level.
ON/OFF/MUTE – short press - switch
the system ON. Press and hold (until the
screen turns black) - switch the system
OFF . A short press when the infotainment
system is on will mute/unmute the sound.
The entire infotainment system, including the navigation* and telephone functions, isswitched on/off at the same time by usingthis button.
CD/DVD* slot.
Mode buttons – select a mode (e.g.,
RADIO , MEDIA , TEL , etc.) by pressing its
button on the center console. The most recent source in the selected mode (e.g.,FM1 in RADIO mode) will be displayed. In
TEL or NAV* modes, pressing the respective
source button will display a shortcut menu.
Page 230 of 380
06 Infotainment
Introduction
06
228* Option/accessory, for more information, see Introduction.
Mode button (in this example, the MEDIA
button). The number of buttons varies, depending on your vehicle’s specifica-tions). Each mode has four basic views:
Normal view
Shortcut view
Quick scroll view
Menu view
Select a mode by pressing its button (1) ( RADIO, MEDIA, TEL , etc.). Navigate using
TUNE, OK/MENU or EXIT .
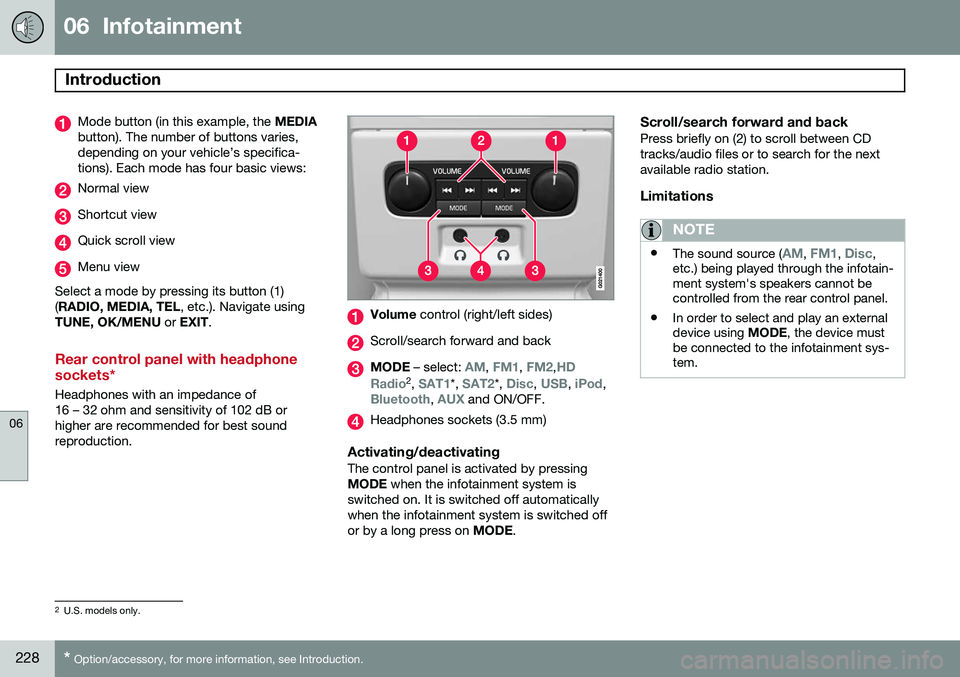
Rear control panel with headphone sockets*
Headphones with an impedance of 16 – 32 ohm and sensitivity of 102 dB orhigher are recommended for best soundreproduction.
Volume control (right/left sides)
Scroll/search forward and back
MODE – select: AM, FM1, FM2,HD
Radio2 , SAT1*, SAT2*, Disc, USB, iPod,Bluetooth, AUX and ON/OFF.
Headphones sockets (3.5 mm)
Activating/deactivatingThe control panel is activated by pressing MODE when the infotainment system is
switched on. It is switched off automaticallywhen the infotainment system is switched offor by a long press on MODE.
Scroll/search forward and backPress briefly on (2) to scroll between CDtracks/audio files or to search for the nextavailable radio station.
Limitations
NOTE
•The sound source (AM, FM1, Disc,
etc.) being played through the infotain- ment system's speakers cannot becontrolled from the rear control panel.
• In order to select and play an externaldevice using
MODE, the device must
be connected to the infotainment sys-tem.
2 U.S. models only.
Page 236 of 380
06 Infotainment
Radio
06
234* Option/accessory, for more information, see Introduction.
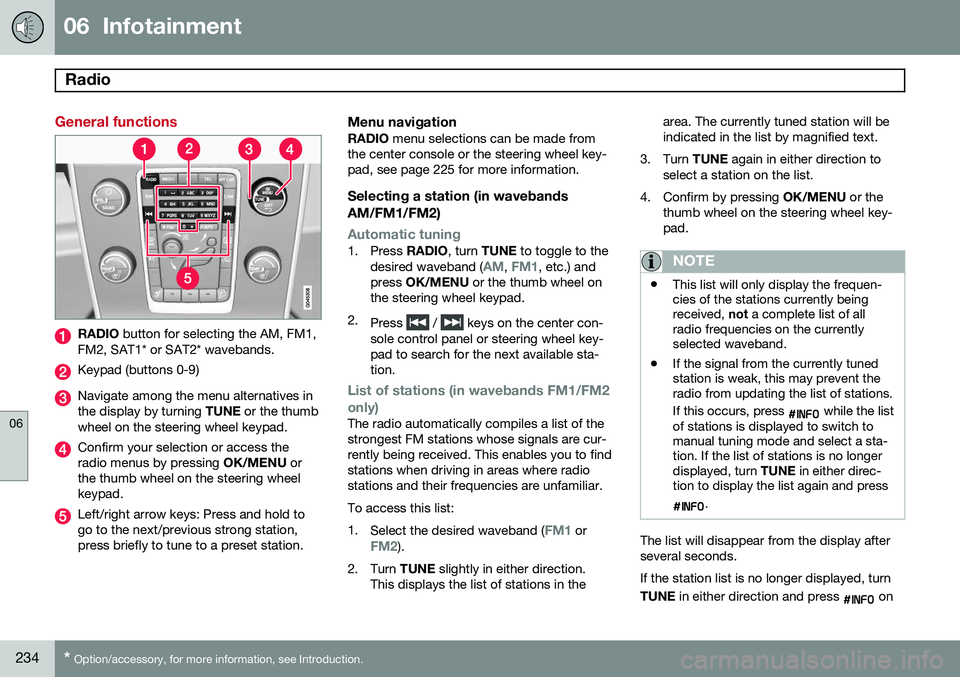
General functions
RADIO button for selecting the AM, FM1,
FM2, SAT1* or SAT2* wavebands.
Keypad (buttons 0-9)
Navigate among the menu alternatives in the display by turning TUNE or the thumb
wheel on the steering wheel keypad.
Confirm your selection or access the radio menus by pressing OK/MENU or
the thumb wheel on the steering wheelkeypad.
Left/right arrow keys: Press and hold to go to the next/previous strong station,press briefly to tune to a preset station.
Menu navigationRADIO menu selections can be made from
the center console or the steering wheel key-pad, see page 225 for more information.
Selecting a station (in wavebands AM/FM1/FM2)
Automatic tuning1. Press RADIO, turn TUNE to toggle to the
desired waveband (AM, FM1, etc.) and
press OK/MENU or the thumb wheel on
the steering wheel keypad.
2. Press
/ keys on the center con-
sole control panel or steering wheel key- pad to search for the next available sta-tion.
List of stations (in wavebands FM1/FM2 only)
The radio automatically compiles a list of the strongest FM stations whose signals are cur-rently being received. This enables you to findstations when driving in areas where radiostations and their frequencies are unfamiliar. To access this list:1. Select the desired waveband (
FM1 orFM2).
2. Turn TUNE slightly in either direction.
This displays the list of stations in the area. The currently tuned station will be indicated in the list by magnified text.
3. Turn TUNE again in either direction to
select a station on the list.
4. Confirm by pressing OK/MENU or the
thumb wheel on the steering wheel key-pad.
NOTE
• This list will only display the frequen- cies of the stations currently beingreceived,
not a complete list of all
radio frequencies on the currentlyselected waveband.
• If the signal from the currently tunedstation is weak, this may prevent theradio from updating the list of stations. If this occurs, press
while the list
of stations is displayed to switch to manual tuning mode and select a sta-tion. If the list of stations is no longerdisplayed, turn TUNE in either direc-
tion to display the list again and press
.
The list will disappear from the display after several seconds. If the station list is no longer displayed, turn TUNE in either direction and press
on
Page 237 of 380
06 Infotainment
Radio
06
235
the keypad on the center console to switch to manual tuning (or to switch back from manualtuning to the "list of stations" function).
Manual tuningBy default, the list of stations of the strongest stations in the area will be displayed whenyou turn
TUNE (see the preceding section,
"List of stations"). While the list of stations is displayed, press
on the center console
keypad to switch to manual tuning, which enables you to select a frequency from thecomplete list of all radio frequencies availa-
ble on the currently selected waveband. Inother words, in manual tuning mode, turningTUNE one step will change from e.g., 93.3 to
93.5, etc.). To manually tune a station:
1. Press RADIO. Turn TUNE to scroll to the
desired waveband (
AM, FM1, etc.) and
press OK/MENU or the thumb wheel on
the steering wheel keypad to confirm.
2. Turn TUNE or the thumb wheel to select
a frequency.
NOTE
The radio is initially set to automatically search for stations in the area in which youare driving (see the preceding section,"List of stations"). However, if you have switched to manual tuning (by pressing
on the keypad
on the center console while the list of sta- tions is displayed), the radio will remain inmanual tuning mode the next time it isswitched on. To switch back to "list of sta-tions" mode, turn TUNE one step (to dis-
play the full list of stations) and press
.
Please note that if you press
when
the list of stations is not displayed, this will activate the INFO function.
Storing preset stationsTen preset stations can be stored for each waveband (AM, FM1, etc.).
Stored preset stations are selected using the buttons on the keypad on the center console.
Manually storing preset stations1. Tune to a station (see "Selecting a sta- tion" on page 234).
2. Press and hold one of the number key buttons. > The sound will be muted for several
seconds and when it returns, the sta- tion has been stored on the numberkey button used.
A list of preset stations can be displayed. Thisfunction can be activated/deactivated in AM/FM mode in
FM menuShow presets
or in AM menuShow presets
ScanThe function automatically searches the cur- rent waveband for radio stations. When a sta-tion is found, it is played for several secondsbefore scanning is resumed. While the stationis playing it can be stored as a preset in theusual way (see "Manually storing preset sta-tions").
–To start scanning in AM/FM mode, go to
FM menuScan or in AM menuScan.
Stop station scanning by pressing EXIT.
NOTE
Storing a station interrupts the SCAN func- tion.
Page 241 of 380
06 Infotainment
Radio
06
239
Selecting SiriusXM™ radio mode
1. With the infotainment system switched
on, press RADIO.
2. Turn TUNE or the thumb wheel on the
steering wheel keypad to scroll to the desired waveband (
SAT1 or SAT2) and
press OK/MENU or the thumb wheel on
the steering wheel keypad.
Activating SiriusXM ™ radio
1. Tune to a satellite channel that has no
audio, which means that the channel is unsubscribed and the text
Subscription
update needed is displayed (see also
"Selecting a channel").
2. Call SiriusXM ™ at 1-888-539-SIRIUS
(7474).
3. If you tune to an unsubscribed channel, the SiriusXM ™ ID will be displayed. The
SiriusXM ™ ID can also be accessed from
the menu (press OK/MENU, turn TUNE
to scroll to the
Advanced settingsmenu, press OK/MENU, scroll to SIRIUS
ID and press OK/MENU to display the
number).
4.
Updating subscription will be displayed
while the subscription is being updated, after which the display will return to thenormal view.
SiriusXM™ ID
The SiriusXM ™ ID (sometimes referred to as
the Electronic Serial Number or ESN) is required when contacting the SiriusXM ™ Call
Center. It is used to activate your accountand when making any account transactions.
Selecting a channel category1. Turn TUNE to display a list of channels.
2. Press EXIT.
3. Turn TUNE to scroll through the list of
categories and press OK/MENU to make
a selection.
> The channels in the selected category are displayed.
NOTE
• The category All is default, which ena-
bles you to scroll through the entire list of available satellite channels.
• The channel categories are automati-cally updated several times a year.This takes approximately two minutesand will interrupt normal broadcasting.A message will be displayed whileupdating is in progress. Information onchannel or feature updates is availableat www.siriusxm.com.
Selecting a channelThere are three ways of tuning in a channel:
• Using the left and right arrow keys to go to the next channel. Skipped channels(see page 241) will be excluded.
• By turning the
TUNE control and select-
ing a channel from the list
• Through direct channel entry.
NOTE
•The numbers of skipped or locked channels will not be displayed.
• If a channel is locked, the access codemust be entered before the channelcan be selected. See "Unlocking achannel" on page 242.
Direct channel entryThe SiriusXM
™ satellite channels are in
numerical order throughout all of the catego- ries. To access a channel directly:
1. Turn TUNE to access the channel list.
2. Use the keypad buttons to enter the channel's number.
3. Press OK/MENU . The radio will tune to
this channel, even if it belongs to a cate- gory other than the currently selectedone.
Page 246 of 380
06 Infotainment
Media player
06
244* Option/accessory, for more information, see Introduction.
Navigating a disc and playing tracks
CD audio discsTurn TUNE to access the disc's playlist and
to navigate in this list. Press OK/MENU to
confirm a choice and begin listening. Press EXIT to cancel. Press and hold EXIT to return
to the playlist's root level. The
/ buttons on the center console
or steering wheel keypad can also be used to change tracks.
Home-burned CD/DVD audio/video filesTurn TUNE to access the disc's playlist and
to navigate in this list. Press OK/MENU to
confirm a choice and begin listening. Use EXIT to stop or to go back in the disc's folder
structure. Press and hold EXIT to return to
the playlist's root level. The
/ buttons on the center console
or steering wheel keypad* can also be used to change audio/video files. The following symbols are used in the dis- play: •
- audio files
•
- video files
•
- folders When a file has been played, the player will continue to play the rest of the files (of thesame type) in the current folder. When all ofthe files in the folder have been played, theplayer will automatically go to the next folder and play the files in it (unless
Repeat folderis activated). The system automatically detects and changes settings if a disc containing onlyaudio or only video files is inserted in theplayer and will play these files. However, thesystem will not change settings if a disc con-taining both audio and video files is insertedand the player will continue to play the cur-rent type of file.
NOTE
Video images will only be visible when the vehicle is not moving. When the vehicle istraveling faster than approximately 4 mph (6 km/h),
No visual media available
while driving will be displayed. Sound
from the film will still be audible and video images will be shown again when the vehi-cle stops.
NOTE
Some copy protected audio files or home- burned audio files may not be read by theplayer.
DVD videosFor information, see page 243.
Fast forward/reverse
Press and hold the / buttons to fast
forward/reverse. This is done at one speed for audio files but several speeds can be chosen for video files. Press the
/ but-
tons several times to increase the speed. Release the button to return to normal view-ing speed.
Scan 3This function plays the first ten seconds ofeach track/audio file. To start scanning:
1. Press
OK/MENU .
2. Scroll to
Scan.
> The first ten seconds of each track/ audio file will be played.
3. Stop scanning by pressing EXIT. The cur-
rent track/audio file will continue playing.
3 Not video DVDs