VOLVO S80 2015 Owner´s Manual
Manufacturer: VOLVO, Model Year: 2015, Model line: S80, Model: VOLVO S80 2015Pages: 392, PDF Size: 10.66 MB
Page 141 of 392
03 Your driving environment
Parking brake
03
}}
139
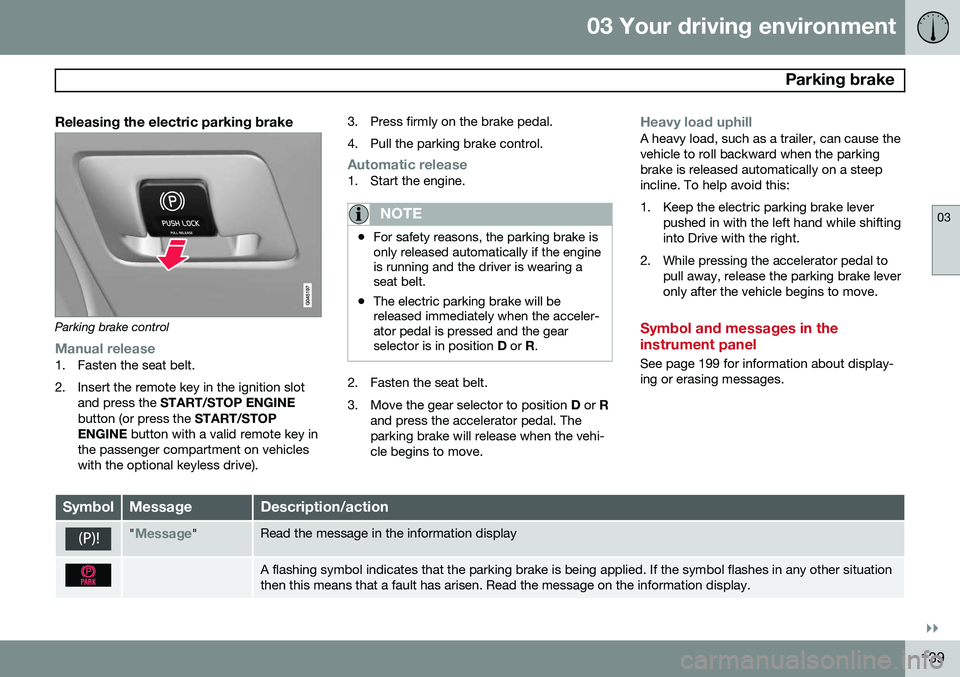
Releasing the electric parking brake
Parking brake control
Manual release1. Fasten the seat belt.
2. Insert the remote key in the ignition slotand press the START/STOP ENGINE
button (or press the START/STOP
ENGINE button with a valid remote key in
the passenger compartment on vehicles with the optional keyless drive). 3. Press firmly on the brake pedal.
4. Pull the parking brake control.
Automatic release1. Start the engine.
NOTE
•
For safety reasons, the parking brake is only released automatically if the engineis running and the driver is wearing aseat belt.
• The electric parking brake will bereleased immediately when the acceler-ator pedal is pressed and the gearselector is in position
D or R.
2. Fasten the seat belt.
3. Move the gear selector to position D or R
and press the accelerator pedal. The parking brake will release when the vehi-cle begins to move.
Heavy load uphillA heavy load, such as a trailer, can cause the vehicle to roll backward when the parkingbrake is released automatically on a steepincline. To help avoid this:
1. Keep the electric parking brake lever pushed in with the left hand while shifting into Drive with the right.
2. While pressing the accelerator pedal to pull away, release the parking brake leveronly after the vehicle begins to move.
Symbol and messages in the instrument panel
See page 199 for information about display- ing or erasing messages.
SymbolMessageDescription/action
"Message"Read the message in the information display
A flashing symbol indicates that the parking brake is being applied. If the symbol flashes in any other situation then this means that a fault has arisen. Read the message on the information display.
Page 142 of 392
03 Your driving environment
Parking brake
03
140
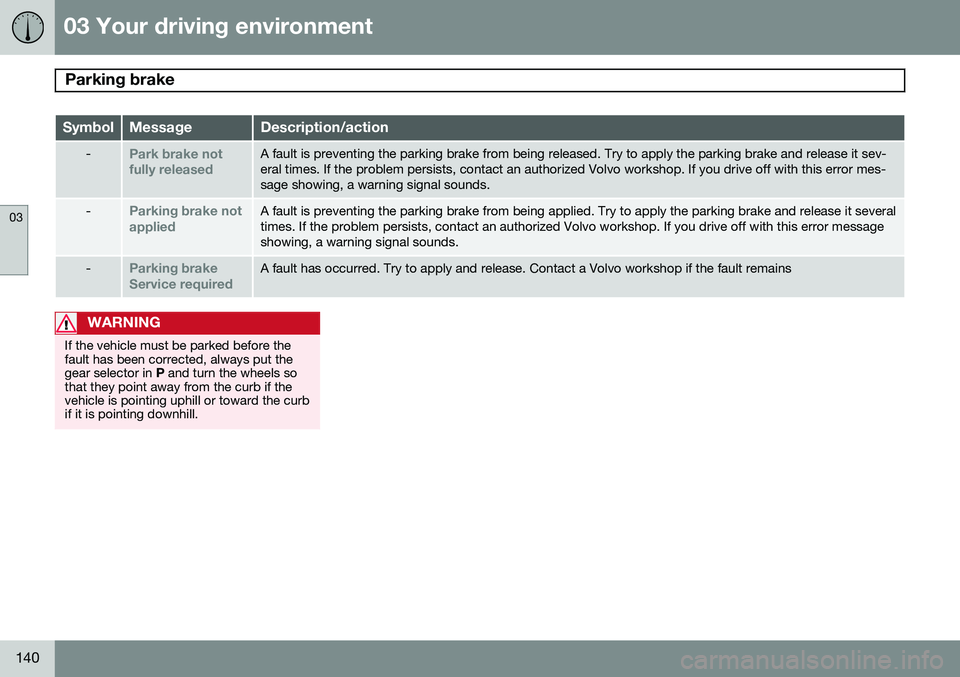
SymbolMessageDescription/action
-Park brake not fully releasedA fault is preventing the parking brake from being released. Try to apply the parking brake and release it sev- eral times. If the problem persists, contact an authorized Volvo workshop. If you drive off with this error mes-sage showing, a warning signal sounds.
-Parking brake not appliedA fault is preventing the parking brake from being applied. Try to apply the parking brake and release it several times. If the problem persists, contact an authorized Volvo workshop. If you drive off with this error messageshowing, a warning signal sounds.
-Parking brake Service requiredA fault has occurred. Try to apply and release. Contact a Volvo workshop if the fault remains
WARNING
If the vehicle must be parked before the fault has been corrected, always put thegear selector in P and turn the wheels so
that they point away from the curb if thevehicle is pointing uphill or toward the curbif it is pointing downhill.
Page 143 of 392
03 Your driving environment
03
141
Page 144 of 392
G000000
142* Option/accessory, for more information, see Introduction. Stability system..................................................................................... 144
Road sign information (RSI)* ................................................................ 146Cruise control........................................................................................ 148
Adaptive Cruise Control (ACC)*............................................................ 150Distance Alert* ..................................................................................... 161City Safety™ ........................................................................................ 164
Pedestrian and Cyclist Detection with Full Auto Brake*....................... 170
Driver Alert System* ............................................................................. 180Park assist*........................................................................................... 185
Rear Park Assist Camera (PAC)* .......................................................... 189
Blind Spot Information System (BLIS)*................................................. 192
Page 145 of 392
D R I V E R S U P P O R T
Page 146 of 392
04 Driver support
Stability system
04
144
Introduction
The Dynamic Stability and Traction Control system (DSTC) consists of a number of func-tions designed to help reduce wheel spin,counteract skidding, and to generally helpimprove directional stability.
CAUTION
A pulsating sound will be audible when the system is actively operating and is normal.
Traction control (TC)This function is designed to help reduce wheel spin by transferring power from a drivewheel that begins to lose traction to thewheel on the opposite side of the vehicle (onthe same axle). TC is most active at low speeds.This is one of DSTC's permanent functions and cannot be switched off.
Active Yaw Control (AYC)This function helps maintain directional stabil-ity, for example when cornering, by brakingone or more of the wheels if the vehicleshows a tendency to skid or slide laterally.This is one of DSTC's permanent functionsand cannot be switched off.
Spin control (SC)The spin control function is designed to helpprevent the drive wheels from spinning whilethe vehicle is accelerating.
Trailer Stability Assist – TSATrailer Stability Assist helps stabilize a vehiclethat is towing a trailer when the vehicle andtrailer have begun to sway. See page 288 formore information. This system is automatically deactivated if the driver selects
Sport mode.
Operation
Sport modeThe stability system is always activated and cannot be switched off. However, the driver can select Sport mode,
which offers more active driving characteris- tics. In this mode, the engine managementsystem monitors movement of the acceleratorpedal and steering wheel for sportier driving by allowing more lateral movement of the rearwheels before DSTC is activated. Under certain circumstances, such as when driving with snow chains, or driving in deepsnow or loose sand, it may be advisable totemporarily use
Sport mode for maximum
tractive force. If the driver releases pressure on the acceler- ator pedal, DSTC will also activate to helpstabilize the vehicle. To switch to Sport mode:
1. Press the My Car button in the center
console control panel and select
My S80
DSTC in the menu.
2. Unselect the symbol and leave the menu by pressing EXIT.
> This puts DSTC in Sport mode.
Sport mode remains active until the driver
switches it off in the menu or until the engine is switched off. DSTC will return to normalmode when the engine is restarted.
Page 147 of 392
04 Driver support
Stability system
04
145
Symbols and messages in the main instrument panel
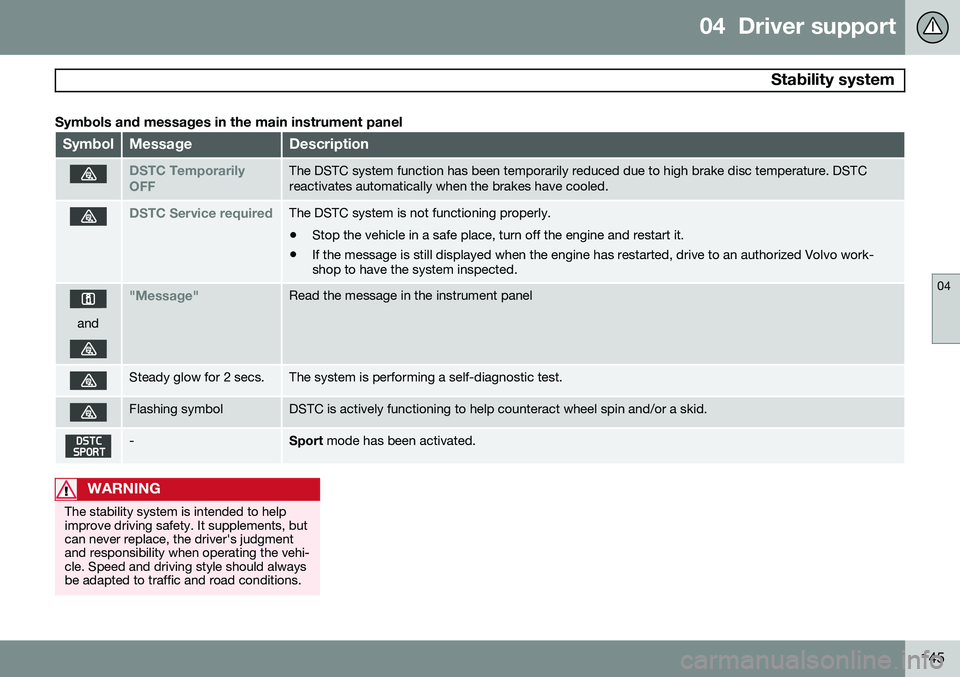
SymbolMessageDescription
DSTC Temporarily OFFThe DSTC system function has been temporarily reduced due to high brake disc temperature. DSTC reactivates automatically when the brakes have cooled.
DSTC Service requiredThe DSTC system is not functioning properly.
• Stop the vehicle in a safe place, turn off the engine and restart it.
• If the message is still displayed when the engine has restarted, drive to an authorized Volvo work- shop to have the system inspected.
and
"Message"Read the message in the instrument panel
Steady glow for 2 secs.The system is performing a self-diagnostic test.
Flashing symbolDSTC is actively functioning to help counteract wheel spin and/or a skid.
-Sport
mode has been activated.
WARNING
The stability system is intended to help improve driving safety. It supplements, butcan never replace, the driver's judgmentand responsibility when operating the vehi-cle. Speed and driving style should alwaysbe adapted to traffic and road conditions.
Page 148 of 392
04 Driver support
Road sign information (RSI)*
04
146* Option/accessory, for more information, see Introduction.
Introduction
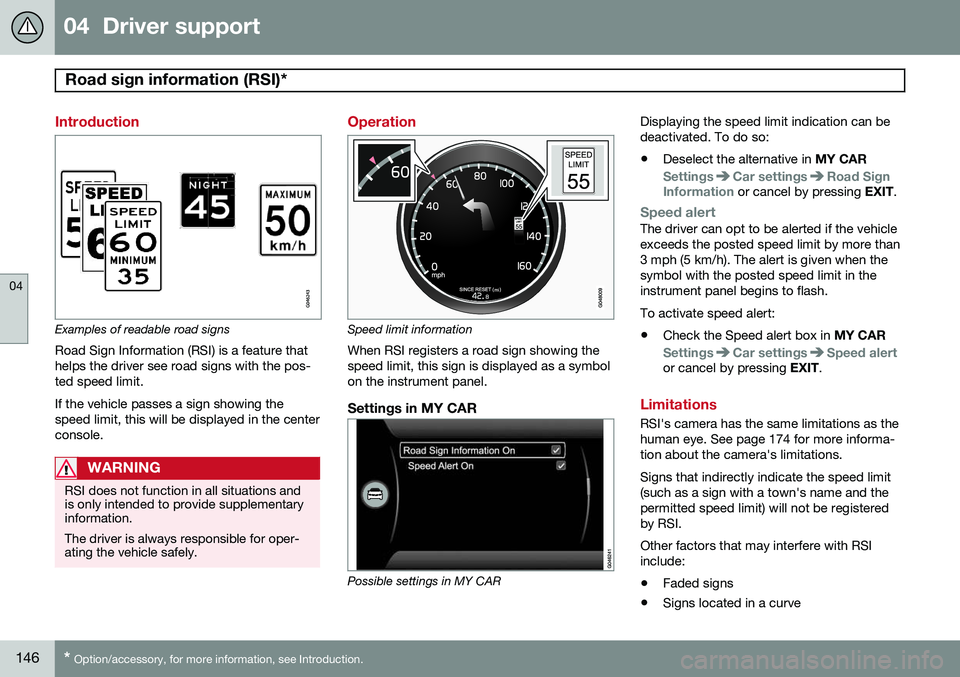
Examples of readable road signs Road Sign Information (RSI) is a feature that helps the driver see road signs with the pos-ted speed limit. If the vehicle passes a sign showing the speed limit, this will be displayed in the centerconsole.
WARNING
RSI does not function in all situations and is only intended to provide supplementaryinformation. The driver is always responsible for oper- ating the vehicle safely.
Operation
Speed limit information
When RSI registers a road sign showing the speed limit, this sign is displayed as a symbolon the instrument panel.
Settings in MY CAR
Possible settings in MY CAR Displaying the speed limit indication can be deactivated. To do so:
• Deselect the alternative in
MY CAR
SettingsCar settingsRoad Sign
Information or cancel by pressing EXIT.
Speed alertThe driver can opt to be alerted if the vehicle exceeds the posted speed limit by more than3 mph (5 km/h). The alert is given when thesymbol with the posted speed limit in theinstrument panel begins to flash. To activate speed alert:
• Check the Speed alert box in
MY CAR
SettingsCar settingsSpeed alertor cancel by pressing EXIT.
Limitations
RSI's camera has the same limitations as the human eye. See page 174 for more informa-tion about the camera's limitations. Signs that indirectly indicate the speed limit (such as a sign with a town's name and thepermitted speed limit) will not be registeredby RSI. Other factors that may interfere with RSI include:
• Faded signs
• Signs located in a curve
Page 149 of 392
04 Driver support
Road sign information (RSI)*
04
* Option/accessory, for more information, see Introduction.147
•
Twisted or damaged signs
• Obstructed signs
• Signs that are partially covered by snow, ice, etc.
Page 150 of 392
04 Driver support
Cruise control
04
148
Operation
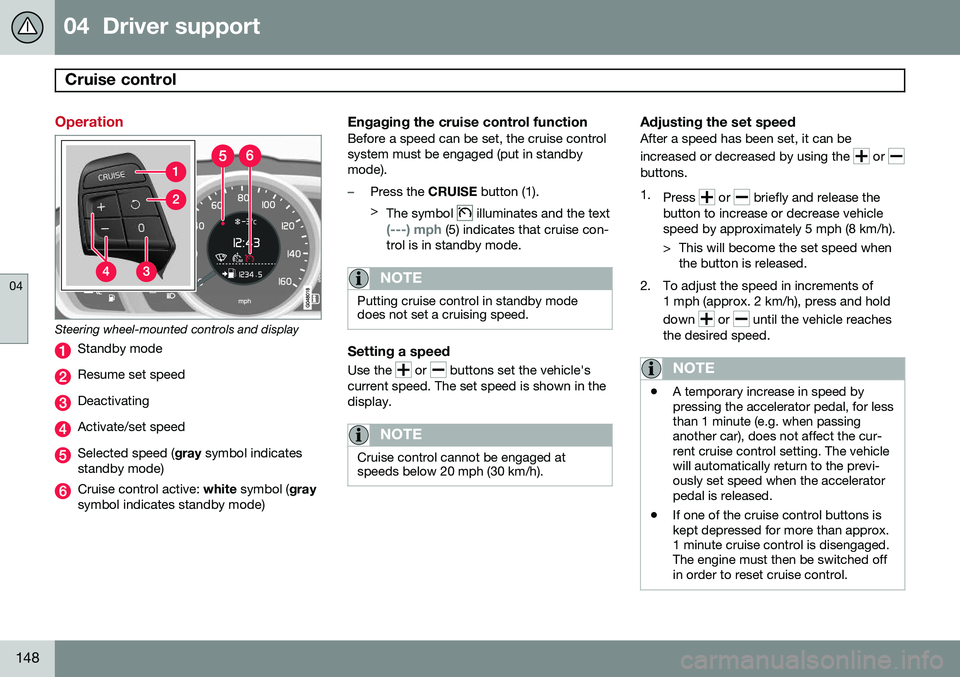
Steering wheel-mounted controls and display
Standby mode
Resume set speed
Deactivating
Activate/set speed
Selected speed (gray symbol indicates
standby mode)
Cruise control active: white symbol ( gray
symbol indicates standby mode)
Engaging the cruise control functionBefore a speed can be set, the cruise control system must be engaged (put in standbymode).
–Press the CRUISE button (1).
> The symbol
illuminates and the text
(---) mph (5) indicates that cruise con-
trol is in standby mode.
NOTE
Putting cruise control in standby mode does not set a cruising speed.
Setting a speed
Use the or buttons set the vehicle's
current speed. The set speed is shown in the display.
NOTE
Cruise control cannot be engaged at speeds below 20 mph (30 km/h).
Adjusting the set speedAfter a speed has been set, it can be increased or decreased by using the
or buttons. 1. Press
or briefly and release the
button to increase or decrease vehicle speed by approximately 5 mph (8 km/h).
> This will become the set speed when the button is released.
2. To adjust the speed in increments of 1 mph (approx. 2 km/h), press and hold down
or until the vehicle reaches
the desired speed.
NOTE
• A temporary increase in speed by pressing the accelerator pedal, for lessthan 1 minute (e.g. when passinganother car), does not affect the cur-rent cruise control setting. The vehiclewill automatically return to the previ-ously set speed when the acceleratorpedal is released.
• If one of the cruise control buttons iskept depressed for more than approx.1 minute cruise control is disengaged.The engine must then be switched offin order to reset cruise control.