set clock VOLVO S80 2015 Owner´s Manual
[x] Cancel search | Manufacturer: VOLVO, Model Year: 2015, Model line: S80, Model: VOLVO S80 2015Pages: 392, PDF Size: 10.66 MB
Page 70 of 392
02 Locks and alarm
Locks
02
68
Automatic relockingIf the doors are unlocked, the locks will auto- matically reengage (re-lock) and the alarm willrearm after 2 minutes unless a door or thetrunk has been opened.
Automatic lockingWhen the vehicle starts to move, the doorsand trunk can be locked automatically. Thisfeature can be turned on or off by pressing MY CAR and going to
Car settingsLock
settings
Automatic door locking. See
page 201 for a description of the menu sys- tem.
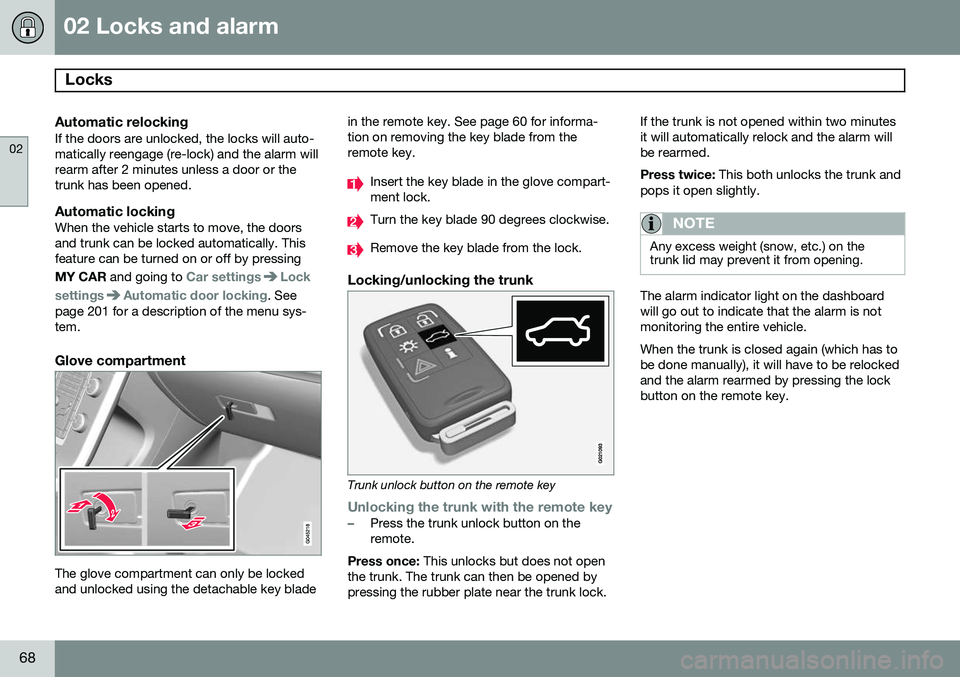
Glove compartment
The glove compartment can only be locked and unlocked using the detachable key blade in the remote key. See page 60 for informa-tion on removing the key blade from theremote key.
Insert the key blade in the glove compart- ment lock.
Turn the key blade 90 degrees clockwise.
Remove the key blade from the lock.
Locking/unlocking the trunk
Trunk unlock button on the remote key
Unlocking the trunk with the remote key–Press the trunk unlock button on the remote.
Press once: This unlocks but does not open
the trunk. The trunk can then be opened bypressing the rubber plate near the trunk lock. If the trunk is not opened within two minutesit will automatically relock and the alarm willbe rearmed. Press twice:
This both unlocks the trunk and
pops it open slightly.
NOTE
Any excess weight (snow, etc.) on the trunk lid may prevent it from opening.
The alarm indicator light on the dashboard will go out to indicate that the alarm is notmonitoring the entire vehicle. When the trunk is closed again (which has to be done manually), it will have to be relockedand the alarm rearmed by pressing the lockbutton on the remote key.
Page 84 of 392
03 Your driving environment
Instruments and controls
03
82* Option/accessory, for more information, see Introduction.
NOTE
When the ambient temperature is between 23° and 36 °F (–5° and +2 °C), a snowflakesymbol will be displayed next to the tem-perature. This symbol serves as a warningfor possible slippery road surfaces. Pleasenote that this symbol does not indicate a
fault with your vehicle. At low speeds or when the vehicle is not moving, the temperature readings may beslightly higher than the actual ambienttemperature.
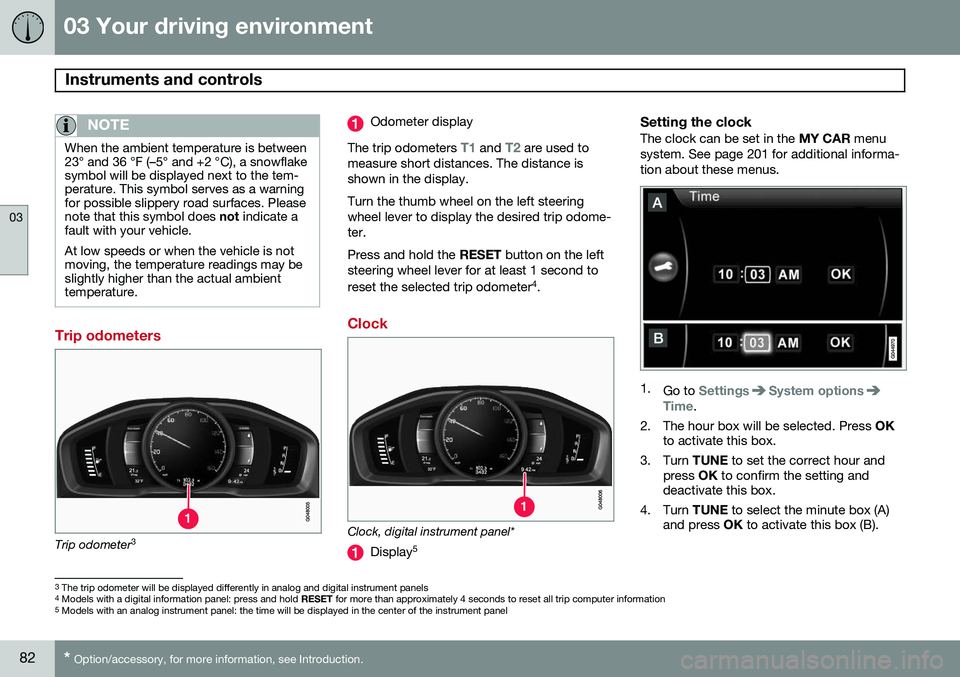
Trip odometers
Trip odometer 3
Odometer display
The trip odometers
T1 and T2 are used to
measure short distances. The distance is shown in the display. Turn the thumb wheel on the left steering wheel lever to display the desired trip odome-ter. Press and hold the RESET button on the left
steering wheel lever for at least 1 second to reset the selected trip odometer 4
.
Clock
Clock, digital instrument panel*
Display 5
Setting the clockThe clock can be set in the
MY CAR menu
system. See page 201 for additional informa- tion about these menus.
1. Go to SettingsSystem optionsTime.
2. The hour box will be selected. Press OK
to activate this box.
3. Turn TUNE to set the correct hour and
press OK to confirm the setting and
deactivate this box.
4. Turn TUNE to select the minute box (A)
and press OK to activate this box (B).
3
The trip odometer will be displayed differently in analog and digital instrument panels
4 Models with a digital information panel: press and hold RESET for more than approximately 4 seconds to reset all trip computer information
5 Models with an analog instrument panel: the time will be displayed in the center of the instrument panel
Page 200 of 392
05 Comfort and driving pleasure
Volvo Sensus
05
198* Option/accessory, for more information, see Introduction.
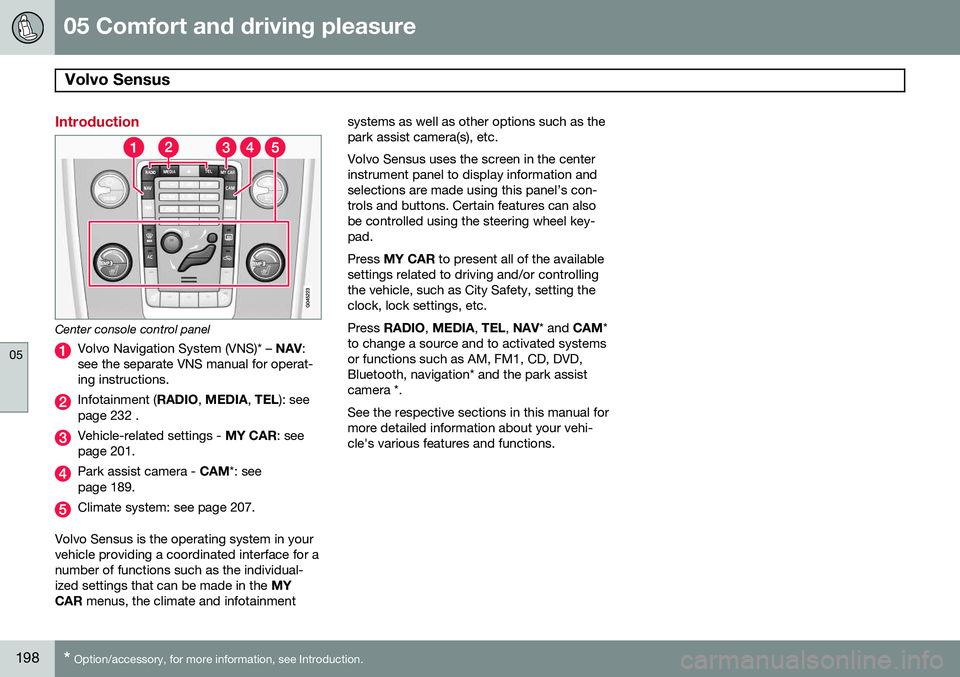
Introduction
Center console control panel
Volvo Navigation System (VNS)* – NAV:
see the separate VNS manual for operat- ing instructions.
Infotainment ( RADIO, MEDIA , TEL ): see
page 232 .
Vehicle-related settings - MY CAR: see
page 201.
Park assist camera - CAM*: see
page 189.
Climate system: see page 207.
Volvo Sensus is the operating system in your vehicle providing a coordinated interface for anumber of functions such as the individual-ized settings that can be made in the MY
CAR menus, the climate and infotainment systems as well as other options such as thepark assist camera(s), etc. Volvo Sensus uses the screen in the center instrument panel to display information andselections are made using this panel’s con-trols and buttons. Certain features can alsobe controlled using the steering wheel key-pad. Press
MY CAR to present all of the available
settings related to driving and/or controlling the vehicle, such as City Safety, setting theclock, lock settings, etc. Press RADIO , MEDIA , TEL , NAV * and CAM*
to change a source and to activated systems or functions such as AM, FM1, CD, DVD,Bluetooth, navigation* and the park assistcamera *. See the respective sections in this manual for more detailed information about your vehi-cle's various features and functions.
Page 203 of 392
05 Comfort and driving pleasure
The MY CAR menus
05
}}
201
Introduction
The menu system provides access to menus for operating many of the vehi-cle's functions, such as setting the
clock, door mirrors, locks, etc.
Navigating in the menus is done using the buttons on the center console control panelor with the right-side steering wheel keypad. Some of the features mentioned in this sec- tion are optional.
Operation
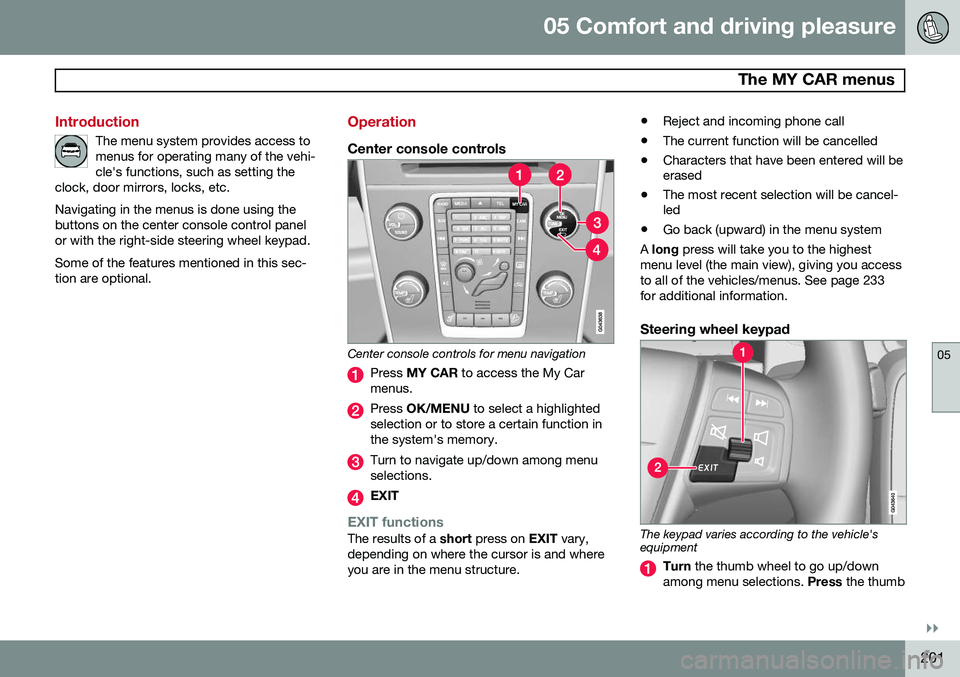
Center console controls
Center console controls for menu navigation
Press MY CAR to access the My Car
menus.
Press OK/MENU to select a highlighted
selection or to store a certain function in the system's memory.
Turn to navigate up/down among menu selections.
EXIT
EXIT functionsThe results of a short press on EXIT vary,
depending on where the cursor is and where you are in the menu structure. •
Reject and incoming phone call
• The current function will be cancelled
• Characters that have been entered will be erased
• The most recent selection will be cancel-led
• Go back (upward) in the menu system
A long press will take you to the highest
menu level (the main view), giving you access to all of the vehicles/menus. See page 233for additional information.
Steering wheel keypad
The keypad varies according to the vehicle's equipment
Turn the thumb wheel to go up/down
among menu selections. Press the thumb
Page 214 of 392
05 Comfort and driving pleasure
Climate system
05
212
Blower controlTurn the control clockwise to increase or counterclockwiseto decrease the blowerspeed. If AUTO is selected,
blower speed will be regula-ted automatically and thiswill override manual adjust-
ment.
NOTE
If the blower is turned off completely, the air conditioning is disengaged, which mayresult in fogging on the windows.
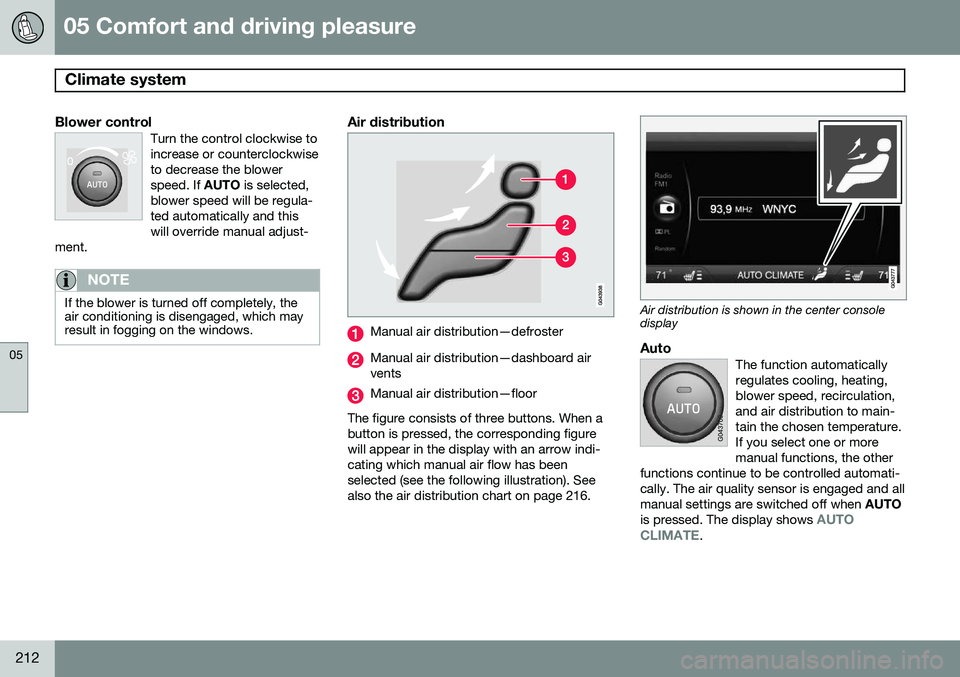
Air distribution
Manual air distribution—defroster
Manual air distribution—dashboard air vents
Manual air distribution—floor
The figure consists of three buttons. When a button is pressed, the corresponding figurewill appear in the display with an arrow indi-cating which manual air flow has beenselected (see the following illustration). Seealso the air distribution chart on page 216.
Air distribution is shown in the center console display
AutoThe function automatically regulates cooling, heating,blower speed, recirculation,and air distribution to main-tain the chosen temperature.If you select one or moremanual functions, the other
functions continue to be controlled automati-cally. The air quality sensor is engaged and allmanual settings are switched off when AUTO
is pressed. The display shows
AUTO
CLIMATE.
Page 266 of 392
06 Infotainment
Bluetooth® hands-free connection
06
264
Making a call1. Ensure that is shown at the top of
the center console display and that the hands-free function is in telephone mode.
2. Dial the desired phone number using the center console keypad or use the speeddial function (see page 268). In normalview (see page see page 233 for informa-tion about the various display views), it isalso possible to turn TUNE clockwise to
access the phone book and then counter-clockwise for the call list. See page 269for more information about the phonebook.
3. Press the thumb wheel or OK/MENU.
End or reject a call by pressing EXIT.
Disconnecting the cell phoneThe cell phone is automatically disconnectedfrom the infotainment system if it is movedout of range. The cell phone can be manually disconnected from the hands-free system by pressing andholding TEL or in phone mode, going to
Phone menuDisconnect phone. See also
page 265 for more information about con- nections. The hands-free system is also deactivatedwhen the ignition is switched off (or if thedriver’s door is opened). When the cell phone is disconnected from the hands-free system, a call in progress can becontinued using the cell phone’s own speakerand microphone. Even if the cell phone has been disconnected manually, some phones may reconnect auto-matically, for example when a new call is initi-ated.
Removing a paired deviceA paired phone or device can be removedfrom the list. To do so:
1. Press
TEL.
2. Select
Phone menuRemove
Bluetooth device.
Handling calls
Incoming calls–Press OK/MENU (or the thumb wheel on
the steering wheel keypad) to answer a call, even if the infotainment system is currently in another mode (e.g.,
RADIO orMEDIA).
Press EXIT to reject a call.
Auto answerThis function means that incoming calls will be answered automatically. Activate or deac-tivate the function in the menu system under
Phone menuCall optionsAuto
answer.
Call settingsWhile a call is in progress, press OK/MENU
or the thumb wheel on the steering wheel keypad to access the following functions:
•
Mute: mute the infotainment system’s
microphone.
•
Mobile phone: transfer the call from
hands-free to the cell phone. On certain cell phones, the connection will be bro-ken, which is normal. The hands-freefunction will ask if you would like toreconnect.
•
Dial number: dial a third party during an
ongoing call using the keypad (the current call will be put on hold).
Call listsCall lists are copied to the hands-free func- tion each time a cell phone is connected andthe lists are updated while the phone is con-nected. In normal view, turn TUNE counter-
clockwise to see the
All calls list.
Page 268 of 392
06 Infotainment
Bluetooth® hands-free connection
06
266
connected when the contact is saved. These contacts will be displayed regard-less of the cell phone that is connected. Ifa contact has been saved in the infotain- ment system, the
symbol will be
displayed next to it.
NOTE
Changes made from the infotainment sys- tem to a contact in the cell phone's phonebook will result in a new contact beingadded to the infotainment system's phonebook. However, this contact will not besaved in the cell phone's phone book. Theinfotainment system's display will showduplicate contacts with different icons. Please also note that if a speed dial num- ber is saved or if a contact's information isedited, this will result in a new contact inthe infotainment system's phone book.
The symbol must be displayed before
the phone book can be used and the hands- free function must be in phone mode. The infotainment system saves a copy of each paired cell phone's phone book. Thisphone book can be copied each time thephone is connected.
–Activate/deactivate this function in phone mode in
Phone menuPhone settings
Download phone book.
If the phone book contains information about someone who is trying to call you, this infor-mation will be shown in the display.
Contact shortcutsA quick way of searching the phone book forcontacts in normal view is to turn TUNE
clockwise to access the phone book and thencounter-clockwise to select a contact fromthe list. Press OK/MENU to call.
Each name in the phone book has a default phone number. If the
symbol is displayed
to the right of it, this indicates that there are additional phone numbers for this contact. Touse a phone number other than the default one, press the
button on the center
console control panel. Turn TUNE to select a
different phone number and press OK/MENU
to call. It is also possible to search for a contact by using the center console keypad to enter thefirst letter(s) of the contact's name (see alsothe following table "Buttons in the center con-sole" for each button's function). The list of contacts can also be accessed from normal view by pressing and holding thebutton on the center console keypad with the first letter of the contact's name. For exam-ple, pressing and holding button
6 would pro-
vide direct access to the section of the listwith contacts whose names begin with M.
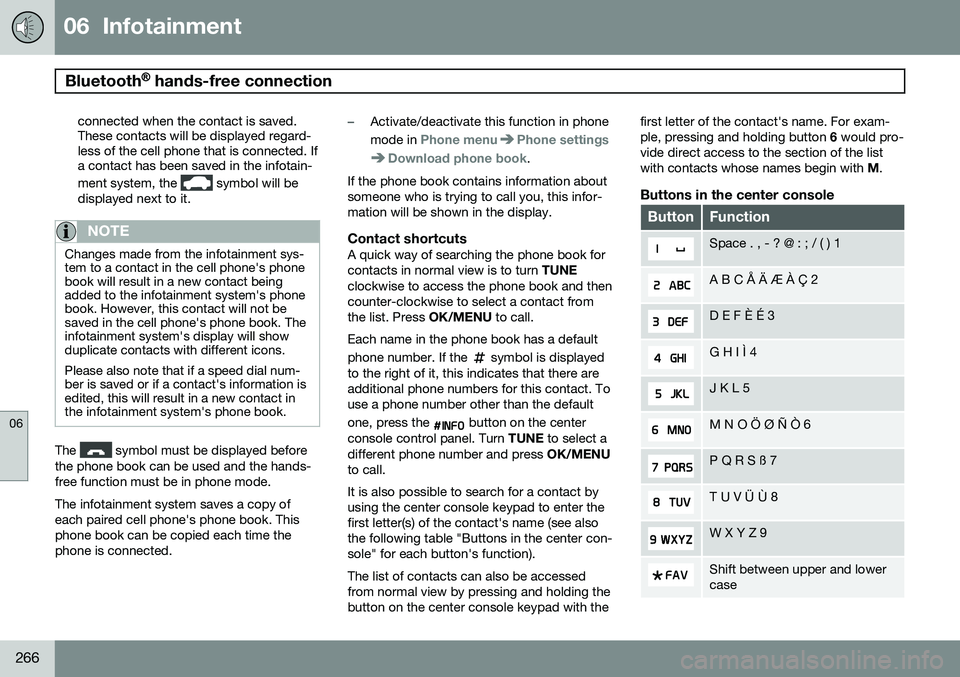
Buttons in the center console
ButtonFunction
Space . , - ? @ : ; / ( ) 1
A B C Å Ä Æ À Ç 2
D E F È É 3
G H I Ì 4
J K L 5
M N O Ö Ø Ñ Ò 6
P Q R S ß 7
T U V Ü Ù 8
W X Y Z 9
Shift between upper and lower case
Page 318 of 392
08 Wheels and tires
Changing a wheel
08
316
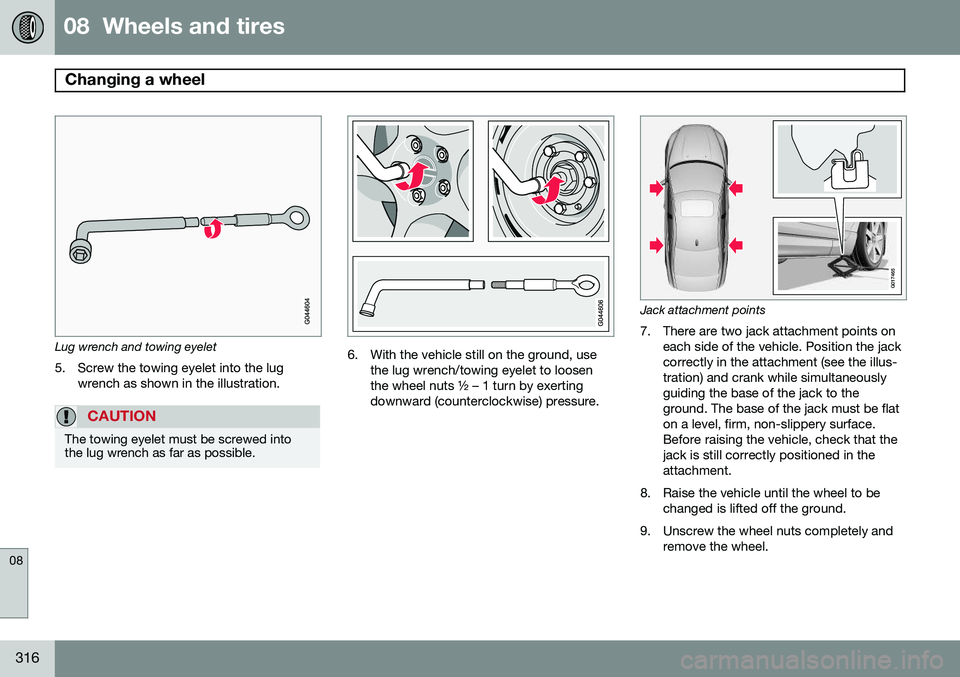
Lug wrench and towing eyelet5. Screw the towing eyelet into the lug wrench as shown in the illustration.
CAUTION
The towing eyelet must be screwed into the lug wrench as far as possible.
6. With the vehicle still on the ground, usethe lug wrench/towing eyelet to loosen the wheel nuts ½ – 1 turn by exertingdownward (counterclockwise) pressure.
G017465
Jack attachment points
7. There are two jack attachment points on each side of the vehicle. Position the jack correctly in the attachment (see the illus-tration) and crank while simultaneouslyguiding the base of the jack to theground. The base of the jack must be flaton a level, firm, non-slippery surface.Before raising the vehicle, check that thejack is still correctly positioned in theattachment.
8. Raise the vehicle until the wheel to be changed is lifted off the ground.
9. Unscrew the wheel nuts completely and remove the wheel.
Page 383 of 392
11 Index
11
381
fluid..................................................... 373
general information............................. 135
Bulbs headlights........................... 334, 335, 336
introduction......................................... 334
license plate lights.............................. 338
side marker lights............................... 337
specifications...................................... 339
trunk lighting....................................... 339
C
Camera, Park Assist................................ 189
Capacity weight....................................... 304
Catalytic converter................................... 282
Cell phone, hands-free connection......... 261
Cell phone voice control.......................... 270
Central locking system, introduction......... 54
Chains...................................................... 307
Check Engine warning light....................... 78Child restraintsrecalls and registration......................... 39
Child restraint systems.............................. 40 booster cushions.................................. 47
convertible seats.................................. 44 infant seats........................................... 42
ISOFIX/LATCH anchors........................ 48
top tether anchors................................ 50
Child safety................................................ 37 booster cushions.................................. 47
child restraint systems.......................... 40
convertible seats.................................. 44
infant seats........................................... 42
Child safety locks...................................... 51
City safety................................................ 164
Climate system........................................ 213 air distribution............................. 208, 216
air vents.............................................. 209
Interior Air Quality System.................. 208
introduction......................................... 207
passenger compartment filter............ 208
refrigerant........................................... 207
Clock, setting............................................. 82
Cold weather driving................................ 278
Collision warning system................. 170, 171
Compass in rearview mirror..................... 109
Conserving electrical current................... 277
Controls, center console.......................... 233
Convertible seats....................................... 44
Coolant............................................ 332, 373 Cooling system, general information....... 277
Courtesy lighting................................ 99, 100
Crash event data......................................... 9
Crash mode............................................... 35
Cruise control.................................. 148, 149
adaptive.............................................. 150
Curb weight............................................. 304
Current, conserving................................. 277
Cyclist detection...................................... 170D
Daytime running lights............................... 94
Defroster.................................................. 213
Detachable key blade.......................... 60, 63Disconnecting the front passenger’s air-
bag....................................................... 26, 27
Distance Alert.......................................... 161
Dome lighting..................................... 99, 100
Door mirrors............................................. 106
Driver alert............................................... 180 Lane Departure Warning..................... 182
Driver distraction warning.......................... 13