center console VOLVO S90 2018 Owner´s Manual
[x] Cancel search | Manufacturer: VOLVO, Model Year: 2018, Model line: S90, Model: VOLVO S90 2018Pages: 640, PDF Size: 11.37 MB
Page 14 of 640
12
WHEELS AND TIRES
Tires508
Tire direction of rotation 510
Tread wear indicator 511
Tire terminology 511
Tire sidewall designations 512
Uniform Tire Quality Grading 514
Checking tire pressure 515
Adjusting tire pressure 516
Recommended tire pressure 517
Tire pressure monitoring system *
517
Calibrating the tire pressure monitor- ing system * 519
Viewing tire pressure status in thecenter display * 520
Action when warned of low tire pressure 521
When changing wheels 522
Tool kit 522
Jack *
523
Wheel bolts 523
Removing a wheel 524
Installing a wheel 526
Spare wheel 527
Accessing the spare wheel 528
Snow tires 529
Snow chains 529
Tire sealing system530
Using the tire sealing system 531
Inflate tires with the compressor included in the tire sealing system 535
Determining the vehicle's permittedweight 536
LOADING, STORAGE AND
PASSENGER COMPARTMENT
Passenger compartment interior
538
Tunnel console 539
Electrical outlets 539
Using the electrical outlets 540
Using the glove compartment 541
Sun visors 542
Cargo compartment 543
Loading recommendations 543
Roof loads and load carriers 544
Grocery bag holders 544
Load anchoring eyelets 545
Rear seat ski hatch *
545
Page 61 of 640

SAFETY
}}
59
WARNING
•Keep the following points in mind with respect to the OWS system. Failure tofollow these instructions could adverselyaffect the system's function and result inserious injury to the occupant of the frontpassenger's seat:
• The full weight of the front seat passen-ger should always be on the seat cushion.The passenger should never lift him/herself off the seat cushion using thearmrest in the door or the center console,by pressing the feet on the floor, by sit-ting on the edge of the seat cushion, orby pressing against the backrest in a waythat reduces pressure on the seat cush-ion. This could cause OWS to disable thefront, passenger's side airbag.
WARNING
•Do not place any type of object on the front passenger's seat in such a way thatjamming, pressing, or squeezing occursbetween the object and the front seat,other than as a direct result of the correctuse of the Automatic Locking Retractor/Emergency Locking Retractor (ALR/ELR)seat belt.
• No objects should be placed under thefront passenger's seat. This could inter-fere with the OWS system's function.
Related information
• Driver/passenger-side airbags (p. 53)
Side airbags
The side airbags, on the driver's and passenger sides, protect the chest and hip in a collision.
The side airbags are located in the front seats' outer backrest frames and help protect the driverand front seat passenger. A collision of a sufficiently violent force will trig- ger the sensors and one or more side airbags willinflate. The side airbags inflate between the seatoccupant and the door panel to help cushion theinitial impact of the collision. The airbag deflateswhen compressed by the collision. The side air-bags are normally only deployed on the side ofthe vehicle impacted by the collision.
Page 80 of 640

DISPLAYS AND VOICE CONTROL
* Option/accessory.
78
Instruments and controls in left-hand drive vehicles
The overviews show the location of the vehicle's
displays and controls.
Steering wheel and dashboard
Parking lights, daytime running lights, low beams, high beams, turn signals, front fog lights/cornering illumination *, rear fog light,
trip computer reset
Steering wheel paddles for manual shifting *
Head-up display*
Instrument panel
Wipers and washers, rain sensor *
Right-side steering wheel keypad
Steering wheel adjustment
Horn
Left-side steering wheel keypad
Hood open
Display lighting, trunk lid unlock/open */
close *, halogen headlight height adjustment
Ceiling console
Front reading lights and courtesy lighting
Panoramic roof *
Ceiling console display
HomeLink®
*
Center and tunnel console
Center display
Hazard warning flashers, defrosting, media
Gear selector
Start knob
Drive modes *
Parking brake
Auto-hold brakes
Driver's door
Page 140 of 640
||
DISPLAYS AND VOICE CONTROL
1384.
Pull down Top view again and tap
Settings
SystemDriver ProfilesEdit
Profile.
5. Select
Connect key to link the profile with
the key. A driver profile can only be linked to the key currently being used in the vehicle. If there are any other keys in the vehicle,
More
than one key is found, put the key you want to connect on backup reader
will be
displayed.
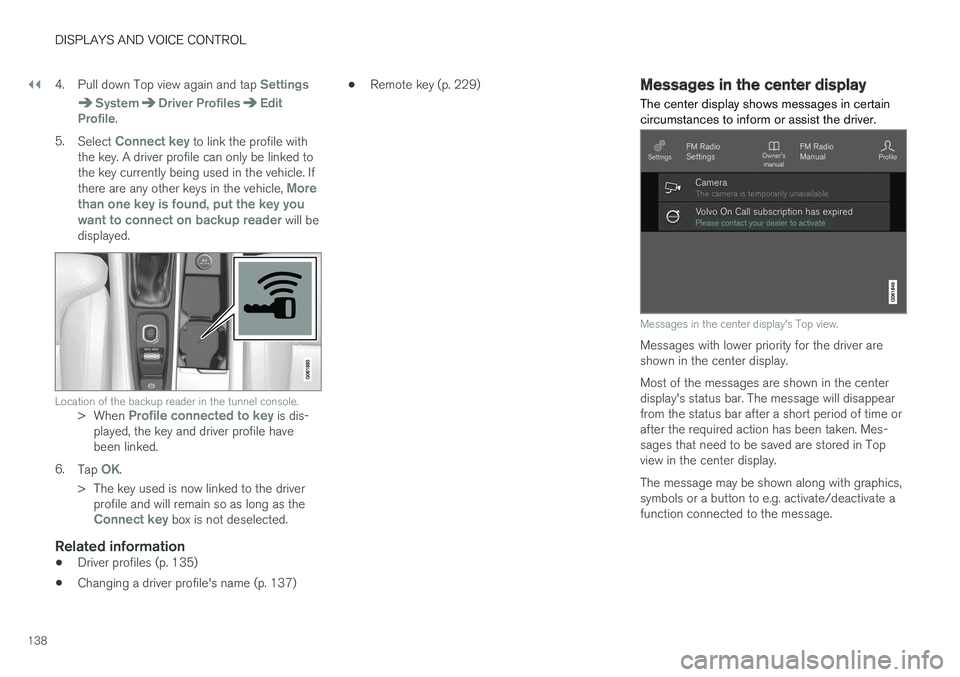
Location of the backup reader in the tunnel console.> When Profile connected to key is dis-
played, the key and driver profile have been linked.
6. Tap
OK.
> The key used is now linked to the driver profile and will remain so as long as the
Connect key box is not deselected.
Related information
• Driver profiles (p. 135)
• Changing a driver profile's name (p. 137) •
Remote key (p. 229)
Messages in the center display
The center display shows messages in certain circumstances to inform or assist the driver.
Messages in the center display's Top view.
Messages with lower priority for the driver are shown in the center display. Most of the messages are shown in the center display's status bar. The message will disappearfrom the status bar after a short period of time orafter the required action has been taken. Mes-sages that need to be saved are stored in Topview in the center display. The message may be shown along with graphics, symbols or a button to e.g. activate/deactivate afunction connected to the message.
Page 164 of 640
||
LIGHTING
* Option/accessory.
162
Ground lighting *The ground lighting comes on or goes off when a door is opened or closed.
Doorsill lightingThe doorsill lighting comes on or goes off when adoor is opened or closed.
Trunk lightingThe trunk lighting comes on or goes off when thetrunk lid is opened or closed.
Ambient LightingThe ambient lighting comes on when the doorsare opened and goes out when the vehicle islocked. Ambient lighting brightness can beadjusted in the center display and also fine-tunedusing the thumb wheel in the dashboard.
Mood lighting*The vehicle is equipped with several LEDs thatprovide faint lighting in various colors. This light-ing is on when the engine is running. Mood light-ing can be adjusted in the center display and alsofine-tuned using the thumb wheel in the dash-board.
Lighting in the door storage compartments
Lighting in the door storage compartments comes on when the doors are opened and goesout when the vehicle is locked. The brightnesscan be adjusted using the thumb wheel in thedashboard.
Lighting in the front tunnel console cupholders
The lighting in front console cupholders switches on when the vehicle is unlocked and off when thevehicle is locked. The brightness can be adjustedusing the thumb wheel in the dashboard.
Related information
•Adjusting interior lighting (p. 162)
• Lighting panel and controls (p. 150)
• Ignition modes (p. 397)
• Passenger compartment interior (p. 538)
Adjusting interior lighting
Illumination in the vehicle varies depending on ignition mode. The interior lighting can beadjusted with a thumb wheel in the dashboardand certain light functions can also be adjustedvia the center display.
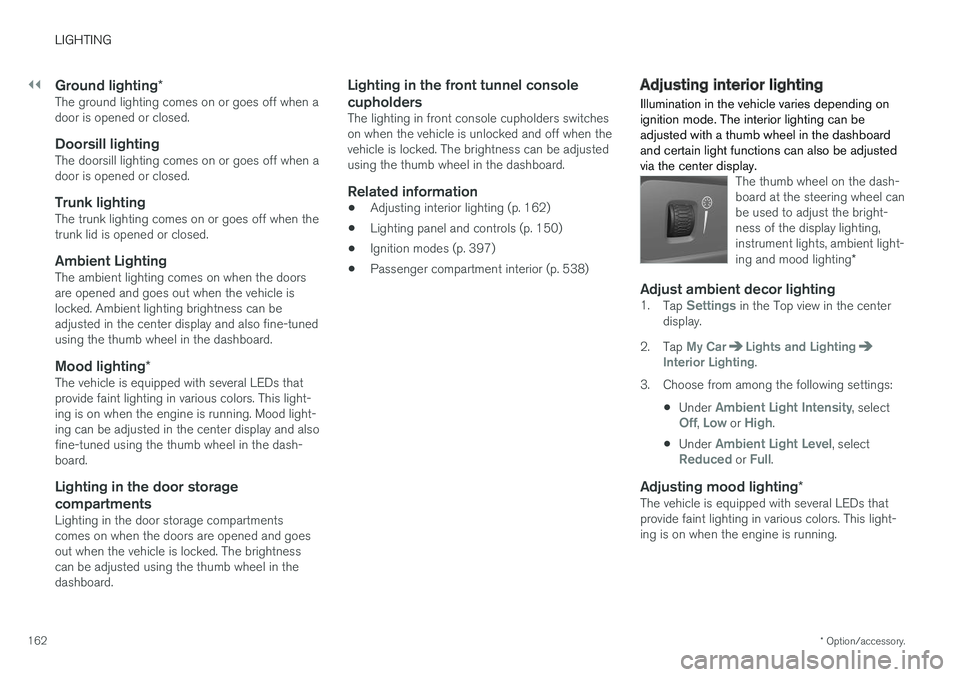
The thumb wheel on the dash- board at the steering wheel canbe used to adjust the bright-ness of the display lighting,instrument lights, ambient light- ing and mood lighting *
Adjust ambient decor lighting1.
Tap Settings in the Top view in the center
display.
2. Tap
My CarLights and LightingInterior Lighting.
3. Choose from among the following settings:
•Under
Ambient Light Intensity, selectOff, Low or High.
• Under
Ambient Light Level, selectReduced or Full.
Adjusting mood lighting
*The vehicle is equipped with several LEDs that provide faint lighting in various colors. This light-ing is on when the engine is running.
Page 198 of 640
CLIMATE CONTROL
* Option/accessory.
196
Climate
The vehicle is equipped with electronic climate control. The climate system cools, heats anddehumidifies the air in the passenger compart-ment.
All of the climate system functions are controlled from the center display and the buttons on thecenter console. Certain rear seat functions can also be controlled from the climate controls * on the rear of the tun-
nel console.
Related information
• Climate zones (p. 196)
• Climate control sensors (p. 197)
• Perceived temperature (p. 197)
• Climate control system voice commands (p. 198)
• Air quality (p. 199)
• Air distribution (p. 201)
• Climate system controls (p. 208)
Climate zones
The vehicle is divided into climate zones to make it possible to set different temperatures for dif-ferent parts of the passenger compartment.
2-zone climate system
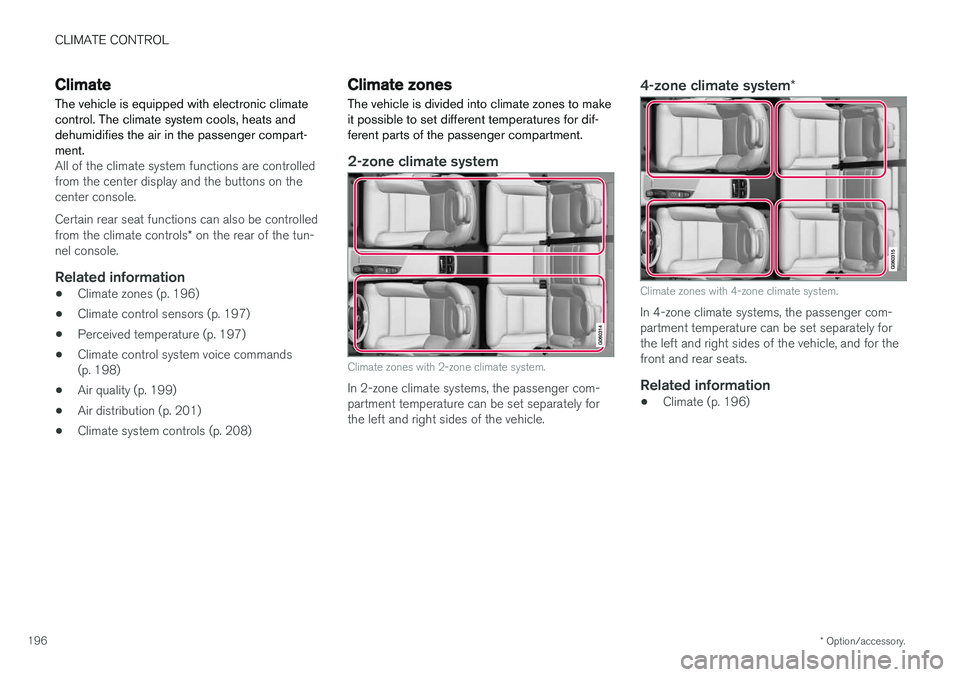
Climate zones with 2-zone climate system.
In 2-zone climate systems, the passenger com- partment temperature can be set separately forthe left and right sides of the vehicle.
4-zone climate system *
Climate zones with 4-zone climate system.
In 4-zone climate systems, the passenger com- partment temperature can be set separately forthe left and right sides of the vehicle, and for thefront and rear seats.
Related information
•Climate (p. 196)
Page 199 of 640
CLIMATE CONTROL
* Option/accessory.197
Climate control sensors
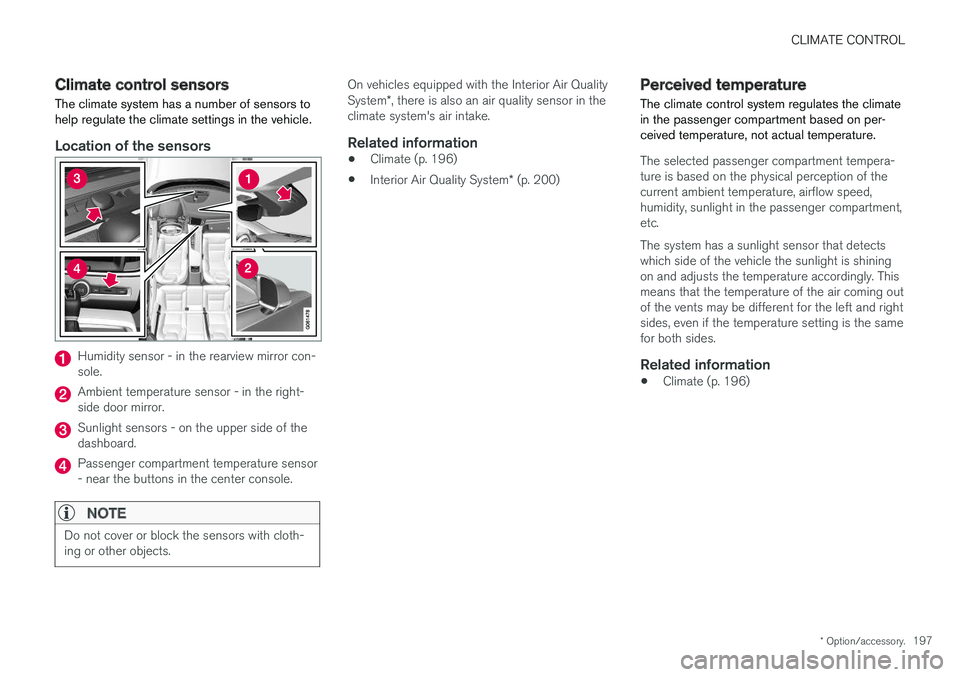
The climate system has a number of sensors to help regulate the climate settings in the vehicle.
Location of the sensors
Humidity sensor - in the rearview mirror con- sole.
Ambient temperature sensor - in the right- side door mirror.
Sunlight sensors - on the upper side of the dashboard.
Passenger compartment temperature sensor - near the buttons in the center console.
NOTE
Do not cover or block the sensors with cloth- ing or other objects.
On vehicles equipped with the Interior Air Quality System *, there is also an air quality sensor in the
climate system's air intake.
Related information
• Climate (p. 196)
• Interior Air Quality System
* (p. 200)
Perceived temperature
The climate control system regulates the climate in the passenger compartment based on per-ceived temperature, not actual temperature.
The selected passenger compartment tempera- ture is based on the physical perception of thecurrent ambient temperature, airflow speed,humidity, sunlight in the passenger compartment,etc. The system has a sunlight sensor that detects which side of the vehicle the sunlight is shiningon and adjusts the temperature accordingly. Thismeans that the temperature of the air coming outof the vents may be different for the left and rightsides, even if the temperature setting is the samefor both sides.
Related information
• Climate (p. 196)
Page 203 of 640
CLIMATE CONTROL
}}
* Option/accessory.201
Activating and deactivating the air
quality sensor *
The air quality sensor is part of the fully automa- ted Interior Air Quality System (IAQS).
The air quality sensor can be switched on or off. 1. Tap
Settings in the Top view in the center
display.
2. Tap
Climate.
3. Select
Air Quality Sensor to activate/deac-
tivate the air quality sensor.
Related information
• Interior Air Quality System
* (p. 200)
Passenger compartment air filter
All air entering the passenger compartment through the climate control system intake is fil-tered.
Replacing the passenger compartment filter
To maintain the high performance of the climate control system, the filter must be replaced regu-larly. Follow Volvo's service schedule for recom-mended replacement intervals. When driving inareas with a lot of smog, dust, etc., the filter mayneed to be changed more frequently.
NOTE
There are two types of passenger compart- ment filters. Make sure that the correct filteris installed.
Related information
• Air quality (p. 199)
• Clean Zone
* (p. 199)
• Clean Zone Interior Package
* (p. 200)
• Interior Air Quality System
* (p. 200)
Air distribution
The climate system distributes incoming air through a number of vents in the passengercompartment.
Automatic and manual air distributionWhen the auto-climate feature is on, air distribu- tion is regulated automatically. Air distribution canalso be controlled manually.
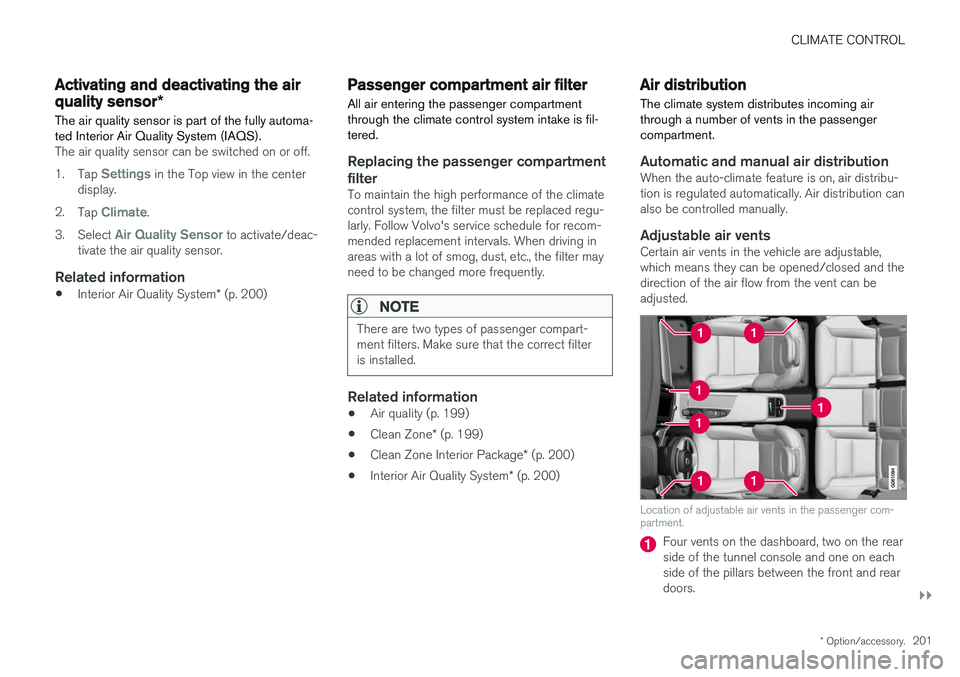
Adjustable air ventsCertain air vents in the vehicle are adjustable,which means they can be opened/closed and thedirection of the air flow from the vent can beadjusted.
Location of adjustable air vents in the passenger com- partment.
Four vents on the dashboard, two on the rear side of the tunnel console and one on eachside of the pillars between the front and reardoors.
Page 210 of 640
CLIMATE CONTROL
* Option/accessory.
208
Climate system controls
The climate system functions are controlled from physical buttons on the center console, the cen-ter display, and the climate panel on the rear side of the tunnel console *.
Physical buttons in the center console
Button for heated windshield * and max
defroster.
Button for heated rear window and door mir- rors.
Climate bar in the center displayThe most common climate system functions canbe controlled from the climate bar.
Temperature control for the driver and pas- senger sides.
Control for heated * and ventilated * driver and
passenger seats, and heated steering wheel *.
Button for opening Climate view. The graphic in the button shows activated climate systemsettings.
Climate view in the center displayTap the center button on the climate bar to openClimate view. Climate view is divided into the fol-lowing tabs:
•
Main climate
•Rear climate*
Toggle between the tabs by swiping the screen to the left/right or by tapping the desired head-ing.
Main climate
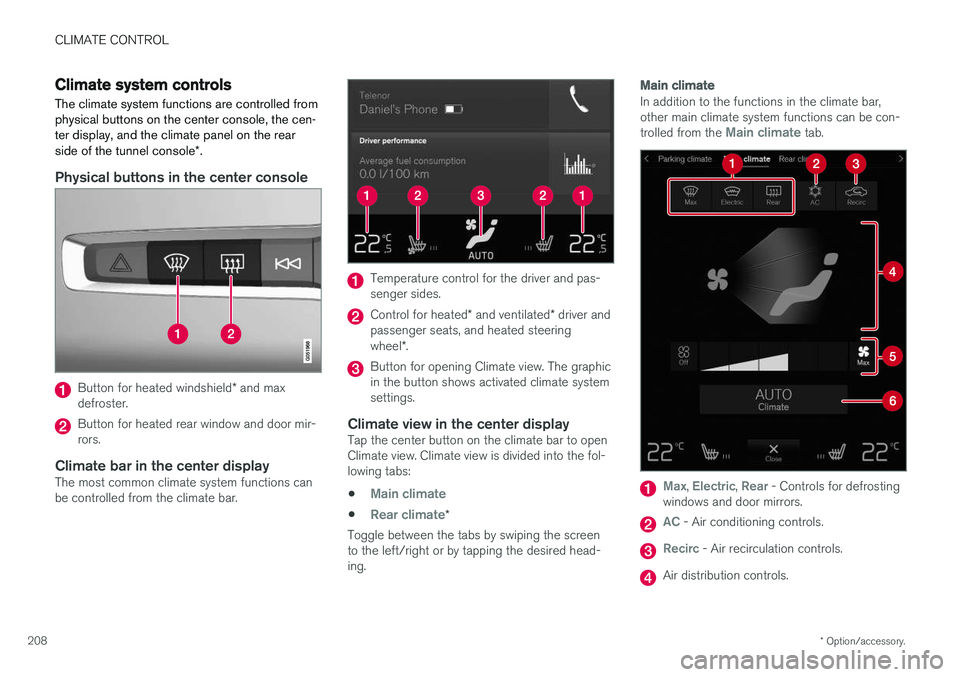
In addition to the functions in the climate bar, other main climate system functions can be con- trolled from the
Main climate tab.
Max, Electric, Rear - Controls for defrosting
windows and door mirrors.
AC - Air conditioning controls.
Recirc - Air recirculation controls.
Air distribution controls.
Page 214 of 640
||
CLIMATE CONTROL
* Option/accessory.
212 3. Tap the seat heating button repeatedly to
select one of the four levels:
Off, High,Medium or Low.
> The level is changed and the set level is displayed in the button.
Activating and deactivating the heated rear seats from the rear seat
With 2-zone system:
Buttons for seat heating on the rear side of the tunnel console.
–Press repeatedly on the left or right seat heating buttons on the rear side of the tun- nel console to select one of four levels:
Off,High, Medium or Low.
> The level is changed and the indicator lights in the button display the level. With 4-zone system
*:
Seat heating controls and indicator lights on the rear side of the tunnel console.
–Press repeatedly on the left or right seat heating buttons in the climate panel on thetunnel console to select one of four levels:
Off, High, Medium or Low.
> The level will be changed and the climate panel screen will show the new level.
Related information
• Climate system controls (p. 208)
Activating and deactivating front
seat ventilation
*
The seats can be ventilated to provide increased comfort in warm weather.
The ventilation system consists of fans in the seats and backrest that draw air through the seatupholstery. The cooler the passenger compart-ment is, the greater the cooling effect of the ven-tilation. The system can be activated when theengine is running.
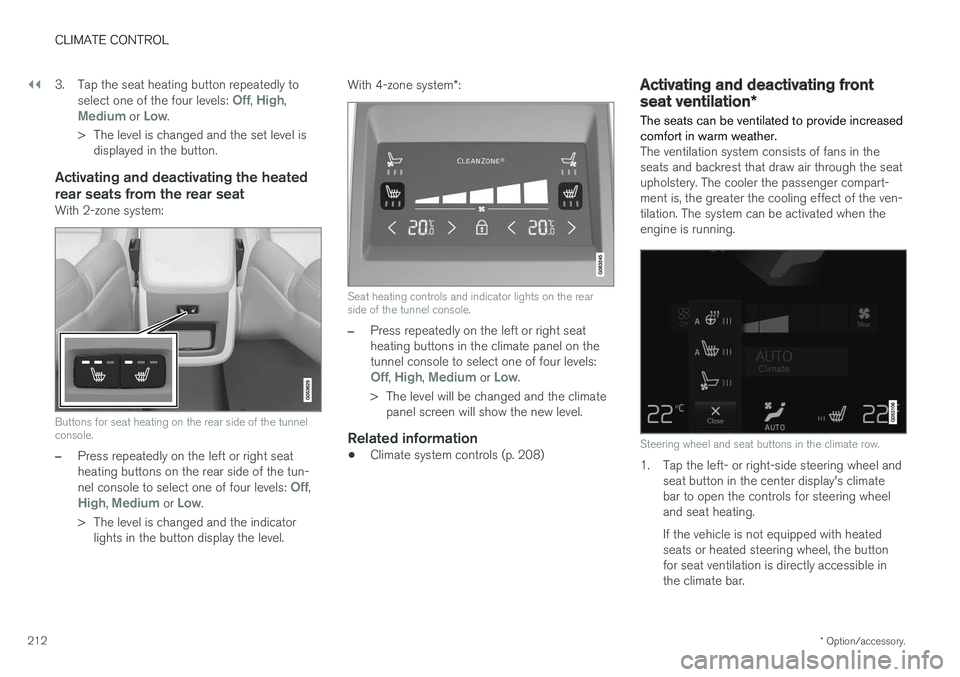
Steering wheel and seat buttons in the climate row.
1. Tap the left- or right-side steering wheel and seat button in the center display's climate bar to open the controls for steering wheeland seat heating. If the vehicle is not equipped with heated seats or heated steering wheel, the buttonfor seat ventilation is directly accessible inthe climate bar.