display VOLVO S90 2019 Quick Guide
[x] Cancel search | Manufacturer: VOLVO, Model Year: 2019, Model line: S90, Model: VOLVO S90 2019Pages: 43, PDF Size: 1.85 MB
Page 21 of 43
PASSENGER COMPARTMENT CLIMATE Climate system functions for the front and rear sections of the passen- ger compartment are controlled from the center display and from the buttons on the center console and the rear side of the tunnel console*.
Some functions can also be controlled using voice commands.
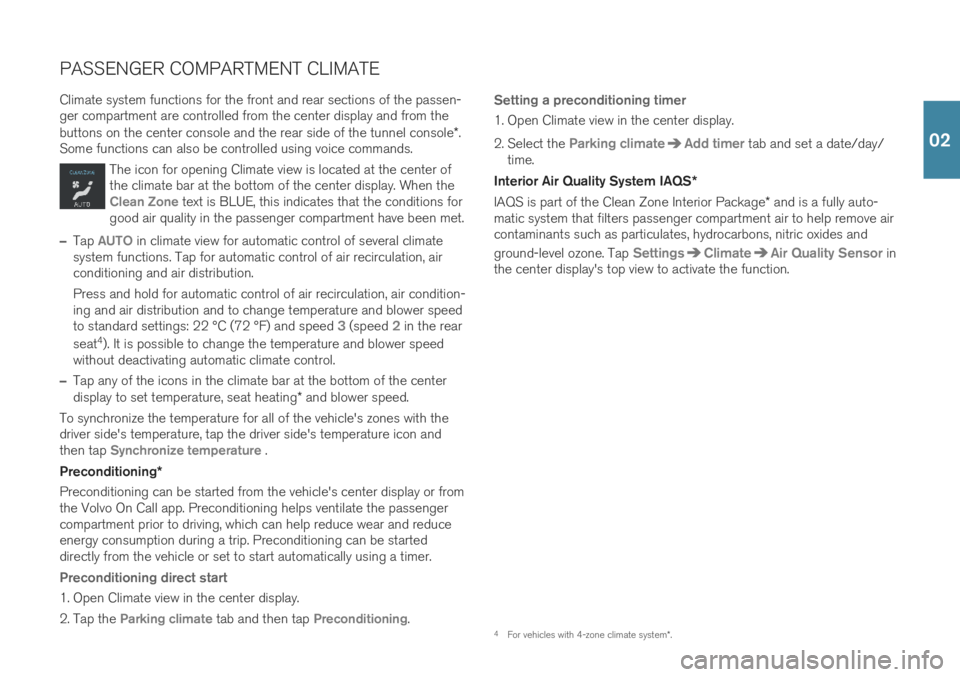
The icon for opening Climate view is located at the center of the climate bar at the bottom of the center display. When the
Clean Zone text is BLUE, this indicates that the conditions for
good air quality in the passenger compartment have been met.
–Tap AUTO in climate view for automatic control of several climate
system functions. Tap for automatic control of air recirculation, air conditioning and air distribution. Press and hold for automatic control of air recirculation, air condition- ing and air distribution and to change temperature and blower speedto standard settings: 22 °C (72 °F) and speed
3 (speed 2 in the rear
seat 4
). It is possible to change the temperature and blower speed
without deactivating automatic climate control.
–Tap any of the icons in the climate bar at the bottom of the center display to set temperature, seat heating * and blower speed.
To synchronize the temperature for all of the vehicle's zones with the driver side's temperature, tap the driver side's temperature icon andthen tap
Synchronize temperature .
Preconditioning *
Preconditioning can be started from the vehicle's center display or from the Volvo On Call app. Preconditioning helps ventilate the passengercompartment prior to driving, which can help reduce wear and reduceenergy consumption during a trip. Preconditioning can be starteddirectly from the vehicle or set to start automatically using a timer.
Preconditioning direct start
1. Open Climate view in the center display.
2. Tap the
Parking climate tab and then tap Preconditioning.
Setting a preconditioning timer
1. Open Climate view in the center display.
2. Select the
Parking climateAdd timer tab and set a date/day/
time.
Interior Air Quality System IAQS *
IAQS is part of the Clean Zone Interior Package * and is a fully auto-
matic system that filters passenger compartment air to help remove air contaminants such as particulates, hydrocarbons, nitric oxides and ground-level ozone. Tap
SettingsClimateAir Quality Sensor in
the center display's top view to activate the function.
4 For vehicles with 4-zone climate system *.
02
Page 23 of 43
Bluetooth function is activated). Up to 20 devices are saved in a list to facilitate connecting to these later.
1. Activate Bluetooth in your phone. Also activate tethering/personalhotspot if you would like to connect to the Internet.
2. Open the phone tile in the center display.
3. Tap
Add phone or, if a phone is already connected, tap Change and
then Add phone.
4. Select the phone to be connected and then follow the steps on the center display and in the phone. Note that in certain phones, the message function is activated.
Wi-Fi Wi-Fi connections can be used to connect the vehicle to the Internet at greater speeds than are possible using Bluetooth to stream onlineservices such as web radio and music via apps in the vehicle, down-load/upload software, etc. A Wi-Fi connection from a smartphone actsas a hotspot for the vehicle and any external devices that may be in thevehicle.
1. Activate your smartphone's tethering/personal hotspot.
2. Tap
Settings in the center display's top view.
3. Tap
CommunicationWi-Fi and activate by checking the box for
Wi-Fi connection.
Please note that in certain phones, tethering is closed after contact with the vehicle has been broken. The phone's tethering function willthen need to be reactivated before it can be used again. USB The USB ports can be used to connect an external device to e.g. play music. You can also use the USB ports for Apple CarPlay * and Android
Auto *. Your external device will also be recharged while it is connected
to the vehicle.
USB ports (type A) are provided in the armrest storage compart- ment between the seats. Electrical sockets Your vehicle contains the following electrical sockets:
12-volt electrical socket.
12-volt electrical socket. There is also a 12-volt electrical socket
* in
the trunk.
5 Only vehicles with Volvo On Call. When the vehicle's modem is used to make the connection, the Volvo On Call services will use the connection.
02
Page 24 of 43
6For information about which phones are compatible with the vehicle, go to support.volvocars.com.
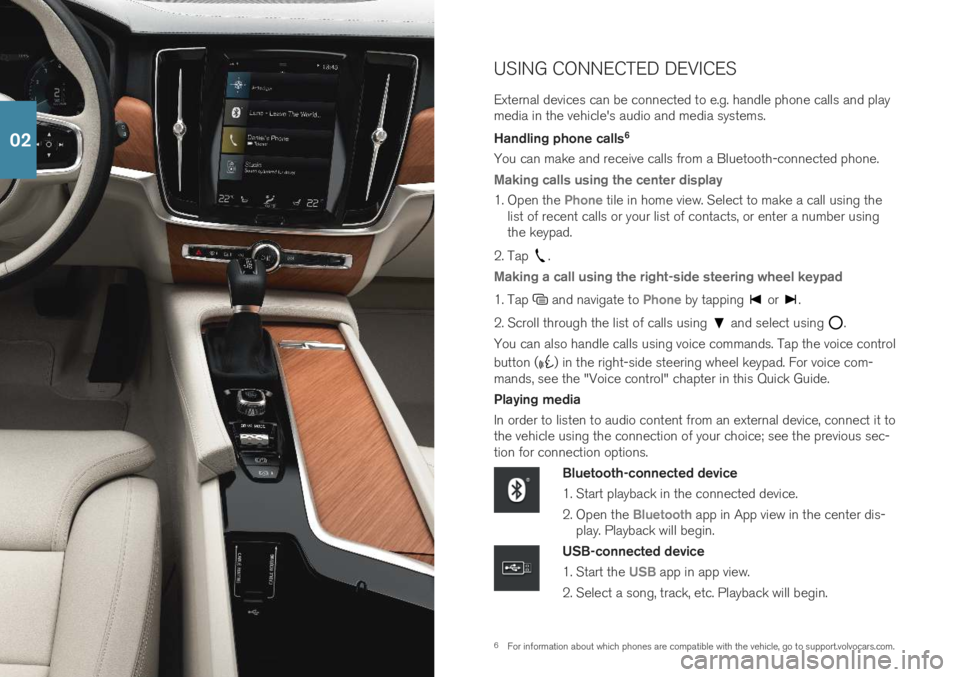
USING CONNECTED DEVICES External devices can be connected to e.g. handle phone calls and play media in the vehicle's audio and media systems. Handling phone calls
6
You can make and receive calls from a Bluetooth-connected phone.
Making calls using the center display
1. Open the Phone tile in home view. Select to make a call using the
list of recent calls or your list of contacts, or enter a number using the keypad.
2. Tap
.
Making a call using the right-side steering wheel keypad
1. Tap and navigate to Phone by tapping or .
2. Scroll through the list of calls using
and select using .
You can also handle calls using voice commands. Tap the voice control button (
) in the right-side steering wheel keypad. For voice com-
mands, see the "Voice control" chapter in this Quick Guide. Playing media In order to listen to audio content from an external device, connect it to the vehicle using the connection of your choice; see the previous sec-tion for connection options.
Bluetooth-connected device
1. Start playback in the connected device.
2. Open the
Bluetooth app in App view in the center dis-
play. Playback will begin.
USB-connected device
1. Start the
USB app in app view.
2. Select a song, track, etc. Playback will begin.
02
Page 25 of 43
7Apple and CarPlay are registered trademarks of Apple Inc.
MP3 player or iPod
1. Start playback in the device.
2. Open the
iPod or USB app, depending on connection
method. For playback from iPod, select the iPod app
regardless of connection method. Playback will begin.
Apple
® CarPlay®*7
and Android Auto *
CarPlay and Android Auto make it possible to use certain apps in your smartphone via the vehicle to e.g. play music or listen to podcasts. Thisinteraction takes place via the vehicle's center display or your smart-phone. If you have an iPhone, Siri voice control must be activated before using CarPlay.
1. Connect the phone to the USB port with a white frame.
2. Tap
Apple CarPlay or Android Auto in app view to acti-
vate.
Activate voice control with CarPlay and Android Auto by pressing and holding the
button in the right-side steering wheel keypad. Pressing
this button briefly will instead activate the vehicle's own voice control system. Bluetooth is deactivated when CarPlay is used. Use Wi-Fi or the vehi- cle's modem if you would like to connect the vehicle to the Internet.
02
Page 27 of 43
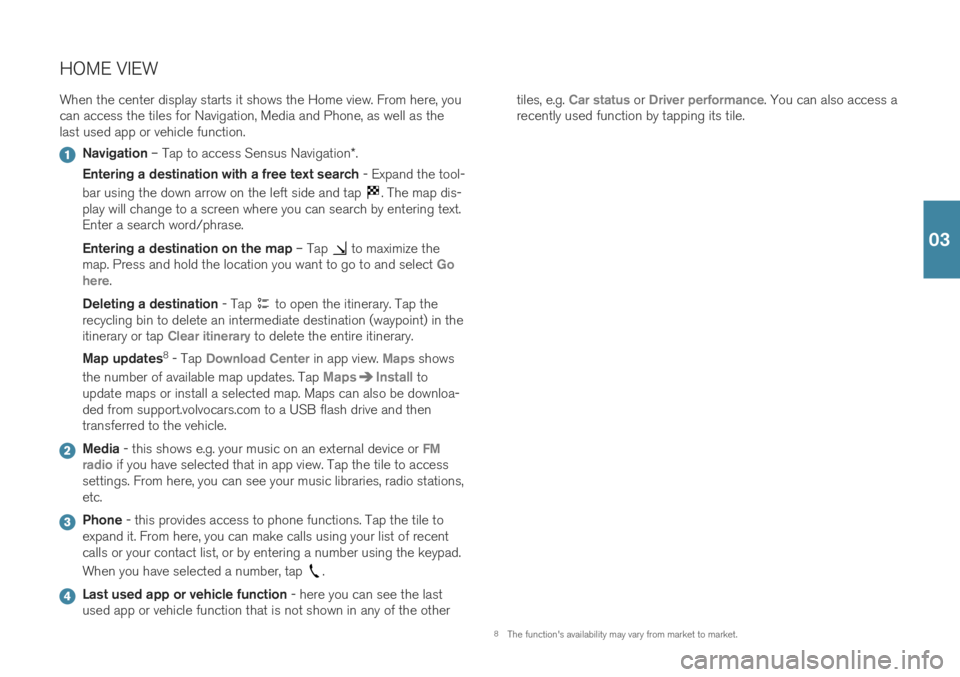
HOME VIEWWhen the center display starts it shows the Home view. From here, you can access the tiles for Navigation, Media and Phone, as well as thelast used app or vehicle function.
Navigation – Tap to access Sensus Navigation *.
Entering a destination with a free text search - Expand the tool-
bar using the down arrow on the left side and tap
. The map dis-
play will change to a screen where you can search by entering text. Enter a search word/phrase. Entering a destination on the map – Tap
to maximize the
map. Press and hold the location you want to go to and select Go
here.
Deleting a destination - Tap
to open the itinerary. Tap the
recycling bin to delete an intermediate destination (waypoint) in the itinerary or tap
Clear itinerary to delete the entire itinerary.
Map updates 8
- Tap
Download Center in app view. Maps shows
the number of available map updates. Tap
MapsInstall to
update maps or install a selected map. Maps can also be downloa- ded from support.volvocars.com to a USB flash drive and thentransferred to the vehicle.
Media - this shows e.g. your music on an external device or FM
radio if you have selected that in app view. Tap the tile to access
settings. From here, you can see your music libraries, radio stations, etc.
Phone - this provides access to phone functions. Tap the tile to
expand it. From here, you can make calls using your list of recent calls or your contact list, or by entering a number using the keypad. When you have selected a number, tap
.
Last used app or vehicle function - here you can see the last
used app or vehicle function that is not shown in any of the other tiles, e.g.
Car status or Driver performance. You can also access a
recently used function by tapping its tile.
8 The function's availability may vary from market to market.
03
Page 29 of 43
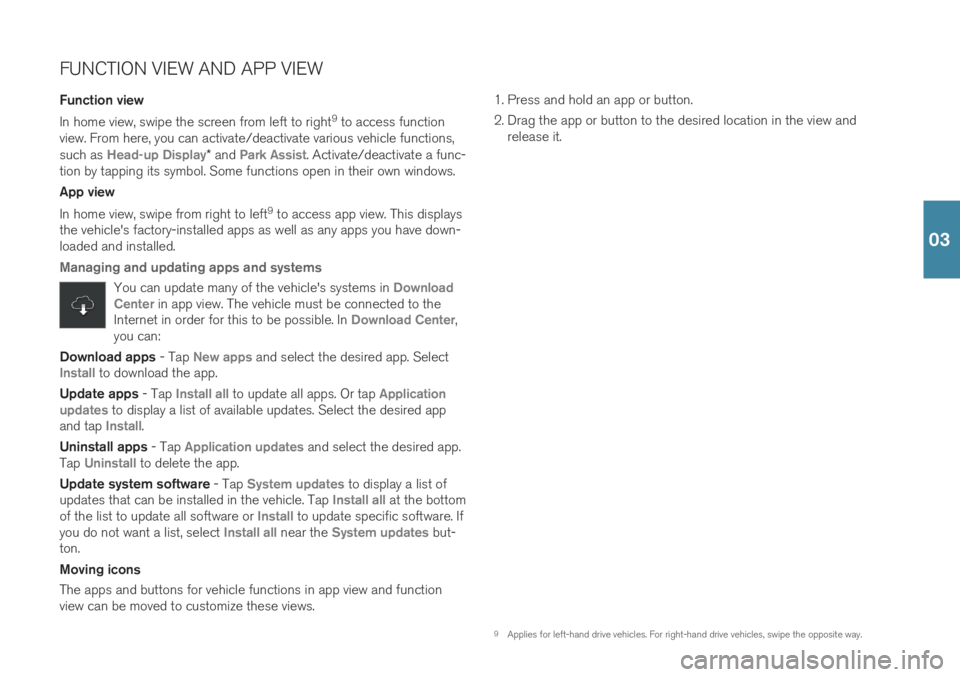
FUNCTION VIEW AND APP VIEW Function view In home view, swipe the screen from left to right9
to access function
view. From here, you can activate/deactivate various vehicle functions, such as
Head-up Display* and Park Assist. Activate/deactivate a func-
tion by tapping its symbol. Some functions open in their own windows. App view In home view, swipe from right to left 9
to access app view. This displays
the vehicle's factory-installed apps as well as any apps you have down- loaded and installed.
Managing and updating apps and systems
You can update many of the vehicle's systems in Download
Center in app view. The vehicle must be connected to the
Internet in order for this to be possible. In Download Center,
you can:
Download apps - Tap New apps and select the desired app. SelectInstall to download the app.
Update apps - Tap
Install all to update all apps. Or tap Application
updates to display a list of available updates. Select the desired app
and tap Install.
Uninstall apps - Tap
Application updates and select the desired app.
Tap Uninstall to delete the app.
Update system software - Tap
System updates to display a list of
updates that can be installed in the vehicle. Tap Install all at the bottom
of the list to update all software or Install to update specific software. If
you do not want a list, select Install all near the System updates but-
ton. Moving icons The apps and buttons for vehicle functions in app view and function view can be moved to customize these views. 1. Press and hold an app or button.
2. Drag the app or button to the desired location in the view and
release it.
9Applies for left-hand drive vehicles. For right-hand drive vehicles, swipe the opposite way.
03
Page 31 of 43
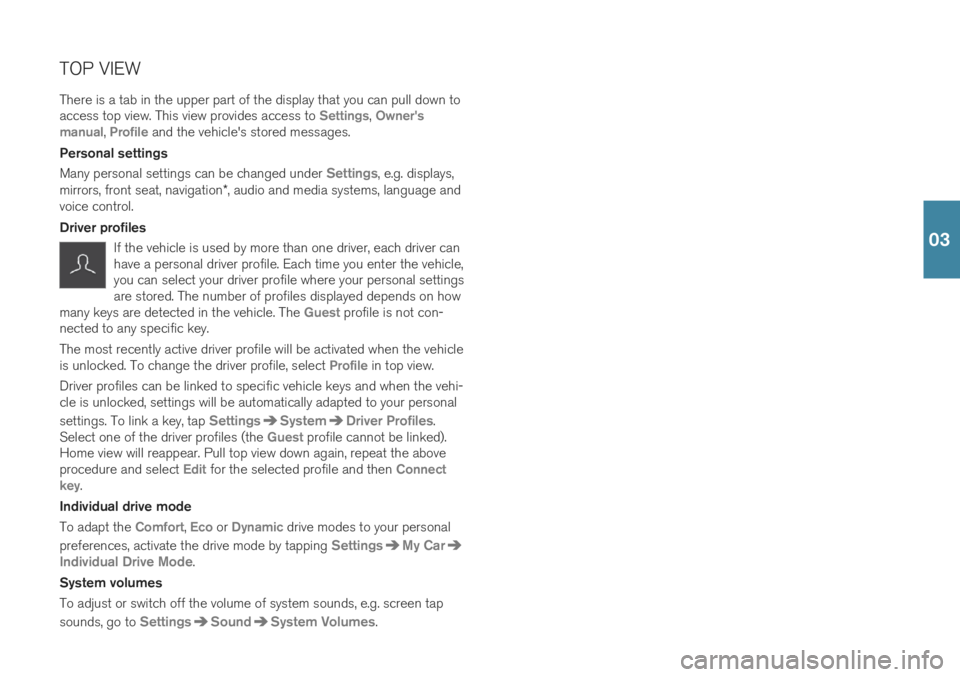
TOP VIEW There is a tab in the upper part of the display that you can pull down to access top view. This view provides access to
Settings, Owner's
manual, Profile and the vehicle's stored messages.
Personal settings Many personal settings can be changed under
Settings, e.g. displays,
mirrors, front seat, navigation *, audio and media systems, language and
voice control. Driver profiles
If the vehicle is used by more than one driver, each driver can have a personal driver profile. Each time you enter the vehicle,you can select your driver profile where your personal settingsare stored. The number of profiles displayed depends on how
many keys are detected in the vehicle. The
Guest profile is not con-
nected to any specific key. The most recently active driver profile will be activated when the vehicle is unlocked. To change the driver profile, select
Profile in top view.
Driver profiles can be linked to specific vehicle keys and when the vehi- cle is unlocked, settings will be automatically adapted to your personal settings. To link a key, tap
SettingsSystemDriver Profiles.
Select one of the driver profiles (the Guest profile cannot be linked).
Home view will reappear. Pull top view down again, repeat the above procedure and select
Edit for the selected profile and then Connect
key.
Individual drive mode To adapt the
Comfort, Eco or Dynamic drive modes to your personal
preferences, activate the drive mode by tapping
SettingsMy Car
Individual Drive Mode.
System volumes To adjust or switch off the volume of system sounds, e.g. screen tap sounds, go to
SettingsSoundSystem Volumes.
03
Page 33 of 43
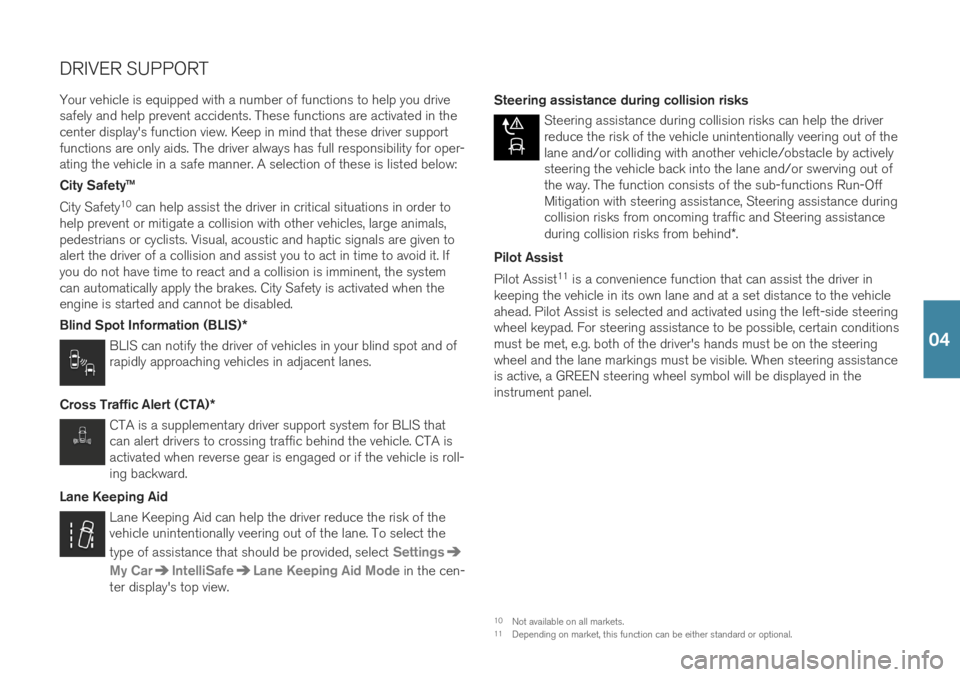
DRIVER SUPPORT
Your vehicle is equipped with a number of functions to help you drive safely and help prevent accidents. These functions are activated in thecenter display's function view. Keep in mind that these driver supportfunctions are only aids. The driver always has full responsibility for oper-ating the vehicle in a safe manner. A selection of these is listed below: City Safety™ City Safety 10
can help assist the driver in critical situations in order to
help prevent or mitigate a collision with other vehicles, large animals, pedestrians or cyclists. Visual, acoustic and haptic signals are given toalert the driver of a collision and assist you to act in time to avoid it. Ifyou do not have time to react and a collision is imminent, the systemcan automatically apply the brakes. City Safety is activated when theengine is started and cannot be disabled. Blind Spot Information (BLIS) *
BLIS can notify the driver of vehicles in your blind spot and of rapidly approaching vehicles in adjacent lanes.
Cross Traffic Alert (CTA) *
CTA is a supplementary driver support system for BLIS that can alert drivers to crossing traffic behind the vehicle. CTA isactivated when reverse gear is engaged or if the vehicle is roll-ing backward.
Lane Keeping Aid
Lane Keeping Aid can help the driver reduce the risk of the vehicle unintentionally veering out of the lane. To select the type of assistance that should be provided, select
Settings
My CarIntelliSafeLane Keeping Aid Mode in the cen-
ter display's top view. Steering assistance during collision risks
Steering assistance during collision risks can help the driver reduce the risk of the vehicle unintentionally veering out of thelane and/or colliding with another vehicle/obstacle by activelysteering the vehicle back into the lane and/or swerving out ofthe way. The function consists of the sub-functions Run-OffMitigation with steering assistance, Steering assistance duringcollision risks from oncoming traffic and Steering assistance during collision risks from behind
*.
Pilot Assist Pilot Assist 11
is a convenience function that can assist the driver in
keeping the vehicle in its own lane and at a set distance to the vehicle ahead. Pilot Assist is selected and activated using the left-side steeringwheel keypad. For steering assistance to be possible, certain conditionsmust be met, e.g. both of the driver's hands must be on the steeringwheel and the lane markings must be visible. When steering assistanceis active, a GREEN steering wheel symbol will be displayed in theinstrument panel.
10 Not available on all markets.
11 Depending on market, this function can be either standard or optional.
04
Page 35 of 43
PARKING ASSISTANCE SYSTEMS
Park Assist Pilot *
Park Assist Pilot can help detect if the vehicle will fit into a parking space and then helps guide the vehicle into the space. The driver's taskis to check the area around the vehicle, follow the instructions providedin the center display, select the appropriate gear, control the vehicle'sspeed and be prepared to apply the brakes to stop the vehicle.
Parking with Park Assist Pilot
1. The vehicle's speed may not exceed 30 km/h (20 mph) when parallel parking or 20 km/h (12 mph) when per- pendicular parking. The distance between the vehicleand the parking space should be about 1 meter (3 feet)when the function is looking for parking.
2. Tap
Park In in Function view or Camera view.
3. Stop the vehicle when notified by a graphic and a mes- sage in the center display that a suitable parking space has been found. A pop-up window will appear.
Pulling out of a parking space with Park Assist Pilot
This function can only be used when the vehicle has been parallel parked.
1. Tap Park Out in function view or camera view.
2. Use the turn signals to indicate the direction in which the vehicle will pull out of the parking space.
3. Follow the instructions in the center display.
Park Assist Camera *
The Park Assist Camera can help the driver detect potential obstacles around the vehicle using a camera image and graphics in the centerdisplay. Camera views and guiding lines can be selected in the centerdisplay. The Park Assist Camera starts automatically when reverse gearis engaged. It can also be started manually from the center display.
–Tap the Camera button in function view to manually acti-
vate/deactivate the function.
04
Page 39 of 43
Set fan to max/Turn off fan
Raise fan speed/Lower fan speed
Turn on auto
Air condition on/Air condition off
Recirculation on/Recirculation off
Turn on defroster /Turn off defroster
Turn on max defroster/Turn off max defroster
Turn on electric defroster/Turn off electric defroster*
Turn on rear defroster/Turn off rear defroster
Turn steering wheel heat on/Turn steering wheel heat off*
Raise steering wheel heat/Lower steering wheel heat*
Turn on seat heat/Turn off seat heat*
Raise seat heat/Lower seat heat*
Turn on seat ventilation/Turn off seat ventilation*
Raise seat ventilation/Lower seat ventilation*
Navigation system voice commands *
Navigation
Take me home
Go to [city]
Go to [address]
Add intersection
Go to [zip code]
Go to [contact]
Search [POI category]
Search [POI category] [city]
Search [POI name]
Change country/Change state13,
14
Show favorites
Clear itinerary
Repeat voice guidance
Turn off voice guidance
Turn on voice guidance
12
Certain markets only.
13 For European countries, "country" is used instead of "state".
14 For Brazil and India, the search area is changed using the center display.
05