start stop button VOLVO S90 2020 Quick Guide
[x] Cancel search | Manufacturer: VOLVO, Model Year: 2020, Model line: S90, Model: VOLVO S90 2020Pages: 643, PDF Size: 13.68 MB
Page 11 of 643

9
STARTING AND DRIVING
Starting the vehicle378
Switching off the vehicle 380
Ignition modes 381
Selecting ignition mode 382
Brake functions 382
Brakes 383
Brake Assist System 384
Braking on wet roads 384
Braking on salted roads 385
Maintenance of the brake system 385
Parking brake 385
Activating and deactivating the parking brake 386
Settings for automatically activat-ing the parking brake 387
Parking on a hill 388
Parking brake malfunction 388
Auto-hold brakes 389
Activating and deactivating Auto-hold at a standstill 390
Hill Start Assist 390
Braking assist after a collision 391
Transmission 391
Automatic transmission 391
Gear selector positions for auto-matic transmissions 392
Using the steering wheel paddles
*
to shift 395
Shiftlock 397
Deactivating the automatic shiftlock 398
The kickdown function 398
All Wheel Drive (AWD) *
399
Drive modes *
399
Changing drive mode *
401
Eco drive mode 401
Activating and deactivating Eco drive mode using the function button 404
Start/Stop function 404
Driving with the Start/Stop function 404
Deactivating the Start/Stop function 406
Conditions for the Start/Stop function 406
Leveling control * and suspension
408
Leveling control settings *
411
Economical driving 411
Preparing for a long trip 412
Winter driving 412
Driving through standing water 413
Opening/closing the fuel filler door 414
Refueling 414
Fuel 415
Octane rating 416
Emission controls418
Overheating of engine and trans- mission 418
Battery drain 419
Jump starting using another battery 420
Towing using a towline 422
Attaching and removing the tow-ing eyelet 423
Recovery 425
HomeLink ®
* 425
Programming HomeLink ®
* 426
Using HomeLink ®
* 428
Type approval for HomeLink ®
* 429
Compass *
429
Activating and deactivating the compass * 430
Calibrating the compass *
430
Page 226 of 643

CLIMATE CONTROL
* Option/accessory.
224
Preconditioning *
Preconditioning is a climate function that, if possible, attempts to achieve a comfortabletemperature in the passenger compartmentbefore driving.
Preconditioning can be started immediately or started at a preset time using a timer. In warm weather, the ventilation system cools the passenger compartment by blowing air infrom outside. The function cannot heat thepassenger compartment.
NOTE
During preconditioning of the passenger compartment, the vehicle works to reach acomfortable temperature and not the tem-perature set in the climate system.
Related information
Parking climate
* (p. 223)
Starting and stopping preconditioning
*
(p. 224)
Preconditioning timer
* (p. 225)
Starting and stopping preconditioning *
Preconditioning ventilates the passenger compartment, if possible, before driving. Thefunction can be started in the center displayor from a cellular phone.
Starting and stopping from the vehicle
1. Tap the symbol in the center of the climate bar to open Climate view in the center dis- play.
2. Select the
Parking climate tab.
3. Tap
Preconditioning.
> Preconditioning starts/stops and the button lights up/goes out.
NOTE
The vehicle doors and windows should be closed during preconditioning of the pas-senger compartment.
Starting from app *A device with the Volvo On Call * app can be
used to start preconditioning or check set- tings. Preconditioning ventilates the passen- ger compartment by blowing in air from out-side. The passenger compartment can also be pre- conditioned using the Engine Remote Start (ERS)
6
function using the Volvo On Call * app.
Related information
Parking climate
* (p. 223)
Preconditioning
* (p. 224)
Preconditioning timer
* (p. 225)
6
Certain markets only.
Page 272 of 643

DRIVER SUPPORT
270
Electronic Stability Control symbols and messagesA number of symbols and messages related to Electronic Stability Control (ESC 6
) may be displayed in the instrument panel. Several examples are provided below.
Symbol Message Meaning
Steady glow for approx. 2 seconds. System check when the engine is started.
Flashing light. The system is actively operating.
Steady glow. Sport mode is activated.
NOTE! The system is not deactivated in this mode, but has partially
reduced functionality.
ESC Temporarily offThe system's functionality has been temporarily reduced due to high brake system temperatures. The function will be automatically reactivated when the brakes have cooled.
ESC Service requiredThe system is not functioning properly. Stop the vehicle in a safe place, turn off the engine and then restart it.
A text message can be erased by briefly press- ing the
button in the center of the right-
side steering wheel keypad. If the message persists: Contact a workshop
‒
an authorized Volvo workshop is recom- mended.
Related information
Electronic Stability Control (p. 267)
6
Electronic Stability Control
Page 372 of 643

DRIVER SUPPORT
* Option/accessory.
370
Using Park Assist Pilot *
Park Assist Pilot (PAP 98
) helps the driver park
using three different steps. The function can also help the driver pull out of a parkingspace.
The function measures the space and steers the vehicle. The driver's role is to:
keep close watch of the area around thevehicle
follow the instructions on the center dis-play
change gears (reverse/forward) – an audi-ble signal indicates when the driver needsto change gears
regulating and maintaining a safe speed
applying the brakes and stopping the vehi-cle.
Information about the actions required by thedriver are provided in the center display usingsymbols, graphics and/or text. The function can be activated if the following criteria have been met after the engine isstarted:
Your vehicle's speed is lower than30 km/h (20 mph).
NOTE
The distance between the vehicle and parking spots should be 0.5–1.5 meters(1.6–5.0 ft) when the function is lookingfor parking.
Parking with Park Assist PilotThe function helps park the vehicle using the following steps:
1. The system searches for and measures
potential parking spaces.
2. The vehicle is steered while it is backing into the parking space.
3. The vehicle is positioned in the parking space (the driver may be prompted to shift gears and apply the brakes).
Searching and measuring potential parking spots
The function can be activated in the center display's Func-tion view. It can also be accessed from the camera views.
GREEN button indicator light – the func- tion is activated.
GRAY button indicator light – the functionis deactivated.
Parallel parking search overview.
Perpendicular parking search overview.
The vehicle's speed may not exceed 30 km/h (20 mph) when parallel parking or 20 km/h(12 mph) when perpendicular parking.
98
Park Assist Pilot
Page 405 of 643

STARTING AND DRIVING
* Option/accessory.403
ECO gauge in the instrument panel
Eco gauge in 12" instrument panel *.
Eco gauge in 8" instrument panel.
The ECO gauge indicates how economical current driving is:
A low reading in the green area of thegauge indicates economical driving.
A high reading is shown when driving isnot economical, e.g. heavy braking orrapid acceleration.
The ECO gauge also has an indicator showinghow a reference driver would drive in the samedriving situation. This is shown by the shortpointer in the gauge.
ECO ClimateIn Eco mode, ECO climate is automatically
activated in the passenger compartment to help reduce energy consumption.
NOTE
When the Eco drive mode is activated, set-
tings for certain climate system and elec- tricity consuming functions are reduced.Some of these settings can be reset man-ually, but full functionality will only be restored by switching off
Eco mode or
adapting the Individual* drive mode to full
climate system functionality.
If condensation forms on the windows, tap the max defroster button, which will function nor-mally.
Related information
Changing drive mode
* (p. 401)
Activating and deactivating Eco drivemode using the function button (p. 404)
Drive modes
* (p. 399)
Economical driving (p. 411)
Start/Stop function (p. 404)
Page 406 of 643

STARTING AND DRIVING
* Option/accessory.
404
Activating and deactivating Eco drive mode using the functionbutton There is a function button for
Eco drive mode
in the center display's Function view if the vehicle is not equipped with a drive modecontrol in the tunnel console.
When the engine is switched off, Eco mode is
deactivated and must therefore be reactivated each time the engine is started. ECO will be
displayed in the instrument panel when thefunction is activated.
Selecting Eco drive mode in the center
display's Function view
–Tap the Driving Mode ECO button to
activate or deactivate the function.
> An indicator light in the button will illu- minate when the function is activated.
Related information
Eco drive mode (p. 401)
Changing drive mode
* (p. 401)
Drive modes
* (p. 399)
Start/Stop function Start/Stop is a function that temporarily switches off the engine when the vehicle hasstopped, e.g. at a traffic light or in heavy traf-fic, and then starts it again automaticallywhen needed.
The Start/Stop function reduces fuel con- sumption, which helps to reduce exhaustemissions. The system makes it possible to drive more economically and climate-smart by letting theengine auto-stop when appropriate.
Related information
Driving with the Start/Stop function(p. 404)
Conditions for the Start/Stop function(p. 406)
Drive modes
* (p. 399)
Driving with the Start/Stop function
Start/stop is a function that temporarily turns off the engine when the vehicle is stationaryand then automatically starts it when needed.
The Start/Stop function is available when the ignition is started and can be activated if cer-tain conditions are met. The instrument panel indicates when the func- tion is
Available
active
not available.
All of the vehicle's ordinary systems, such aslighting, radio, etc. function normally when theengine has been auto-stopped. Certain func-tions may be temporarily reduced, however,such as the climate system's blower speed orextremely high audio system volume.
Auto-stopTo auto-stop the engine:
Page 407 of 643

STARTING AND DRIVING
405
Stop the vehicle by applying the brakes and keep the brake pedal depressed. Theengine will auto-stop.
In
Comfort or Eco drive mode, the engine
may auto-stop before the vehicle has com- pletely stopped. With Adaptive Cruise Control or Pilot Assist activated, the engine will auto-stop aboutthree seconds after the vehicle has stopped.
Auto-startThe following conditions must be met for theengine to auto-start.
Release the brake pedal. The engine willauto-start and the vehicle can be driven.On an uphill gradient, Hill Start Assist (HSA 12
) will activate to help prevent the
vehicle from rolling backward.
When the Auto-hold function is activated, auto-start will be delayed until the acceler-ator is pressed.
When Adaptive Cruise Control or PilotAssist are activated, the engine will auto- start when the accelerator pedal is depressed or the
button on the left-
side steering wheel keypad is pressed.
Maintain pressure on the brake pedal and press the accelerator pedal. The enginewill auto-start.
On a downhill gradient: Release the brakepedal slightly so that the vehicle begins toroll. The engine will auto-start after a slightincrease in speed.
Symbols in the instrument panel
The symbol will be displayed in
the tachometer when the function is avail- able.
An indicator in the tachometer will point toward
when Start/Stop is active
and the engine has auto-stopped.
The
symbol will be grayed-out
when the function is not available.
No symbol will be shown when the func- tion is turned off.
The function is active and the engine has auto-stop- ped.
On vehicles with the 8-inch instrument panel, the symbol will be shown at the bottom of thespeedometer.
Related information
Deactivating the Start/Stop function(p. 406)
Conditions for the Start/Stop function(p. 406)
Start/Stop function (p. 404)
Hill Start Assist (p. 390)
Auto-hold brakes (p. 389)
12
Hill Start Assist
Page 408 of 643

STARTING AND DRIVING
406
Deactivating the Start/Stop function
In certain situations, it may be advisable to turn the Start/Stop function off.
To turn off Start/Stop, tap theStart/Stop function button
in the center display's Func- tion view. The indicator lightin the button will go outwhen the function has beenturned off.
The function will remain turned off until:
it is reactivated
the drive mode is changed to
Eco.
Related information
Driving with the Start/Stop function (p. 404)
Conditions for the Start/Stop function(p. 406)
Conditions for the Start/Stop function
Certain conditions must be met for Start/ Stop to function.
If any condition is not met, this will be indi- cated in the instrument panel.
The engine does not auto-stopThe engine will not auto-stop if: The vehicle has not reached a speed of ca 10 km/h (6 mph) after starting.
After several auto-stops, the speed mustagain exceed approximately ca 10 km/h(6 mph) before the next auto-stop.
The driver has not fastened the seatbelt.
The engine is not running at its normaloperating temperature.
The ambient temperature is underapproximately -5 °C (23 °F) or overapproximately 30 °C (86 °F).
Windshield heating is activated.
The climate system settings and theactual climate in the passenger compart-ment differ.
The vehicle is in reverse.
The driver is making large steering wheelmovements.
The road gradient is very steep.
The hood is open.
Driving at high altitude and the engine hasnot reached its normal operating tempera-ture.
ABS has been activated.
Hard braking (even if the ABS system hasnot been activated).
Many starts during a short period of timehave triggered the starter motor's over-heating protection.
The exhaust system's particulate filter isfull
A trailer is connected to the vehicle's elec-trical system.
The transmission is not running at its nor-mal operating temperature.
The gear selector is in mode
M (±
).
If traffic conditions allow it (for example ina traffic jam).
The engine does not auto-startThe engine will not auto-start after an auto-stop if:
The driver is not wearing a seat belt, thegear selector is in the
P position and the
driver's door is open. The engine must bestarted normally.
Page 429 of 643

STARTING AND DRIVING
}}
427
3. Do not release the buttons until the indica-
tor light has stopped flashing slowly (about once a second) and either flashesquickly (about 10 times a second) orglows steadily. >If the indicator light glows steadily: Indication that programming is com-plete. Press the programmed buttontwice to activate. If the indicator light flashes quickly: The device being programmed with HomeLink ®
may have a security func-
tion that requires an extra step. Try pressing the programmed button twiceto see whether the programmingworks. Otherwise, continue with thefollowing steps.
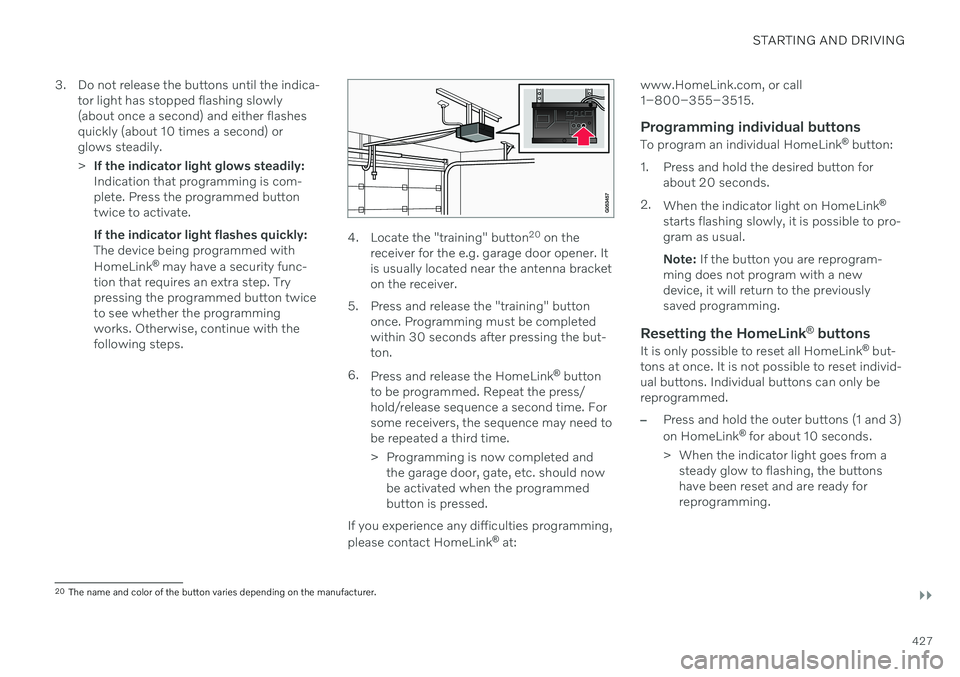
4. Locate the "training" button 20
on the
receiver for the e.g. garage door opener. It is usually located near the antenna bracketon the receiver.
5. Press and release the "training" button once. Programming must be completedwithin 30 seconds after pressing the but-ton.
6. Press and release the HomeLink ®
button
to be programmed. Repeat the press/hold/release sequence a second time. Forsome receivers, the sequence may need tobe repeated a third time.
> Programming is now completed and the garage door, gate, etc. should now be activated when the programmedbutton is pressed.
If you experience any difficulties programming, please contact HomeLink ®
at: www.HomeLink.com, or call 1–800–355–3515.
Programming individual buttons
To program an individual HomeLink
®
button:
1. Press and hold the desired button for about 20 seconds.
2. When the indicator light on HomeLink ®
starts flashing slowly, it is possible to pro-gram as usual. Note: If the button you are reprogram-
ming does not program with a new device, it will return to the previouslysaved programming.
Resetting the HomeLink ®
buttons
It is only possible to reset all HomeLink ®
but-
tons at once. It is not possible to reset individ-ual buttons. Individual buttons can only bereprogrammed.
–Press and hold the outer buttons (1 and 3) on HomeLink ®
for about 10 seconds.
> When the indicator light goes from a steady glow to flashing, the buttons have been reset and are ready forreprogramming.
20The name and color of the button varies depending on the manufacturer.
Page 430 of 643

||
STARTING AND DRIVING
* Option/accessory.
428
Related information
Using HomeLink ®
* (p. 428)
HomeLink ®
* (p. 425)
Type approval for HomeLink ®
* (p. 429)Using HomeLink ®
*21
Once HomeLink ®
is programmed, it can be
used instead of the separate remote controls.
Press and hold the programming button. The garage door, gate, alarm system, etc. will beactivated (this may take several seconds). Ifthe button is held down for more than 20 sec-onds, reprogramming will begin. The indicatorlight will glow steadily or flash when the but-ton has been pressed. The original remotecontrols may be used concurrently with HomeLink ®
if desired.
NOTE
When the ignition is switched off, HomeLink ®
will be active for at least
7 minutes.
NOTE
HomeLink ®
cannot be used if the vehicle is
locked and the alarm is armed * from the
outside.
WARNING
If you use HomeLink ®
to open a garage
door or gate, be sure no one is near the gate or door while it is in motion.
Do not use HomeLink ®
with any
garage door opener that lacks safetystop and reverse features as requiredby US federal safety standards (thisincludes any garage door opener modelmanufactured before April 1, 1982). Agarage door that cannot detect anobject - signaling the door to stop andreverse - does not meet current U.S.federal safety standards. For moreinformation, contact HomeLink at:www.homelink.com.
Related information
HomeLink ®
* (p. 425)
Programming HomeLink ®
* (p. 426)
Type approval for HomeLink ®
* (p. 429)
21
Certain markets only.