child seat VOLVO S90 TWIN ENGINE 2020 Owner's Manual
[x] Cancel search | Manufacturer: VOLVO, Model Year: 2020, Model line: S90 TWIN ENGINE, Model: VOLVO S90 TWIN ENGINE 2020Pages: 655, PDF Size: 12.54 MB
Page 74 of 655
||
SAFETY
72
Related information
Child restraints (p. 65)
Infant seats (p. 67)
Booster cushions (p. 72)
Top tether anchors (p. 73)
Lower child seat attachment points (p. 74)
ISOFIX/LATCH lower anchors (p. 75)
Booster cushions
Suitable child restraints should always be used when children (depending on their age/size) are seated in the vehicle.
Securing a booster cushion
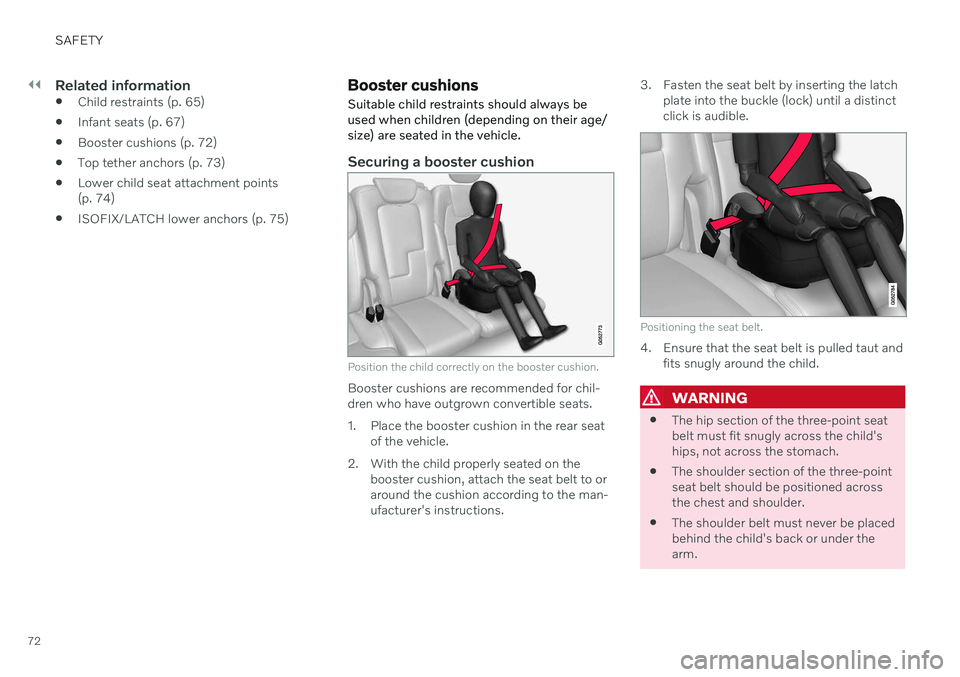
Position the child correctly on the booster cushion.
Booster cushions are recommended for chil- dren who have outgrown convertible seats.
1. Place the booster cushion in the rear seat of the vehicle.
2. With the child properly seated on the booster cushion, attach the seat belt to or around the cushion according to the man-ufacturer's instructions. 3. Fasten the seat belt by inserting the latch
plate into the buckle (lock) until a distinctclick is audible.
Positioning the seat belt.
4. Ensure that the seat belt is pulled taut andfits snugly around the child.
WARNING
The hip section of the three-point seat belt must fit snugly across the child'ships, not across the stomach.
The shoulder section of the three-pointseat belt should be positioned acrossthe chest and shoulder.
The shoulder belt must never be placedbehind the child's back or under thearm.
Page 75 of 655

SAFETY
}}}}
73
Related information
Child restraints (p. 65)
Convertible seats (p. 70)
Infant seats (p. 67)
Top tether anchors (p. 73)
Lower child seat attachment points (p. 74)
ISOFIX/LATCH lower anchors (p. 75)
Top tether anchors
Your Volvo is equipped with child restraint top tether anchorages for all three seatingpositions in the rear seat. They are located onthe rear parcel shelf.
Child restraint anchorages
Top tether anchors and symbols on the rear parcel shelf.
Securing a child seat
1. Place the child restraint on the rear seat.
2. Route the top tether strap under the head restraint and attach it to the anchor. 3. Attach the strap for the lower tether
anchors in the lower ISOFIX/LATCH attachment points. If the child restraint isnot equipped with straps for the lowertether anchors, or if the child restraint isused on the center seating position, followthe instructions for attaching a childrestraint using the automatic locking seatbelt.
4. Firmly tension all straps. Refer also to the child seat manufacturer's instructions for information on securing thechild seat.
WARNING
Always refer to the recommendations made by the child restraint manufac-turer.
Volvo recommends that the top tetheranchors be used when installing a for-ward-facing child restraint.
Never route a top tether strap over thetop of the head restraint. The strapshould be routed beneath the headrestraint.
Child restraint anchorages aredesigned to withstand only those loadsimposed by correctly fitted childrestraints. Under no circumstances arethey to be used for adult seat belts orharnesses. The anchorages are not able
Page 76 of 655
||
SAFETY
74
to withstand excessive forces on them in the event of collision if full harnessseat belts or adult seat belts are instal-led to them. An adult who uses a beltanchored in a child restraint anchorageruns a great risk of suffering severeinjuries should a collision occur.
Do not install rear speakers that requirethe removal of the top tether anchorsor interfere with the proper use of thetop tether strap.
Related information
Child restraints (p. 65)
Lower child seat attachment points(p. 74)
ISOFIX/LATCH lower anchors (p. 75)
Lower child seat attachment points
The rear seats are equipped with lower child seat attachment points.
The lower child seat attachment points are intended for use with certain rear-facing childrestraints. Always follow the manufacturer's installation instructions when attaching a child seat to thelower child seat attachment points.
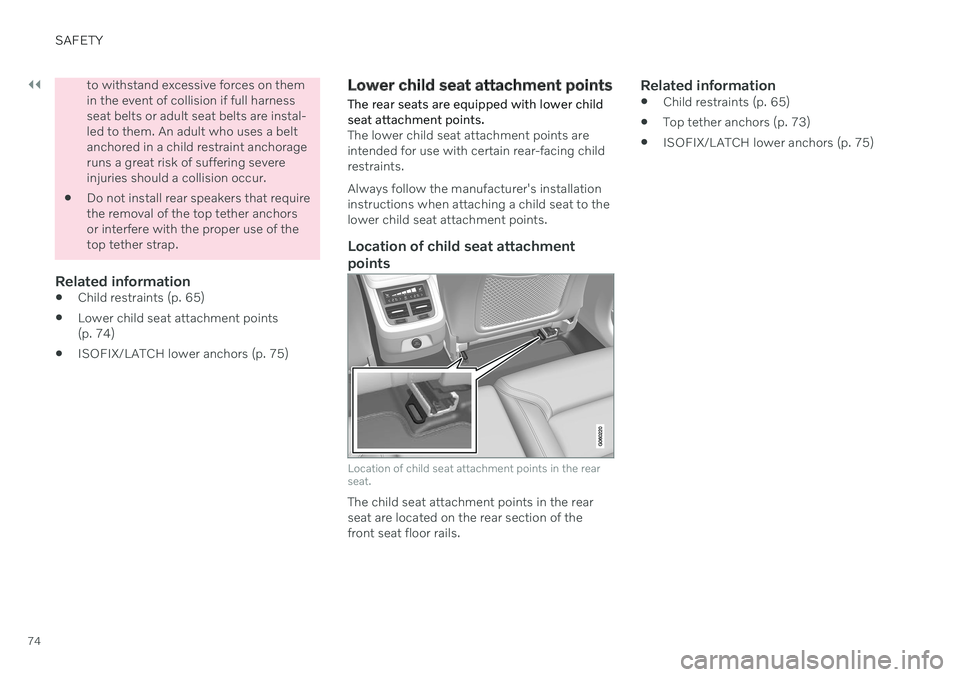
Location of child seat attachment points
Location of child seat attachment points in the rear seat.
The child seat attachment points in the rear seat are located on the rear section of thefront seat floor rails.
Related information
Child restraints (p. 65)
Top tether anchors (p. 73)
ISOFIX/LATCH lower anchors (p. 75)
Page 77 of 655
SAFETY
}}
75
ISOFIX/LATCH lower anchors
Lower anchors for ISOFIX/LATCH-equipped child seats are located in the rear, outboard seats, hidden below the backrest cushions.
Using the ISOFIX/LATCH lower child seat anchors
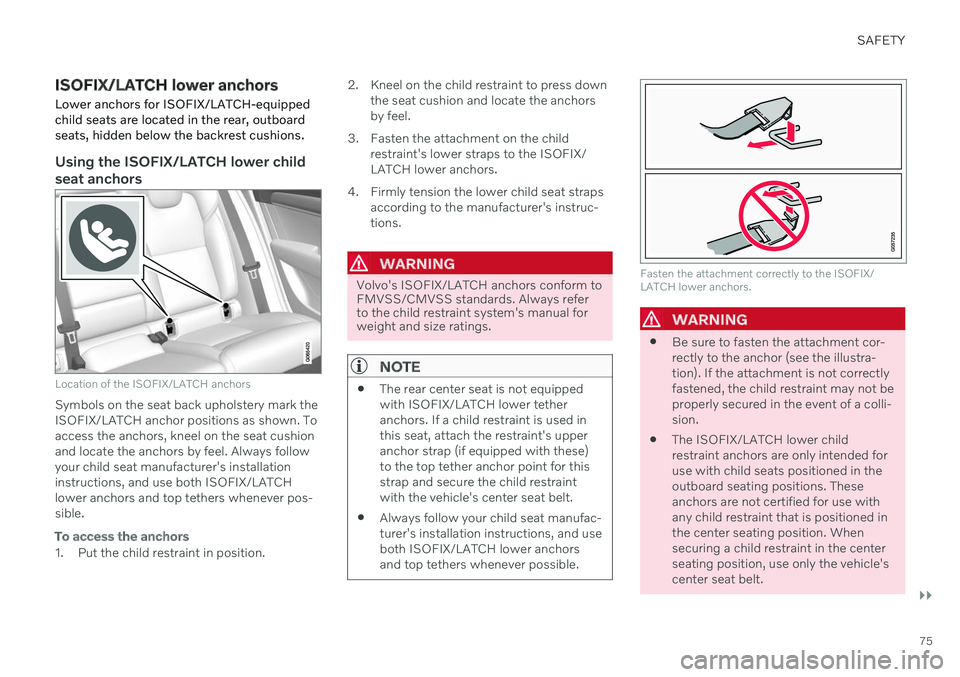
Location of the ISOFIX/LATCH anchors
Symbols on the seat back upholstery mark the ISOFIX/LATCH anchor positions as shown. Toaccess the anchors, kneel on the seat cushionand locate the anchors by feel. Always followyour child seat manufacturer's installationinstructions, and use both ISOFIX/LATCHlower anchors and top tethers whenever pos-sible.
To access the anchors
1. Put the child restraint in position. 2. Kneel on the child restraint to press down
the seat cushion and locate the anchors by feel.
3. Fasten the attachment on the child restraint's lower straps to the ISOFIX/LATCH lower anchors.
4. Firmly tension the lower child seat straps according to the manufacturer's instruc-tions.
WARNING
Volvo's ISOFIX/LATCH anchors conform to FMVSS/CMVSS standards. Always referto the child restraint system's manual forweight and size ratings.
NOTE
The rear center seat is not equipped with ISOFIX/LATCH lower tetheranchors. If a child restraint is used inthis seat, attach the restraint's upperanchor strap (if equipped with these)to the top tether anchor point for thisstrap and secure the child restraintwith the vehicle's center seat belt.
Always follow your child seat manufac-turer's installation instructions, and useboth ISOFIX/LATCH lower anchorsand top tethers whenever possible.
Fasten the attachment correctly to the ISOFIX/ LATCH lower anchors.
WARNING
Be sure to fasten the attachment cor- rectly to the anchor (see the illustra-tion). If the attachment is not correctlyfastened, the child restraint may not beproperly secured in the event of a colli-sion.
The ISOFIX/LATCH lower childrestraint anchors are only intended foruse with child seats positioned in theoutboard seating positions. Theseanchors are not certified for use withany child restraint that is positioned inthe center seating position. Whensecuring a child restraint in the centerseating position, use only the vehicle'scenter seat belt.
Page 81 of 655

DISPLAYS AND VOICE CONTROL
* Option/accessory.79
Driver's door
Memory for power front seat settings *,
door mirrors and head-up display *
Central locking
Power windows, door mirrors, electric child safety locks*
Controls for front seat
Related information
Manual front seats (p. 184)
Adjusting the power
* front seats (p. 185)
Adjusting the steering wheel (p. 195)
Lighting control and panel (p. 150)
Starting the vehicle (p. 398)
Instrument panel (p. 80)
Center display overview (p. 107)
Transmission (p. 412)
Page 190 of 655

||
SEATS AND STEERING WHEEL
* Option/accessory.
188
Front door closed
–Press and hold one of the memory buttons 1 (
) or 2 () until the seat, door mirrors
and head-up display stop in the positions stored in that memory button.
If the memory button is released, the seat,door mirrors and head-up display will stopmoving.
WARNING
This list point needs to be translated exactly to: "Because the driver's seatcan be adjusted with the ignition off,children should never be left unatten-ded in the vehicle.
Movement of the seat can be STOP-PED at any time by pressing any but-ton on the power seat control panel.
Do not adjust the seat while driving.
The seat should be adjusted so that thebrake pedal can be depressed fully. Inaddition, position the seat as far rear-ward as comfort and control allow.
The seat rails on the floor must not beobstructed in any way when the seat isin motion.
Related information
Manual front seats (p. 184)
Power
* front seats (p. 185)
Adjusting the power
* front seats (p. 185)
Storing positions for seats, mirrors and head-up display
* (p. 186)
Adjusting front seat massage settings
*
(p. 189)
Adjusting
* front seat cushion length
(p. 190)
Front seat massage
* settings (p. 188)
Adjusting front seat side bolster settings
*
(p. 191)
Adjusting front seat lumbar support
*
(p. 191)
Adjusting the passenger seat from thedriver's seat
* (p. 193)
Adjusting the door mirrors (p. 171)
Head-up display settings
* (p. 141)
Front seat massage * settings
The settings for the multifunctional seats can be adjusted using either the mutifunctioncontrol on the side of the seat or the centerdisplay. The adjustment settings are shown inthe center display.
Multifunction control, located on the side of the seat cushion.
Massage settingsThe following massage settings are available:
On/Off: Select On/Off to turn on/off the
massage function.
Programs 1-5: There are 5 preset mas-
sage programs. Select Swell, Tread,Advanced, Lumbar or Shoulder.
Intensity: Select Low, Normal or High.
Speed: Select Slow, Normal or Fast.
Page 639 of 655

INDEX
637
messages 137, 138
operation 109, 112, 116, 121
overview 107
settings 129, 130
switch off and change volume 128
symbols in status bar 121
views 112
Central locking 254
Change of owner 131
Changing a wheel 534Charge vehicle function 431
Charge level vehicle function 431
Charging hybrid battery 381 opening and closing the charging
door 386
start charging 386
Status 388, 389, 390
stop charging 392
Charging cable 383
Charging current 383
Checking engine oil level 575
Child restraints 63, 65 booster cushions 72
convertible seats 70
infant seats 67
ISOFIX/LATCH anchors 75
lower attachment points 74
recalls and registration 65
top tether anchors 73
Child safety 63
Child safety locks 256
Circuit breaker 385
City Safety 314 braking for oncoming vehicles 323
crossing traffic 320
delayed evasive maneuver 323
detecting obstacles 318
evasive maneuver 322
limitations 324
limitations for evasive maneuvers 322
limitations in crossing traffic 321
setting warning distance 317
sub-functions 315
Symbols and messages 327
Cleaning 607, 609 automatic car wash 613
car wash 610, 611, 613, 614, 615, 616
center display 605
Seat belts 607
textile upholstery 605, 607, 608
upholstery 605, 607, 608, 609
wheels 616
Cleaning wheels 616
Cleaning wiper blades 614Clean Zone 201
Clean Zone Interior Package 201
Climate 198 auto-regulation 215
blower control 219
parking 224
perceived temperature 199
Sensors 198
temperature control 221, 223
voice control 199
zones 198
Climate controls 209 center display 209
rear seat 209
Climate system 198, 209 Refrigerant 633
repairs 571
Clock, setting 90
Collision 42, 47, 53, 62Collision warner crossing traffic rear 333
see City Safety 314
Collision warning from the rear 328
Color code, paintwork 618
Color codes 618
Page 647 of 655

INDEX
645
heating 212
temperature 221
ventilation 213
Rearview/door mirrors adjusting door mirrors 171
dimming 170
heating 218
interior 170
Rearview mirror 170 dimming 170
Rear window heating 218
sun shade 168
Recalls 45
Recommendations when driving 432
Recommendations when loading 558
Recovery 444Red Key restricted remote key 244
settings 245
Refrigerant 571 climate system 633
Refueling filling 435
fuel filler door, fuel flap 434
Remote immobilizer 248
Remote key 236 battery replacement 240
connecting to driver profile 135
detachable key blade 246
loss 243
Range 239
Remote updates 565
Reporting safety defects 44
Resetting door mirrors 171
Resetting settings 131 change of owner 131
Driver profile 137
Resetting trip odometer 88
Road Sign Information 337 activating/deactivating 338
display 338
limitations 341
Sensus Navigation 339
settings 340
speed camera information 339
Speed warning 339
Road trip 432
Roof load, max. weight 629
Run-off Mitigation 352S
Safety 42 pregnancy 43
Safety belt, see Seat belt 47
Safety defects, reporting 44
Safety mode 62 starting/moving 62
Sealing compound 542
Seat, see Seats 184
Seat belt reminder 51
Seat belts 47 Automatic locking retractor/Emer-
gency locking retractor 65
buckling/unbuckling 48
pregnancy 43
seat belt reminder 51
seat belt tensioner 50
securing child restraint systems 67, 70, 72
Seat belt tensioner 50 resetting 51
Seats heating 211, 212
manual front seat 184
power front seats 185
store position 186, 187