tow VOLVO V4 2004 Owners Manual
[x] Cancel search | Manufacturer: VOLVO, Model Year: 2004, Model line: V4, Model: VOLVO V4 2004Pages: 89, PDF Size: 2.05 MB
Page 12 of 89
WARNING!
Children must never be allowed in the front passenger seat. Volvo recommends that ALL occupants (adults and
children) shorter than 4 feet 7 inches (140 cm) be seated in the back seat of any vehicle with a front passenger side
airbag.
Occupants in the front passenger's seat must never sit on the edge of the seat, sit leaning toward the instrument
panel or otherwise sit out of position. The occupant's back must be as upright as comfort allows and be against the
seat back with the seat belt properly fastened.
Feet must be on the floor, e.g. not on the dash, seat or out of the window.
No objects or accessory equipment, e.g. dash covers, may be placed on, attached to or installed near the SRS
hatch (the area above the glove compartment) or the area affected by airbag deployment (see illustration on page 4
).
There should be no loose articles, e.g. coffee cups, on the floor, seat or dash area.
Never try to open the SRS cover on the steering wheel or the passenger side SRS seam. This should only be done
by an authorized Volvo service technician.
Failure to follow these instructions can result in injury to the vehicle occupants in an accident.
pg. 7 Volvo SRS
NOTE : The information on this page does not pertain to the Side Impact Protection System airbags.
When are the airbags deployed?
The SRS system is designed to deploy during certain frontal or front -angular collisions, impacts, or decelerations,
depending on the crash severity, angle, speed and object impacted. The SRS sensor is designed to react to both the
impact of the collision and the inertial forces generated by it and to determine if the intensity of the collision is
sufficient for the airbags to be deployed.
WARNING!
The SRS is designed to help prevent serious injury. Deployment occurs very quickly and with considerable force.
During normal deployment and depending on variables such as seating position, one may experience abrasions,
bruises, swellings, or other injuries as a result of airbag deployment.
If the airbags have been deployed, we recommend the following:
Have the car towed to an authorized Volvo retailer. Never drive with the airbags deployed.
Have an authorized Volvo retailer replace the SRS system components.
Use only new, Genuine Volvo Parts when replacing SRS components (airbags, seat belts, tensioners, etc.).
When are the airbags NOT deployed?
Not all frontal collisions activate the SRS system. If the collision involves a non-rigid object (e.g., a snow drift or
bush), or a rigid, fixed object at a low speed, the SRS system will not necessarily deploy. Front airbags do not
normally deploy in a side impact collision, in a collision from the rear or in a rollover situation. The amount of
damage to the bodywork does not reliably indicate if the airbags should have deployed or not.
Seat belts - the heart of the Volvo safety system
ProCarManuals.com
Page 13 of 89
The heart of the Volvo safety system is the three-point seat belt (a Volvo invention)! In order for the SRS system to
provide the protection intended, seat belts must be worn at all times by everyone in the car.
The SRS system is a supplement to the seat belts.WARNING!
If your car has been subjected to flood conditions (e.g. soaked carpeting/standing water on the floor of the vehicle)
or if your car has become flood-damaged in any way, do not attempt to start the vehicle or put the key in the ignition
before disconnecting the battery (see below). This may cause airbag deployment which could result in personal
injury. Have the car towed to an authorized Volvo retailer for repairs.
Before attempting to tow the car, use the following procedure to override the shiftlock system to move the gear
selector to the neutral position.
Disconnect the battery
Wait at least one minute
Insert the key in the ignition and turn it to position 1
Press firmly on the shiftlock override button (located near the base of the gear selector)
While holding the override button down, move the gear selector from the park position.
WARNING!
Never drive with the airbags deployed. The fact that they hang out can impair the steering of your car. Other safety
systems can also be damaged. The smoke and dust formed when the airbags are deployed can cause skin and eye
irritation in the event of prolonged exposure.
Contents | Top of Page
ProCarManuals.com
Page 18 of 89
1 Turn signal, left
2 Turn signal, right
3 Low washer fluid level
4 Brake light* failure warning
5 Turn indicator - trailer (certain models)
6 Front fog lights on
7 Door open
8 Rear fog light on
9 Seat belt warning
10 High beams on
11 Fault in SRS system
12 Brake circuit not working (brake fluid level too low) and EBD
13 Battery charge failure
14 Parking brake applied
15 Low oil pressure
16 ABS (anti-lock brakes) malfunction
17 Automatic transmission: position W, 4 or 3 or L
18 Malfunction indicator light
19 Immobilizer on
20 Service Reminder Indicator
21 DSA (option)
22 High coolant temperature warning light
23 Low fuel warning light
Starting check
After a few seconds, all lights except 16 and 19 will go out. Once the engine starts, these lights will also go out.
* Indicates failure of a brake light, not failure of the braking system (see item 12).
pg. 22 Warning lights
The warning lights described on pages 22 and 23 should never stay on when driving
When the ignition key is turned on and before the engine starts, all of the warning lights should go on to test the
function of the bulbs. Should a light not go off after the engine has started, the system indicated should be inspected.
However, the parking brake reminder light will not go off until the parking brake has been fully released.
Supplemental Restraint System (SRS)
If the light comes on (or stays on after the vehicle has started), the SRS diagnostic system has detected a fault. Drive to
an authorized Volvo retailer for an inspection of the system. See the SRS section for more information.
Oil pressure warning light
If the light comes on while driving, stop the car and then stop the engine immediately and check the engine oil
level . See page 114.
If the light stays on after restart, have the car towed to the nearest authorized Volvo retailer. After
hard driving, the light may come on occasionally when the engine is idling. This is normal, provided it goes off when
the engine speed is increased.
Parking brake reminder light
This light will be on when the parking brake (hand brake) is applied. The parking brake lever is situated between the
front seats.
ProCarManuals.com
Page 19 of 89
Canadian models are equipped with this warning light:
WARNING!
If the fluid level is below the lowest MIN mark in the brake fluid reservoir: DO NOT DRIVE. Tow the car to a
Volvo retailer and have the brake system checked and any leakage repaired.
Brake failure warning light
If the light comes on while driving or braking, stop immediately, open the hood and check the brake fluid level
in the reservoir. See page 116
for reservoir position.
If the control lamp still stays on, the EBD (Electronic Brakeforce Distribution) is not working.
Drive to your Volvo retailer. See ABS control lamp and also page 73.
Canadian models are equipped with this warning light:
Bulb failure warning light
The light will come on if one of the brake light bulbs are defective when the brake pedal is pressed.
Check the fuse and bulb. See sections "Replacing bulbs" and "fuses".
pg. 23 Warning lights, Daytime Running Lights
DSA (option)
Dynamic Stability Assistance
This is a system which helps keep the drive wheels from spinning. The light flashes if the road surface is slippery, the
wheels are spinning and the system is working.
The control light comes on if a fault occurs in the DSA system. It also comes on if the system is switched off via the
switch.
For more information see page 30.
Service Reminder Light
This light will come on according to preset service intervals or after 750 hours of driving or after 12 months,
whichever occurs first. It is a reminder to the driver that the service interval has been exceeded. The light will stay on
for 2 minutes after start until reset by the servicing retailer.
Anti-lock Brake system (ABS)
If the warning lamp lights up there is a malfunction of the ABS system (the standard braking system will however
function). The vehicle should be driven to a Volvo retailer for inspection.
See page 73
for additional information.
Malfunction Indicator Lamp
On-Board Diagnostics II (OBDII): As you drive, a computer called "OBDII" monitors your car's engine,
transmission, electrical and emission systems. The CHECK ENGINE light will light up if the computer senses a
condition that potentially may need correcting. When this happens, please have your car checked by a Volvo retailer as
soon as possible.
A CHECK ENGINE light may have many causes. Sometimes, you may not notice a change in your car's behavior.
Even so, an uncorrected condition could hurt fuel economy, emission cleanliness, and driveability. Extended driving
ProCarManuals.com
Page 20 of 89
without correcting the cause could even damage other components in your car.
Canadian models are equipped with this warning light:
NOTE: If the fuel filler cap is not closed tightly or if the engine is running when the car is refueled, the Check Engine
Lamp may indicate a fault. However, your vehicle's performance will not be affected. Use only Volvo original or
approved fuel filler caps.
Daytime Running Lights:
The S40 and V40 come from the factory with daytime running lights activated. Carry out the following steps if you
will deactivate them (in the U.S. only *). These steps may be carried out again to reactivate and deactivate the daytime
running lights as desired.
Programming for On or OFF
Turn the headlight switch to position
.
Turn the ignition key in position II.
Pull the turn signal lever towards you and hold it while turning the headlight switch to position 0.
WARNING!
Do not activate or deactivate the daytime running lights while driving. Laws in your area may mandate the use of
daytime running lights. Check your local laws before deactivating daytime running lights.
* The use of daytime running lights is mandatory in Canada.
pg. 24 Headlights, Parking lights, Instrument illumination, Fog lights
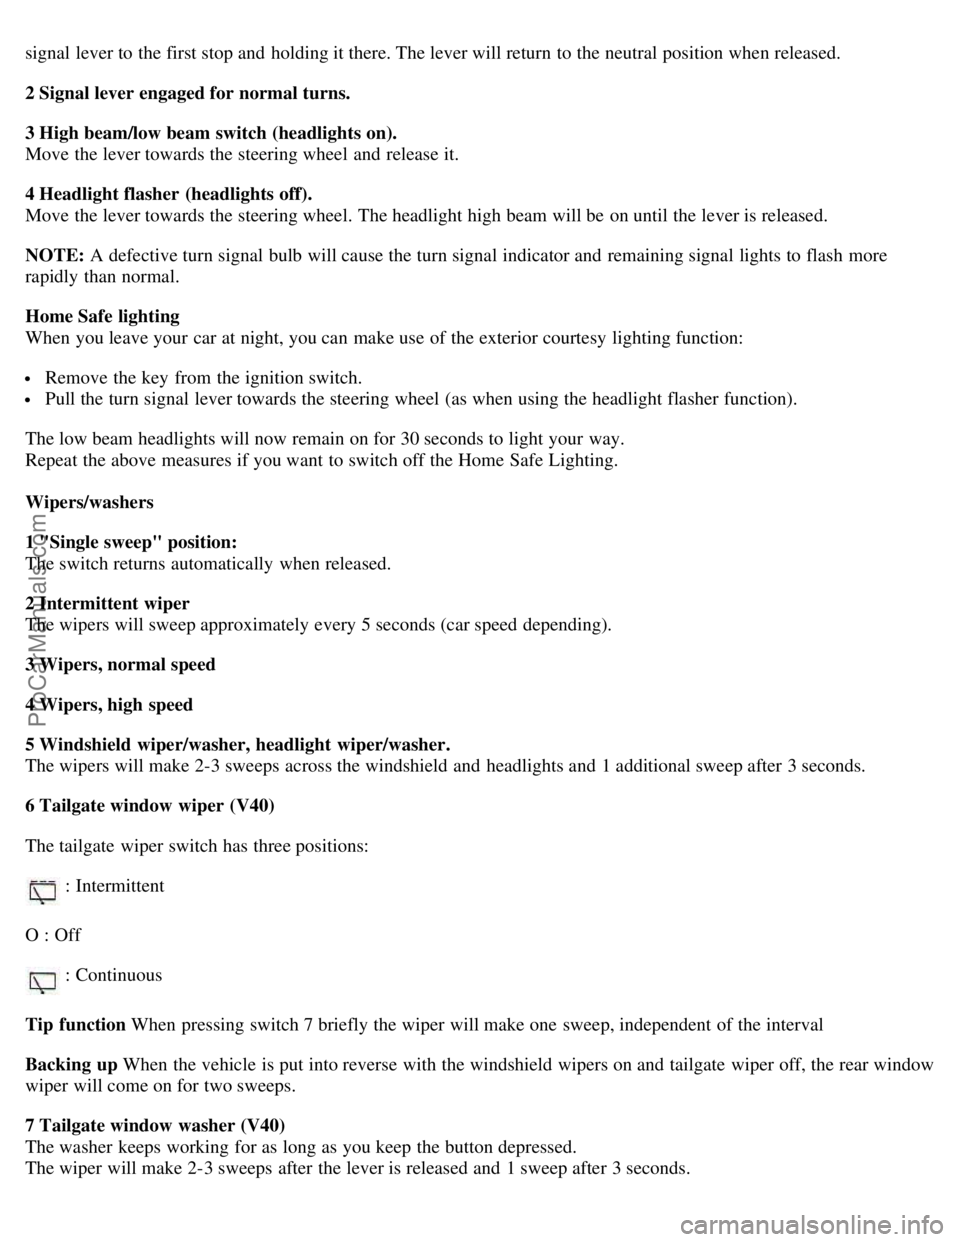
A Headlights and parking lights 0 Switch position
Ignition key in positions 0+I: All lights switched off.
Ignition key in position II:
Low beam headlights on (+ front and rear parking lights, license plate light and instrument lighting).
Switch position
Parking lights front and rear.
Ignition key in positions 0, I and II
Parking lights should only be used when the car is parked, never when the car is being driven.
ProCarManuals.com
Page 22 of 89
signal lever to the first stop and holding it there. The lever will return to the neutral position when released.
2 Signal lever engaged for normal turns.
3 High beam/low beam switch (headlights on).
Move the lever towards the steering wheel and release it.
4 Headlight flasher (headlights off).
Move the lever towards the steering wheel. The headlight high beam will be on until the lever is released.
NOTE: A defective turn signal bulb will cause the turn signal indicator and remaining signal lights to flash more
rapidly than normal.
Home Safe lighting
When you leave your car at night, you can make use of the exterior courtesy lighting function:
Remove the key from the ignition switch.
Pull the turn signal lever towards the steering wheel (as when using the headlight flasher function).
The low beam headlights will now remain on for 30 seconds to light your way.
Repeat the above measures if you want to switch off the Home Safe Lighting.
Wipers/washers
1 "Single sweep" position:
The switch returns automatically when released.
2 Intermittent wiper
The wipers will sweep approximately every 5 seconds (car speed depending).
3 Wipers, normal speed
4 Wipers, high speed
5 Windshield wiper/washer, headlight wiper/washer.
The wipers will make 2-3 sweeps across the windshield and headlights and 1 additional sweep after 3 seconds.
6 Tailgate window wiper (V40)
The tailgate wiper switch has three positions:
: Intermittent
O : Off
: Continuous
Tip function When pressing switch 7 briefly the wiper will make one sweep, independent of the interval
Backing up When the vehicle is put into reverse with the windshield wipers on and tailgate wiper off, the rear window
wiper will come on for two sweeps.
7 Tailgate window washer (V40)
The washer keeps working for as long as you keep the button depressed.
The wiper will make 2-3 sweeps after the lever is released and 1 sweep after 3 seconds.
ProCarManuals.com
Page 27 of 89

Turn the key again within 10 seconds to unlock other doors, trunk/tailgate.
One turn with the key towards "lock" in the driver's door locks all doors, trunk/tailgate and fuel filler door with a 10
minutes delay in the fuel filler door.
WARNING!
If the doors are locked while driving, this may hinder rapid access to the occupants of the car in the event of an
accident. (Also see information on "Child safety locks").
Central locking button
Central locking switch
You can use the button to lock or unlock all doors (unlock only for 25 seconds after locking by remote).
LEFT side of button: lock
RIGHT side of button: unlock
NOTE: If the key is in the ignition switch and you close the driver's door, the driver's door will be immediately
unlocked again in order to prevent accidentally locking the car with the keys left inside the car.
pg. 43 Alarm
Alarm
The radio signal emitted from the remote control, which is used to set/unset the alarm, is a "rolling code" signal. This
means that the signal is changed randomly for each transmission and is intended to help prevent unauthorized
recording of the code.
When armed (set), the alarm continuously monitors a number of points on the car. The following conditions will set off
the alarm:
The hood is opened
The trunk/tailgate is opened
A door is opened
The ignition switch is tampered with
The alarm will sound for 30 second intervals, with a 10 second pause between intervals. This function cannot be
interrupted.
If the battery or the siren are disconnected, the alarm will sound for five minutes
Arming (setting) the alarm
The alarm can be armed in the following ways:
Press the LOCK button on the remote control (the turn signals will flash to confirm that the car is locked and the
alarm is armed)
ProCarManuals.com
Page 30 of 89
2 0 0 4
VOLVO
S40 & V40
Chapter 4 - Starting and driving
pg. 61 Starting and driving
Starting and driving
This section on starting and driving contains items such as starting the engine, operating the gear selector, towing,
trailers, etc. Fuel requirements, Refueling
62
Driving economy64
Starting the engine65
Automatic transmission66
Points to remember68
Emergency towing70
Vehicle towing information71
Jump starting, Proposition 65 Battery Warning72
Brake system, ABS73
Electronic Brake-Force Distribution (EBD)74
Winter driving, Before a long distance trip75
Detachable trailer hitch, installing/removing76
Trailer towing78
pg. 62 Fuel requirements
Deposit control (detergent) gasoline
Volvo recommends the use of detergent gasoline to control engine deposits. Detergent gasoline is effective in keeping
injectors and intake valves clean. Consistent use of deposit control gasolines will help ensure good driveability and
fuel economy. If you are not sure whether the gasoline contains deposit control additives, check with the service
station operator.
Unleaded fuel
ProCarManuals.com
Page 48 of 89

Replacement
Insert a new bulb in the holder.
Re-insert the bulb holder in the lamp housing and turn it clockwise until it clicks into place.
Press the lamp housing into place.
Make sure than locating pin (B) fits into the hole in the fender and slotted hole (C) around the screw.
Tighten the screw.
pg. 92 Replacing bulbs
Replacement of rear light bulbs - S40
All the bulbs in the rear light unit are replaced from inside the trunk
Procedure:
Switch off the lights and remove the ignition key.
Turn the clip 90° and pull it out. Fold the panel in the boot towards the middle so as to get access to the bulb
holders.
Push catches A and B in and remove the bulb holder. The bulbs are held in the bulb holder.
Leave the connector and cables connected to the bulb holder.
Remove the bulb by pressing it inwards and turning it a few degrees counterclockwise.
Insert a new bulb into the bulb holder and replace the holder. Check that the bulb works and refit the panel.
ProCarManuals.com
Page 49 of 89

Replacement of rear light bulbs - V40
All the bulbs in the rear light unit are replaced from inside the cargo area.
Procedure:
Switch off the lights and remove the ignition key.
Open the cover in the panel
Push catches A and B in and remove the bulb holder. The bulbs are held in the bulb holder.
Leave the connector and cables connected to the bulb holder.
Remove the bulb by pressing it inwards and turning it a few degrees counterclockwise.
Insert a new bulb into the bulb holder and replace the holder. Check that the bulb works and refit the cover.
1 Tail light (rear parking light) 5W
2 Direction indicator 21W
3 Brake light 21W
4 Tail light 5W
5 Backup light 21W
6 Rear fog light (Left side only) 21W
pg. 93 Replacing bulbs
Side direction indicator
1. Slide the lens forward and pull out the rear edge.
2. Pull out the entire lens/bulb unit.
3. With the lens toward you, turn the bulb holder 1/4 turn (the wires should not be disconnected from the holder) and
pull out the bulb holder from the lens unit.
4. Pull the old bulb straight out and press a new one into place.
5. Replace the entire unit in the reverse order.
ProCarManuals.com