VOLVO V50 2009 Owner´s Manual
Manufacturer: VOLVO, Model Year: 2009, Model line: V50, Model: VOLVO V50 2009Pages: 286, PDF Size: 7.12 MB
Page 161 of 286
06 Starting and driving
Towing a trailer
06
161
NOTE
•
When parking the vehicle with a trailer
on a hill, apply the parking brake before
putting the gear selector in Park (P) or
in reverse on models with a manual
transmission. Always follow the trailer
manufacturer's recommendations for
wheel chocking.
•
If you use the manual (Geartronic) shift
positions while towing a trailer, or if the
vehicle is equipped with a manual trans-
mission, make sure the gear you select
does not put too much strain on the
engine (using too high a gear).
•
The drawbar assembly/trailer hitch may
be rated for trailers heavier than the
vehicle is designed to tow. Please
adhere to Volvo's recommended trailer
weights.
•
Avoid driving with a trailer on inclines
exceeding 15%.
Page 162 of 286
06 Starting and drivingDetachable trailer hitch
06162
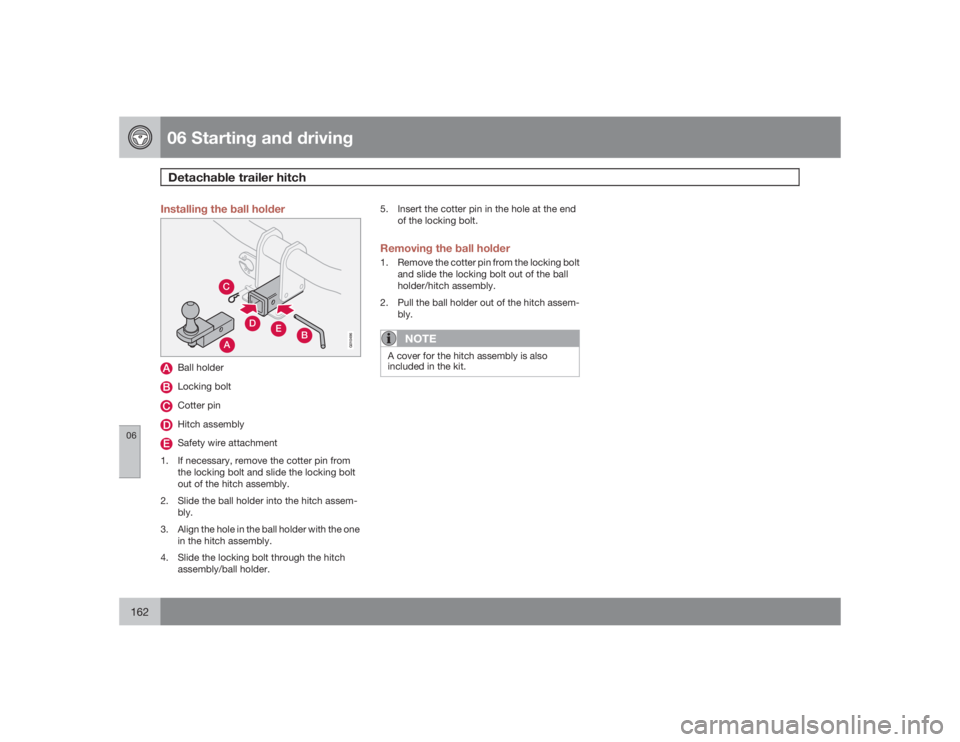
Installing the ball holder
AC
E
D
B
G010496
Ball holderLocking boltCotter pinHitch assemblySafety wire attachment
1. If necessary, remove the cotter pin from
the locking bolt and slide the locking bolt
out of the hitch assembly.
2. Slide the ball holder into the hitch assem-
bly.
3. Align the hole in the ball holder with the one
in the hitch assembly.
4. Slide the locking bolt through the hitch
assembly/ball holder.5. Insert the cotter pin in the hole at the end
of the locking bolt.
Removing the ball holder1. Remove the cotter pin from the locking bolt
and slide the locking bolt out of the ball
holder/hitch assembly.
2. Pull the ball holder out of the hitch assem-
bly.
NOTE
A cover for the hitch assembly is also
included in the kit.
Page 163 of 286
06 Starting and driving
Transporting loads
06
163 Loading the vehicle
Your vehicle's load-carrying capacity is affec-
ted by factors such as:•
the number of passengers
•
tire inflation
•
the amount of optional or accessory equip-
ment installed
•
the amount of cargo.
See the chapter "Wheels and tires" for more
detailed information.
Before loading the car, turn off the engine, and
apply the parking brake when loading or
unloading long objects. The gear selector can
be inadvertently knocked out of position by
long cargo, causing the car to move.
Keep the following in mind when
loading the vehicle:•
Load objects in the cargo area against the
rear seat backrest.
•
Load heavy cargo as low as possible.
•
Center wide loads.
•
Secure all cargo with restraining straps
anchored to the load securing eyelets.
•
Cover sharp edges on the load.
•
Seats can be folded down and head
restraints removed to extend the cargo
compartment, see page 111.
WARNING
•
Remember that an object weighing
44 lbs (20 kg) produces a force of
2,200 lbs (1,000 kg) in a head-on colli-
sion at 30 mph (50 km/h)!
•
When the rear backrest(s) are folded
down, the vehicle should not be loaded
to a level higher than 2 in. (5 cm) below
the upper edge of the rear side win-
dows. Objects placed higher than this
level could impede the function of the
Volvo Inflatable Curtain.
Load carriers (accessory)Load carriers are available as Volvo accesso-
ries. Follow the installation instructions sup-
plied with the load carriers.
Observe the following points when using load
carriers:•
To avoid damaging your car and to achieve
maximum safety when driving, we recom-
mend using the load carriers that Volvo has
developed especially for your car.
•
Volvo-approved removable roof racks are
designed to carry the maximum allowable
roof load for this vehicle: 165 lbs (75 kg).
For Non-Volvo roof racks, check the man-
ufacturer's weight limits for the rack.
•
Never exceed the rack manufacturer's
weigh limits and never exceed the maxi-
mum rated roof load of 165 lbs (75 kg).
•
Avoid single-point loads. Distribute loads
evenly.
•
Place heavier cargo at the bottom of the
load.
•
Secure the cargo correctly with appropri-
ate tie-down equipment.
•
Check periodically that the load carriers
and load are properly secured.
•
Remember that the car's center of gravity
and handling change when you carry a
load on the roof.
•
The car's wind resistance and fuel con-
sumption will increase with the size of the
load.
•
Drive smoothly. Avoid rapid starts, fast
cornering and hard braking.
Page 164 of 286
06 Starting and drivingBlind Spot Information System (BLIS)–option
06164
Introduction
G020295
BLIS cameraIndicator lightBLIS symbol
The Blind Spot Information System (BLIS) is an
information system that indicates the presence
of another vehicle moving in the same direction
as your vehicle in the side-view mirror's "blind
area".CAUTION
The BLIS system should only be repaired by
a trained and qualified Volvo service tech-
nician.
WARNING
•
BLIS is an information system, NOT a
warning or safety system.
•
BLIS does not eliminate the need for
you to visually confirm the conditions
around you, and the need for you to turn
your head and shoulders to make sure
that you can safely change lanes.
•
As the driver, you have full responsibility
for changing lanes in a safe manner.
The system is based on digital camera tech-
nology. The cameras (1) are located beneath
the side-view mirrors.
When one (or both) of the cameras have
detected a vehicle in the blind area (up to
approximately 10 ft. (3 meters) from the side of
your vehicle, and up to approximately 31 ft.
(9.5 meters) behind the side-view mirror), the
indicator light in the door panel (2) illuminates.
The light will glow continuously to alert the
driver of the vehicle in the blind area.
NOTE
The door panel indicator light illuminates on
the side of the vehicle where the system has
detected another vehicle. If your vehicle is
passed on both sides at the same time, both
lights will illuminate.
A B
G020296
A = approx. 10 ft. (3 meters), B = approx. 31 ft.
(9.5 meters)BLIS has an integrated function that alerts the
driver if a fault should occur with the system.
For example, if one or both of the system's
cameras are obscured, a message (see the
table on page 167) will appear in the informa-
tion display in the instrument panel. If this
occurs, clean the camera lenses. If necessary,
the system can be temporarily switched off (for
instructions see page 166).
Page 165 of 286
06 Starting and driving
Blind Spot Information System (BLIS)–option
06�`�`165 When does BLIS function
The system functions when your vehicle is
moving at speeds above 6 mph (10 km/h).
When you pass another vehicle:
The system reacts when you pass another
vehicle at a speed of up to 6 mph (10 km/h)
faster than that vehicle.
When you are passed by another vehicle:
The system reacts if your vehicle is passed by
another vehicle at a speed of up to 43 mph
(70 km/h) faster than your vehicle.
WARNING
•
BLIS does not function in sharp curves.
•
BLIS does not function when your vehi-
cle is backing up.
•
If you are towing a wide trailer, this may
prevent the BLIS cameras from detect-
ing other vehicles in adjacent lanes.
How BLIS functions in daylight and
darkness
DaylightBLIS reacts to the shape of surrounding vehi-
cles. The system is designed to help detect
motor vehicles such as cars, trucks, buses,
motorcycles, etc.
DarknessBLIS reacts to the headlights of surrounding
vehicles. In order to be detected by BLIS, a
vehicle in the blind area must have its head-
lights on. This means, for example, that the
system will not detect a trailer without head-
lights that is being towed behind a car or truck.
WARNING
•
BLIS does not react to cyclists or
mopeds.
•
BLIS does not react to vehicles that are
standing still.
•
The function of the BLIS cameras may
be affected by intense light, or when
driving at night in areas where there are
no external sources of light (e.g., street
lights, other vehicles, etc.). In such
cases, the system may react as if the
cameras were obscured.
•
In both of the above mentioned condi-
tions, a message will appear in the infor-
mation display.
•
When driving in such conditions, the
system's function will be limited or it
may be temporarily switched off, see
page 166 for instructions.
•
When the message is no longer dis-
played, BLIS will return to normal func-
tion.
•
The BLIS cameras have the same limi-
tation as the human eye. In other words,
their "vision is impaired" by adverse
weather conditions such as heavy
snowfall, dense fog, etc.
Page 166 of 286
06 Starting and drivingBlind Spot Information System (BLIS)–option
06166
LimitationsIn certain situations, the BLIS indicator light(s)
may illuminate even when there are no other
vehicles in the area monitored by the system.
NOTE
If the BLIS indicator lights illuminate occa-
sionally even when there are no other vehi-
cles in the blind area, this does not indicate
a fault in the system.
In the event of a fault,
Blind spot syst.
service required
will be displayed.
The following are several examples of situa-
tions in which the BLIS indicator light(s) may
illuminate even when there are no other vehi-
cles in the area monitored by the system.
G018176
Light reflected from a wet road surface
G018177
The vehicle's own shadow against a large, light,
smooth surface such as barriers between lanes on
a highway
G018178
Sunlight directly in the camera when the sun is low
on the horizonCleaning the BLIS camera lensesIn order to function optimally, the BLIS camera
lenses must be kept clean. They can be wiped
clean with a soft cloth or wet sponge.
CAUTION
•
Clean the lenses carefully to avoid
scratching.
•
The lenses are electrically heated to
help melt ice or snow. If necessary, gen-
tly brush away snow from the lenses.
Switching BLIS on and off
G018270
BLIS button (left button in the illustration)BLIS is automatically activated when the igni-
tion is switched on. The indicator lights will
provide confirmation by flashing 3 times.•
The system can be switched off by press-
ing the BLIS button in the center console.
The indicator light in the button goes out
Page 167 of 286
06 Starting and driving
Blind Spot Information System (BLIS)–option
06
167
when the system is switched off, and a text
message is displayed.
•
BLIS can be switched on again by pressing
the button. The indicator light in the button
will illuminate and a new text message will
be displayed. Press the READ button, see
page 58, to erase the message.
BLIS system messagesText in the
display
System status
BLIS service
required
BLIS not functioning
properly. Contact an
authorized Volvo serv-
ice technician.
BLIS camera
blocked
BLIS camera obscured.
Clean the lenses.
BLIS ON
BLIS system on
BLIS OFF
BLIS system off
BLIS reduced
function
The BLIS cameras'
function has been
reduced by e.g., fog, or
strong sunlight directly
into the camera. The
camera will reset itself
when these conditions
have changed. have
been function reduced
Page 168 of 286
06 Starting and drivingPark assist (Option/accessory)
06168
Introduction
G020294
Front/rear park assistThe park assist system is designed to assist
you when driving into parking spaces, garages,
etc. It utilizes four ultrasound sensors located
in one or both bumpers to measure the dis-
tance to a vehicle, object or a person who may
be close to the front or rear of your vehicle.
Park assist is available in two versions:•
Rear bumper only
•
Front and rear bumpers
WARNING
Park Assist is an information system, NOT a
safety system. This system is designed to
be a supplementary aid when parking the
vehicle. It is not, however, intended to
replace the driver's attention and judge-
ment.FunctionThe system is activated automatically when the
vehicle is started. The indicator light in the but-
ton in the center console illuminates.•
The front park assist system is active from
the time the engine is started until the vehi-
cle exceeds a speed of approximately
10 mph (15 km/h). It is also active when the
vehicle is backing up.
•
Rear park assist is active when the engine
is running and reverse gear has been
selected.
Rear park assistThe distance monitored behind the vehicle is
approximately 5 ft (1.5 m). The signal comes
from the rear speakers.
The system must be deactivated when towing
a trailer, carrying bicycles in a rear-mounted
carrier, etc, which could trigger the rear park
assist system's sensors.
NOTE
Rear park assist is deactivated automati-
cally when towing a trailer if Volvo genuine
trailer wiring is used.Front park assistThe distance monitored in front of the vehicle
is approximately 2.5 ft (0.8 m). The audible sig-
nal comes from the audio system's front
speakers.
It may not be possible to combine auxiliary
headlights and front park assist since these
lights could trigger the system's sensors.
Page 169 of 286
06 Starting and drivingPark assist (Option/accessory)
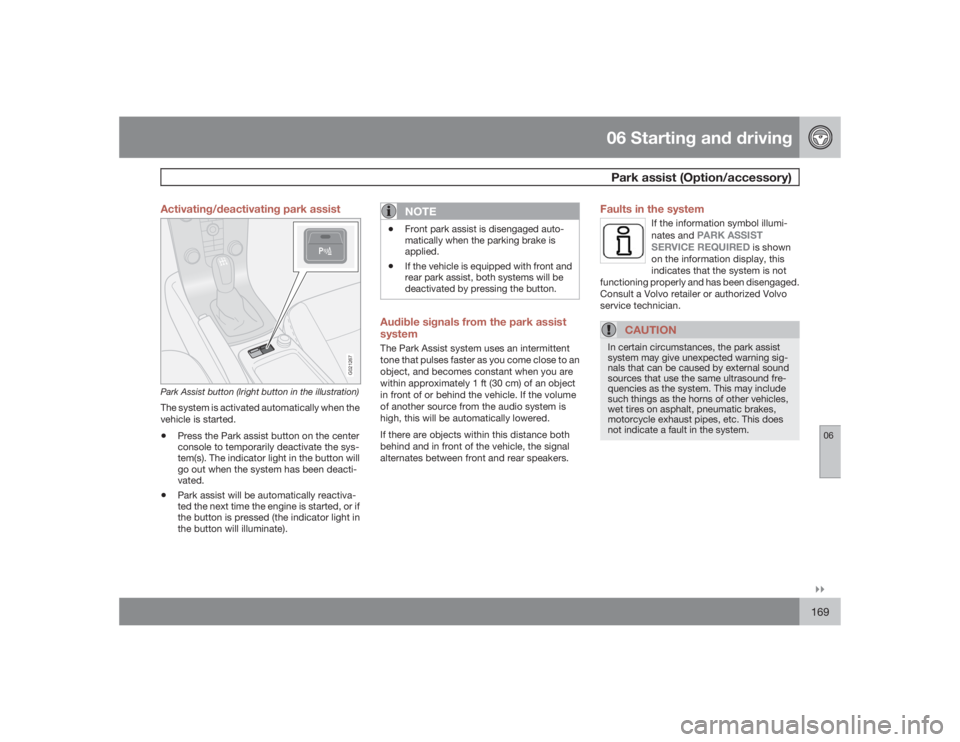
06�`�`169 Activating/deactivating park assist
G021267
Park Assist button (lright button in the illustration)The system is activated automatically when the
vehicle is started.•
Press the Park assist button on the center
console to temporarily deactivate the sys-
tem(s). The indicator light in the button will
go out when the system has been deacti-
vated.
•
Park assist will be automatically reactiva-
ted the next time the engine is started, or if
the button is pressed (the indicator light in
the button will illuminate).
NOTE
•
Front park assist is disengaged auto-
matically when the parking brake is
applied.
•
If the vehicle is equipped with front and
rear park assist, both systems will be
deactivated by pressing the button.
Audible signals from the park assist
systemThe Park Assist system uses an intermittent
tone that pulses faster as you come close to an
object, and becomes constant when you are
within approximately 1 ft (30 cm) of an object
in front of or behind the vehicle. If the volume
of another source from the audio system is
high, this will be automatically lowered.
If there are objects within this distance both
behind and in front of the vehicle, the signal
alternates between front and rear speakers.
Faults in the system
If the information symbol illumi-
nates and
PARK ASSIST
SERVICE REQUIRED
is shown
on the information display, this
indicates that the system is not
functioning properly and has been disengaged.
Consult a Volvo retailer or authorized Volvo
service technician.
CAUTION
In certain circumstances, the park assist
system may give unexpected warning sig-
nals that can be caused by external sound
sources that use the same ultrasound fre-
quencies as the system. This may include
such things as the horns of other vehicles,
wet tires on asphalt, pneumatic brakes,
motorcycle exhaust pipes, etc. This does
not indicate a fault in the system.
Page 170 of 286

06 Starting and drivingPark assist (Option/accessory)
06170
Cleaning the sensors
G020770
Park assist sensorsThe sensors must be cleaned regularly to
ensure that they work properly. Clean them
with water and a suitable car washing deter-
gent.
Ice and snow covering the sensors may cause
incorrect warning signals.
NOTE
If the sensors are obstructed by e.g., dirt,
snow, or ice, this could result in false warn-
ing signals from the park assist system.