ESP VOLVO V50 2009 Owner´s Manual
[x] Cancel search | Manufacturer: VOLVO, Model Year: 2009, Model line: V50, Model: VOLVO V50 2009Pages: 286, PDF Size: 7.12 MB
Page 244 of 286

10 AudioRadio functions
10244
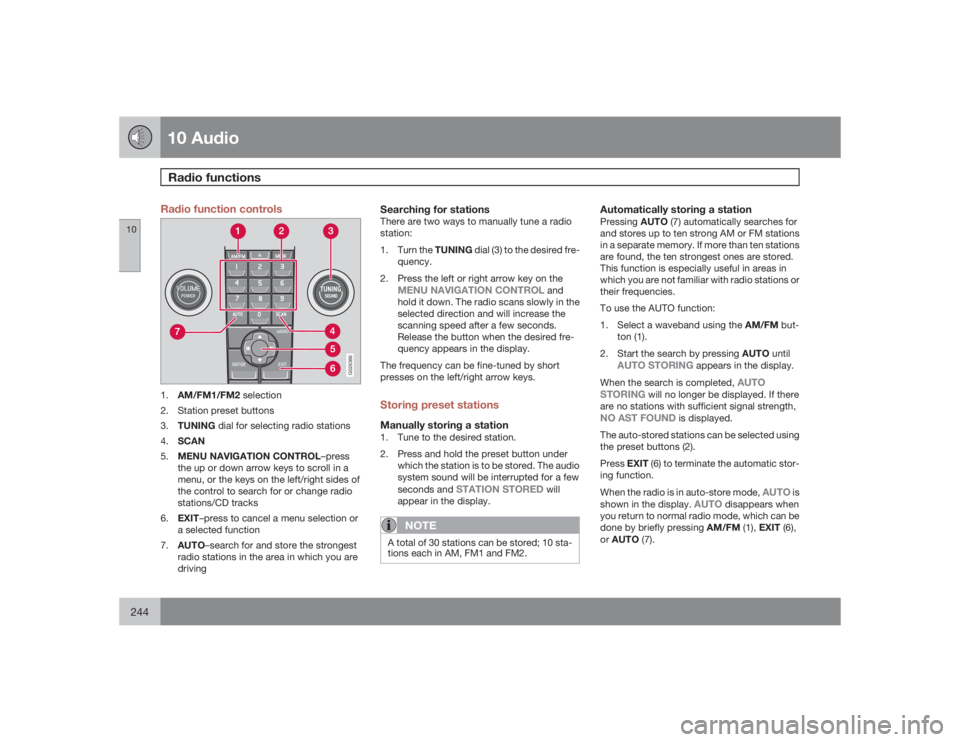
Radio function controls
G026366
1.
AM/FM1/FM2 selection
2. Station preset buttons
3.
TUNING dial for selecting radio stations
4.
SCAN
5.
MENU NAVIGATION CONTROL–press
the up or down arrow keys to scroll in a
menu, or the keys on the left/right sides of
the control to search for or change radio
stations/CD tracks
6.
EXIT–press to cancel a menu selection or
a selected function
7.
AUTO–search for and store the strongest
radio stations in the area in which you are
driving
Searching for stationsThere are two ways to manually tune a radio
station:
1.
Turn the TUNING dial (3) to the desired fre-
quency.
2. Press the left or right arrow key on the
MENU NAVIGATION CONTROL
and
hold it down. The radio scans slowly in the
selected direction and will increase the
scanning speed after a few seconds.
Release the button when the desired fre-
quency appears in the display.
The frequency can be fine-tuned by short
presses on the left/right arrow keys.
Storing preset stationsManually storing a station1. Tune to the desired station.
2. Press and hold the preset button under
which the station is to be stored. The audio
system sound will be interrupted for a few
seconds and
STATION STORED
will
appear in the display.
NOTE
A total of 30 stations can be stored; 10 sta-
tions each in AM, FM1 and FM2.
Automatically storing a stationPressingAUTO (7) automatically searches for
and stores up to ten strong AM or FM stations
in a separate memory. If more than ten stations
are found, the ten strongest ones are stored.
This function is especially useful in areas in
which you are not familiar with radio stations or
their frequencies.
To use the AUTO function:
1.
Select a waveband using the AM/FM but-
ton (1).
2.
Start the search by pressing AUTO until
AUTO STORING
appears in the display.
When the search is completed,
AUTO
STORING
will no longer be displayed. If there
are no stations with sufficient signal strength,
NO AST FOUND
is displayed.
The auto-stored stations can be selected using
the preset buttons (2).
PressEXIT (6) to terminate the automatic stor-
ing function.
When the radio is in auto-store mode,
AUTO
is
shown in the display.
AUTO
disappears when
you return to normal radio mode, which can be
done by briefly pressing AM/FM (1), EXIT (6),
orAUTO (7).
Page 250 of 286

10 AudioCD player/CD changer
10250
NOTE
•
The EJECT ALL function can only be
used while the vehicle is at a standstill
and will be cancelled if the vehicle
begins to move.
•
For reasons of traffic safety, the ejected
CD must be removed within 12 seconds
or it will be automatically drawn back
into the slot and the CD player will enter
pause mode. Press the CD button to
restart the disc.
CD PauseWhen the audio system volume is turned off
completely, the CD player will pause and will
resume playing when the volume is turned up
again.Audio filesIn addition to playing normal music CDs, the
CD player/changer can also play discs con-
taining files in mp3 or wma format.
NOTE
Certain discs that are copy protected can-
not be read by the player.When a disc with audio files is inserted in the
player, the player scans the disc's folders
before it begins playing the files. The length oftime that this takes depends on the quality of
the disc.
Navigating the disc and playing tracksIf a disc with audio files is in the CD player,
pressENTER to display a list of folders on the
disc.
Use the up and down arrows in the navigation
control (see the illustration on page 249) to
move among the folders on the disc. Audio files
have the
symbol and folders containing
these files have the
symbol. Press
ENTER to play a selected folder or a file.
When the music file has been played, the
player will continue to play the rest of the files
in the current folder. When all of the files in the
folder have been played, the player will auto-
matically go to the next folder and play the files
in it.
Press the left or right arrow key on the naviga-
tion control if the entire name of the current
track does not fit in the display.
Changing tracksBriefly press the left or right arrow keys on the
MENU NAVIGATION CONTROL to skip to the
previous or next track/file.
NOTE
TheTUNING dial (6) (turn clockwise to go to
the next track/file, or counterclockwise to
go to the previous track/file) or the steering
wheel keypad can also be used for this pur-
pose.Fast forward/backPress and hold down the left or right arrows
keys in the MENU NAVIGATION CONTROL (or
the corresponding keys on the optional steer-
ing wheel keypad) to search within a track/file
or the whole disc. The search continues for as
long as the buttons are held down.Random playThis function plays the tracks/files on a CD (or
on all of the CDs if the vehicle is equipped with
the optional CD changer) in random order
(shuffle).Activating/deactivating the random
function-CD player
If a normal CD is being played:1.
PressMENU followed by ENTER.
2.
Select Random and press ENTER.If a CD with audio files is being played:1.
PressMENU followed by ENTER.
2.
Select
Random
and press ENTER.
Page 263 of 286

11 Specifications
Label information
11
263
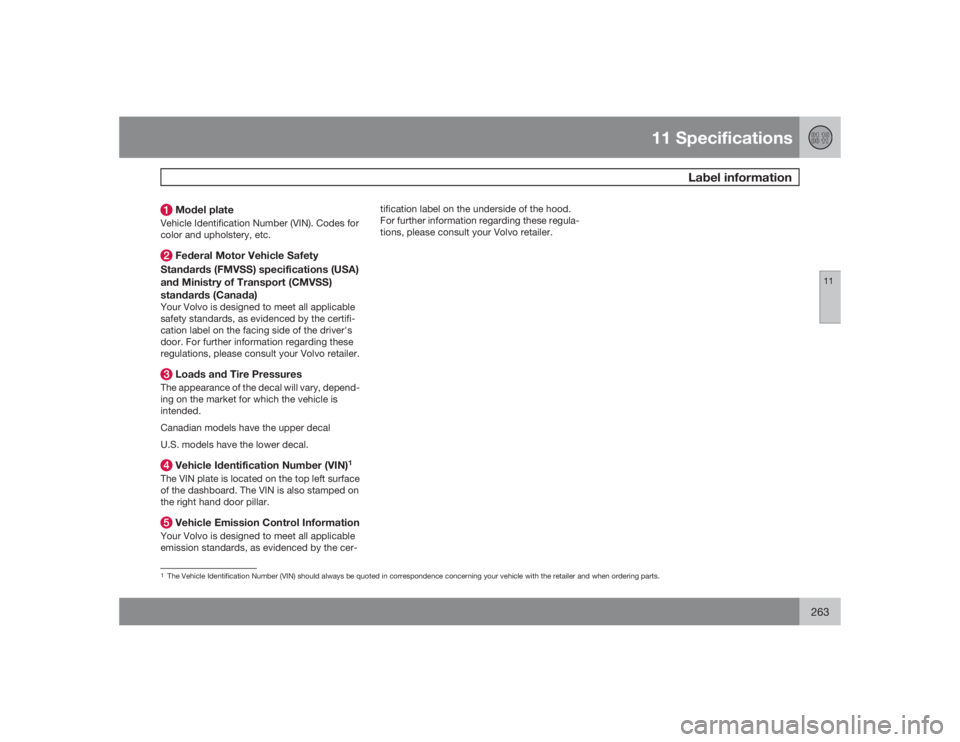
Model plateVehicle Identification Number (VIN). Codes for
color and upholstery, etc. Federal Motor Vehicle Safety
Standards (FMVSS) specifications (USA)
and Ministry of Transport (CMVSS)
standards (Canada)Your Volvo is designed to meet all applicable
safety standards, as evidenced by the certifi-
cation label on the facing side of the driver's
door. For further information regarding these
regulations, please consult your Volvo retailer. Loads and Tire PressuresThe appearance of the decal will vary, depend-
ing on the market for which the vehicle is
intended.
Canadian models have the upper decal
U.S. models have the lower decal. Vehicle Identification Number (VIN)
1
The VIN plate is located on the top left surface
of the dashboard. The VIN is also stamped on
the right hand door pillar. Vehicle Emission Control InformationYour Volvo is designed to meet all applicable
emission standards, as evidenced by the cer-tification label on the underside of the hood.
For further information regarding these regula-
tions, please consult your Volvo retailer.1The Vehicle Identification Number (VIN) should always be quoted in correspondence concerning your vehicle with the retailer and when ordering parts.