wiper blades VOLVO V60 2012 Owners Manual
[x] Cancel search | Manufacturer: VOLVO, Model Year: 2012, Model line: V60, Model: VOLVO V60 2012Pages: 400, PDF Size: 9.28 MB
Page 6 of 400
Table of contents
4* Option/accessory, for more information, see Introduction.
06
06 During your journey
Recommendations during driving........... 270
Refuelling................................................ 273
Fuel.........................................................274
Loading................................................... 278
Cargo area.............................................. 280
Driving with a trailer................................283
Towing and recovery..............................289
07
07 Wheels and tyres
General ................................................... 294
Changing wheels ................................... 298
Tyre pressure ......................................... 301
Warning triangle and first-aid kit*............ 302
Tyre pressure monitoring (TPMS)*.......... 303
Emergency puncture repair (TMK) ......... 305
08
08 Maintenance and service
Engine compartment............................... 312
Lamps.....................................................319
Wiper blades and washer fluid................ 325
Battery..................................................... 327
Fuses...................................................... 333
Car care.................................................. 344
ProCarManuals.com
Page 99 of 400
03 Your driving environment
Wipers and washing
03
* Option/accessory, for more information, see Introduction.97 Windscreen wipers
1
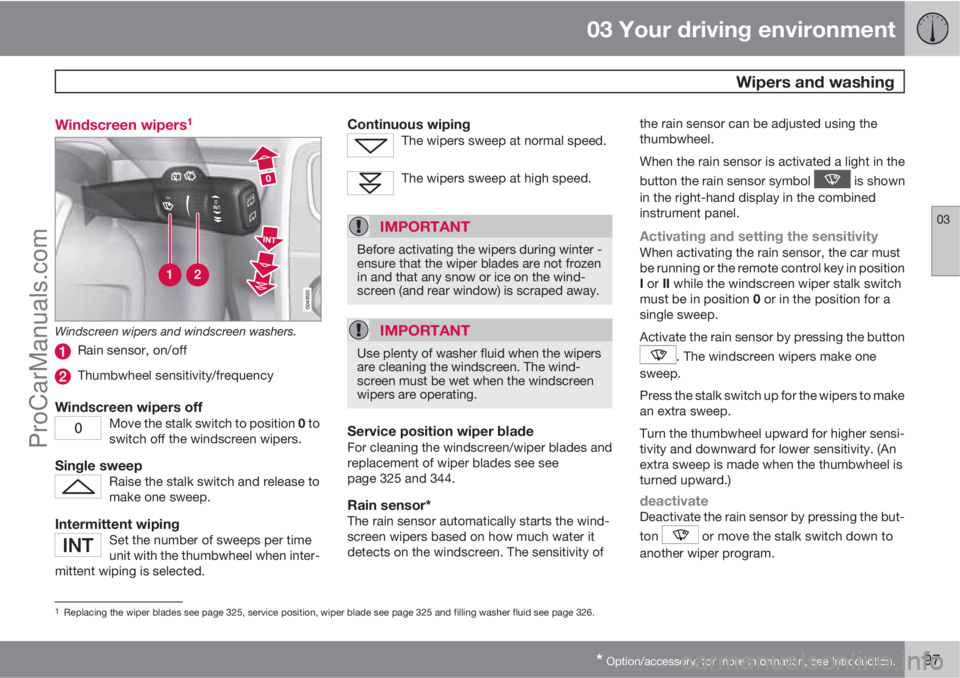
Windscreen wipers and windscreen washers.
Rain sensor, on/off
Thumbwheel sensitivity/frequency
Windscreen wipers offMove the stalk switch to position 0 to
switch off the windscreen wipers.
Single sweepRaise the stalk switch and release to
make one sweep.
Intermittent wipingSet the number of sweeps per time
unit with the thumbwheel when inter-
mittent wiping is selected.
Continuous wipingThe wipers sweep at normal speed.
The wipers sweep at high speed.
IMPORTANT
Before activating the wipers during winter -
ensure that the wiper blades are not frozen
in and that any snow or ice on the wind-
screen (and rear window) is scraped away.
IMPORTANT
Use plenty of washer fluid when the wipers
are cleaning the windscreen. The wind-
screen must be wet when the windscreen
wipers are operating.
Service position wiper bladeFor cleaning the windscreen/wiper blades and
replacement of wiper blades see see
page 325 and 344.
Rain sensor*The rain sensor automatically starts the wind-
screen wipers based on how much water it
detects on the windscreen. The sensitivity ofthe rain sensor can be adjusted using the
thumbwheel.
When the rain sensor is activated a light in the
button the rain sensor symbol
is shown
in the right-hand display in the combined
instrument panel.
Activating and setting the sensitivityWhen activating the rain sensor, the car must
be running or the remote control key in position
I or II while the windscreen wiper stalk switch
must be in position 0 or in the position for a
single sweep.
Activate the rain sensor by pressing the button
. The windscreen wipers make one
sweep.
Press the stalk switch up for the wipers to make
an extra sweep.
Turn the thumbwheel upward for higher sensi-
tivity and downward for lower sensitivity. (An
extra sweep is made when the thumbwheel is
turned upward.)
deactivateDeactivate the rain sensor by pressing the but-
ton
or move the stalk switch down to
another wiper program.
1Replacing the wiper blades see page 325, service position, wiper blade see page 325 and filling washer fluid see page 326.
ProCarManuals.com
Page 312 of 400
310
Engine compartment............................................................................. 312
Lamps................................................................................................... 319
Wiper blades and washer fluid.............................................................. 325
Battery................................................................................................... 327
Fuses..................................................................................................... 333
Car care................................................................................................ 344
ProCarManuals.com
Page 327 of 400
08 Maintenance and service
Wiper blades and washer fluid
08
325 Wiper blades
Service position
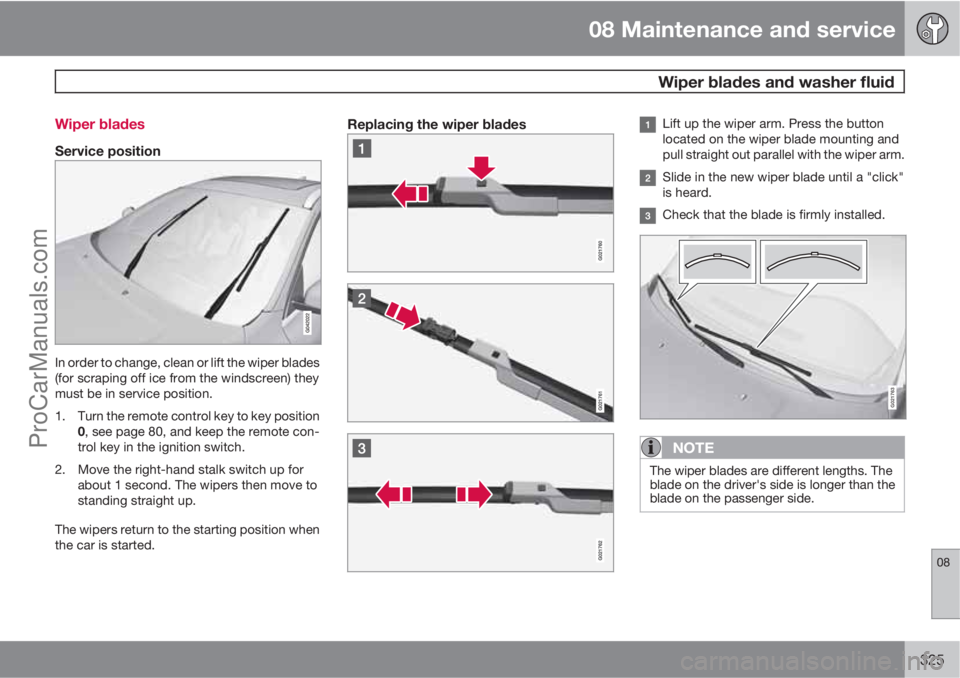
In order to change, clean or lift the wiper blades
(for scraping off ice from the windscreen) they
must be in service position.
1. Turn the remote control key to key position
0, see page 80, and keep the remote con-
trol key in the ignition switch.
2. Move the right-hand stalk switch up for
about 1 second. The wipers then move to
standing straight up.
The wipers return to the starting position when
the car is started.
Replacing the wiper bladesLift up the wiper arm. Press the button
located on the wiper blade mounting and
pull straight out parallel with the wiper arm.
Slide in the new wiper blade until a "click"
is heard.
Check that the blade is firmly installed.
G021763
NOTE
The wiper blades are different lengths. The
blade on the driver's side is longer than the
blade on the passenger side.
ProCarManuals.com
Page 328 of 400
08 Maintenance and service
Wiper blades and washer fluid
08
326
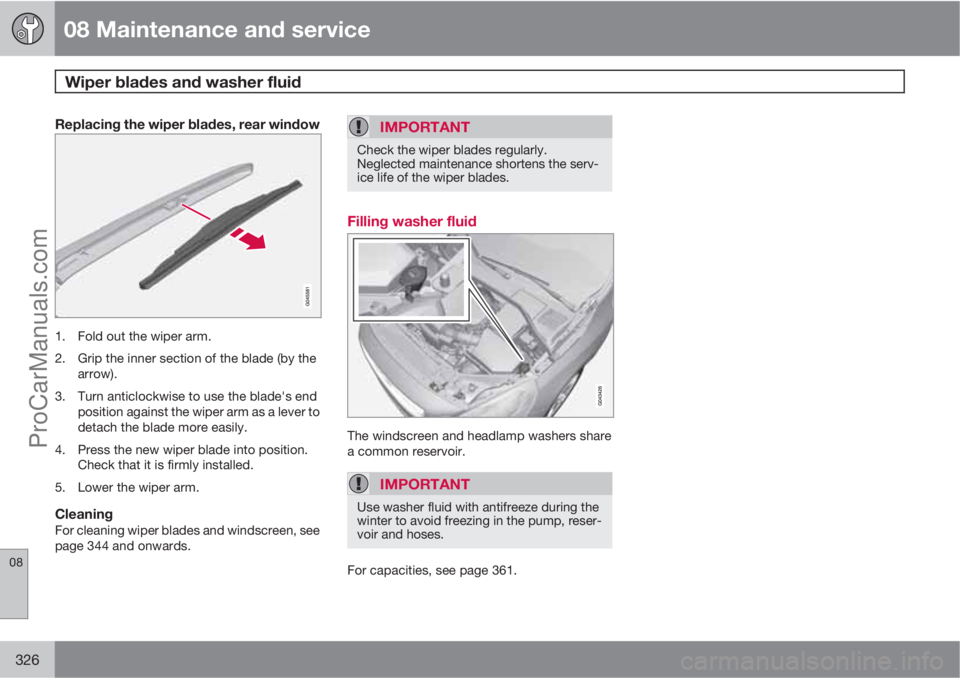
Replacing the wiper blades, rear window
1. Fold out the wiper arm.
2. Grip the inner section of the blade (by the
arrow).
3. Turn anticlockwise to use the blade's end
position against the wiper arm as a lever to
detach the blade more easily.
4. Press the new wiper blade into position.
Check that it is firmly installed.
5. Lower the wiper arm.
CleaningFor cleaning wiper blades and windscreen, see
page 344 and onwards.
IMPORTANT
Check the wiper blades regularly.
Neglected maintenance shortens the serv-
ice life of the wiper blades.
Filling washer fluid
The windscreen and headlamp washers share
a common reservoir.
IMPORTANT
Use washer fluid with antifreeze during the
winter to avoid freezing in the pump, reser-
voir and hoses.
For capacities, see page 361.
ProCarManuals.com
Page 346 of 400
08 Maintenance and service
Car care
08
344
Washing the car
Wash the car as soon as it becomes dirty.
Wash the car in a car wash with oil separator.
Use car shampoo.
•Remove bird droppings from the paintwork
as soon as possible. Bird droppings con-
tain chemicals that affect and discolour
paintwork very quickly. An authorised
Volvo workshop is recommended for the
removal of any discoloration.
•Hose down the underbody.
•Rinse the entire car to remove loose dirt.
Do not spray directly onto the locks.
•Wash using a sponge, car shampoo and
plenty of lukewarm water.
•Clean the wiper blades with a lukewarm
soap solution or car shampoo.
•Use cold degreasing agent on very dirty
surfaces.
•Dry the car using a clean, soft chamois or
a water scraper.
WARNING
Always have the engine cleaned by a work-
shop. There is a risk of fire if the engine is
hot.
IMPORTANT
Dirty headlamps have impaired functional-
ity. Clean them regularly, when refuelling for
example.
NOTE
Outside lighting such as headlamps, fog
lamps and rear lamps may temporarily have
condensation on the inside of the lens. This
is normal, all exterior lighting is designed to
withstand this. Condensation is normally
vented out of the lamp housing when the
lamp has been switched on for a time.
Cleaning the wiper bladesAsphalt, dust and salt residue on wiper blades,
as well as insects, ice etc. on the windscreen,
impair the service life of wiper blades.
For cleaning:
–Set the wiper blades in service position,
see page 325.
NOTE
Wash the wiper blades and windscreen reg-
ularly with lukewarm soap solution or car
shampoo.
Do not use any strong solvents.
Automatic car washesAn automatic car wash is a simple and quick
way of washing the car, but it cannot reach
everywhere. Handwashing the car is recom-
mended for achieving optimum results.
NOTE
During the first few months a new car must
only be handwashed. This is because the
paintwork is more sensitive when it is new.
High-pressure washingWhen using high-pressure washing, use
sweeping movements and make sure that the
nozzle does not come closer than 30 cm to the
surface of the car (the distance applies to all
exterior parts). Do not spray directly onto the
locks.
Testing the brakes
WARNING
Always test the brakes after washing the
car, including the parking brake, to ensure
that moisture and corrosion do not attack
the brake linings and reduce braking per-
formance.
Lightly depress the brake pedal now and then
when driving long distances in rain or slush.
The heat from the friction causes the brake lin-
ProCarManuals.com
Page 398 of 400
10 Alphabetical Index
10
396
Waxing..................................................... 345
Weights
kerb weight......................................... 355
Wheels
changing............................................. 298
installation........................................... 299
rims..................................................... 295
snow chains........................................ 296
spare wheel........................................ 299
Wheels and tyres..................................... 294
Whiplash injury, WHIPS............................. 27
WHIPS
child seat/booster cushion................... 27
whiplash injury...................................... 27
Windows, rearview and door mirrors....... 100
Windscreen washing.................................. 98
Windscreen wipers.................................... 97
rain sensor............................................ 97
Winter driving........................................... 271
Winter tyres.............................................. 296
Wiper blades............................................ 325
changing............................................. 325
cleaning.............................................. 326
replacing, rear window.......................326
service position................................... 325Wipers and washing.................................. 97
ProCarManuals.com