charging VOLVO V60 2013 Owners Manual
[x] Cancel search | Manufacturer: VOLVO, Model Year: 2013, Model line: V60, Model: VOLVO V60 2013Pages: 422, PDF Size: 9.59 MB
Page 76 of 422
03 Your driving environment
Instruments and controls
03
74
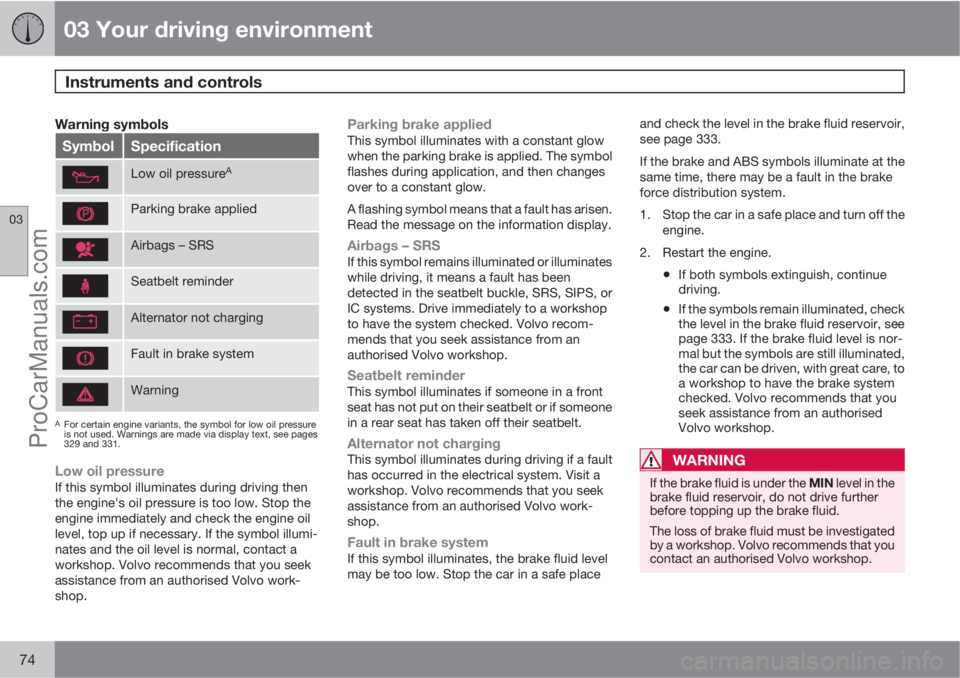
Warning symbols
SymbolSpecification
Low oil pressureA
Parking brake applied
Airbags – SRS
Seatbelt reminder
Alternator not charging
Fault in brake system
Warning
AFor certain engine variants, the symbol for low oil pressure
is not used. Warnings are made via display text, see pages
329 and 331.
Low oil pressureIf this symbol illuminates during driving then
the engine's oil pressure is too low. Stop the
engine immediately and check the engine oil
level, top up if necessary. If the symbol illumi-
nates and the oil level is normal, contact a
workshop. Volvo recommends that you seek
assistance from an authorised Volvo work-
shop.
Parking brake appliedThis symbol illuminates with a constant glow
when the parking brake is applied. The symbol
flashes during application, and then changes
over to a constant glow.
A flashing symbol means that a fault has arisen.
Read the message on the information display.
Airbags – SRSIf this symbol remains illuminated or illuminates
while driving, it means a fault has been
detected in the seatbelt buckle, SRS, SIPS, or
IC systems. Drive immediately to a workshop
to have the system checked. Volvo recom-
mends that you seek assistance from an
authorised Volvo workshop.
Seatbelt reminderThis symbol illuminates if someone in a front
seat has not put on their seatbelt or if someone
in a rear seat has taken off their seatbelt.
Alternator not chargingThis symbol illuminates during driving if a fault
has occurred in the electrical system. Visit a
workshop. Volvo recommends that you seek
assistance from an authorised Volvo work-
shop.
Fault in brake systemIf this symbol illuminates, the brake fluid level
may be too low. Stop the car in a safe placeand check the level in the brake fluid reservoir,
see page 333.
If the brake and ABS symbols illuminate at the
same time, there may be a fault in the brake
force distribution system.
1. Stop the car in a safe place and turn off the
engine.
2. Restart the engine.
•If both symbols extinguish, continue
driving.
•If the symbols remain illuminated, check
the level in the brake fluid reservoir, see
page 333. If the brake fluid level is nor-
mal but the symbols are still illuminated,
the car can be driven, with great care, to
a workshop to have the brake system
checked. Volvo recommends that you
seek assistance from an authorised
Volvo workshop.
WARNING
If the brake fluid is under the MIN level in the
brake fluid reservoir, do not drive further
before topping up the brake fluid.
The loss of brake fluid must be investigated
by a workshop. Volvo recommends that you
contact an authorised Volvo workshop.
ProCarManuals.com
Page 111 of 422
03 Your driving environment
Alcolock*
03
* Option/accessory, for more information, see Introduction.109 General information on the alcolock
The alcolock's1 function is to prevent the car
from being driven by individuals under the
influence of alcohol. Before the engine can be
started the driver must take a breath test that
verifies that he/she is not under the influence
of alcohol. Alcolock calibration takes place in
accordance with each market's limit value in
force for driving legally.
WARNING
The Alcolock is an aid and does not exempt
the driver from responsibility. It is always the
responsibility of the driver to be sober and
to drive the car safely.
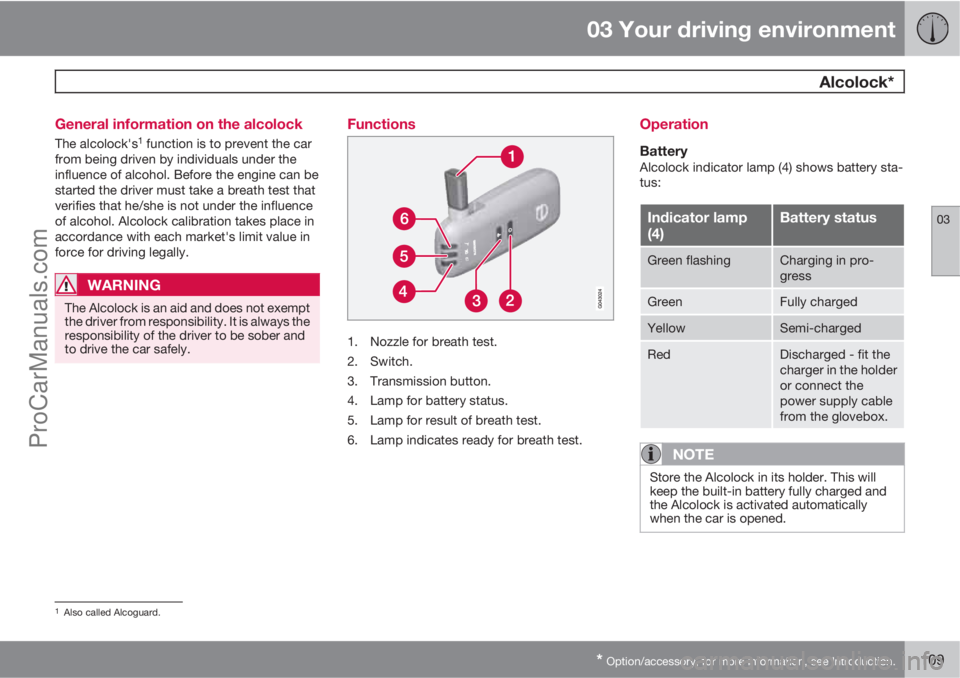
Functions
1. Nozzle for breath test.
2. Switch.
3. Transmission button.
4. Lamp for battery status.
5. Lamp for result of breath test.
6. Lamp indicates ready for breath test.
Operation
BatteryAlcolock indicator lamp (4) shows battery sta-
tus:
Indicator lamp
(4)Battery status
Green flashingCharging in pro-
gress
GreenFully charged
YellowSemi-charged
RedDischarged - fit the
charger in the holder
or connect the
power supply cable
from the glovebox.
NOTE
Store the Alcolock in its holder. This will
keep the built-in battery fully charged and
the Alcolock is activated automatically
when the car is opened.
1Also called Alcoguard.
ProCarManuals.com
Page 112 of 422
03 Your driving environment
Alcolock*
03
110* Option/accessory, for more information, see Introduction.
Storage
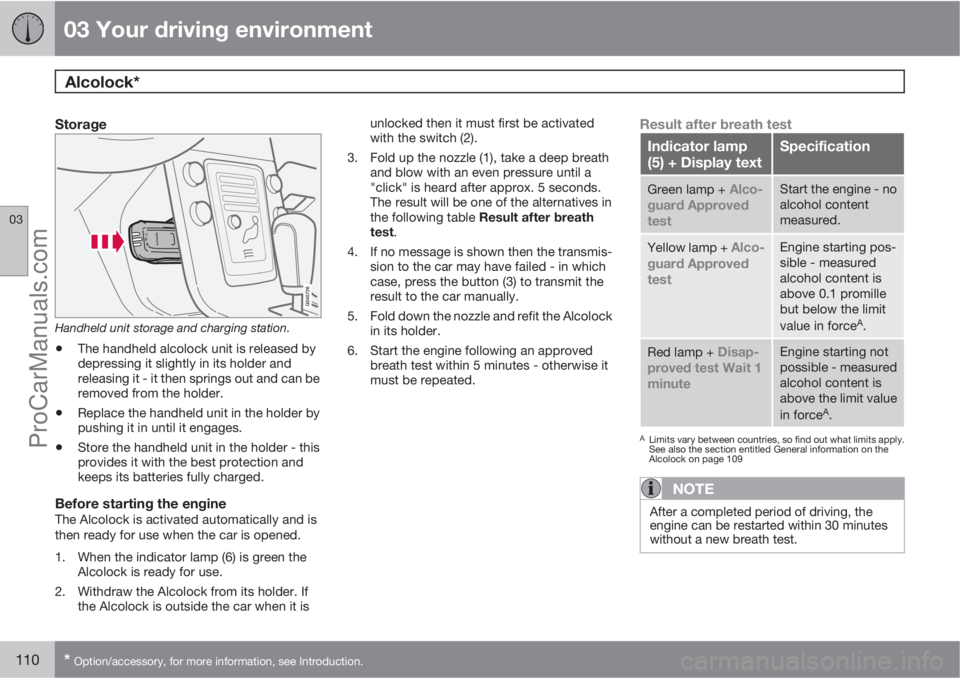
Handheld unit storage and charging station.
•The handheld alcolock unit is released by
depressing it slightly in its holder and
releasing it - it then springs out and can be
removed from the holder.
•Replace the handheld unit in the holder by
pushing it in until it engages.
•Store the handheld unit in the holder - this
provides it with the best protection and
keeps its batteries fully charged.
Before starting the engineThe Alcolock is activated automatically and is
then ready for use when the car is opened.
1. When the indicator lamp (6) is green the
Alcolock is ready for use.
2. Withdraw the Alcolock from its holder. If
the Alcolock is outside the car when it isunlocked then it must first be activated
with the switch (2).
3. Fold up the nozzle (1), take a deep breath
and blow with an even pressure until a
"click" is heard after approx. 5 seconds.
The result will be one of the alternatives in
the following table Result after breath
test.
4. If no message is shown then the transmis-
sion to the car may have failed - in which
case, press the button (3) to transmit the
result to the car manually.
5. Fold down the nozzle and refit the Alcolock
in its holder.
6. Start the engine following an approved
breath test within 5 minutes - otherwise it
must be repeated.
Result after breath test
Indicator lamp
(5) + Display textSpecification
Green lamp + Alco-
guard Approved
testStart the engine - no
alcohol content
measured.
Yellow lamp + Alco-
guard Approved
testEngine starting pos-
sible - measured
alcohol content is
above 0.1 promille
but below the limit
value in force
A.
Red lamp + Disap-
proved test Wait 1
minuteEngine starting not
possible - measured
alcohol content is
above the limit value
in force
A.
ALimits vary between countries, so find out what limits apply.
See also the section entitled General information on the
Alcolock on page 109
NOTE
After a completed period of driving, the
engine can be restarted within 30 minutes
without a new breath test.
ProCarManuals.com
Page 236 of 422
06 Infotainment system
General information on infotainment
06
234* Option/accessory, for more information, see Introduction.
General
The infotainment system consists of radio,
media player, TV* and the facility to communi-
cate with mobile phone*. Information is pre-
sented on a 5 or 7-inch* colour screen in the
upper section of the centre console. Functions
can be controlled via buttons in the steering
wheel, in the centre console under the colour
screen or via a remote control*. A mobile phone
can also be controlled with voice recognition in
certain cases.
If the Infotainment System is active when the
engine is switched off then it is automatically
activated the next time the key is inserted into
key position I or higher, and it continues with
the same source (e.g. radio) as before the
engine was switched off (the driver's door must
be closed on cars with Keyless systems*).
The infotainment system can be used for 15
minutes at a time without the remote control
key being in the ignition switch by pressing the
On/Off button.
When the car is being started the infotainment
system is switched off temporarily and contin-
ues when the engine has started.
NOTE
Remove the remote control key from the
ignition switch if the infotainment system is
used when the engine is switched off. This
is to avoid discharging the battery unnec-
essarily.
Dolby, Pro Logic
Made under license from Dolby Laboratories.
Dolby, Pro Logic and the double-D symbol are
trademarks of Dolby Laboratories.
Audyssey MultEQ1
The Audyssey MultEQ system has been used
in the development and tuning of the sound to
ensure a world-class sound experience.
1Only applies to Premium Sound Multimedia.
ProCarManuals.com
Page 243 of 422
06 Infotainment system
General information on infotainment
06
241
of the car. The compensation level can be set
to low, medium, high or off. Select the level
under Audio settings
Volume
compensation.
For general information on menu navigation,
see page 238 and menu overview, see
page 241.
External audio source audio volumeIf an external audio source (e.g. an MP3 player
or iPod�Ÿ) is connected to the AUX input then
the audio source that is connected can have a
different volume than the audio system's inter-
nal volume (e.g. radio). Correct this by adjust-
ing the volume of the input:
1.
Press the MEDIA button and turn TUNE to
AUX and wait a few seconds or press OK/
MENU.
2.
Press OK/MENU and then turn TUNE to
AUX input volume. Confirm with OK/
MENU.
3.
Turn TUNE to adjust the volume for the
AUX input.
NOTE
If the external audio source's volume is too
high or too low, the quality of the sound may
deteriorate. The audio quality may also be
impaired if the player is charged while the
infotainment system is in AUX mode. In
which case, avoid charging the player via
the 12 V socket.
Optimum sound reproductionThe audio system is pre-calibrated for opti-
mum sound reproduction by means of digital
signal processing.
This calibration takes into account loudspeak-
ers, amplifiers, passenger compartment
acoustics, listener position etc. for each com-
bination of car model and audio system.
There is a also a dynamic calibration that takes
into account the position of the volume control,
radio reception and vehicle speed.
The controls explained in these operating
instructions, e.g.
Bass, Treble and Equalizer,
are only intended for the user to be able to
adapt the sound reproduction according to
personal taste.
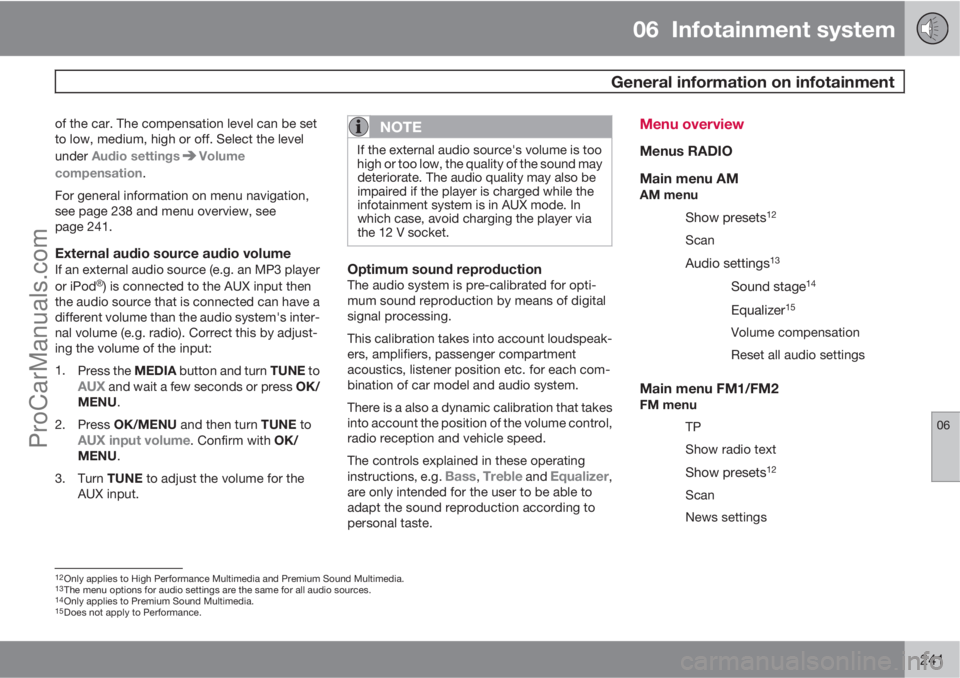
Menu overview
Menus RADIO
Main menu AM
AM menu
Show presets12
Scan
Audio settings13
Sound stage14
Equalizer15
Volume compensation
Reset all audio settings
Main menu FM1/FM2FM menu
TP
Show radio text
Show presets12
Scan
News settings
12Only applies to High Performance Multimedia and Premium Sound Multimedia.13The menu options for audio settings are the same for all audio sources.14Only applies to Premium Sound Multimedia.15Does not apply to Performance.
ProCarManuals.com
Page 287 of 422
07 During your journey
Recommendations during driving
07
285
•If the text message High engine temp
Stop engine or Coolant level low, Stop
engine is shown then the engine must be
switched off after stopping the car.
•In the event of overheating in the gearbox
a built-in protection function is activated
which, amongst other things, illuminates
the instrument panel's warning symbol and
there is a text message displayed there
Transmission hot Reduce speed orTransmission hot Stop safely - follow
the recommendation given and lower the
speed and stop the car in a safe way and
allow the engine to run at idling speed for
a few minutes to allow the gearbox to cool
down.
•If the car overheats, the air conditioning
may be switched off temporarily.
•Do not turn the engine off immediately you
stop after a hard drive.
NOTE
It is normal for the engine's cooling fan to
operate for a while after the engine has been
switched off.
Open tailgate
WARNING
Do not drive with the tailgate open. Toxic
exhaust fumes could be drawn into the car
through the cargo area.
Do not overload the batteryThe electrical functions in the car load the bat-
tery to varying degrees. Avoid using the key
position II when the engine is switched off.
Instead use the I mode - which uses less
power.
Also, be aware of different accessories that
load the electrical system. Do not use functions
which use a lot of power when the engine is
switched off. Examples of such functions are:
•ventilation fan
•headlamps
•windscreen wiper
•audio system (high volume).
If the battery voltage is low the information dis-
play shows the text
Low battery Power save
mode. The energy-saving function then shuts
down certain functions or reduces certain
functions such as the ventilation fan and/or
audio system.
–In which case, charge the battery by star-
ting the engine and then running it for atleast 15 minutes - battery charging is more
effective during driving than running the
engine at idling speed while stationary.
Before a long journey
•Check that the engine is working normally
and that fuel consumption is normal.
•Make sure that there are no leaks (fuel, oil
or other fluid).
•Check all bulbs and tyre tread depths.
•Carrying a warning triangle is a legal
requirement in certain countries.
Winter drivingCheck the following in particular before the
cold season:
•The engine coolant must contain at least
50% glycol. This mixture protects the
engine against frost erosion down to
approximately –35 °C. To achieve optimum
antifreeze protection, different types of gly-
col must not be mixed.
•The fuel tank must be kept filled to prevent
condensation.
•Engine oil viscosity is important. Oils with
lower viscosity (thinner oils) facilitate star-
ting in cold weather and also reduce fuel
consumption while the engine is cold. For
more information on suitable oils, see
page 379.
ProCarManuals.com
Page 295 of 422
07 During your journey
Loading
07
* Option/accessory, for more information, see Introduction.293 Lowering the rear seat backrest
To simplify loading in the cargo area, the rear
seat backrest can be folded down, see
page 82.
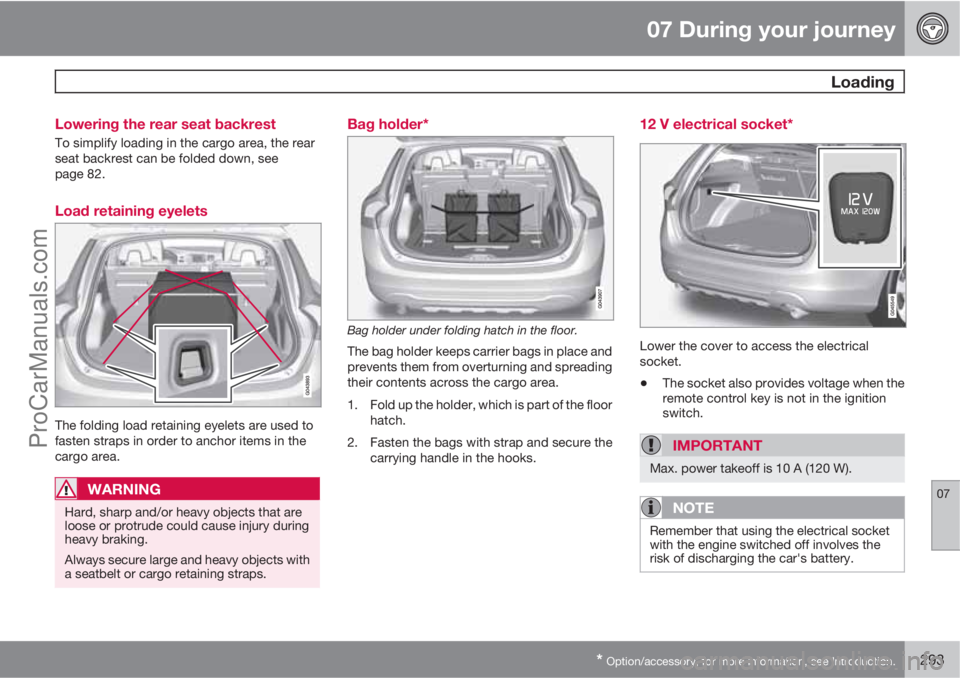
Load retaining eyelets
The folding load retaining eyelets are used to
fasten straps in order to anchor items in the
cargo area.
WARNING
Hard, sharp and/or heavy objects that are
loose or protrude could cause injury during
heavy braking.
Always secure large and heavy objects with
a seatbelt or cargo retaining straps.
Bag holder*
Bag holder under folding hatch in the floor.
The bag holder keeps carrier bags in place and
prevents them from overturning and spreading
their contents across the cargo area.
1. Fold up the holder, which is part of the floor
hatch.
2. Fasten the bags with strap and secure the
carrying handle in the hooks.
12 V electrical socket*
Lower the cover to access the electrical
socket.
•The socket also provides voltage when the
remote control key is not in the ignition
switch.
IMPORTANT
Max. power takeoff is 10 A (120 W).
NOTE
Remember that using the electrical socket
with the engine switched off involves the
risk of discharging the car's battery.
ProCarManuals.com
Page 346 of 422
09 Maintenance and service
Battery 09
344
Operation
The service life and function of the battery is
influenced by factors such as the number of
starts, discharging, driving style, driving con-
ditions, climatic conditions etc.
•Never disconnect the battery when the
engine is running.
•Check that the cables to the battery are
correctly connected and properly tight-
ened.
WARNING
•The battery can generate oxyhydrogen
gas, which is highly explosive. A spark
can be formed if a jump lead is con-
nected incorrectly, and this can be
enough for the battery to explode.
•The battery contains sulphuric acid,
which can cause serious burns.
•If sulphuric acid comes into contact
with eyes, skin or clothing, flush with
large quantities of water. If acid
splashes into the eyes - seek medical
attention immediately.
NOTE
The life of the battery is shortened if it
becomes discharged repeatedly.
The life of the battery is affected by several
factors, including driving conditions and cli-
mate. Battery starting capacity decreases
gradually with time and therefore needs to
be recharged if the car is not used for a
longer time or when it is only driven short
distances. Extreme cold further limits star-
ting capacity.
To maintain the battery in good condition, at
least 15 minutes of driving/week is recom-
mended or that the battery is connected to
a battery charger with automatic trickle
charging.
A battery that is kept fully charged has a
maximum service life.
IMPORTANT
Never use a quick charger to charge the
battery.
IMPORTANT
If the following instruction is not observed
then the energy saving function for infotain-
ment may be temporarily disengaged, and/
or the message in the information display
about the main battery's state of charge
may be temporarily inapplicable, following
the connection of an external battery or bat-
tery charger:
•The negative battery terminal on the
car's main battery must never be used
for connecting an external battery or
battery charger - only the car chassis
may be used as the grounding point.
See the section "Start assistance" - for a
description of how the cable clamps must
be attached.
ProCarManuals.com
Page 351 of 422
09 Maintenance and service
Battery09
349
NOTE
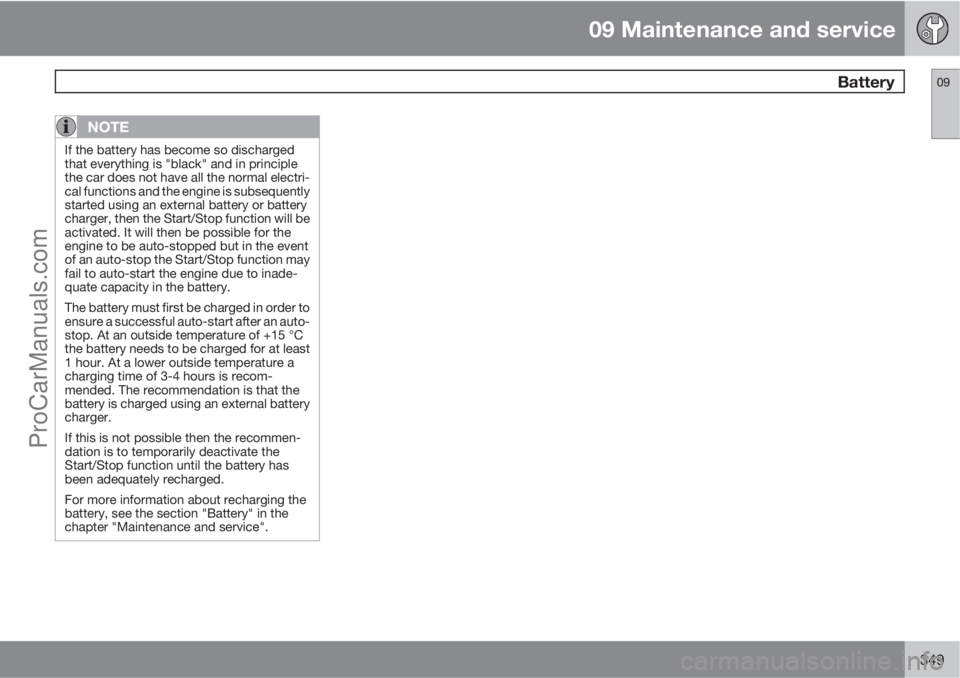
If the battery has become so discharged
that everything is "black" and in principle
the car does not have all the normal electri-
cal functions and the engine is subsequently
started using an external battery or battery
charger, then the Start/Stop function will be
activated. It will then be possible for the
engine to be auto-stopped but in the event
of an auto-stop the Start/Stop function may
fail to auto-start the engine due to inade-
quate capacity in the battery.
The battery must first be charged in order to
ensure a successful auto-start after an auto-
stop. At an outside temperature of +15 °C
the battery needs to be charged for at least
1 hour. At a lower outside temperature a
charging time of 3-4 hours is recom-
mended. The recommendation is that the
battery is charged using an external battery
charger.
If this is not possible then the recommen-
dation is to temporarily deactivate the
Start/Stop function until the battery has
been adequately recharged.
For more information about recharging the
battery, see the section "Battery" in the
chapter "Maintenance and service".
ProCarManuals.com
Page 362 of 422
09 Maintenance and service
Fuses 09
360
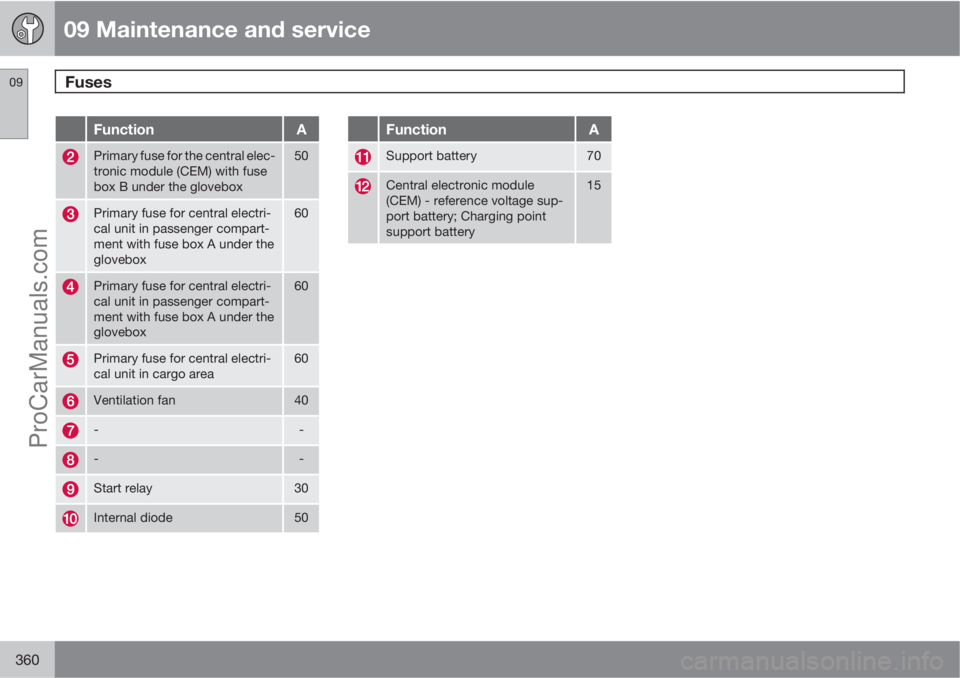
FunctionA
Primary fuse for the central elec-
tronic module (CEM) with fuse
box B under the glovebox50
Primary fuse for central electri-
cal unit in passenger compart-
ment with fuse box A under the
glovebox60
Primary fuse for central electri-
cal unit in passenger compart-
ment with fuse box A under the
glovebox60
Primary fuse for central electri-
cal unit in cargo area60
Ventilation fan40
--
--
Start relay30
Internal diode50
FunctionA
Support battery70
Central electronic module
(CEM) - reference voltage sup-
port battery; Charging point
support battery15
ProCarManuals.com