key battery VOLVO V60 2013 Owners Manual
[x] Cancel search | Manufacturer: VOLVO, Model Year: 2013, Model line: V60, Model: VOLVO V60 2013Pages: 422, PDF Size: 9.59 MB
Page 4 of 422
Table of contents
2* Option/accessory, for more information, see Introduction.
00
00 Introduction
Important information................................. 6
Volvo and the environment....................... 11
01
01 Safety
Seatbelts .................................................. 16
Airbags...................................................... 19
Activating/deactivating the airbag*........... 22
Side airbags (SIPS bags) ......................... 24
Inflatable Curtain (IC) ............................... 26
WHIPS ...................................................... 27
When the systems deploy ........................ 29
Safety mode.............................................. 30
Child safety............................................... 31
02
02 Locks and alarm
Remote control key/key blade.................. 44
Privacy locking*......................................... 49
Battery replacement, remote control key/
PCC*.........................................................51
Keyless drive*............................................ 53
Locking/unlocking..................................... 57
Child safety locks...................................... 62
Alarm*....................................................... 63
ProCarManuals.com
Page 5 of 422
Table of contents
* Option/accessory, for more information, see Introduction.3
03
03 Your driving environment
Instruments and controls.......................... 68
Volvo Sensus ........................................... 77
Key positions............................................ 78
Seats......................................................... 80
Steering wheel.......................................... 85
Lighting..................................................... 86
Wipers and washing.................................. 98
Windows, rearview and door mirrors...... 101
Compass*............................................... 106
Power sunroof*....................................... 107
Alcolock*................................................. 109
Starting the engine.................................. 113
Starting the engine – Flexifuel.................118
Starting the engine – external battery..... 120
Gearboxes............................................... 121
DRIVe Start/Stop*................................... 127
All-wheel drive – AWD*...........................134
Foot brake............................................... 135
Parking brake.......................................... 137
HomeLink
�Ÿ *............................................ 141
04
04 Driver support
DSTC – Stability and traction control sys-
tem.......................................................... 146
Road sign information - RSI*.................. 148
Speed limiter*.......................................... 150
Cruise control*........................................ 152
Adaptive cruise control*.......................... 154
Distance Warning*..................................165
City Safety™........................................... 168
Collision Warning with Auto Brake &
Pedestrian Protection*............................ 173
Driver Alert System*................................ 181
Driver Alert System - DAC*.....................182
Driver Alert System - LDW*..................... 185
Park assist syst*...................................... 188
Park assist camera*................................ 191
BLIS* – Blind Spot Information System. . 194
05
05 Comfort and driving pleasure
Menus and messages............................. 200
Menu source MY CAR............................202
Climate control........................................ 210
Fuel-driven engine block heater and pas-
senger compartment heater*.................. 220
Additional heater*.................................... 223
Trip computer......................................... 224
Adapting driving characteristics............. 226
Comfort inside the passenger compart-
ment........................................................ 227
ProCarManuals.com
Page 44 of 422
42* Option/accessory, for more information, see Introduction.
Remote control key/key blade................................................................ 44
Privacy locking*....................................................................................... 49
Battery replacement, remote control key/PCC*...................................... 51
Keyless drive*.......................................................................................... 53
Locking/unlocking................................................................................... 57
Child safety locks.................................................................................... 62
Alarm*...................................................................................................... 63
ProCarManuals.com
Page 53 of 422
02 Locks and alarm
Battery replacement, remote control key/PCC*
02
* Option/accessory, for more information, see Introduction.51 Replacing the battery
The batteries should be replaced if:
•the information symbol is illuminated and
the display shows Low battery in remote
control. Please change batteries.
and/or
•the locks repeatedly do not react to signals
from the remote control key within
20 metres from the car.
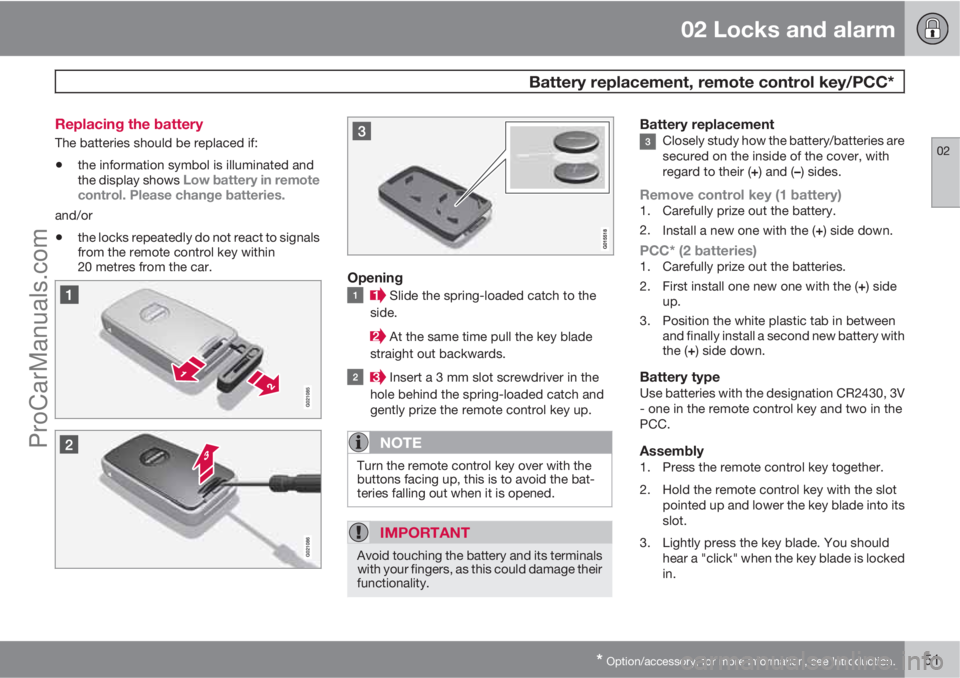
Opening
Slide the spring-loaded catch to the
side.
At the same time pull the key blade
straight out backwards.
Insert a 3 mm slot screwdriver in the
hole behind the spring-loaded catch and
gently prize the remote control key up.
NOTE
Turn the remote control key over with the
buttons facing up, this is to avoid the bat-
teries falling out when it is opened.
IMPORTANT
Avoid touching the battery and its terminals
with your fingers, as this could damage their
functionality.
Battery replacementClosely study how the battery/batteries are
secured on the inside of the cover, with
regard to their (+) and (–) sides.
Remove control key (1 battery)1. Carefully prize out the battery.
2.
Install a new one with the (+) side down.
PCC* (2 batteries)1. Carefully prize out the batteries.
2.
First install one new one with the (+) side
up.
3. Position the white plastic tab in between
and finally install a second new battery with
the (+) side down.
Battery typeUse batteries with the designation CR2430, 3V
- one in the remote control key and two in the
PCC.
Assembly1. Press the remote control key together.
2. Hold the remote control key with the slot
pointed up and lower the key blade into its
slot.
3. Lightly press the key blade. You should
hear a "click" when the key blade is locked
in.
ProCarManuals.com
Page 54 of 422
02 Locks and alarm
Battery replacement, remote control key/PCC*
02
52* Option/accessory, for more information, see Introduction.
IMPORTANT
Make sure that you dispose of old batteries
in an environmentally-friendly way.
ProCarManuals.com
Page 59 of 422
02 Locks and alarm
Locking/unlocking
02
* Option/accessory, for more information, see Introduction.57 From the outside
The remote control key can lock/unlock all
doors and the tailgate simultaneously. Different
sequences for unlocking can be selected, see
"Unlocking with the remote control key" page
46.
In order that the lock sequence can be acti-
vated, the driver's door must be closed - if any
of the other doors or the tailgate is open, then
it/they is/are locked and the alarm is activated
only when it/they are closed. With the Key-
less* system all the doors and tailgate must be
closed.
NOTE
Be aware of the risk of locking the remote
control key in the car.
If it is not possible to lock/unlock with the
remote control key, the battery may be dis-
charged - lock or unlock the left-hand front
door with the detachable key blade, see
page 48.
NOTE
Remember that the alarm is triggered when
the door is opened after being unlocked
with the key blade - the alarm is switched
off when the remote control key is inserted
into the ignition switch.
WARNING
Be aware of the risk of being locked in the
car when it is locked from the outside using
the remote control key - it is then not pos-
sible to open any of the doors from the
inside with the door controls. Read more
about this in the section "Deadlocks" later
on.
Automatic relockingIf none of the doors or the tailgate is opened
within 2 minutes of unlocking, all are locked
again automatically. This function reduces the
risk that the car is left unlocked unintentionally.
(For cars with alarm, see page 63.)
Manual lockingIn certain situations the car must be lockable
manually, e.g. in the event of power failure.
The left-hand front door can be locked with its
lock cylinder and the remote control key's
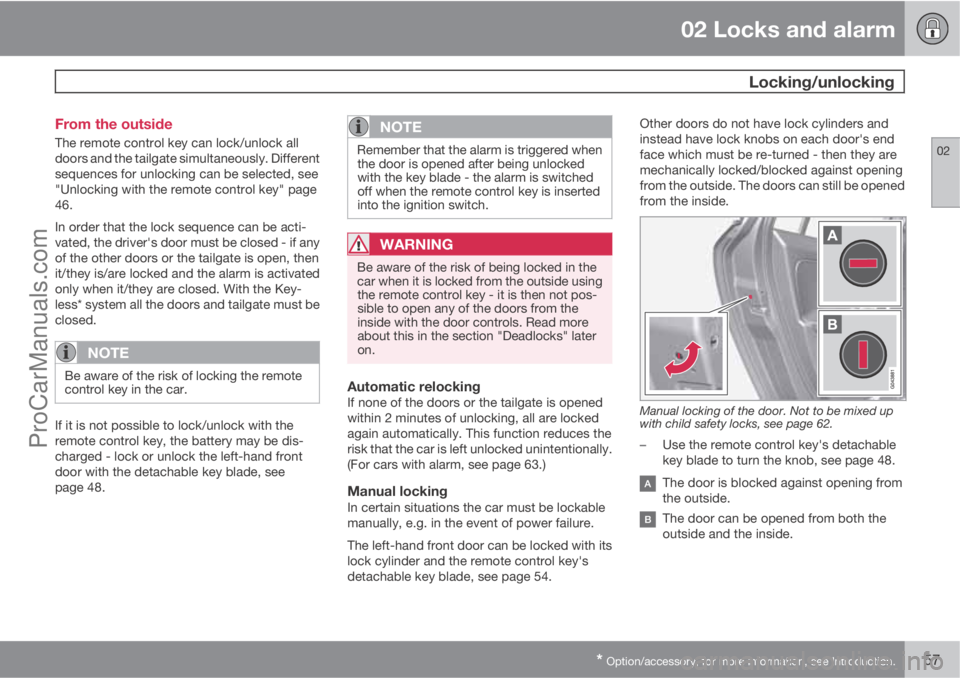
detachable key blade, see page 54.Other doors do not have lock cylinders and
instead have lock knobs on each door's end
face which must be re-turned - then they are
mechanically locked/blocked against opening
from the outside. The doors can still be opened
from the inside.
Manual locking of the door. Not to be mixed up
with child safety locks, see page 62.
–Use the remote control key's detachable
key blade to turn the knob, see page 48.
The door is blocked against opening from
the outside.
The door can be opened from both the
outside and the inside.
ProCarManuals.com
Page 65 of 422
02 Locks and alarm
Alarm*
02
* Option/accessory, for more information, see Introduction.63 General
Activated alarm is triggered if:
•a door, the bonnet or the tailgate is opened
•a movement is detected in the passenger
compartment (if fitted with a movement
detector*)
•the car is raised or towed away (if fitted
with a tilt detector*)
•the battery's cable is disconnected
•the siren is disconnected.
If there is a fault in the alarm system, the infor-
mation display shows a message. In which
case, contact a workshop - an authorised
Volvo workshop is recommended.
NOTE
The movement sensors trigger an alarm in
the event of movement in the passenger
compartment - air currents are also regis-
tered. For this reason the alarm is triggered
if the car is left with a window or the sunroof
open or if the passenger compartment
heater is used.
To avoid this: Close the window/sunroof
when leaving the car. If the car's integrated
passenger compartment heater (or a porta-
ble electric heater) shall be used - direct the
airflow from the air vents so that they are not
pointing upwards in the passenger com-
partment.
NOTE
Do not attempt to repair or modify alarm
system components. All such attempts
could affect the terms of insurance.
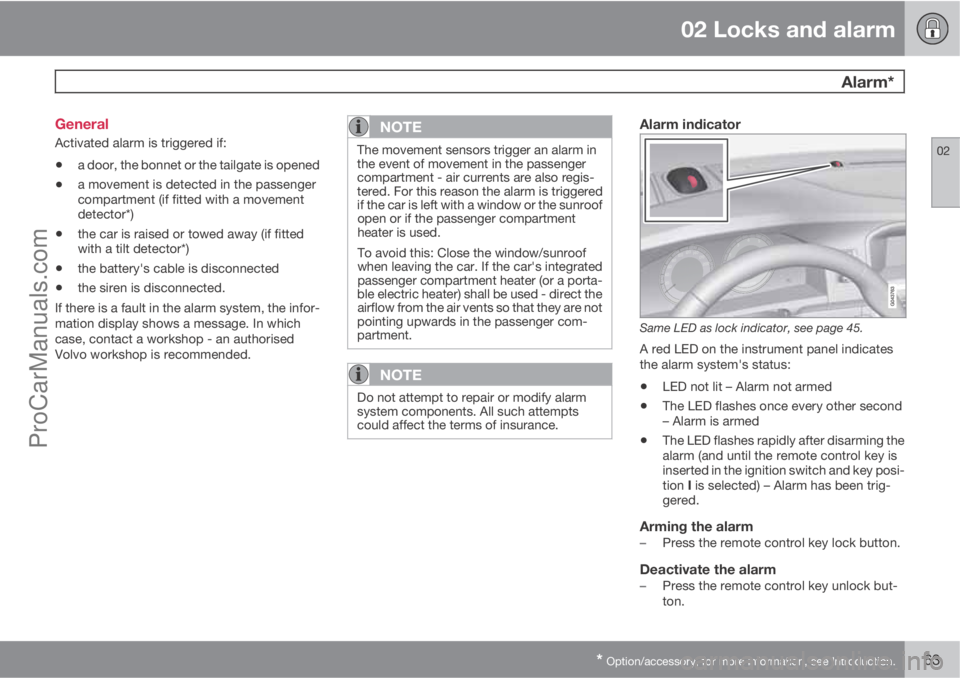
Alarm indicator
Same LED as lock indicator, see page 45.
A red LED on the instrument panel indicates
the alarm system's status:
•LED not lit – Alarm not armed
•The LED flashes once every other second
– Alarm is armed
•The LED flashes rapidly after disarming the
alarm (and until the remote control key is
inserted in the ignition switch and key posi-
tion I is selected) – Alarm has been trig-
gered.
Arming the alarm–Press the remote control key lock button.
Deactivate the alarm–Press the remote control key unlock but-
ton.
ProCarManuals.com
Page 66 of 422
02 Locks and alarm
Alarm*
02
64* Option/accessory, for more information, see Introduction.
Deactivating a triggered alarm–Press the remote control key unlock button
or insert the remote control key in the igni-
tion switch.
Other alarm functions
Automatic re-arming of the alarmThis function prevents the car being left with
the alarm disarmed unintentionally.
If the car is unlocked with the remote control
key (and the alarm is disarmed) but none of the
doors or the tailgate is opened within 2
minutes, then the alarm is automatically re-
armed. The car is relocked at the same time.
Remote control key not workingIf the alarm cannot be deactivated with the
remote control key, e.g. if the key's battery is
discharged - the car can be unlocked, dis-
armed and the engine started as follows:
1. Open the driver's door with the detachable
key blade - see page 54.
> The alarm is triggered, the alarm indica-
tor flashes rapidly and the siren sounds.
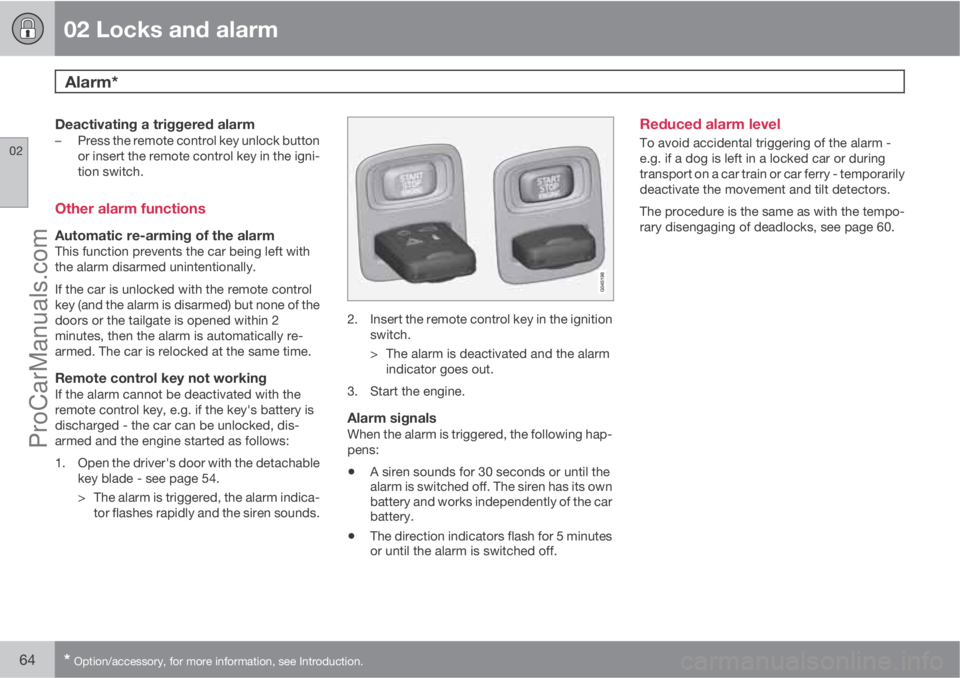
2. Insert the remote control key in the ignition
switch.
> The alarm is deactivated and the alarm
indicator goes out.
3. Start the engine.
Alarm signalsWhen the alarm is triggered, the following hap-
pens:
•A siren sounds for 30 seconds or until the
alarm is switched off. The siren has its own
battery and works independently of the car
battery.
•The direction indicators flash for 5 minutes
or until the alarm is switched off.
Reduced alarm level
To avoid accidental triggering of the alarm -
e.g. if a dog is left in a locked car or during
transport on a car train or car ferry - temporarily
deactivate the movement and tilt detectors.
The procedure is the same as with the tempo-
rary disengaging of deadlocks, see page 60.
ProCarManuals.com
Page 68 of 422
66* Option/accessory, for more information, see Introduction.
Instruments and controls........................................................................ 68
Volvo Sensus ......................................................................................... 77
Key positions.......................................................................................... 78
Seats....................................................................................................... 80
Steering wheel........................................................................................ 85
Lighting................................................................................................... 86
Wipers and washing................................................................................ 98
Windows, rearview and door mirrors....................................................101
Compass*.............................................................................................. 106
Power sunroof*..................................................................................... 107
Alcolock*............................................................................................... 109
Starting the engine................................................................................ 113
Starting the engine – Flexifuel............................................................... 118
Starting the engine – external battery................................................... 120
Gearboxes............................................................................................. 121
DRIVe Start/Stop*................................................................................. 127
All-wheel drive – AWD*.........................................................................134
Foot brake............................................................................................. 135
Parking brake........................................................................................ 137
HomeLink
�Ÿ *.......................................................................................... 141
ProCarManuals.com
Page 80 of 422
03 Your driving environment
Key positions
03
78* Option/accessory, for more information, see Introduction.
Insert and remove the remote control
key
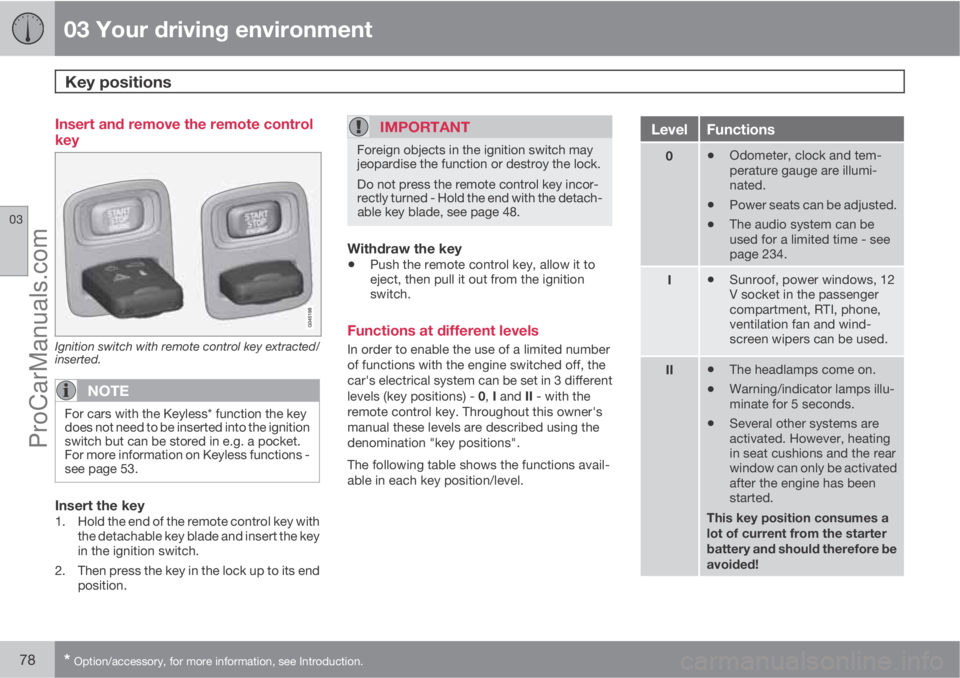
Ignition switch with remote control key extracted/
inserted.
NOTE
For cars with the Keyless* function the key
does not need to be inserted into the ignition
switch but can be stored in e.g. a pocket.
For more information on Keyless functions -
see page 53.
Insert the key1. Hold the end of the remote control key with
the detachable key blade and insert the key
in the ignition switch.
2. Then press the key in the lock up to its end
position.
IMPORTANT
Foreign objects in the ignition switch may
jeopardise the function or destroy the lock.
Do not press the remote control key incor-
rectly turned - Hold the end with the detach-
able key blade, see page 48.
Withdraw the key
•Push the remote control key, allow it to
eject, then pull it out from the ignition
switch.
Functions at different levels
In order to enable the use of a limited number
of functions with the engine switched off, the
car's electrical system can be set in 3 different
levels (key positions) - 0, I and II - with the
remote control key. Throughout this owner's
manual these levels are described using the
denomination "key positions".
The following table shows the functions avail-
able in each key position/level.
LevelFunctions
0•Odometer, clock and tem-
perature gauge are illumi-
nated.
•Power seats can be adjusted.
•The audio system can be
used for a limited time - see
page 234.
I•Sunroof, power windows, 12
V socket in the passenger
compartment, RTI, phone,
ventilation fan and wind-
screen wipers can be used.
II•The headlamps come on.
•Warning/indicator lamps illu-
minate for 5 seconds.
•Several other systems are
activated. However, heating
in seat cushions and the rear
window can only be activated
after the engine has been
started.
This key position consumes a
lot of current from the starter
battery and should therefore be
avoided!
ProCarManuals.com