warning light VOLVO V60 2014 User Guide
[x] Cancel search | Manufacturer: VOLVO, Model Year: 2014, Model line: V60, Model: VOLVO V60 2014Pages: 442, PDF Size: 13.85 MB
Page 95 of 442
03 Instruments and controls
03
}}
93
WARNING
Check that no rear seat passengers are trapped when the windows are closedfrom the driver's door.
WARNING
Check that children or other passengers are not trapped if the windows are closed,even when the remote control key is used.
WARNING
If there are children in the car - remember to always switch off the power supply tothe power windows by selecting key posi-tion 0 and then take the remote control key
with you when leaving the car. For infor-mation on key positions - see Key posi-tions - functions at different levels (p. 70).
Operating
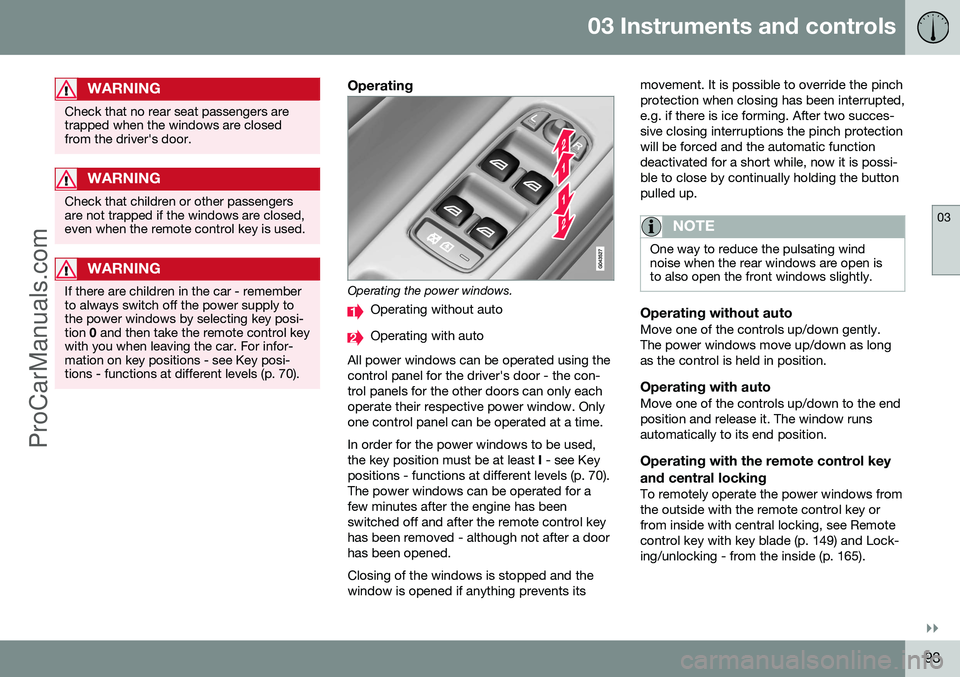
Operating the power windows.
Operating without auto
Operating with auto
All power windows can be operated using the control panel for the driver's door - the con-trol panels for the other doors can only eachoperate their respective power window. Onlyone control panel can be operated at a time. In order for the power windows to be used, the key position must be at least I - see Key
positions - functions at different levels (p. 70).The power windows can be operated for afew minutes after the engine has beenswitched off and after the remote control keyhas been removed - although not after a doorhas been opened. Closing of the windows is stopped and the window is opened if anything prevents its movement. It is possible to override the pinchprotection when closing has been interrupted,e.g. if there is ice forming. After two succes-sive closing interruptions the pinch protectionwill be forced and the automatic functiondeactivated for a short while, now it is possi-ble to close by continually holding the buttonpulled up.
NOTE
One way to reduce the pulsating wind noise when the rear windows are open isto also open the front windows slightly.
Operating without autoMove one of the controls up/down gently. The power windows move up/down as longas the control is held in position.
Operating with autoMove one of the controls up/down to the endposition and release it. The window runsautomatically to its end position.
Operating with the remote control key and central locking
To remotely operate the power windows from the outside with the remote control key orfrom inside with central locking, see Remotecontrol key with key blade (p. 149) and Lock-ing/unlocking - from the inside (p. 165).
ProCarManuals.co’
Page 96 of 442
||
03 Instruments and controls
03
94
ResettingIf the battery is disconnected then the func- tion for automatic opening must be reset sothat it can work correctly.
1. Gently raise the front section of the but-ton to raise the window to its end position and hold it there for one second.
2. Release the button briefly.
3. Raise the front section of the button again for one second.
WARNING
A reset must take place for pinch protec- tion to work.
Door mirrors
The door mirror positions are adjusted with the joystick in the driver's door controls.
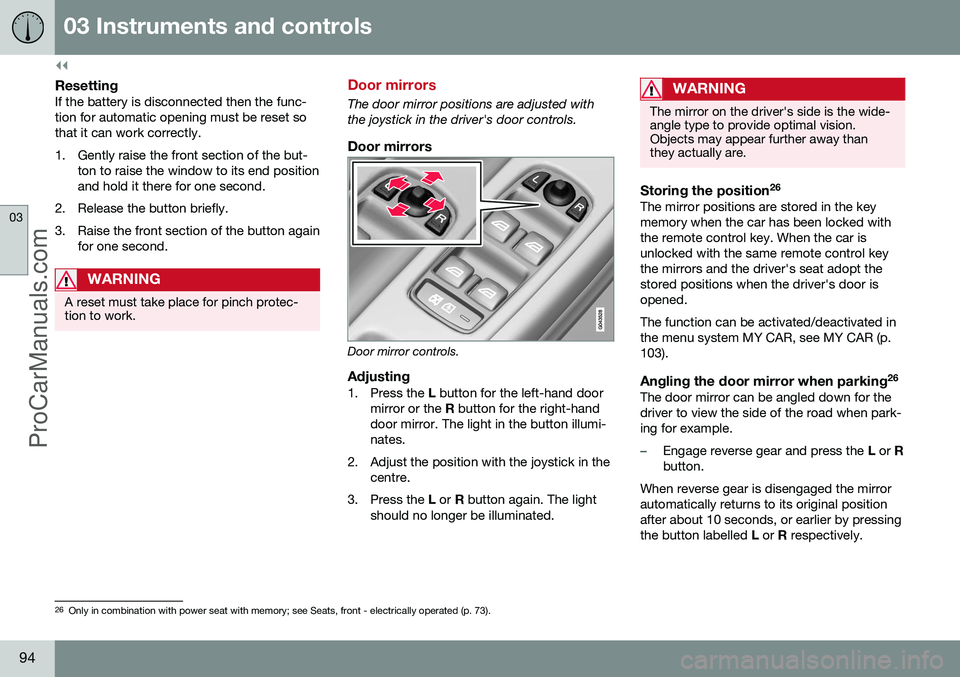
Door mirrors
Door mirror controls.
Adjusting1. Press the L button for the left-hand door
mirror or the R button for the right-hand
door mirror. The light in the button illumi- nates.
2. Adjust the position with the joystick in the centre.
3. Press the L or R button again. The light
should no longer be illuminated.
WARNING
The mirror on the driver's side is the wide- angle type to provide optimal vision.Objects may appear further away thanthey actually are.
Storing the position 26The mirror positions are stored in the key memory when the car has been locked withthe remote control key. When the car isunlocked with the same remote control keythe mirrors and the driver's seat adopt thestored positions when the driver's door isopened. The function can be activated/deactivated in the menu system MY CAR, see MY CAR (p.103).
Angling the door mirror when parking 26The door mirror can be angled down for thedriver to view the side of the road when park-ing for example.
–Engage reverse gear and press the
L or R
button.
When reverse gear is disengaged the mirror automatically returns to its original positionafter about 10 seconds, or earlier by pressingthe button labelled L or R respectively.
26
Only in combination with power seat with memory; see Seats, front - electrically operated (p. 73).
ProCarManuals.co’
Page 142 of 442
05 Loading and storage
05
140* Option/accessory, for more information, see Introduction.
Glovebox
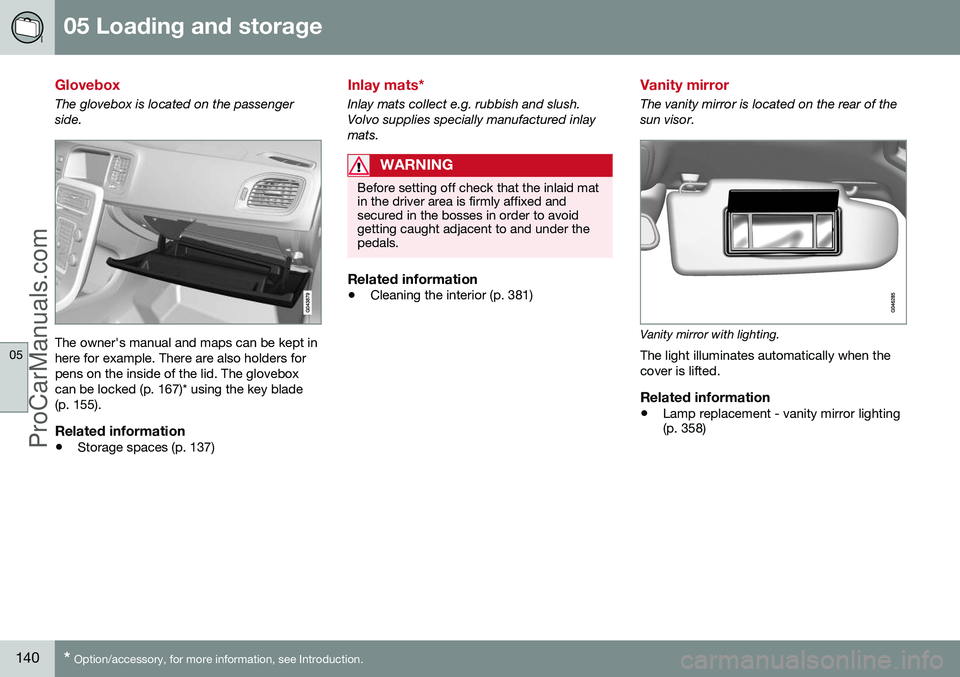
The glovebox is located on the passenger side.
The owner's manual and maps can be kept in here for example. There are also holders forpens on the inside of the lid. The gloveboxcan be locked (p. 167)* using the key blade(p. 155).
Related information
• Storage spaces (p. 137)
Inlay mats*
Inlay mats collect e.g. rubbish and slush. Volvo supplies specially manufactured inlaymats.
WARNING
Before setting off check that the inlaid mat in the driver area is firmly affixed andsecured in the bosses in order to avoidgetting caught adjacent to and under thepedals.
Related information
•Cleaning the interior (p. 381)
Vanity mirror
The vanity mirror is located on the rear of the sun visor.
Vanity mirror with lighting.
The light illuminates automatically when the cover is lifted.
Related information
• Lamp replacement - vanity mirror lighting (p. 358)
ProCarManuals.co’
Page 143 of 442
05 Loading and storage
05
* Option/accessory, for more information, see Introduction.141
Tunnel console - 12 V-sockets
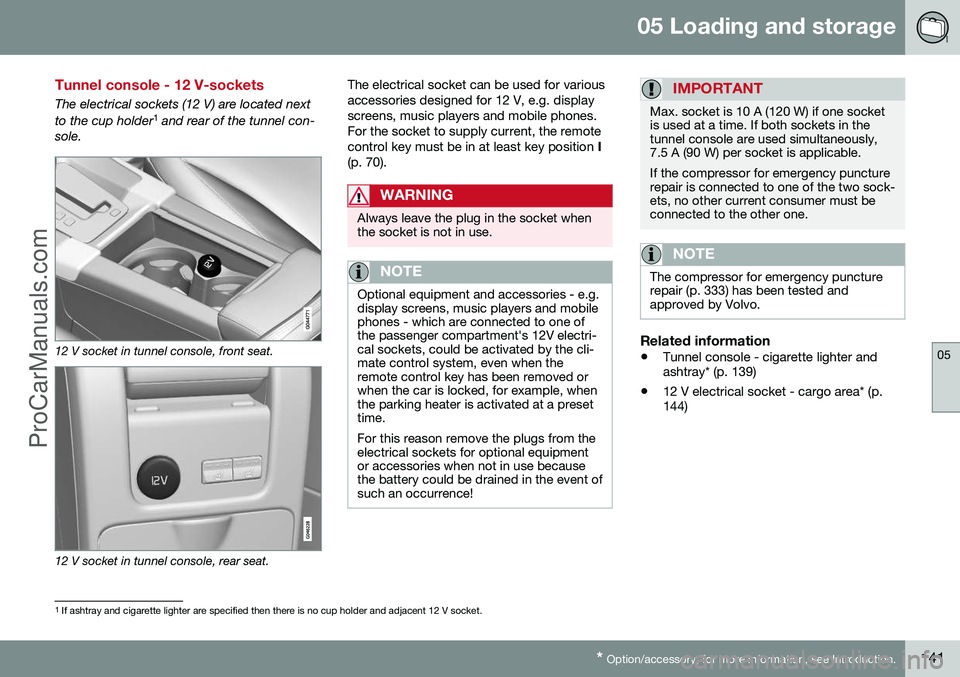
The electrical sockets (12 V) are located next to the cup holder 1
and rear of the tunnel con-
sole.
12 V socket in tunnel console, front seat.
12 V socket in tunnel console, rear seat. The electrical socket can be used for various accessories designed for 12 V, e.g. displayscreens, music players and mobile phones.For the socket to supply current, the remotecontrol key must be in at least key position
I
(p. 70).
WARNING
Always leave the plug in the socket when the socket is not in use.
NOTE
Optional equipment and accessories - e.g. display screens, music players and mobilephones - which are connected to one ofthe passenger compartment's 12V electri-cal sockets, could be activated by the cli-mate control system, even when theremote control key has been removed orwhen the car is locked, for example, whenthe parking heater is activated at a presettime. For this reason remove the plugs from the electrical sockets for optional equipmentor accessories when not in use becausethe battery could be drained in the event ofsuch an occurrence!
IMPORTANT
Max. socket is 10 A (120 W) if one socket is used at a time. If both sockets in thetunnel console are used simultaneously,7.5 A (90 W) per socket is applicable. If the compressor for emergency puncture repair is connected to one of the two sock-ets, no other current consumer must beconnected to the other one.
NOTE
The compressor for emergency puncture repair (p. 333) has been tested andapproved by Volvo.
Related information
• Tunnel console - cigarette lighter and ashtray* (p. 139)
• 12 V electrical socket - cargo area* (p.144)
1
If ashtray and cigarette lighter are specified then there is no cup holder and adjacent 12 V socket.
ProCarManuals.co’
Page 144 of 442
05 Loading and storage
05
142* Option/accessory, for more information, see Introduction.
Loading
Payload depends on the car's kerb weight. Payload depends on the car's kerb weight. The total of the weight of the passengers andall accessories reduces the car's payload bya corresponding weight. For more detailedinformation on weights, see Weights (p. 390).
The tailgate is opened via a buttonon the lighting panel or the remotecontrol key, see Locking/unlocking -
tailgate (p. 167).
WARNING
The car’s driving properties change depending on the weight and positioningof the load.
To bear in mind when loading
• Position the load firmly against the rear seat's backrest.
Note that objects must not prevent the func- tion of the WHIPS system for the front seats ifany of the rear seat's backrests is foldeddown, seeWHIPS - seating position (p. 35).
• Centre the load.
• Heavy objects should be placed as low as possible. Avoid placing heavy loads onlowered backrests.
• Cover sharp edges with something soft toavoid damaging the upholstery. •
Secure all loads to the load retaining eye-lets with straps or web lashings.
WARNING
A loose object weighing 20 kg can, in a frontal collision at a speed of 50 km/h,carry the impact of an item weighing1000 kg.
WARNING
The protection provided by the inflatable curtain in the headlining may be compro-mised or eliminated by high loads.
• Never load cargo above the backrest.
WARNING
Always secure the load. During heavy braking the load may otherwise shift, caus-ing injury to the car's occupants. Cover sharp edges and sharp corners with something soft. Switch off the engine and apply the park- ing brake when loading/unloading longitems. Otherwise you may accidentallyknock the gear lever or gear selector withthe load into a drive position - and the carcould then move off.
Related information
•
Load retaining eyelets (p. 143)
• Safety net* (p. 145) •
Loading - long load (p. 143)
• Roof load (p. 143)
ProCarManuals.co’
Page 154 of 442
||
06 Locks and alarm
06
152* Option/accessory, for more information, see Introduction.
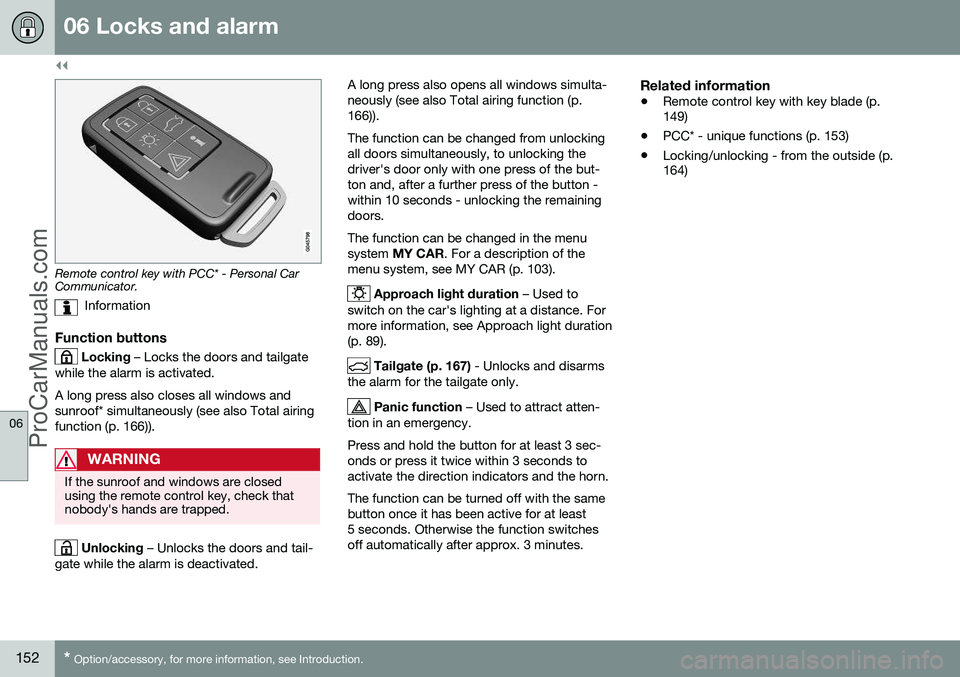
Remote control key with PCC* - Personal Car Communicator.
Information
Function buttons
Locking – Locks the doors and tailgate
while the alarm is activated. A long press also closes all windows and sunroof* simultaneously (see also Total airingfunction (p. 166)).
WARNING
If the sunroof and windows are closed using the remote control key, check thatnobody's hands are trapped.
Unlocking – Unlocks the doors and tail-
gate while the alarm is deactivated. A long press also opens all windows simulta- neously (see also Total airing function (p.166)). The function can be changed from unlocking all doors simultaneously, to unlocking thedriver's door only with one press of the but-ton and, after a further press of the button -within 10 seconds - unlocking the remainingdoors. The function can be changed in the menu system
MY CAR . For a description of the
menu system, see MY CAR (p. 103).
Approach light duration – Used to
switch on the car's lighting at a distance. For more information, see Approach light duration(p. 89).
Tailgate (p. 167) - Unlocks and disarms
the alarm for the tailgate only.
Panic function – Used to attract atten-
tion in an emergency. Press and hold the button for at least 3 sec- onds or press it twice within 3 seconds toactivate the direction indicators and the horn. The function can be turned off with the same button once it has been active for at least5 seconds. Otherwise the function switchesoff automatically after approx. 3 minutes.
Related information
• Remote control key with key blade (p. 149)
• PCC* - unique functions (p. 153)
• Locking/unlocking - from the outside (p.164)
ProCarManuals.co’
Page 155 of 442
06 Locks and alarm
06
* Option/accessory, for more information, see Introduction.153
Remote control key - range
Remote control key (p. 149) functions have a range of about 20 metres from the car. If the car does not verify a button being pressed - move closer and try again.
NOTE
The remote control key functions may be disrupted by surrounding radio waves,buildings, topographical conditions, etc.The car can always be locked/unlockedwith the key blade, Detachable key blade -unlocking doors (p. 156).
If the remote control key is removed from the car when the engine is running or key position(p. 70) I or II is active, and if all doors are
closed, then a warning message is shown inthe information display in the combinedinstrument panel and an audio reminder sig-nal sounds at the same time. The message is extinguished and the audible reminder signal stops when the remote con-trol key is brought back to the car aftereither/or:
• The remote control key has been inserted into the ignition switch.
• Speed exceeds 30 km/h.
• the
OK button has been pressed.
Related information
• Remote control key - functions (p. 151)
PCC* - unique functions
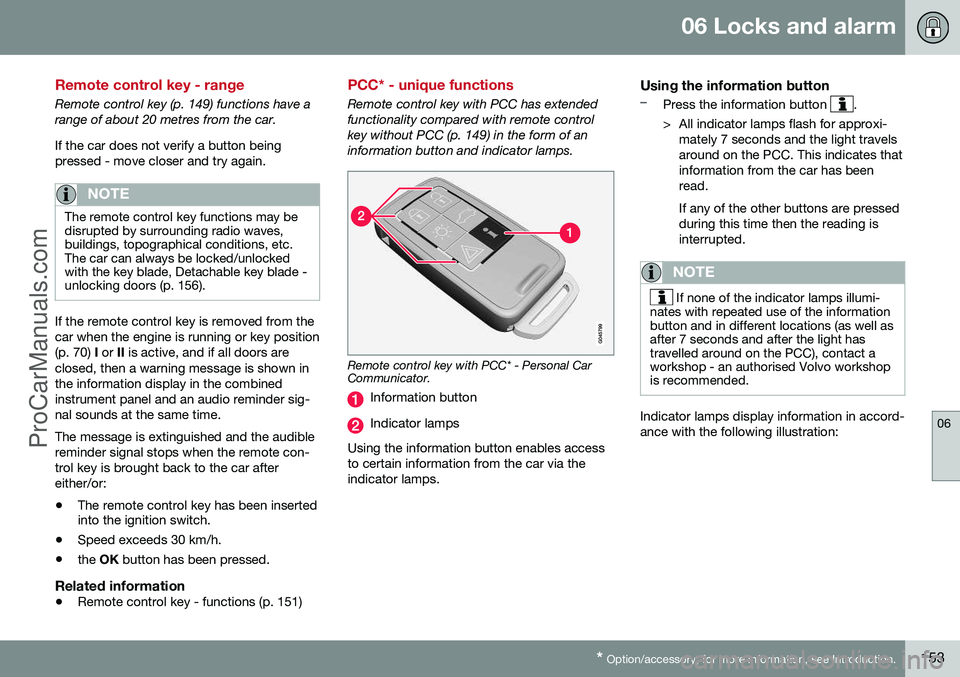
Remote control key with PCC has extended functionality compared with remote controlkey without PCC (p. 149) in the form of aninformation button and indicator lamps.
Remote control key with PCC* - Personal Car Communicator.
Information button
Indicator lamps
Using the information button enables access to certain information from the car via theindicator lamps.
Using the information button–Press the information button .
> All indicator lamps flash for approxi- mately 7 seconds and the light travels around on the PCC. This indicates thatinformation from the car has beenread. If any of the other buttons are pressed during this time then the reading isinterrupted.
NOTE
If none of the indicator lamps illumi-
nates with repeated use of the information button and in different locations (as well asafter 7 seconds and after the light hastravelled around on the PCC), contact aworkshop - an authorised Volvo workshopis recommended.
Indicator lamps display information in accord- ance with the following illustration:
ProCarManuals.co’
Page 161 of 442
06 Locks and alarm
06
* Option/accessory, for more information, see Introduction.159
NOTE
Volvo recommends that the batteries to be used in the remote control key/PCC fulfilUN Manual of Test and Criteria, Part III,sub-section 38.3. Batteries fitted in thefactory or replaced by an authorised Volvoworkshop fulfil the above criteria.
Assembly1. Press the remote control key together.
2. Hold the remote control key with the slot
pointed up and lower the key blade into its slot.
3. Lightly press the key blade. You should hear a "click" when the key blade islocked in.
IMPORTANT
Make sure that exhausted batteries are disposed of in a manner which is kind tothe environment.
Related information
• Remote control key with key blade (p. 149)
• Remote control key - functions (p. 151)
Keyless drive*
Keyless drive, only with PCC (p. 153) 2
means
that the car's lock and starting systems can be operated keylessly. The Keyless drive function in the PCC allows the car to be unlocked (p. 161), driven andlocked without the need for a key. You simplyhave to have the PCC with you. The systemmakes it easier and more convenient to openthe car, e.g. when your hands are full. Both of the car's PCCs incorporate the Keyless function. Additional PCCs can beordered, see Remote control key with keyblade (p. 149). The car's electrical system can be set to three different levels - key position 0, I and II
(p. 70) - with the remote control key.
Related information
• Keyless drive* - PCC range (p. 159)
• Keyless drive* - handling the PCC safely (p. 160)
• Keyless drive* - interference to PCC func-tion (p. 160)
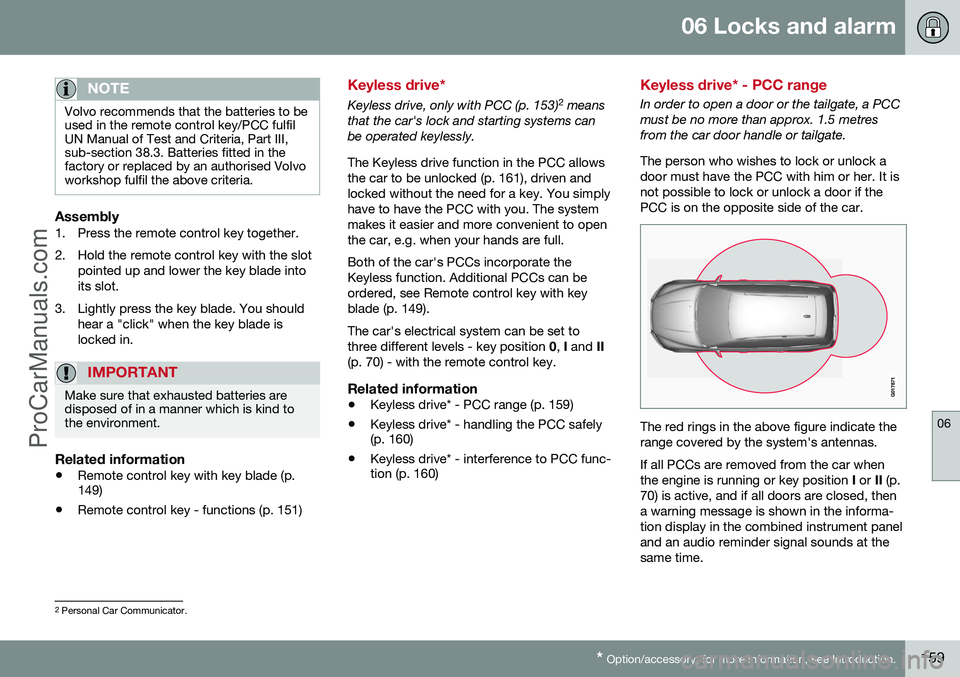
Keyless drive* - PCC range
In order to open a door or the tailgate, a PCC must be no more than approx. 1.5 metresfrom the car door handle or tailgate. The person who wishes to lock or unlock a door must have the PCC with him or her. It isnot possible to lock or unlock a door if thePCC is on the opposite side of the car.
The red rings in the above figure indicate the range covered by the system's antennas. If all PCCs are removed from the car when the engine is running or key position
I or II (p.
70) is active, and if all doors are closed, thena warning message is shown in the informa-tion display in the combined instrument paneland an audio reminder signal sounds at thesame time.
2 Personal Car Communicator.
ProCarManuals.co’
Page 170 of 442
||
06 Locks and alarm
06
168* Option/accessory, for more information, see Introduction.
The doors remain locked and armed.
• The tailgate is unlocked, but remains closed - press lightly on the rubberisedpressure plate under the outer handle andlift the tailgate.
If the tailgate is not opened within 2 minutes then it is relocked and the alarm is re-armed.
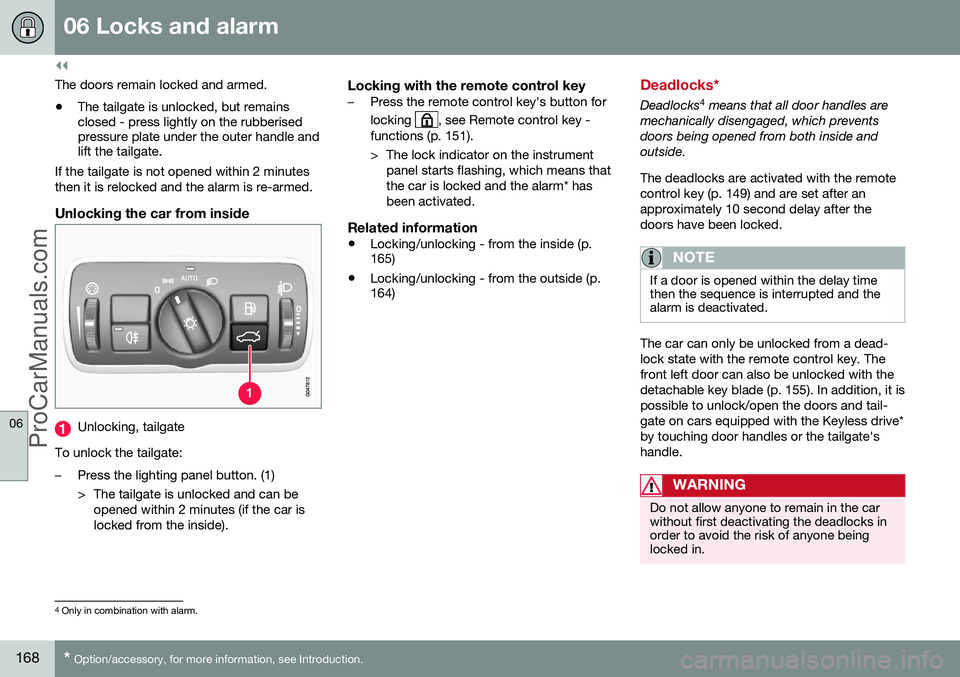
Unlocking the car from inside
Unlocking, tailgate
To unlock the tailgate:
–Press the lighting panel button. (1)
> The tailgate is unlocked and can be opened within 2 minutes (if the car is locked from the inside).
Locking with the remote control key–Press the remote control key's button for locking
, see Remote control key -
functions (p. 151).
> The lock indicator on the instrument panel starts flashing, which means that the car is locked and the alarm* hasbeen activated.
Related information
• Locking/unlocking - from the inside (p. 165)
• Locking/unlocking - from the outside (p.164)
Deadlocks*
Deadlocks 4
means that all door handles are
mechanically disengaged, which prevents doors being opened from both inside andoutside. The deadlocks are activated with the remote control key (p. 149) and are set after anapproximately 10 second delay after thedoors have been locked.
NOTE
If a door is opened within the delay time then the sequence is interrupted and thealarm is deactivated.
The car can only be unlocked from a dead- lock state with the remote control key. Thefront left door can also be unlocked with thedetachable key blade (p. 155). In addition, it ispossible to unlock/open the doors and tail-gate on cars equipped with the Keyless drive*by touching door handles or the tailgate'shandle.
WARNING
Do not allow anyone to remain in the car without first deactivating the deadlocks inorder to avoid the risk of anyone beinglocked in.
4 Only in combination with alarm.
ProCarManuals.co’
Page 192 of 442
||
07 Driver support
07
190* Option/accessory, for more information, see Introduction.
If the car needs to be braked more heavily than cruise control capacity and the driverdoes not brake, then cruise control uses thewarning lamp and warning sound from theCollision warning system (p. 212) in order toalert the driver that immediate intervention isrequired.
NOTE
The warning lamp may be difficult to see in strong sunlight or when wearing sun-glasses.
WARNING
Cruise Control warns only of vehicles which the radar sensor has detected.Hence the warning may not be given, or itmay be given with a certain delay. Do notwait for a warning without braking when sorequired.
Steep roads and/or heavy loadBear in mind that the adaptive cruise control is primarily intended for use when driving onlevel road surfaces. It may have difficulty inkeeping the correct distance from the vehicleahead when driving on steep downhill slopes,with a heavy load or with a trailer - in whichcase, be extra attentive and ready to slowdown.
Related information
• Adaptive cruise control - ACC* (p. 188)
• Adaptive cruise control* - deactivate (p. 194)
• Adaptive cruise control* - overtakinganother vehicle (p. 194)
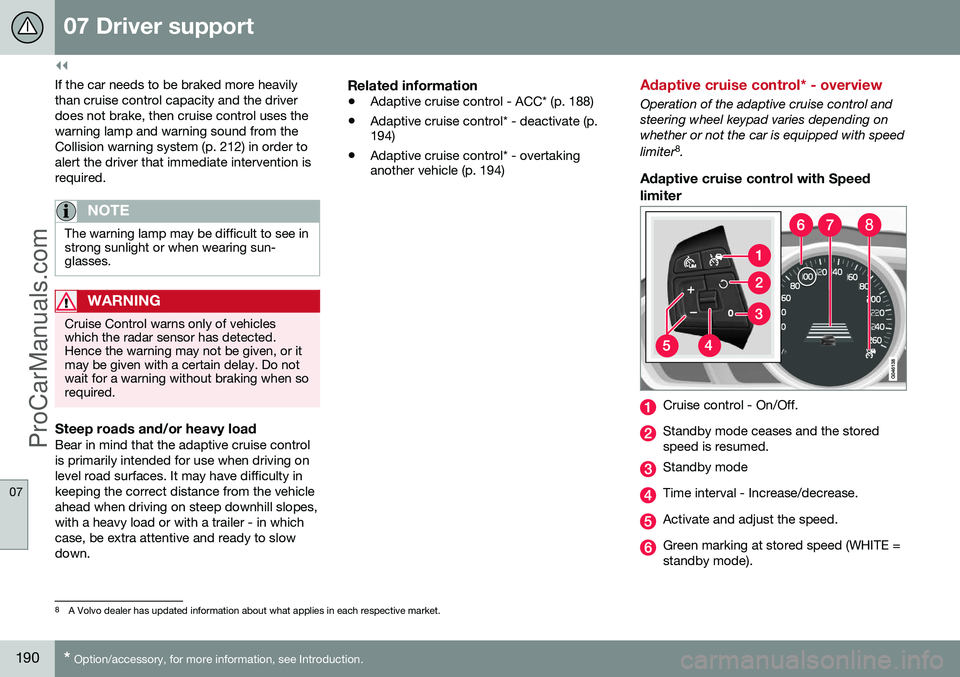
Adaptive cruise control* - overview
Operation of the adaptive cruise control and steering wheel keypad varies depending onwhether or not the car is equipped with speed limiter 8
.
Adaptive cruise control with Speed
limiter
Cruise control - On/Off.
Standby mode ceases and the stored speed is resumed.
Standby mode
Time interval - Increase/decrease.
Activate and adjust the speed.
Green marking at stored speed (WHITE = standby mode).
8 A Volvo dealer has updated information about what applies in each respective market.
ProCarManuals.co’