reset VOLVO V60 2014 Owner's Manual
[x] Cancel search | Manufacturer: VOLVO, Model Year: 2014, Model line: V60, Model: VOLVO V60 2014Pages: 442, PDF Size: 13.85 MB
Page 115 of 442
03 Instruments and controls
03
* Option/accessory, for more information, see Introduction.113
Change unitYou can change unit (km/miles) for distance and speed in the menu system My Car, seeMY CAR (p. 103).
NOTE
In addition to in the trip computer, these units are also changed in Volvo's naviga-tion system*.
Related information
• Trip computer - trip statistics* (p. 113)
Trip computer - trip statistics*
Information is stored about completed trips containing average fuel consumption andaverage speed, which can be viewed in thecentre console's screen as a bar chart.
Function
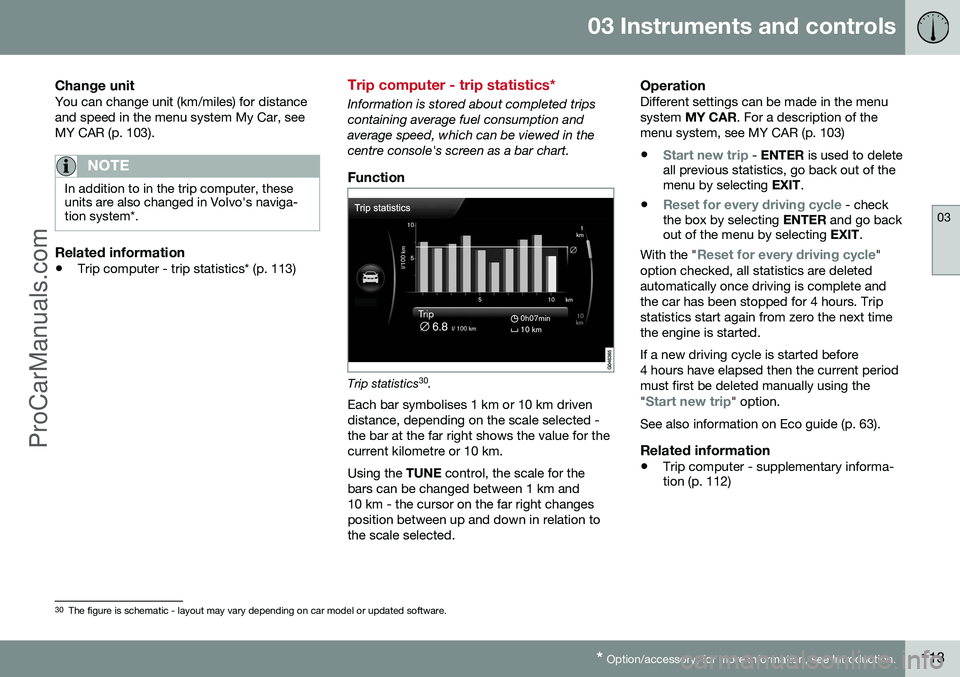
Trip statistics 30
.
Each bar symbolises 1 km or 10 km driven distance, depending on the scale selected -the bar at the far right shows the value for thecurrent kilometre or 10 km. Using the TUNE control, the scale for the
bars can be changed between 1 km and 10 km - the cursor on the far right changesposition between up and down in relation tothe scale selected.
OperationDifferent settings can be made in the menusystem MY CAR . For a description of the
menu system, see MY CAR (p. 103)
•
Start new trip - ENTER is used to delete
all previous statistics, go back out of the menu by selecting EXIT.
•
Reset for every driving cycle - check
the box by selecting ENTER and go back
out of the menu by selecting EXIT.
With the "
Reset for every driving cycle"
option checked, all statistics are deleted automatically once driving is complete andthe car has been stopped for 4 hours. Tripstatistics start again from zero the next timethe engine is started. If a new driving cycle is started before 4 hours have elapsed then the current periodmust first be deleted manually using the "
Start new trip" option.
See also information on Eco guide (p. 63).
Related information
• Trip computer - supplementary informa- tion (p. 112)
30
The figure is schematic - layout may vary depending on car model or updated software.
ProCarManuals.co’
Page 117 of 442
04 Climate control
04
* Option/accessory, for more information, see Introduction.115
General information on climate control
The car is equipped with electronic climate
control (p. 121). The climate control systemcools or heats as well as dehumidifies the airin the passenger compartment.
NOTE
Air conditioning (AC) (p. 124) can be switched off, but to ensure the best possi-ble climate comfort in the passenger com-partment, and to prevent the windowsfrom misting, it should always be switchedon.
To bear in mind
• To ensure that the air conditioning works optimally, the side windows and sunroof*should be closed.
• Total airing function (p. 166) opens/closes all side windows simultaneouslyand can be used for example to quicklyair the car during hot weather.
• Remove ice and snow from the climatecontrol system air intake (the grillebetween the bonnet and the windscreen).
• In warm weather, condensation from theair conditioning may drip under the car.This is normal.
• When the engine requires full power, e.g.for full acceleration or driving uphill with atrailer, the air conditioning can be tempo-rarily switched off. There may then be a temporary increase in temperature in thepassenger compartment.
• Remove misting on the insides of the win-dows primarily by using the defrosterfunction (p. 125). To reduce the risk ofmisting, keep the windows clean and usewindow cleaner.
Cars with Start/Stop*With an auto-stopped (p. 279) engine certain equipment may have its function temporarilyreduced, e.g. climate control fan speed (p.123).
Cars with ECO*Certain equipment may have its function tem-porarily reduced or deactivated when theECO (p. 288) function is activated, e.g. the airconditioning (p. 124).
NOTE
When the ECO function is activated, sev- eral parameters in the climate control sys-tem's settings are changed, and severalelectricity consumer functions are reduced- a press of the
AC button resets the cli-
mate control system, but then withreduced AC function.
Related information
• Actual temperature (p. 116)
• Menu settings - climate control (p. 118)
• Electronic climate control - ECC (p. 121) •
Air distribution in the passenger compart- ment (p. 119)
• Air cleaning (p. 116)
ProCarManuals.co’
Page 120 of 442
04 Climate control
04
118* Option/accessory, for more information, see Introduction.
Air cleaning - IAQS*
The air quality system IAQS separates gases and particles to reduce the levels of odoursand pollution in the passenger compartment. If the outside air is contaminated then the air intake is closed and the air is recirculated. It is possible to activate/deactivate the func- tion in the menu system MY CAR. For a
description of the menu system, see MY CAR(p. 103).
NOTE
The air quality sensor must always be ena- bled to ensure the best air in the passen-ger compartment. In a cold climate recirculation is limited so as to prevent misting. In the event of misting, the air quality sen- sor should be disengaged, and thedefroster functions for the windscreen andside windows, as well as the rear window,should be used.
Related information
• General information on climate control (p. 115)
• Air cleaning (p. 116)
• Air cleaning - Clean Zone Interior Pack-age (CZIP)* (p. 117)
Air cleaning - material
Tested materials have been developed in order to minimise the quantity of dust in thepassenger compartment and to contribute tomaking the passenger compartment easier tokeep clean. The carpets in both the passenger compart- ment and the cargo area are removable andeasy to remove and clean. Use cleaningagents and car care products recommendedby Volvo to clean the interior (p. 381).
Related information
•Air cleaning (p. 116)
Menu settings - climate control
It is possible to activate/deactivate or change the default settings for six of the climate con-trol system's functions via the centre console. •Fan level during automatic climate control (p. 123).
• Recirculation timer (p. 126).
• Automatic start of rear window defroster(p. 96).
• Interior air quality system (p. 118)*.
• Automatic start of seat heating driver (p.122).
• Automatic start of steering wheel heating(p. 77).
More information is available in the descrip-
tion of the menu system (p. 103).
The climate control system's functions can be
reset to default settings in the menu system MY CAR . For a description of the menu sys-
tem, see MY CAR (p. 103).
Related information
• General information on climate control (p. 115)
ProCarManuals.co’
Page 132 of 442
04 Climate control
04
130* Option/accessory, for more information, see Introduction.
Engine block heater and passenger compartment heater* - direct start/immediate stop
Upon direct start of the engine block and pas- senger compartment heater (p. 129), it will runfor 50 minutes. Heating of the passenger compartment will begin as soon as the engine coolant hasreached the correct temperature.
NOTE
The car can be started and driven while the fuel-driven auxiliary heater is running.
1. Press OK to access the menu.
2. Scroll with the thumbwheel to
Parking
heater and select with OK.
3. Scroll forward in the next menu to
Direct
start/Stop in order to activate/deactivate
the heater and select with OK.
4. Exit the menu with RESET.
Related information
•Engine block heater and passenger com- partment heater* - timer (p. 130)
• Engine block heater and passenger com-partment heater* - messages (p. 132)
Engine block heater and passenger compartment heater* - timer
The timer of the engine block and passenger compartment heater (p. 129) is connected tothe car's clock. Two different times can be selected using the timer. Here, time refers to the time when thecar is heated and ready. The car's electronicsystem calculates when heating should bestarted based on the outside temperature.
NOTE
All timer programming will be cleared if the car's clock is reset.
Adjusting 31. Press
OK to access the menu.
2. Use the thumbwheel (p. 100) to scroll to one of the timers
Parking heater and
select with OK.
3. Select one of the two timers using the thumbwheel and confirm with OK.
4. Briefly press OK to move to the lit hours
setting.
5. Select the required hour using the thumb- wheel. 6. Briefly press
OK to move to the flashing
minutes setting.
7. Select the required minute using the thumbwheel.
8. Press OK4
to confirm the setting.
9. Go back in the menu structure using RESET .
10. Select the other time (continue from step 2) or exit the menu with RESET.
Starting1. Press OK to access the menu.
2. Scroll with the thumbwheel to
Parking
heater and select with OK.
3. Select one of the two timers using the thumbwheel and activate with OK.
4. Exit the menu with RESET.
Switching offA timer-started heater can be switched off manually before the set time has elapsed.Proceed as follows:
1. Press OK to access the menu.
3
Setting the timer is only possible with the engine switched off.4
Press OK again to activate the timer.
ProCarManuals.co’
Page 133 of 442
04 Climate control
04
* Option/accessory, for more information, see Introduction.131
2.
Scroll with the thumbwheel to
Parking
heater and select with OK.
> If a timer is set but not activated then a clock icon is shown beside the set time.
3. Select one of the two timers using the thumbwheel and confirm with OK.
4. Deactivate the timer as follows:
•long press on
OK or
• short press on
OK to continue in the
menu. Then select to stop the timer and confirm with OK.
5. Exit the menu with RESET.
A timer-started heater can be switched off directly (p. 130).
Related information
• Engine block heater and passenger com- partment heater* - messages (p. 132)
ProCarManuals.co’
Page 136 of 442
04 Climate control
04
134* Option/accessory, for more information, see Introduction.
Additional heater*
In cold climate zones 5
an additional heater
may be required to obtain the correct operat- ing temperature in the engine and to obtainsufficient heating in the passenger compart-ment. A fuel-driven additional heater (p. 134) is fit- ted in cars with diesel engines. In a semi-cold 5
climate zone diesel-driven
cars have an electric additional heater (p. 135) instead of a fuel-driven version. Cars with certain petrol engines 6
have an
electric additional heater integrated into the car's climate control system.
Related information
• Engine and passenger compartment heater* (p. 129)
Fuel-driven additional heater*
The car is equipped with either an electric (p. 135) or a fuel-driven additional heater (p. 134). The heater starts automatically when extra heat is required when the engine is running. The heater is switched off automatically when the correct temperature is reached or whenthe engine is switched off.
NOTE
When the additional heater is active there may be smoke from the right-hand wheelhousing, which is perfectly normal.
Auto mode or shutdownThe additional heater's automatic start sequence can be switched off if required.
NOTE
Volvo recommends that the fuel-driven additional heater should be switched offfor short distances.
1. Before starting the engine: Select key
position I (p. 70).
2. Press OK to access the menu. 3.
Scroll with the thumbwheel to
Additional
heater7 or Settings8 and select with OK.
4. Select one of the options
ON or OFFusing the thumbwheel and confirm with OK.
5. Exit the menu with RESET.
NOTE
The menu options are only visible in key position I - any adjustments must therefore
be made before starting the engine.
Passenger compartment heater*If the additional heater is supplemented with a timer function then it can be used as a pas-senger compartment heater (p. 129).
5 An authorised Volvo dealer has information regarding the geographical areas concerned.
6 An authorised Volvo dealer has information regarding the engines concerned.
7 Analogue combined instrument panel.
8 Digital combined instrument panel.
ProCarManuals.co’
Page 143 of 442
05 Loading and storage
05
* Option/accessory, for more information, see Introduction.141
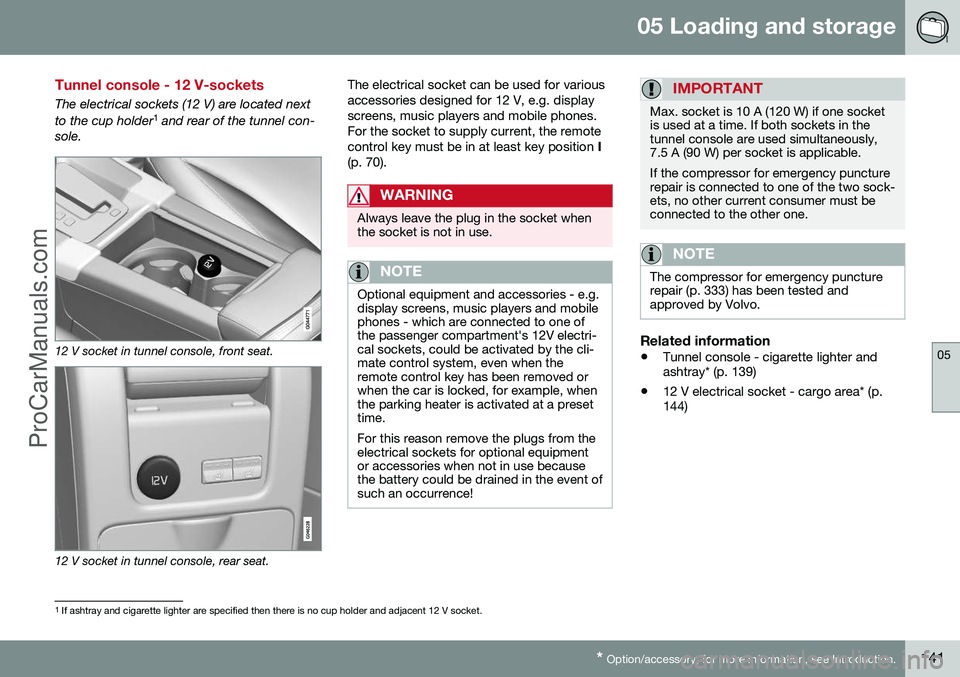
Tunnel console - 12 V-sockets
The electrical sockets (12 V) are located next to the cup holder 1
and rear of the tunnel con-
sole.
12 V socket in tunnel console, front seat.
12 V socket in tunnel console, rear seat. The electrical socket can be used for various accessories designed for 12 V, e.g. displayscreens, music players and mobile phones.For the socket to supply current, the remotecontrol key must be in at least key position
I
(p. 70).
WARNING
Always leave the plug in the socket when the socket is not in use.
NOTE
Optional equipment and accessories - e.g. display screens, music players and mobilephones - which are connected to one ofthe passenger compartment's 12V electri-cal sockets, could be activated by the cli-mate control system, even when theremote control key has been removed orwhen the car is locked, for example, whenthe parking heater is activated at a presettime. For this reason remove the plugs from the electrical sockets for optional equipmentor accessories when not in use becausethe battery could be drained in the event ofsuch an occurrence!
IMPORTANT
Max. socket is 10 A (120 W) if one socket is used at a time. If both sockets in thetunnel console are used simultaneously,7.5 A (90 W) per socket is applicable. If the compressor for emergency puncture repair is connected to one of the two sock-ets, no other current consumer must beconnected to the other one.
NOTE
The compressor for emergency puncture repair (p. 333) has been tested andapproved by Volvo.
Related information
• Tunnel console - cigarette lighter and ashtray* (p. 139)
• 12 V electrical socket - cargo area* (p.144)
1
If ashtray and cigarette lighter are specified then there is no cup holder and adjacent 12 V socket.
ProCarManuals.co’
Page 204 of 442
07 Driver support
07
202* Option/accessory, for more information, see Introduction.
Distance Warning*
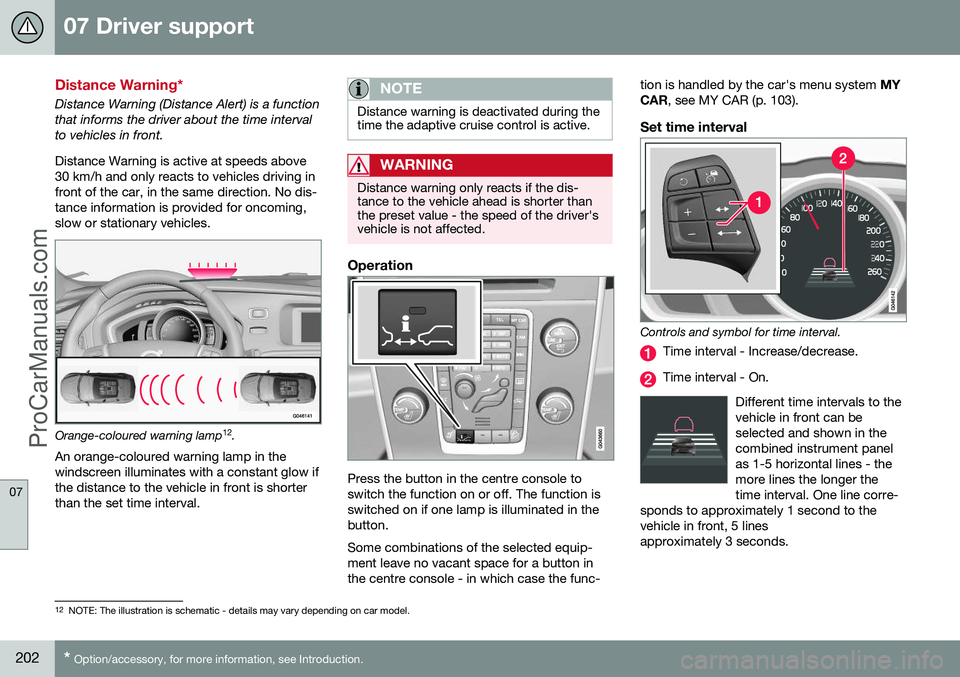
Distance Warning (Distance Alert) is a function that informs the driver about the time intervalto vehicles in front. Distance Warning is active at speeds above 30 km/h and only reacts to vehicles driving infront of the car, in the same direction. No dis-tance information is provided for oncoming,slow or stationary vehicles.
Orange-coloured warning lamp 12
.
An orange-coloured warning lamp in the
windscreen illuminates with a constant glow if the distance to the vehicle in front is shorterthan the set time interval.
NOTE
Distance warning is deactivated during the time the adaptive cruise control is active.
WARNING
Distance warning only reacts if the dis- tance to the vehicle ahead is shorter thanthe preset value - the speed of the driver'svehicle is not affected.
Operation
Press the button in the centre console to switch the function on or off. The function isswitched on if one lamp is illuminated in thebutton. Some combinations of the selected equip- ment leave no vacant space for a button inthe centre console - in which case the func- tion is handled by the car's menu system
MY
CAR , see MY CAR (p. 103).
Set time interval
Controls and symbol for time interval.
Time interval - Increase/decrease.
Time interval - On.
Different time intervals to the vehicle in front can beselected and shown in thecombined instrument panelas 1-5 horizontal lines - themore lines the longer thetime interval. One line corre-
sponds to approximately 1 second to thevehicle in front, 5 linesapproximately 3 seconds.
12 NOTE: The illustration is schematic - details may vary depending on car model.
ProCarManuals.co’
Page 264 of 442
||
08 Starting and driving
08
262* Option/accessory, for more information, see Introduction.
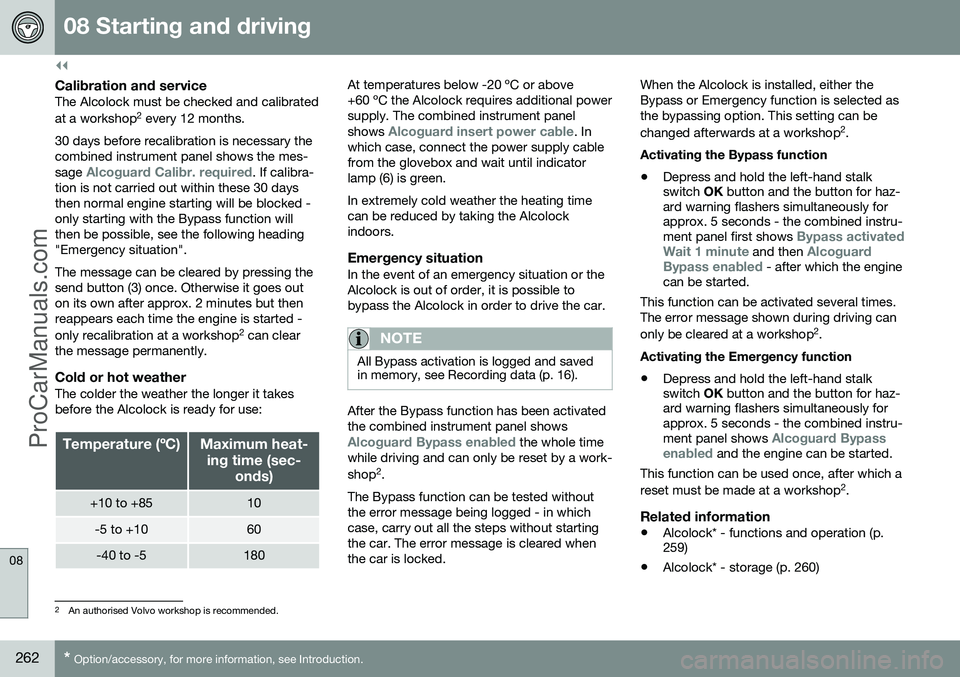
Calibration and serviceThe Alcolock must be checked and calibrated at a workshop 2
every 12 months.
30 days before recalibration is necessary the combined instrument panel shows the mes- sage
Alcoguard Calibr. required. If calibra-
tion is not carried out within these 30 days then normal engine starting will be blocked -only starting with the Bypass function willthen be possible, see the following heading"Emergency situation". The message can be cleared by pressing the send button (3) once. Otherwise it goes outon its own after approx. 2 minutes but thenreappears each time the engine is started - only recalibration at a workshop 2
can clear
the message permanently.
Cold or hot weatherThe colder the weather the longer it takes before the Alcolock is ready for use:
Temperature (ºC)Maximum heat-
ing time (sec- onds)
+10 to +8510
-5 to +1060
-40 to -5180
At temperatures below -20 ºC or above +60 ºC the Alcolock requires additional powersupply. The combined instrument panel shows
Alcoguard insert power cable. In
which case, connect the power supply cable from the glovebox and wait until indicatorlamp (6) is green. In extremely cold weather the heating time can be reduced by taking the Alcolockindoors.
Emergency situationIn the event of an emergency situation or theAlcolock is out of order, it is possible tobypass the Alcolock in order to drive the car.
NOTE
All Bypass activation is logged and saved in memory, see Recording data (p. 16).
After the Bypass function has been activated the combined instrument panel shows
Alcoguard Bypass enabled the whole time
while driving and can only be reset by a work- shop 2
.
The Bypass function can be tested without the error message being logged - in whichcase, carry out all the steps without startingthe car. The error message is cleared whenthe car is locked. When the Alcolock is installed, either theBypass or Emergency function is selected asthe bypassing option. This setting can be changed afterwards at a workshop
2
.
Activating the Bypass function
• Depress and hold the left-hand stalk switch
OK button and the button for haz-
ard warning flashers simultaneously forapprox. 5 seconds - the combined instru- ment panel first shows
Bypass activated
Wait 1 minute and then Alcoguard
Bypass enabled - after which the engine
can be started.
This function can be activated several times. The error message shown during driving can only be cleared at a workshop 2
.
Activating the Emergency function • Depress and hold the left-hand stalk switch
OK button and the button for haz-
ard warning flashers simultaneously forapprox. 5 seconds - the combined instru- ment panel shows
Alcoguard Bypass
enabled and the engine can be started.
This function can be used once, after which a reset must be made at a workshop 2
.
Related information
• Alcolock* - functions and operation (p. 259)
• Alcolock* - storage (p. 260)
2
An authorised Volvo workshop is recommended.
ProCarManuals.co’
Page 284 of 442
08 Starting and driving
08
282* Option/accessory, for more information, see Introduction.
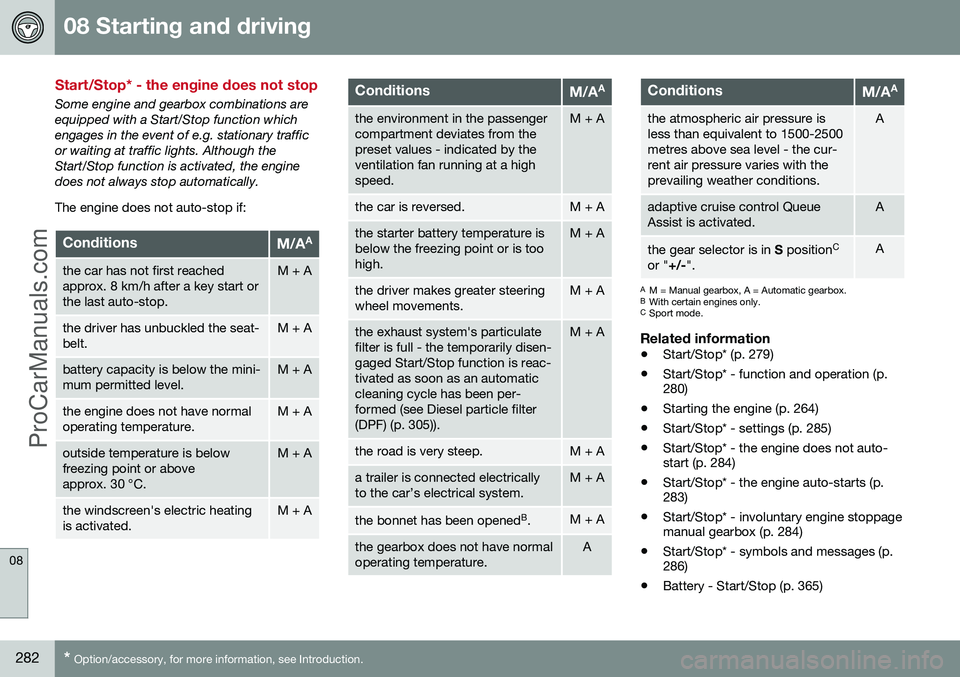
Start/Stop* - the engine does not stop
Some engine and gearbox combinations are equipped with a Start/Stop function whichengages in the event of e.g. stationary trafficor waiting at traffic lights. Although theStart/Stop function is activated, the enginedoes not always stop automatically. The engine does not auto-stop if:
ConditionsM/A A
the car has not first reached approx. 8 km/h after a key start orthe last auto-stop.M + A
the driver has unbuckled the seat- belt.M + A
battery capacity is below the mini- mum permitted level.M + A
the engine does not have normal operating temperature.M + A
outside temperature is below freezing point or aboveapprox. 30 °C.M + A
the windscreen's electric heating is activated.M + A
ConditionsM/AA
the environment in the passenger compartment deviates from thepreset values - indicated by theventilation fan running at a highspeed.M + A
the car is reversed.M + A
the starter battery temperature is below the freezing point or is toohigh.M + A
the driver makes greater steering wheel movements.M + A
the exhaust system's particulate filter is full - the temporarily disen-gaged Start/Stop function is reac-tivated as soon as an automaticcleaning cycle has been per-formed (see Diesel particle filter(DPF) (p. 305)).M + A
the road is very steep.M + A
a trailer is connected electrically to the car’s electrical system.M + A
the bonnet has been opened
B
.M + A
the gearbox does not have normal operating temperature.A
ConditionsM/A A
the atmospheric air pressure is less than equivalent to 1500-2500metres above sea level - the cur-rent air pressure varies with theprevailing weather conditions.A
adaptive cruise control Queue Assist is activated.A
the gear selector is in
S position C
or " +/-".A
A
M = Manual gearbox, A = Automatic gearbox.
B With certain engines only.
C Sport mode.
Related information
• Start/Stop* (p. 279)
• Start/Stop* - function and operation (p. 280)
• Starting the engine (p. 264)
• Start/Stop* - settings (p. 285)
• Start/Stop* - the engine does not auto-start (p. 284)
• Start/Stop* - the engine auto-starts (p.283)
• Start/Stop* - involuntary engine stoppagemanual gearbox (p. 284)
• Start/Stop* - symbols and messages (p.286)
• Battery - Start/Stop (p. 365)
ProCarManuals.co’