checking oil VOLVO V60 2014 Owners Manual
[x] Cancel search | Manufacturer: VOLVO, Model Year: 2014, Model line: V60, Model: VOLVO V60 2014Pages: 442, PDF Size: 13.85 MB
Page 11 of 442

Table of contents
9
10
10 Maintenance and service
Volvo service programme....................... 340
Raising the car........................................ 341
Bonnet - opening and closing................. 343
Engine compartment - overview............. 343
Engine compartment - checking............. 344
Engine oil - general................................. 345
Engine oil - checking and filling.............. 346
Coolant - level......................................... 349
Brake and clutch fluid - level.................. 350
Power steering fluid - level...................... 351Climate control system - fault tracing and
repair....................................................... 352
Lamp replacement.................................. 352
Lamp replacement - headlamps............. 353Lamp replacement - cover for main/
dipped beam bulbs................................. 354
Lamp replacement - dipped beam......... 355
Lamp replacement - main beam............. 355
Lamp replacement - extra main beam.... 355Lamp replacement - direction indicators
front......................................................... 356
Lamp replacement - rear lamp............... 356Lamp replacement - location of rear
lamps...................................................... 357
10
Lamp replacement - number plate light-
ing........................................................... 357 Lamp replacement - lighting in cargo
area......................................................... 357 Lamp replacement - vanity mirror light-
ing........................................................... 358
Lamps - specifications ........................... 358
Wiper blades........................................... 359
Washer fluid - filling................................ 361
Battery..................................................... 361
Battery - symbols.................................... 362
Starter battery - replacement.................. 363
Battery - Start/Stop................................. 365
Fuses - general....................................... 367
Fuses - in engine compartment.............. 368
Fuses - under glovebox.......................... 372Fuses - in the control module under the
glovebox................................................. 374
Fuses - in cargo area.............................. 376Fuses - in the engine compartment's
cold zone................................................ 377
Car washing............................................ 379
Polishing and waxing.............................. 380
Water and dirt-repellent coating............. 381
Rustproofing........................................... 381
10
Cleaning the interior................................ 381
Paint damage.......................................... 383
ProCarManuals.co’
Page 62 of 442
||
03 Instruments and controls
03
60* Option/accessory, for more information, see Introduction.
Tachometer. The meter indicates engine speed in thousands of revolutions perminute (rpm).
Gear shift indicator 2
/Gear position indica-
tor 3
See also Gear shift indicator* (p.
272), Automatic gearbox -- Geartronic* (p. 273) or Automatic gearbox --Powershift* (p. 276).
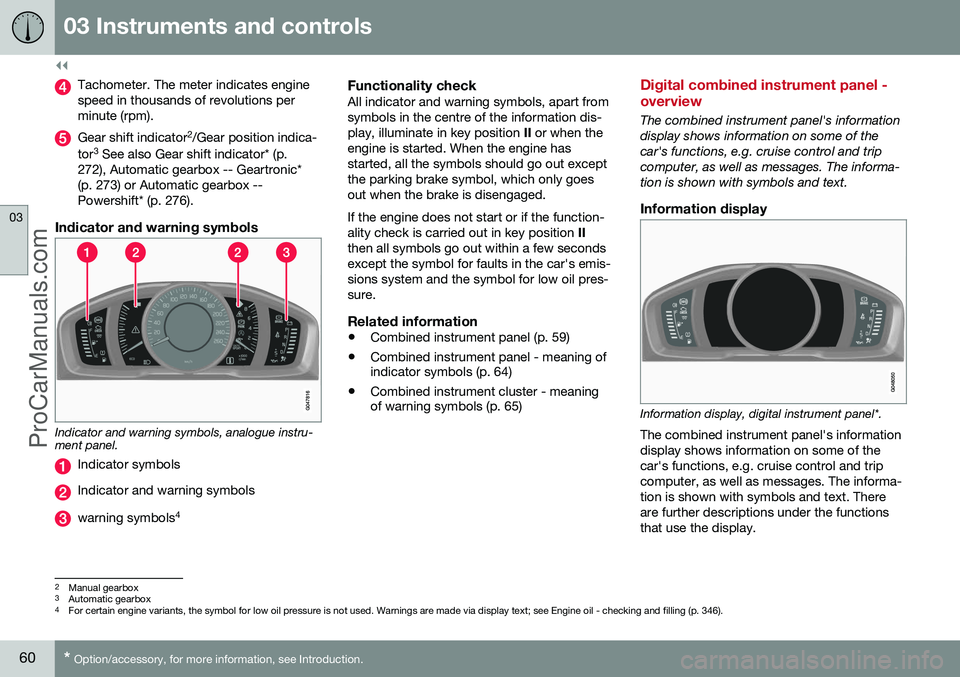
Indicator and warning symbols
Indicator and warning symbols, analogue instru- ment panel.
Indicator symbols
Indicator and warning symbols
warning symbols 4
Functionality checkAll indicator and warning symbols, apart from symbols in the centre of the information dis-play, illuminate in key position
II or when the
engine is started. When the engine hasstarted, all the symbols should go out exceptthe parking brake symbol, which only goesout when the brake is disengaged. If the engine does not start or if the function- ality check is carried out in key position II
then all symbols go out within a few secondsexcept the symbol for faults in the car's emis-sions system and the symbol for low oil pres-sure.
Related information
• Combined instrument panel (p. 59)
• Combined instrument panel - meaning of indicator symbols (p. 64)
• Combined instrument cluster - meaningof warning symbols (p. 65)
Digital combined instrument panel - overview
The combined instrument panel's information display shows information on some of thecar's functions, e.g. cruise control and tripcomputer, as well as messages. The informa-tion is shown with symbols and text.
Information display
Information display, digital instrument panel*.
The combined instrument panel's information display shows information on some of thecar's functions, e.g. cruise control and tripcomputer, as well as messages. The informa-tion is shown with symbols and text. Thereare further descriptions under the functionsthat use the display.
2 Manual gearbox
3 Automatic gearbox
4 For certain engine variants, the symbol for low oil pressure is not used. Warnings are made via display text; see Engine oil - checking and filling (p. 346).
ProCarManuals.co’
Page 64 of 442
||
03 Instruments and controls
03
62* Option/accessory, for more information, see Introduction.
272), Automatic gearbox -- Geartronic* (p. 273) or Automatic gearbox --Powershift* (p. 276).
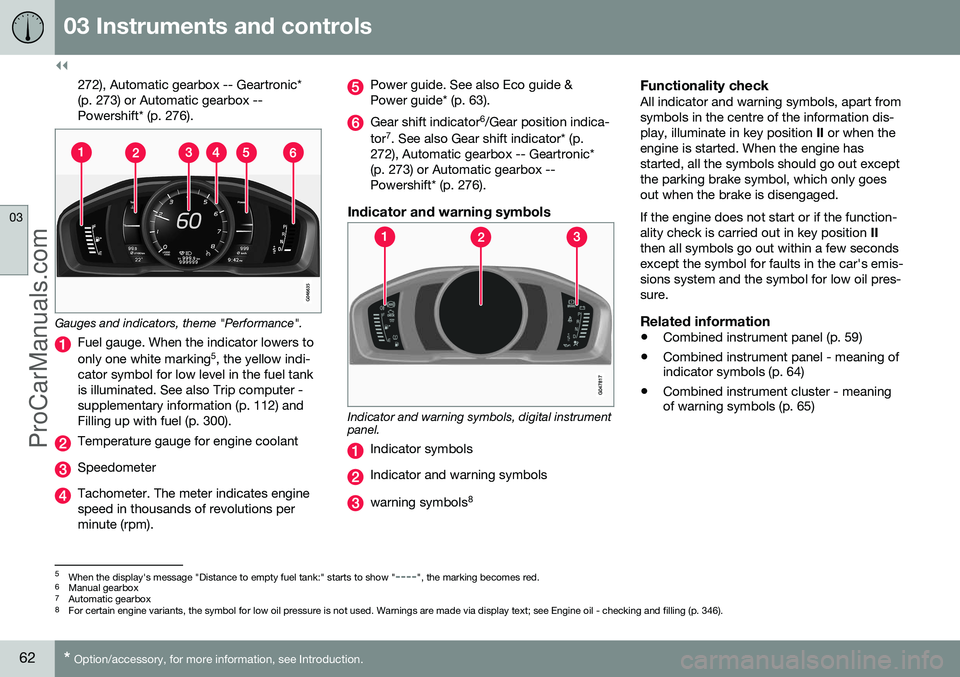
Gauges and indicators, theme "Performance".
Fuel gauge. When the indicator lowers to only one white marking 5
, the yellow indi-
cator symbol for low level in the fuel tank is illuminated. See also Trip computer -supplementary information (p. 112) andFilling up with fuel (p. 300).
Temperature gauge for engine coolant
Speedometer
Tachometer. The meter indicates engine speed in thousands of revolutions perminute (rpm).
Power guide. See also Eco guide & Power guide* (p. 63).
Gear shift indicator 6
/Gear position indica-
tor 7
. See also Gear shift indicator* (p.
272), Automatic gearbox -- Geartronic* (p. 273) or Automatic gearbox --Powershift* (p. 276).
Indicator and warning symbols
Indicator and warning symbols, digital instrument panel.
Indicator symbols
Indicator and warning symbols
warning symbols 8
Functionality checkAll indicator and warning symbols, apart from symbols in the centre of the information dis-play, illuminate in key position
II or when the
engine is started. When the engine hasstarted, all the symbols should go out exceptthe parking brake symbol, which only goesout when the brake is disengaged. If the engine does not start or if the function- ality check is carried out in key position II
then all symbols go out within a few secondsexcept the symbol for faults in the car's emis-sions system and the symbol for low oil pres-sure.
Related information
• Combined instrument panel (p. 59)
• Combined instrument panel - meaning of indicator symbols (p. 64)
• Combined instrument cluster - meaningof warning symbols (p. 65)
5
When the display's message "Distance to empty fuel tank:" starts to show "----", the marking becomes red.
6 Manual gearbox
7 Automatic gearbox
8 For certain engine variants, the symbol for low oil pressure is not used. Warnings are made via display text; see Engine oil - checking and filling (p. 346).
ProCarManuals.co’
Page 67 of 442

03 Instruments and controls
03
65
Information, read display textWhen one of the car's systems does not behave as intended, this information symbolilluminates and a text appears on the informa-tion display. The message text is cleared withthe OK button, see Menu navigation - com-
bined instrument panel (p. 100), or it disap-pears automatically after a time (timedepending on which function is indicated).The information symbol can also illuminate inconjunction with other symbols.
NOTE
When a service message is shown, the symbol and message are cleared using theOK button, or disappear automatically
after a time.
Main beam OnThe symbol illuminates when main beam is on and with main beam flash.
Left/right-hand direction indicatorBoth direction indicator symbols flash whenthe hazard warning flashers are used.
Eco function onThe symbol illuminates when the Eco functionis activated.
Start/StopThe symbol shines when the engine is auto-stopped.
Tyre pressure systemThe symbol illuminates in the event of lowtyre pressure, or if a fault arises in the tyrepressure system.
Related information
• Combined instrument panel (p. 59)
• Combined instrument cluster - meaning of warning symbols (p. 65)
• Digital combined instrument panel - over-view (p. 60)
Combined instrument cluster - meaning of warning symbols
The warning symbols alert the driver that an important function is activated, or that a seri-ous error or a serious failure has occurred.
Warning symbols
SymbolSpecification
Low oil pressure A
Parking brake applied, digital instrument
Parking brake applied, ana- logue instrument
Airbags – SRS
Seatbelt reminder
Alternator not charging
Fault in brake system
Warning
A
For certain engine variants, the symbol for low oil pressure is not used. Warnings are made via display text; seeEngine oil - checking and filling (p. 346).
Low oil pressureIf this symbol illuminates during driving then the engine's oil pressure is too low. Stop the
ProCarManuals.co’
Page 109 of 442
03 Instruments and controls
03
}}
107
FunctionsInformation
Oil levelAFor more information, see Engine oil - checking and filling (p. 346).
Messages (##)For more information, see Messages - handling (p. 102).
A
Certain engines.
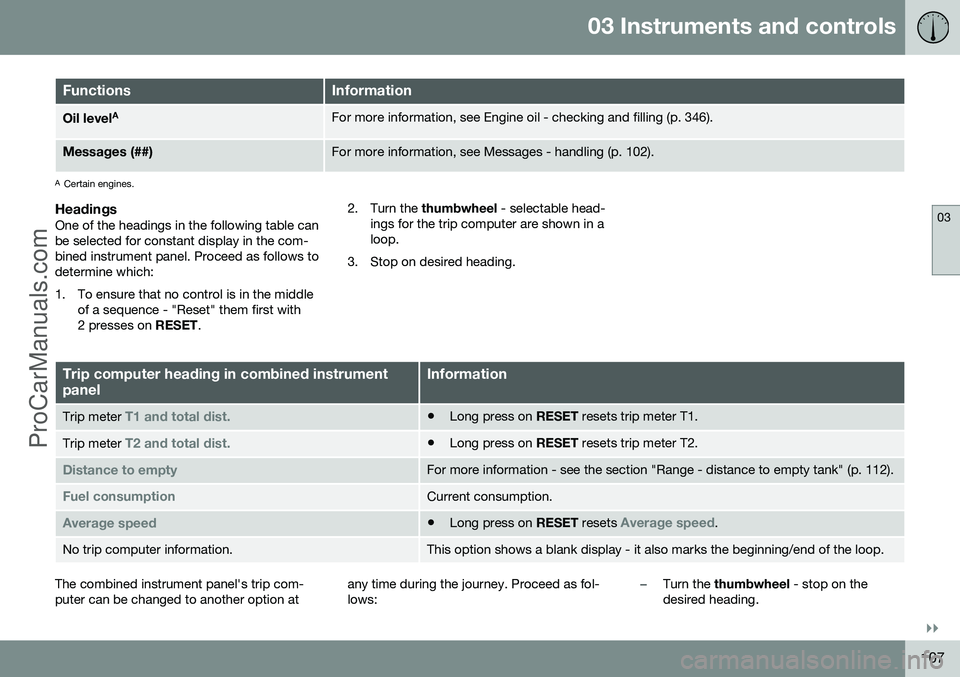
HeadingsOne of the headings in the following table can be selected for constant display in the com-bined instrument panel. Proceed as follows todetermine which:
1. To ensure that no control is in the middle
of a sequence - "Reset" them first with 2 presses on RESET. 2. Turn the
thumbwheel - selectable head-
ings for the trip computer are shown in aloop.
3. Stop on desired heading.
Trip computer heading in combined instrument panelInformation
Trip meter T1 and total dist.• Long press on
RESET resets trip meter T1.
Trip meter T2 and total dist.•Long press on
RESET resets trip meter T2.
Distance to emptyFor more information - see the section "Range - distance to empty tank" (p. 112).
Fuel consumptionCurrent consumption.
Average speed•Long press on
RESET resets Average speed.
No trip computer information.This option shows a blank display - it also marks the beginning/end of the loop.
The combined instrument panel's trip com- puter can be changed to another option at any time during the journey. Proceed as fol-lows:–Turn the
thumbwheel - stop on the
desired heading.
ProCarManuals.co’
Page 112 of 442
||
03 Instruments and controls
03
110* Option/accessory, for more information, see Introduction.
FunctionsInformation
Trip computer reset • Average
• Average speedNote
that this function does not reset both trip meters T1 and T2 - see the table under the next
section "Headings" or the section "Resetting with 'Digital'" (p. 112) for information on the proc- ess.
MessagesFor more information, see Messages - handling (p. 102).
ThemesThe appearance of the combined instrument panel (p. 59) is selected here.
Settings *Select Auto On or Off.
For more information, see Additional heater* (p. 134).
Contrast mode /Colour modeAdjusting the combined instrument panel's brightness and colour intensity.
Parking heater *
•
Direct start
• - Symbol Timer 1 - leads to the menu for selecting time.
• - Symbol Timer 2 - leads to the menu forselecting time.
For a description of programming the timer, see Engine block heater and passenger compart- ment heater* - timer (p. 130).
Service statusShows the number of months and mileage to next service.
Oil level AFor more information, see Engine oil - checking and filling (p. 346).
A
Certain engines.
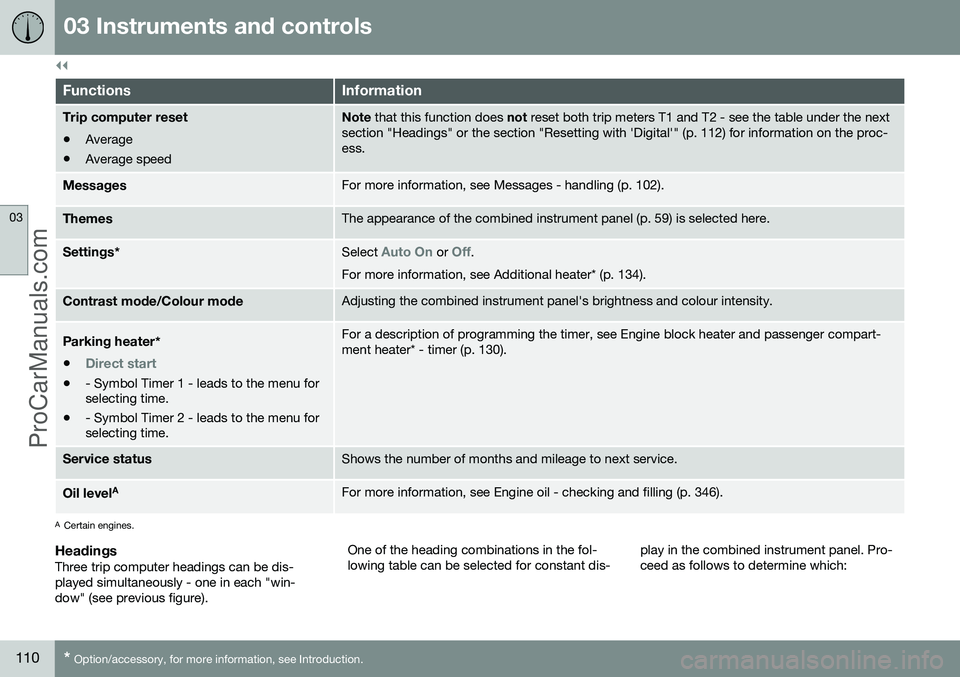
HeadingsThree trip computer headings can be dis- played simultaneously - one in each "win-dow" (see previous figure). One of the heading combinations in the fol-lowing table can be selected for constant dis-
play in the combined instrument panel. Pro-ceed as follows to determine which:
ProCarManuals.co’
Page 301 of 442
08 Starting and driving
08
299
Before a long journey
Before a long journey, it makes good sense to go through the following points: •Check that the engine is working normally and that fuel consumption (p. 403) is nor-mal.
• Make sure that there are no leaks (fuel, oilor other fluid).
• Check all bulbs and tyre tread depths.
• Carrying a warning triangle (p. 329) is alegal requirement in certain countries.
Related information
• Engine oil - checking and filling (p. 346)
• Changing wheels - removing wheels (p.324)
• Lamp replacement (p. 352)
Winter driving
For winter driving it is important to perform certain checks in order to ensure that the carcan be driven safely. Check the following in particular before the cold season:
• The engine coolant (p. 349) must contain at least 50% glycol. This mixture protectsthe engine against frost erosion down toapproximately –35 °C. To achieve opti-mum antifreeze protection, different typesof glycol must not be mixed.
• The fuel tank must be kept filled to pre-vent condensation.
• Engine oil viscosity is important. Oils withlower viscosity (thinner oils) facilitate star-ting in cold weather and also reduce fuelconsumption while the engine is cold. Formore information on suitable oils, seeEngine oil - adverse driving conditions (p.395).
IMPORTANT
Low viscosity oil must not be used for hard driving or in hot weather.
•The condition of the starter battery and charge level must be inspected. Coldweather places great demands on the starter battery and its capacity is reducedby the cold.
• Use washer fluid (p. 361) to avoid iceforming in the washer fluid reservoir.
To achieve optimum roadholding Volvo rec- ommends using winter tyres on all wheels ifthere is a risk of snow or ice.
NOTE
The use of winter tyres is a legal require- ment in certain countries. Studded tyresare not permitted in all countries.
Slippery driving conditionsPractise driving on slippery surfaces under controlled conditions to learn how the carreacts.
ProCarManuals.co’
Page 345 of 442
10 Maintenance and service
10
343
Bonnet - opening and closing
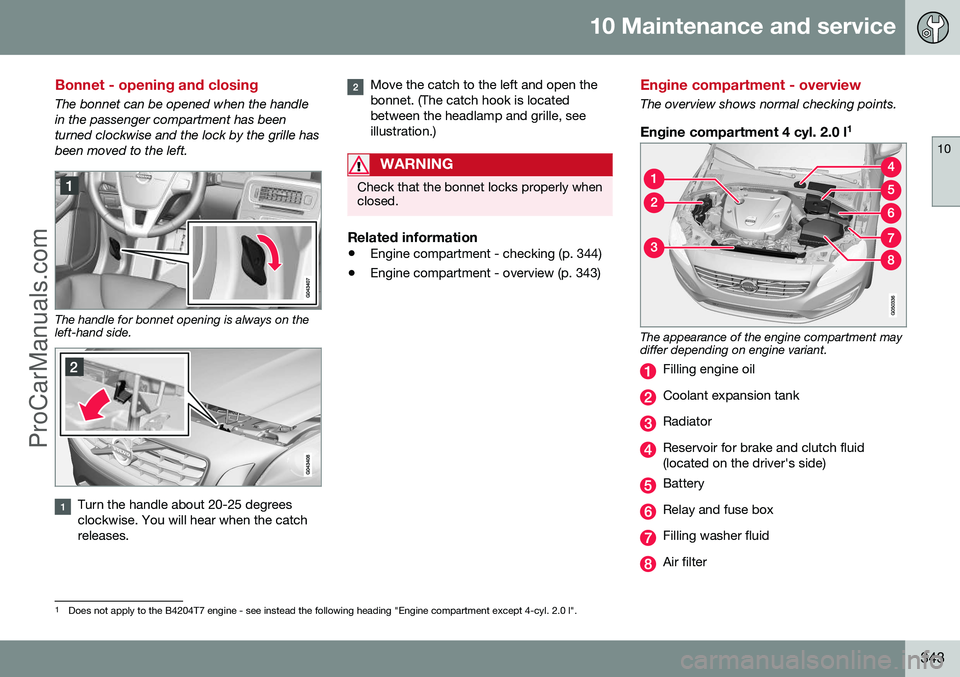
The bonnet can be opened when the handle in the passenger compartment has beenturned clockwise and the lock by the grille hasbeen moved to the left.
The handle for bonnet opening is always on the left-hand side.
Turn the handle about 20-25 degrees clockwise. You will hear when the catchreleases.
Move the catch to the left and open the bonnet. (The catch hook is locatedbetween the headlamp and grille, seeillustration.)
WARNING
Check that the bonnet locks properly when closed.
Related information
•Engine compartment - checking (p. 344)
• Engine compartment - overview (p. 343)
Engine compartment - overview
The overview shows normal checking points.
Engine compartment 4 cyl. 2.0 l 1
The appearance of the engine compartment may differ depending on engine variant.
Filling engine oil
Coolant expansion tank
Radiator
Reservoir for brake and clutch fluid (located on the driver's side)
Battery
Relay and fuse box
Filling washer fluid
Air filter
1
Does not apply to the B4204T7 engine - see instead the following heading "Engine compartment except 4-cyl. 2.0 l".
ProCarManuals.co’
Page 346 of 442
||
10 Maintenance and service
10
344
WARNING
The ignition system has very high voltage and output. The voltage in the ignition sys-tem is highly dangerous. The car's electri-cal system must always be in key position0 when work is being performed in the
engine compartment; see Key positions -functions at different levels (p. 70). Do not touch the spark plugs or ignition coil when the car's electrical system is inkey position II or when the engine is hot.
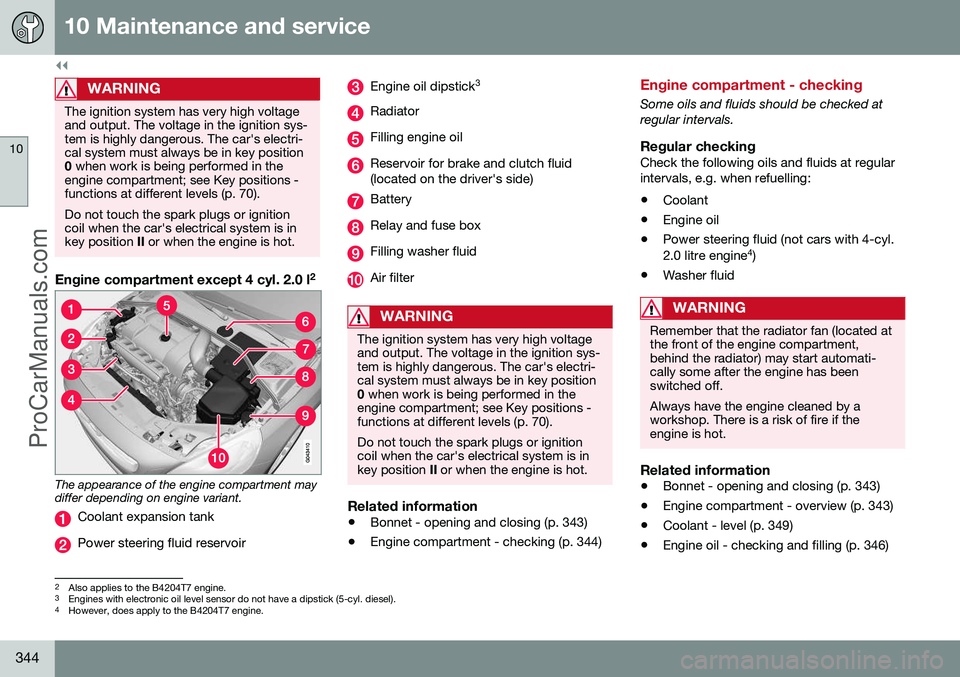
Engine compartment except 4 cyl. 2.0 l 2
The appearance of the engine compartment may differ depending on engine variant.
Coolant expansion tank
Power steering fluid reservoir
Engine oil dipstick
3
Radiator
Filling engine oil
Reservoir for brake and clutch fluid (located on the driver's side)
Battery
Relay and fuse box
Filling washer fluid
Air filter
WARNING
The ignition system has very high voltage and output. The voltage in the ignition sys-tem is highly dangerous. The car's electri-cal system must always be in key position0
when work is being performed in the
engine compartment; see Key positions -functions at different levels (p. 70). Do not touch the spark plugs or ignition coil when the car's electrical system is inkey position II or when the engine is hot.
Related information
• Bonnet - opening and closing (p. 343)
• Engine compartment - checking (p. 344)
Engine compartment - checking
Some oils and fluids should be checked at regular intervals.
Regular checkingCheck the following oils and fluids at regularintervals, e.g. when refuelling:
• Coolant
• Engine oil
• Power steering fluid (not cars with 4-cyl. 2.0 litre engine 4
)
• Washer fluid
WARNING
Remember that the radiator fan (located at the front of the engine compartment,behind the radiator) may start automati-cally some after the engine has beenswitched off. Always have the engine cleaned by a workshop. There is a risk of fire if theengine is hot.
Related information
• Bonnet - opening and closing (p. 343)
• Engine compartment - overview (p. 343)
• Coolant - level (p. 349)
• Engine oil - checking and filling (p. 346)
2
Also applies to the B4204T7 engine.3 Engines with electronic oil level sensor do not have a dipstick (5-cyl. diesel).
4 However, does apply to the B4204T7 engine.
ProCarManuals.co’
Page 348 of 442

||
10 Maintenance and service
10
346
texts. Certain variants have both systems. Contact a Volvo dealer for more information. Change the engine oil and oil filter in accord- ance with the intervals specified in the Serv-ice and Warranty Booklet. Using oil of a higher than specified grade is permitted. If the car is driven in adverse con-ditions, Volvo recommends using an oil of ahigher grade; see Engine oil - adverse drivingconditions (p. 395). For filling capacities, see Engine oil - grade and volume (p. 396).
Related information
•Engine oil - checking and filling (p. 346)
Engine oil - checking and filling
The oil level is checked on certain engine vari- ants with the electronic oil level sensor, onother engine variants with the oil dipstick.
Engine with oil dipstick 5
G021734
Dipstick and filler pipe. Checking the oil level in a new car is espe- cially important before the first scheduled oilchange. Volvo recommends checking the oil level every 2 500 km. The most accurate measure-ments are made on a cold engine before star-ting. The measurement will be inaccurate iftaken immediately after the engine isswitched off. The dipstick will indicate thatthe level is too low because the oil has nothad time to flow down into the oil sump.
G021737
The oil level must be between the
MIN and MAX
marks.
Measurement and filling if required1. Ensure that the car is level. After switch-
ing off the engine it is important to wait 5 minutes to allow the oil time to run backto the sump.
2. Pull up and wipe the dipstick.
3. Re-insert the dipstick.
4. Pull it out and check the level.
5. If the level is close to MIN then 0.5 litres
should be added. If the level is signifi- cantly below, then an additional amountis required.
6. If required, check the level again, do it after driving a short distance. Then repeatsteps 1-4.
5Does not apply to the 4-cyl. 2.0 litre or 5-cyl. diesel, which have electronic oil level sensor. However, does apply to the B4204T7 engine.
ProCarManuals.co’