door lock VOLVO V60 2014 Owners Manual
[x] Cancel search | Manufacturer: VOLVO, Model Year: 2014, Model line: V60, Model: VOLVO V60 2014Pages: 442, PDF Size: 13.85 MB
Page 5 of 442
Table of contents
* Option/accessory, for more information, see Introduction.3
03
03 Instruments and controls
Instruments and controls, left-hand drive
car - overview........................................... 53 Instruments and controls, right-hand
drive car - overview................................... 56
Combined instrument panel...................... 59Analogue combined instrument panel -
overview.................................................... 59 Digital combined instrument panel -
overview.................................................... 60
Eco guide & Power guide*........................ 63Combined instrument panel - meaning of
indicator symbols...................................... 64 Combined instrument cluster - meaning
of warning symbols................................... 65
Outside temperature gauge...................... 67
Trip meter.................................................. 68
Clock......................................................... 68
Volvo Sensus............................................ 68
Key positions............................................ 70Key positions - functions at different lev-
els.............................................................. 70
Seats, front................................................ 72
Seats, front - electrically operated............ 73
Key memory* in remote control key.......... 74
Seats, rear................................................. 74
03
Steering wheel.......................................... 76
Heating* of the steering wheel.................. 77
Light switches........................................... 78
Position/parking lamps............................. 80
Daytime running lights.............................. 80
Tunnel detection*...................................... 81
Main/dipped beam.................................... 81
Active high beam*..................................... 82
Active Xenon headlamps*......................... 84
Rear fog lamp........................................... 85
Brake lights............................................... 86
Hazard warning flashers........................... 86
Direction indicators................................... 87
Interior lighting.......................................... 88
Home safe light duration........................... 89
Approach light duration............................ 89Headlamps - adjusting headlamp pat-
tern............................................................ 90
Wipers and washing.................................. 90
Power windows......................................... 92
Door mirrors.............................................. 94Windows and rearview and door mirrors
- heating.................................................... 96
Rearview mirror - interior.......................... 96
03
Compass*................................................. 97
Sunroof*.................................................... 98Menu navigation - combined instrument
panel....................................................... 100 Menu overview - combined instrument
panel....................................................... 101
Messages................................................ 101
Messages - handling............................... 102
MY CAR.................................................. 103
Trip computer......................................... 104Trip computer - combined instrument
panel "Analog"........................................ 105 Trip computer - combined instrument
panel "Digital"......................................... 109 Trip computer - supplementary informa-
tion.......................................................... 112
Trip computer - trip statistics*................ 113
ProCarManuals.co’
Page 7 of 442
Table of contents
* Option/accessory, for more information, see Introduction.5
06
06 Locks and alarm
Remote control key with key blade......... 149
Remote control key - losing ................... 149
Key memory*........................................... 149
Indication locking/unlocking - adjusting. 150
Lock indicator......................................... 150
Immobiliser.............................................. 150Remote-controlled immobiliser with
tracking system....................................... 151
Remote control key - functions............... 151
Remote control key - range.................... 153
PCC* - unique functions......................... 153
PCC* - range........................................... 154
Detachable key blade............................. 155Detachable key blade - detaching/
attaching................................................. 155
Detachable key blade - unlocking doors 156
Privacy locking*....................................... 156Remote control key/PCC - replacing the
battery..................................................... 158
Keyless drive*.......................................... 159
Keyless drive* - PCC range.................... 159
Keyless drive* - handling the PCC safely 160Keyless drive* - interference to PCC
function................................................... 160
Keyless drive* - locking........................... 161
06
Keyless drive* - unlocking....................... 161 Keyless drive* - unlocking with the key
blade ...................................................... 162
Keyless drive* - key memory.................. 162
Keyless drive* - lock settings.................. 163
Keyless drive* - antenna location........... 163
Locking/unlocking - from the outside..... 164
Manual locking of the door..................... 165
Locking/unlocking - from the inside....... 165
Total airing function................................ 166
Locking/unlocking - glovebox................. 167
Locking/unlocking - tailgate.................... 167
Deadlocks*.............................................. 168
Child safety locks - manual activation.... 169
Child safety locks - electrical activation* 170
Alarm....................................................... 171
Alarm indicator........................................ 172
Alarm - automatic re-arming................... 172
Alarm - remote control key not working. 172
Alarm signals........................................... 173
Reduced alarm level............................... 173
07
07 Driver support
Active chassis - Four C*.......................... 175 Stability and traction control system
(DSTC)..................................................... 175 Stability and traction control system
(DSTC) - operation.................................. 176 Stability and traction control system
(DSTC) - symbols and messages........... 178
Road Sign Information (RSI)*.................. 179
Road sign information (RSI)* - operation 179
Road sign information (RSI)* - limitations 181
Speed limiter*.......................................... 182
Speed limiter* - getting started............... 182
Speed limiter* - changing speed............. 183Speed limiter* - temporary deactivation
and standby mode.................................. 183 Speed limiter* - alarm for speed excee-
ded.......................................................... 184
Speed limiter* - deactivation................... 184
Cruise control*........................................ 185
Cruise control* - managing speed.......... 186Cruise control* temporary deactivation
and standby mode.................................. 186
Cruise control* - resume set speed........ 187
Cruise control* - deactivate.................... 187
Adaptive cruise control - ACC*............... 188
ProCarManuals.co’
Page 41 of 442
02 Safety
02
* Option/accessory, for more information, see Introduction.39
General information on child safety
Children of all ages and sizes must always sit correctly secured in the car. Never allow achild to sit on the knee of a passenger. Volvo recommends that children travel in rear-facing child seats until as late an age aspossible, at least until 3-4 years of age, andthen front-facing booster cushions/child seatsuntil up to 10 years of age. The position of a child in the car and the choice of equipment are dictated by thechild's weight and size; see Child seats (p.40).
NOTE
Regulations regarding the placement of children in cars vary from country to coun-try. Check what does apply.
Volvo has child safety equipment (child seats, booster cushions & attachment devices)which is designed for your particular car.Using Volvo's child safety equipment pro-vides you with optimum conditions for yourchild to travel safely in the car. Furthermore,the child safety equipment fits and is easy touse.
NOTE
In the event of questions when fitting child safety products, contact the manufacturerfor clearer instructions.
Child safety locksThe rear doors and rear door windows* can be blocked manually (p. 169) or electronically(p. 170)* from opening from the inside.
Related information
• Child seats - location (p. 44)
• Child seat - ISOFIX (p. 47)
• Child seats - upper mounting points (p. 51)
ProCarManuals.co’
Page 57 of 442
03 Instruments and controls
03
* Option/accessory, for more information, see Introduction.55
FunctionSee
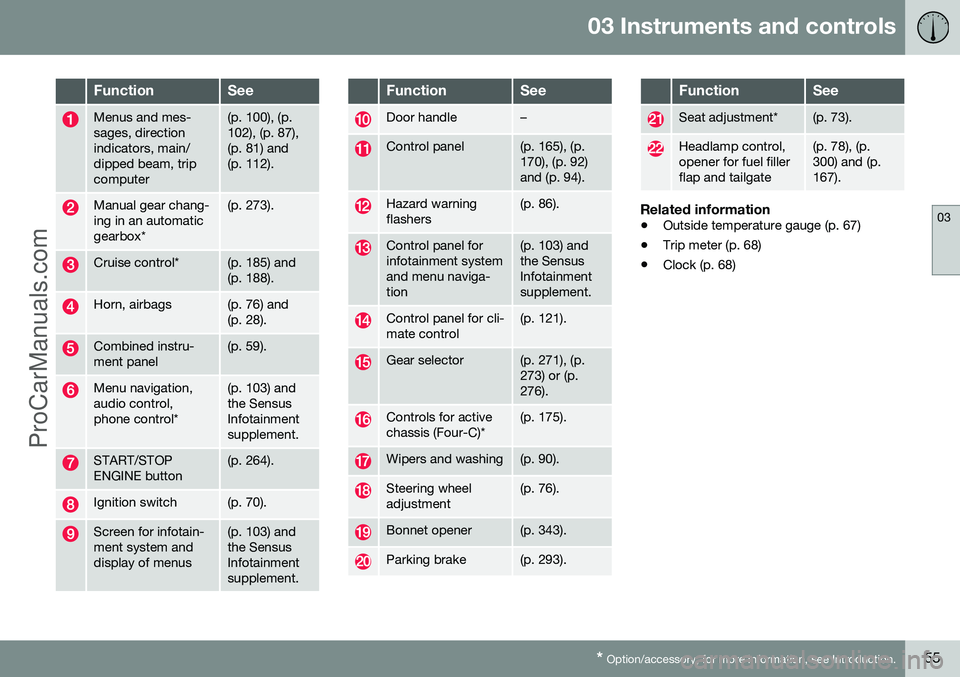
Menus and mes- sages, directionindicators, main/dipped beam, tripcomputer(p. 100), (p. 102), (p. 87),(p. 81) and(p. 112).
Manual gear chang- ing in an automaticgearbox*(p. 273).
Cruise control*(p. 185) and (p. 188).
Horn, airbags(p. 76) and (p. 28).
Combined instru- ment panel(p. 59).
Menu navigation, audio control,phone control*(p. 103) and the SensusInfotainmentsupplement.
START/STOP ENGINE button(p. 264).
Ignition switch(p. 70).
Screen for infotain- ment system anddisplay of menus(p. 103) and the SensusInfotainmentsupplement.
FunctionSee
Door handle–
Control panel(p. 165), (p. 170), (p. 92)and (p. 94).
Hazard warning flashers(p. 86).
Control panel for infotainment systemand menu naviga-tion(p. 103) and the SensusInfotainmentsupplement.
Control panel for cli- mate control(p. 121).
Gear selector(p. 271), (p. 273) or (p.276).
Controls for active chassis (Four-C)*(p. 175).
Wipers and washing(p. 90).
Steering wheel adjustment(p. 76).
Bonnet opener(p. 343).
Parking brake(p. 293).
FunctionSee
Seat adjustment*(p. 73).
Headlamp control, opener for fuel fillerflap and tailgate(p. 78), (p. 300) and (p.167).
Related information
• Outside temperature gauge (p. 67)
• Trip meter (p. 68)
• Clock (p. 68)
ProCarManuals.co’
Page 60 of 442
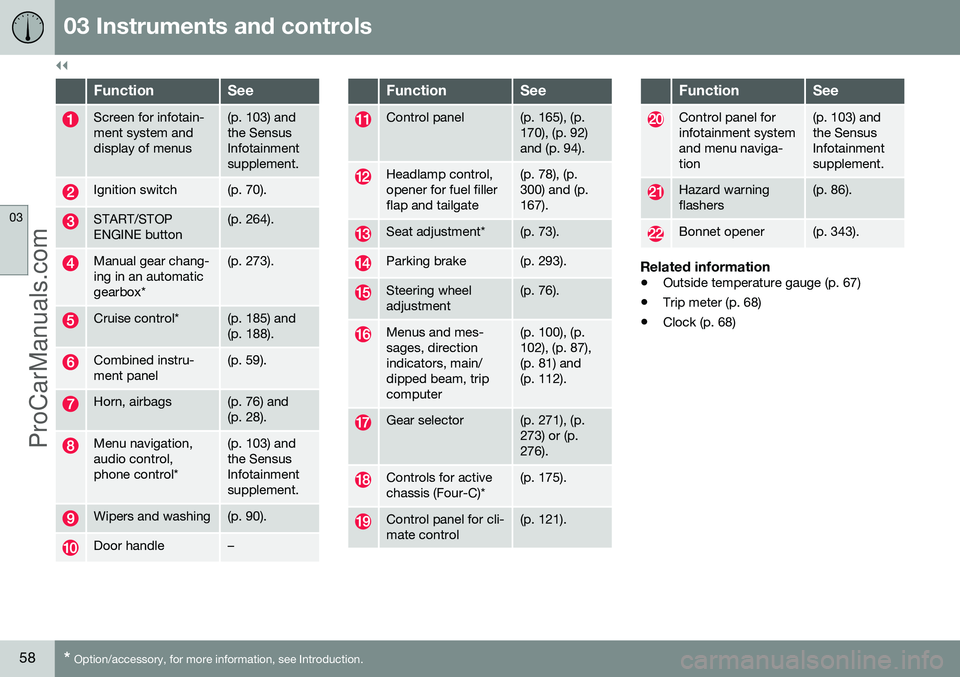
||
03 Instruments and controls
03
58* Option/accessory, for more information, see Introduction.
FunctionSee
Screen for infotain- ment system anddisplay of menus(p. 103) and the SensusInfotainmentsupplement.
Ignition switch(p. 70).
START/STOP ENGINE button(p. 264).
Manual gear chang- ing in an automaticgearbox*(p. 273).
Cruise control*(p. 185) and (p. 188).
Combined instru- ment panel(p. 59).
Horn, airbags(p. 76) and (p. 28).
Menu navigation, audio control,phone control*(p. 103) and the SensusInfotainmentsupplement.
Wipers and washing(p. 90).
Door handle–
FunctionSee
Control panel(p. 165), (p. 170), (p. 92)and (p. 94).
Headlamp control, opener for fuel fillerflap and tailgate(p. 78), (p. 300) and (p.167).
Seat adjustment*(p. 73).
Parking brake(p. 293).
Steering wheel adjustment(p. 76).
Menus and mes- sages, directionindicators, main/dipped beam, tripcomputer(p. 100), (p. 102), (p. 87),(p. 81) and(p. 112).
Gear selector(p. 271), (p. 273) or (p.276).
Controls for active chassis (Four-C)*(p. 175).
Control panel for cli- mate control(p. 121).
FunctionSee
Control panel for infotainment systemand menu naviga-tion(p. 103) and the SensusInfotainmentsupplement.
Hazard warning flashers(p. 86).
Bonnet opener(p. 343).
Related information
• Outside temperature gauge (p. 67)
• Trip meter (p. 68)
• Clock (p. 68)
ProCarManuals.co’
Page 75 of 442

03 Instruments and controls
03
* Option/accessory, for more information, see Introduction.73
Seats, front - electrically operated
The car's front seats have different setting options for optimum seating comfort. Thepower seat can be moved forward/backwardand up/down. The front edge of the seatcushion can be raised/lowered. The backrestangle can be changed.
Power seat*
Front edge of seat cushion up/down
Seat forward/backward and up/down
Backrest rake
The power front seats have overload protec- tion which is tripped if a seat is blocked by anobject. If this happens, go to key position I or
0 and wait a short time before adjusting the
seat again. Only one movement (forward/back/up/down) can be made at a time.
PreparationsThe seats can be adjusted for a certain timeafter unlocking the door with the remote con-trol key without the key in the ignition switch.Seat adjustment is normally made in keyposition I and can always be made when the
engine is running.
Seat with memory function*
The memory function stores settings for the seat and the door mirrors.
Store settingMemory button
Memory button
Memory button
Button for storing settings
1. Adjust the seat and the door mirrors. 2. Hold the button depressed to store set-
tings while depressing one of the memory buttons.
Using a stored settingHold one of the memory buttons depresseduntil the seat and the door mirrors stop. If yourelease the button then the movement of theseat will stop.
Heated seatsFor heated seats, see Heated front seats* (p.122) and Heated rear seat* (p. 122).
Related information
• Seats, front (p. 72)
• Seats, rear (p. 74)
ProCarManuals.co’
Page 76 of 442
03 Instruments and controls
03
74* Option/accessory, for more information, see Introduction.
Key memory* in remote control key 17
All remote control keys can be used by differ- ent drivers to store the settings for the driver's seat and door mirrors
18
.
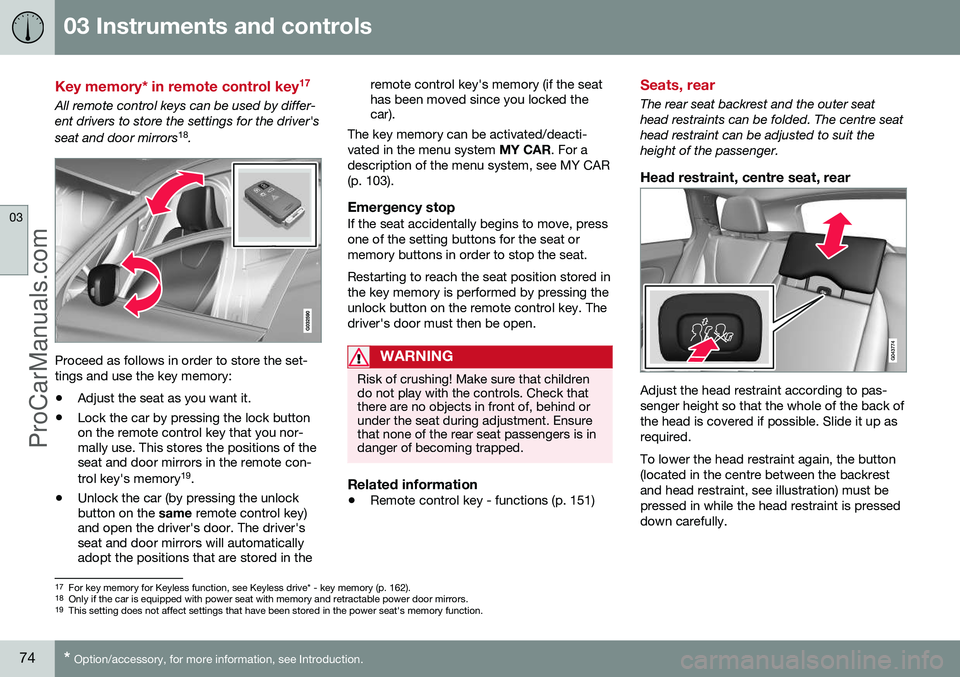
Proceed as follows in order to store the set- tings and use the key memory:
• Adjust the seat as you want it.
• Lock the car by pressing the lock button on the remote control key that you nor-mally use. This stores the positions of theseat and door mirrors in the remote con- trol key's memory 19
.
• Unlock the car (by pressing the unlock button on the
same remote control key)
and open the driver's door. The driver'sseat and door mirrors will automaticallyadopt the positions that are stored in the remote control key's memory (if the seathas been moved since you locked thecar).
The key memory can be activated/deacti- vated in the menu system MY CAR. For a
description of the menu system, see MY CAR(p. 103).
Emergency stopIf the seat accidentally begins to move, pressone of the setting buttons for the seat ormemory buttons in order to stop the seat. Restarting to reach the seat position stored in the key memory is performed by pressing theunlock button on the remote control key. Thedriver's door must then be open.
WARNING
Risk of crushing! Make sure that children do not play with the controls. Check thatthere are no objects in front of, behind orunder the seat during adjustment. Ensurethat none of the rear seat passengers is indanger of becoming trapped.
Related information
• Remote control key - functions (p. 151)
Seats, rear
The rear seat backrest and the outer seat head restraints can be folded. The centre seathead restraint can be adjusted to suit theheight of the passenger.
Head restraint, centre seat, rear
Adjust the head restraint according to pas- senger height so that the whole of the back ofthe head is covered if possible. Slide it up asrequired. To lower the head restraint again, the button (located in the centre between the backrestand head restraint, see illustration) must bepressed in while the head restraint is presseddown carefully.
17
For key memory for Keyless function, see Keyless drive* - key memory (p. 162).
18 Only if the car is equipped with power seat with memory and retractable power door mirrors.
19 This setting does not affect settings that have been stored in the power seat's memory function.
ProCarManuals.co’
Page 90 of 442
03 Instruments and controls
03
88
Interior lighting
The passenger compartment lighting is acti- vated/deactivated with the buttons in the con-trols above the front seats and the rear seat.
G021149
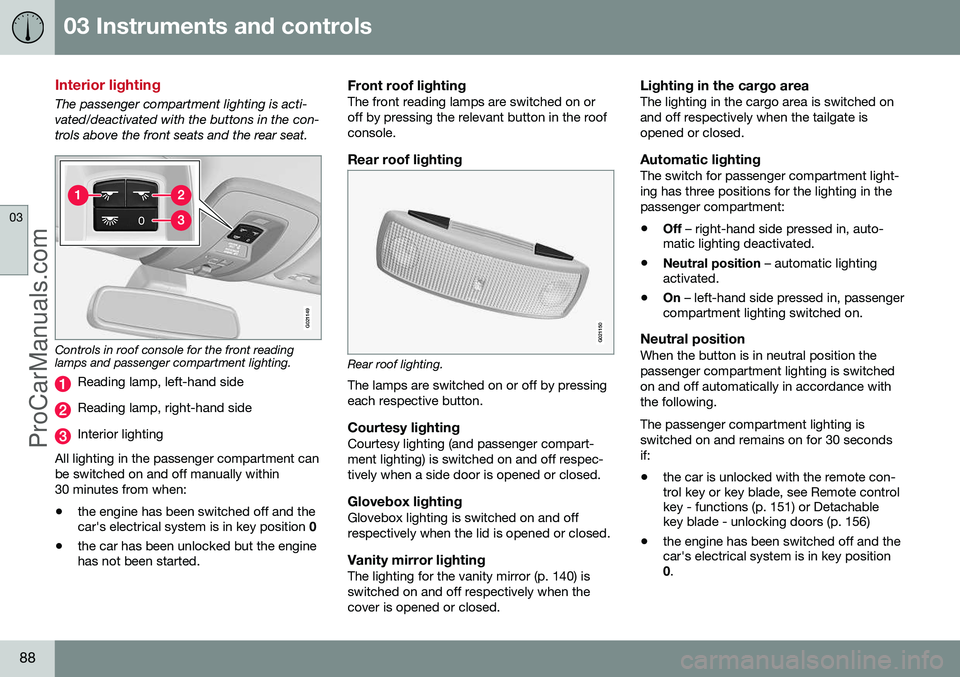
Controls in roof console for the front reading lamps and passenger compartment lighting.
Reading lamp, left-hand side
Reading lamp, right-hand side
Interior lighting
All lighting in the passenger compartment can be switched on and off manually within30 minutes from when:
• the engine has been switched off and the car's electrical system is in key position
0
• the car has been unlocked but the enginehas not been started.
Front roof lightingThe front reading lamps are switched on or off by pressing the relevant button in the roofconsole.
Rear roof lighting
G021150
Rear roof lighting.
The lamps are switched on or off by pressing each respective button.
Courtesy lightingCourtesy lighting (and passenger compart-ment lighting) is switched on and off respec-tively when a side door is opened or closed.
Glovebox lightingGlovebox lighting is switched on and offrespectively when the lid is opened or closed.
Vanity mirror lightingThe lighting for the vanity mirror (p. 140) isswitched on and off respectively when thecover is opened or closed.
Lighting in the cargo areaThe lighting in the cargo area is switched onand off respectively when the tailgate isopened or closed.
Automatic lightingThe switch for passenger compartment light-ing has three positions for the lighting in thepassenger compartment:
• Off
– right-hand side pressed in, auto-
matic lighting deactivated.
• Neutral position
– automatic lighting
activated.
• On
– left-hand side pressed in, passenger
compartment lighting switched on.
Neutral positionWhen the button is in neutral position thepassenger compartment lighting is switchedon and off automatically in accordance withthe following. The passenger compartment lighting is switched on and remains on for 30 secondsif:
• the car is unlocked with the remote con- trol key or key blade, see Remote control key - functions (p. 151) or Detachable key blade - unlocking doors (p. 156)
• the engine has been switched off and thecar's electrical system is in key position0
.
ProCarManuals.co’
Page 91 of 442
03 Instruments and controls
03
89
Passenger compartment lighting is switched off when:
• the engine is started
• the car is locked.
The passenger compartment lighting comeson and remains on for two minutes if one ofthe doors is open. If any lighting is switched on manually and the car is locked then it will be switched offautomatically after two minutes.
Mood lightsWhen the normal passenger compartmentlighting is switched off and the engine is run-ning, a number of LEDs illuminate, includingone in the ceiling lighting, in order to providea low-light and enhance the mood while driv-ing. This lighting goes out for a little whileafter the normal passenger compartmentlighting when the car is locked. The bright-ness is controlled using the thumbwheel onthe headlamp control (p. 78).
Home safe light duration
Home safe lighting consists of dipped beam, parking lamps, lamps in the door mirrors,number plate lighting, interior roof lighting aswell as courtesy lighting. Some of the exterior lighting can be kept switched on to work as home safe lightingafter the car has been locked.
1. Remove the remote control key from the ignition switch.
2. Move the left-hand stalk switch toward the steering wheel to the end position and release it. The function can be activatedin the same way as with main beam flash;see Main/dipped beam (p. 81).
3. Get out of the car and lock the door. When the function is activated, dipped beam, parking lamps, door mirror lamps, numberplate lighting, interior roof lamps and courtesylighting are switched on. The length of time for which the home safe lighting should be kept on can be set in themenu system MY CAR, see MY CAR (p. 103).
Related information
• Approach light duration (p. 89)
Approach light duration
Approach light duration consists of parking lamps, lamps in the door mirrors, numberplate lighting, interior roof lighting as well ascourtesy lighting. Approach lighting is switched on with the remote control key, see Remote control key -functions (p. 151), and is used to switch onthe car's lighting at a distance. When the function is activated with the remote control, the parking lamps, door mir-ror lamps, number plate lighting, interior rooflamps and courtesy lighting are switched on. The length of time for which the approach lighting should be kept on can be set in themenu system MY CAR, see MY CAR (p. 103).
Related information
• Home safe light duration (p. 89)
ProCarManuals.co’
Page 94 of 442
||
03 Instruments and controls
03
92* Option/accessory, for more information, see Introduction.
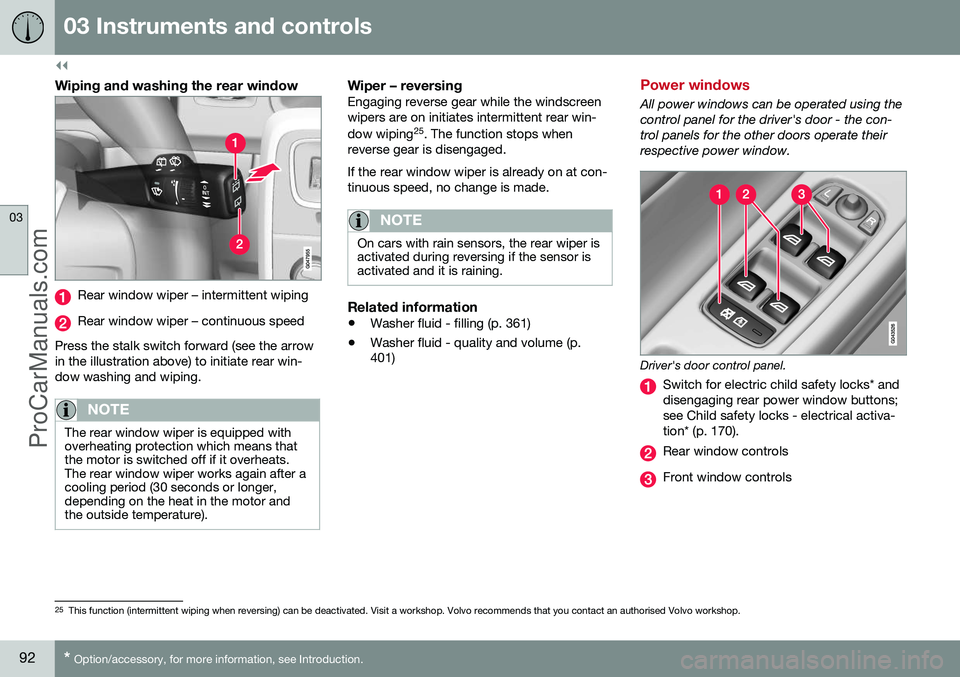
Wiping and washing the rear window
Rear window wiper – intermittent wiping
Rear window wiper – continuous speed
Press the stalk switch forward (see the arrow in the illustration above) to initiate rear win-dow washing and wiping.
NOTE
The rear window wiper is equipped with overheating protection which means thatthe motor is switched off if it overheats.The rear window wiper works again after acooling period (30 seconds or longer,depending on the heat in the motor andthe outside temperature).
Wiper – reversingEngaging reverse gear while the windscreen wipers are on initiates intermittent rear win- dow wiping 25
. The function stops when
reverse gear is disengaged. If the rear window wiper is already on at con- tinuous speed, no change is made.
NOTE
On cars with rain sensors, the rear wiper is activated during reversing if the sensor isactivated and it is raining.
Related information
• Washer fluid - filling (p. 361)
• Washer fluid - quality and volume (p. 401)
Power windows
All power windows can be operated using the control panel for the driver's door - the con-trol panels for the other doors operate theirrespective power window.
Driver's door control panel.
Switch for electric child safety locks* and disengaging rear power window buttons;see Child safety locks - electrical activa-tion* (p. 170).
Rear window controls
Front window controls
25
This function (intermittent wiping when reversing) can be deactivated. Visit a workshop. Volvo recommends that you contact an authorised Volvo workshop.
ProCarManuals.co’