ignition VOLVO V60 2014 Owners Manual
[x] Cancel search | Manufacturer: VOLVO, Model Year: 2014, Model line: V60, Model: VOLVO V60 2014Pages: 442, PDF Size: 13.85 MB
Page 40 of 442
02 Safety
02
38
Safety mode - attempting to start the car
If the car is set in safety mode (p. 37) then an attempt to start the car can be made if every-thing seems normal and the absence of fuelleakage has been checked. First, check that no fuel is leaking from the car. There must be no smell of fuel either. If everything seems normal and you have checked for indications of fuel leakage, youmay attempt to start the car. Remove the remote control key and open the driver's door. If a message is now shown tothe effect that the ignition is on, press thestart button. Then close the door and reinsertthe remote control key. The car's electronicswill now try to reset themselves to normalmode. Then try to start the car. If the message
Safety mode See manual is
still shown on the display then the car must not be driven or towed but a vehicle recoveryservice (p. 316) used instead. Even if the carappears to be driveable, hidden damage maymake the car impossible to control once mov-ing.
WARNING
Never, under any circumstances, attempt to restart the car if it smells of fuel when the
Safety mode See manual message
is displayed. Leave the car at once.
WARNING
If the car is in safety mode it must not be towed. It must be transported from itslocation. Volvo recommends that it istransported to an authorised Volvo work-shop.
Related information
• Safety mode - moving the car (p. 38)
Safety mode - moving the car
If Normal mode is shown after Safety mode
See manual has been reset after attempting
to start the car (p. 38) , the car can be moved carefully out of a dangerous position. Do not move the car further than necessary.
Related information
• General information on safety mode (p. 37)
ProCarManuals.co’
Page 57 of 442
03 Instruments and controls
03
* Option/accessory, for more information, see Introduction.55
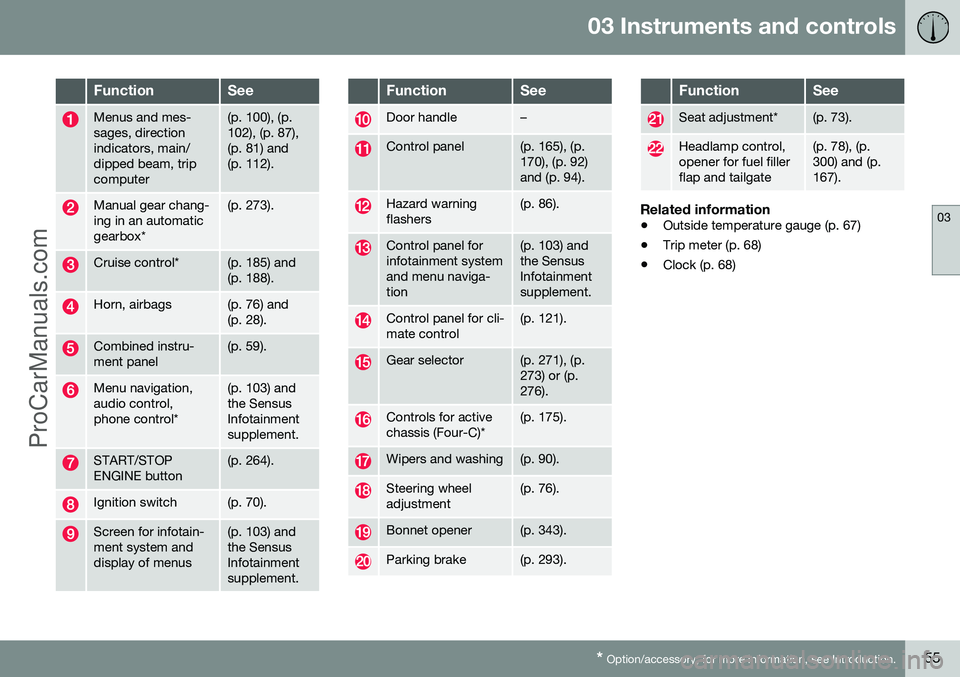
FunctionSee
Menus and mes- sages, directionindicators, main/dipped beam, tripcomputer(p. 100), (p. 102), (p. 87),(p. 81) and(p. 112).
Manual gear chang- ing in an automaticgearbox*(p. 273).
Cruise control*(p. 185) and (p. 188).
Horn, airbags(p. 76) and (p. 28).
Combined instru- ment panel(p. 59).
Menu navigation, audio control,phone control*(p. 103) and the SensusInfotainmentsupplement.
START/STOP ENGINE button(p. 264).
Ignition switch(p. 70).
Screen for infotain- ment system anddisplay of menus(p. 103) and the SensusInfotainmentsupplement.
FunctionSee
Door handle–
Control panel(p. 165), (p. 170), (p. 92)and (p. 94).
Hazard warning flashers(p. 86).
Control panel for infotainment systemand menu naviga-tion(p. 103) and the SensusInfotainmentsupplement.
Control panel for cli- mate control(p. 121).
Gear selector(p. 271), (p. 273) or (p.276).
Controls for active chassis (Four-C)*(p. 175).
Wipers and washing(p. 90).
Steering wheel adjustment(p. 76).
Bonnet opener(p. 343).
Parking brake(p. 293).
FunctionSee
Seat adjustment*(p. 73).
Headlamp control, opener for fuel fillerflap and tailgate(p. 78), (p. 300) and (p.167).
Related information
• Outside temperature gauge (p. 67)
• Trip meter (p. 68)
• Clock (p. 68)
ProCarManuals.co’
Page 60 of 442
||
03 Instruments and controls
03
58* Option/accessory, for more information, see Introduction.
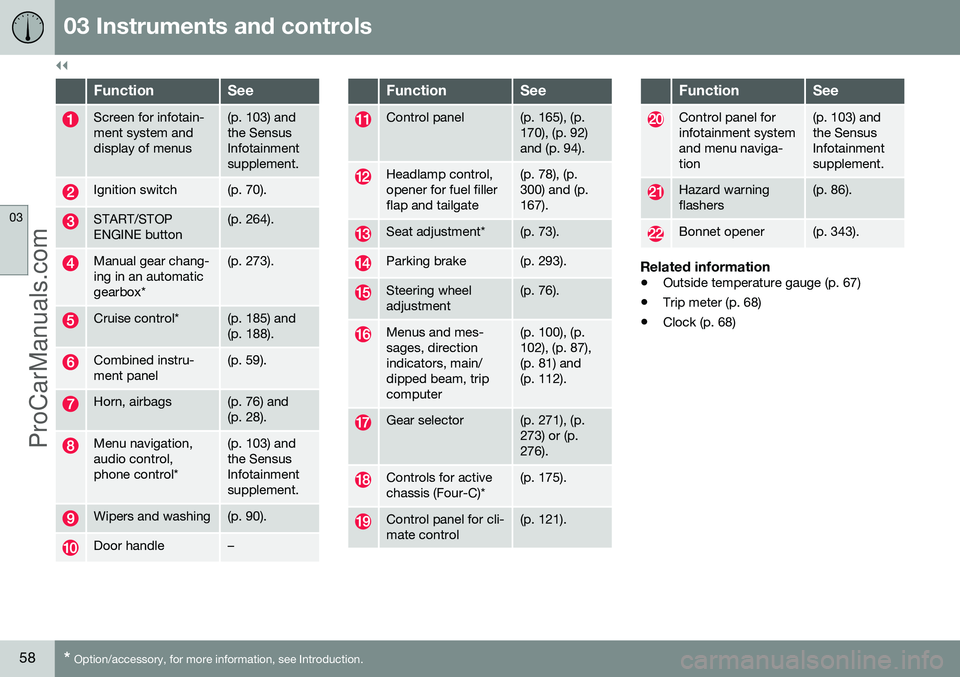
FunctionSee
Screen for infotain- ment system anddisplay of menus(p. 103) and the SensusInfotainmentsupplement.
Ignition switch(p. 70).
START/STOP ENGINE button(p. 264).
Manual gear chang- ing in an automaticgearbox*(p. 273).
Cruise control*(p. 185) and (p. 188).
Combined instru- ment panel(p. 59).
Horn, airbags(p. 76) and (p. 28).
Menu navigation, audio control,phone control*(p. 103) and the SensusInfotainmentsupplement.
Wipers and washing(p. 90).
Door handle–
FunctionSee
Control panel(p. 165), (p. 170), (p. 92)and (p. 94).
Headlamp control, opener for fuel fillerflap and tailgate(p. 78), (p. 300) and (p.167).
Seat adjustment*(p. 73).
Parking brake(p. 293).
Steering wheel adjustment(p. 76).
Menus and mes- sages, directionindicators, main/dipped beam, tripcomputer(p. 100), (p. 102), (p. 87),(p. 81) and(p. 112).
Gear selector(p. 271), (p. 273) or (p.276).
Controls for active chassis (Four-C)*(p. 175).
Control panel for cli- mate control(p. 121).
FunctionSee
Control panel for infotainment systemand menu naviga-tion(p. 103) and the SensusInfotainmentsupplement.
Hazard warning flashers(p. 86).
Bonnet opener(p. 343).
Related information
• Outside temperature gauge (p. 67)
• Trip meter (p. 68)
• Clock (p. 68)
ProCarManuals.co’
Page 72 of 442
03 Instruments and controls
03
70* Option/accessory, for more information, see Introduction.
Key positions
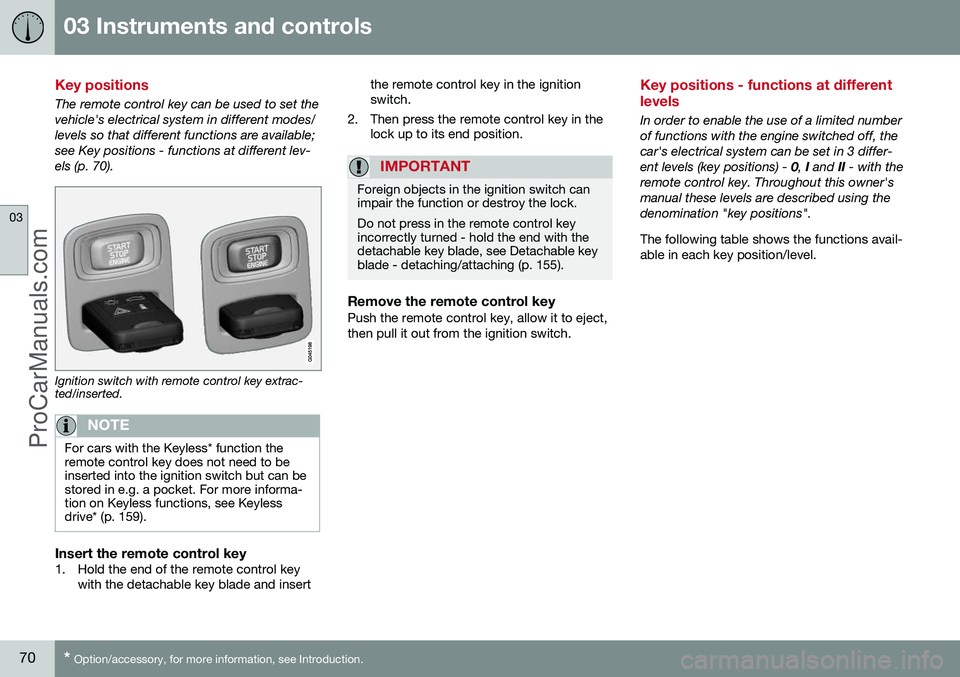
The remote control key can be used to set the vehicle's electrical system in different modes/levels so that different functions are available;see Key positions - functions at different lev-els (p. 70).
Ignition switch with remote control key extrac- ted/inserted.
NOTE
For cars with the Keyless* function the remote control key does not need to beinserted into the ignition switch but can bestored in e.g. a pocket. For more informa-tion on Keyless functions, see Keylessdrive* (p. 159).
Insert the remote control key1. Hold the end of the remote control key
with the detachable key blade and insert the remote control key in the ignition switch.
2. Then press the remote control key in the lock up to its end position.
IMPORTANT
Foreign objects in the ignition switch can impair the function or destroy the lock. Do not press in the remote control key incorrectly turned - hold the end with thedetachable key blade, see Detachable keyblade - detaching/attaching (p. 155).
Remove the remote control keyPush the remote control key, allow it to eject, then pull it out from the ignition switch.
Key positions - functions at different levels
In order to enable the use of a limited number of functions with the engine switched off, thecar's electrical system can be set in 3 differ-ent levels (key positions) - 0, I and II - with the
remote control key. Throughout this owner'smanual these levels are described using thedenomination "key positions". The following table shows the functions avail- able in each key position/level.
ProCarManuals.co’
Page 73 of 442
03 Instruments and controls
03
* Option/accessory, for more information, see Introduction.71
LevelFunctions
0• Odometer, clock and tem- perature gauge are illumi-nated.
• Power seats can be adjusted.
• The audio system can beused for a limited time - seethe Sensus Infotainment sup-plement.
I•Sunroof, power windows, 12V socket in the passenger com-partment, navigation, phone,ventilation fan and wind-screen wipers can be used.
II•The headlamps come on.
• Warning/indicator lamps illu- minate for 5 seconds.
• Several other systems areactivated. However, heating inseat cushions and the rearwindow can only be activatedafter the engine has beenstarted.
This key position consumes a lot of current from the batteryand should therefore be avoi-ded!
Choosing key position/level
• Key position 0
- Unlock the car - This
means that the car's electrical system is at level 0.
• Key position I
- With the remote control
key fully inserted into the ignition switch 13
- Briefly press START/STOP ENGINE .
NOTE
To reach level I or II without starting the
engine - do not depress the brake/clutch
pedal when these key positions are due to be selected.
• Key position II
- With the remote control
key fully inserted into the ignition switch 13
- Give a long 14
press on START/STOP
ENGINE .
• Back to key position 0 -
To return to key
position 0 from position II and I - Briefly
press on START/STOP ENGINE .
Audio systemFor information on audio system functions with remote control key removed, see theSensus Infotainment supplement.
Starting and stopping the engineFor information about starting/stopping theengine, see Starting the engine (p. 264).
TowingFor important information about the remotecontrol key during towing, see Towing (p.313).
Related information
•Key positions (p. 70)
13
Not necessary for cars with the Keyless* function.
14 Approx. 2 seconds.
ProCarManuals.co’
Page 75 of 442

03 Instruments and controls
03
* Option/accessory, for more information, see Introduction.73
Seats, front - electrically operated
The car's front seats have different setting options for optimum seating comfort. Thepower seat can be moved forward/backwardand up/down. The front edge of the seatcushion can be raised/lowered. The backrestangle can be changed.
Power seat*
Front edge of seat cushion up/down
Seat forward/backward and up/down
Backrest rake
The power front seats have overload protec- tion which is tripped if a seat is blocked by anobject. If this happens, go to key position I or
0 and wait a short time before adjusting the
seat again. Only one movement (forward/back/up/down) can be made at a time.
PreparationsThe seats can be adjusted for a certain timeafter unlocking the door with the remote con-trol key without the key in the ignition switch.Seat adjustment is normally made in keyposition I and can always be made when the
engine is running.
Seat with memory function*
The memory function stores settings for the seat and the door mirrors.
Store settingMemory button
Memory button
Memory button
Button for storing settings
1. Adjust the seat and the door mirrors. 2. Hold the button depressed to store set-
tings while depressing one of the memory buttons.
Using a stored settingHold one of the memory buttons depresseduntil the seat and the door mirrors stop. If yourelease the button then the movement of theseat will stop.
Heated seatsFor heated seats, see Heated front seats* (p.122) and Heated rear seat* (p. 122).
Related information
• Seats, front (p. 72)
• Seats, rear (p. 74)
ProCarManuals.co’
Page 91 of 442
03 Instruments and controls
03
89
Passenger compartment lighting is switched off when:
• the engine is started
• the car is locked.
The passenger compartment lighting comeson and remains on for two minutes if one ofthe doors is open. If any lighting is switched on manually and the car is locked then it will be switched offautomatically after two minutes.
Mood lightsWhen the normal passenger compartmentlighting is switched off and the engine is run-ning, a number of LEDs illuminate, includingone in the ceiling lighting, in order to providea low-light and enhance the mood while driv-ing. This lighting goes out for a little whileafter the normal passenger compartmentlighting when the car is locked. The bright-ness is controlled using the thumbwheel onthe headlamp control (p. 78).
Home safe light duration
Home safe lighting consists of dipped beam, parking lamps, lamps in the door mirrors,number plate lighting, interior roof lighting aswell as courtesy lighting. Some of the exterior lighting can be kept switched on to work as home safe lightingafter the car has been locked.
1. Remove the remote control key from the ignition switch.
2. Move the left-hand stalk switch toward the steering wheel to the end position and release it. The function can be activatedin the same way as with main beam flash;see Main/dipped beam (p. 81).
3. Get out of the car and lock the door. When the function is activated, dipped beam, parking lamps, door mirror lamps, numberplate lighting, interior roof lamps and courtesylighting are switched on. The length of time for which the home safe lighting should be kept on can be set in themenu system MY CAR, see MY CAR (p. 103).
Related information
• Approach light duration (p. 89)
Approach light duration
Approach light duration consists of parking lamps, lamps in the door mirrors, numberplate lighting, interior roof lighting as well ascourtesy lighting. Approach lighting is switched on with the remote control key, see Remote control key -functions (p. 151), and is used to switch onthe car's lighting at a distance. When the function is activated with the remote control, the parking lamps, door mir-ror lamps, number plate lighting, interior rooflamps and courtesy lighting are switched on. The length of time for which the approach lighting should be kept on can be set in themenu system MY CAR, see MY CAR (p. 103).
Related information
• Home safe light duration (p. 89)
ProCarManuals.co’
Page 93 of 442
03 Instruments and controls
03
}}
* Option/accessory, for more information, see Introduction.91
detects on the windscreen. The sensitivity of the rain sensor can be adjusted using thethumbwheel. When the rain sensor is activated a lamp in the button illuminates and the rain sensor symbol
is shown in the combined
instrument panel.
Activating and setting the sensitivityWhen activating the rain sensor, the car must be running or the remote control key in posi-tion I or II while the windscreen wiper stalk
switch must be in position 0 or in the position
for a single sweep. Activate the rain sensor by pressing the but- ton
. The windscreen wipers make one
sweep. Press the stalk switch up for the wipers to make an extra sweep. Turn the thumbwheel upward for higher sen- sitivity and downward for lower sensitivity.(An extra sweep is made when the thumb-wheel is turned upward.)
DeactivateDeactivate the rain sensor by pressing the button
or move the stalk switch down
to another wiper program. The rain sensor is automatically deactivated when the remote control key is removed from the ignition switch or five minutes after theengine has been switched off.
IMPORTANT
The windscreen wipers could start and be damaged in an automatic car wash.Switch off the rain sensor while the car isin motion or when the remote control keyis in position
I or II. The symbol in the
combined instrument panel and the lampin the button go out.
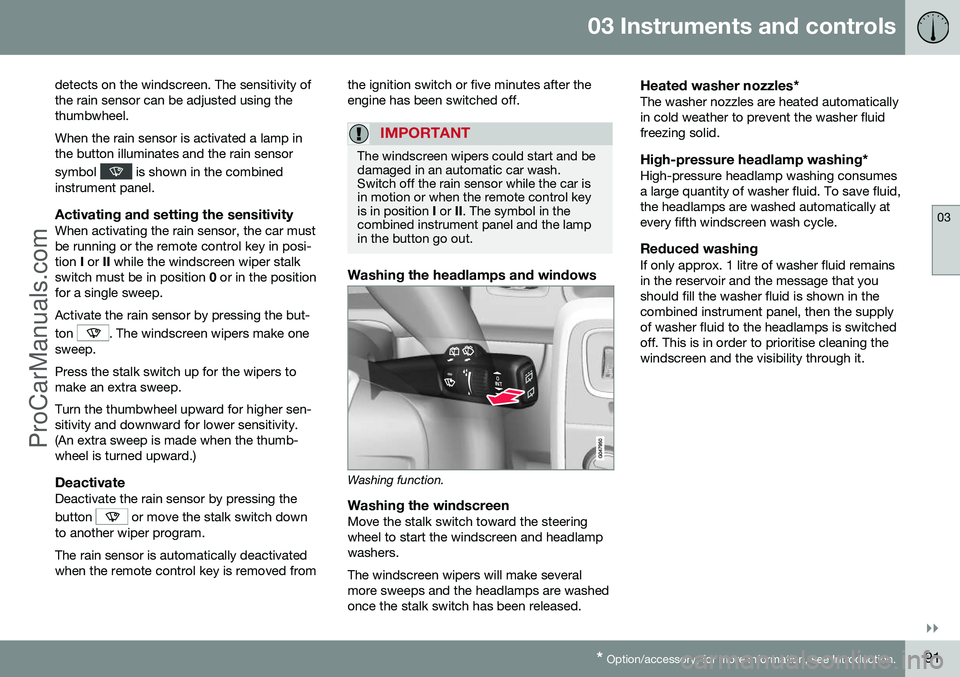
Washing the headlamps and windows
Washing function.
Washing the windscreenMove the stalk switch toward the steering wheel to start the windscreen and headlampwashers. The windscreen wipers will make several more sweeps and the headlamps are washedonce the stalk switch has been released.
Heated washer nozzles*The washer nozzles are heated automaticallyin cold weather to prevent the washer fluidfreezing solid.
High-pressure headlamp washing*High-pressure headlamp washing consumesa large quantity of washer fluid. To save fluid,the headlamps are washed automatically atevery fifth windscreen wash cycle.
Reduced washingIf only approx. 1 litre of washer fluid remainsin the reservoir and the message that youshould fill the washer fluid is shown in thecombined instrument panel, then the supplyof washer fluid to the headlamps is switchedoff. This is in order to prioritise cleaning thewindscreen and the visibility through it.
ProCarManuals.co’
Page 101 of 442

03 Instruments and controls
03
}}
99
OpeningFor maximum sunroof opening, move the control back to the position for automaticopening and release. Open manually by pulling the control back- wards to the point of resistance for manualopening. The sunroof moves to maximumopen position as long as the button is keptdepressed.
ClosingClose manually by pushing the control for-wards to the point of resistance for manualclosing. The sunroof moves to closed posi-tion as long as the button is kept depressed.
WARNING
Risk of crushing when the sunroof is closed. The sunroof's pinch-protectionfunction only operates during automaticclosing, not manual.
Close automatically by pressing the control to the position for automatic closing and thenrelease it. The power supply to the sunroof is switched off by selecting key position 0 and removing
the remote control key from the ignitionswitch.
WARNING
If there are children in the car: Remember to always switch off the power supply to the sunroof by selecting keyposition 0 and then take the remote con-
trol key with you when leaving the car. Forinformation on key positions - see Keypositions - functions at different levels (p.70).
Vertical opening
G028900
Vertical opening, raised at the rear edge.
Open by pressing the rear edge of the control upward.
Close by pulling the rear edge of the con- trol down.
Closing using the remote control key or central locking button
G021345
One long press on the lock button closes the sunroof and all the windows, see Remotecontrol key - functions (p. 151) and Locking/unlocking - from the inside (p. 165). Thedoors and the tailgate are locked. To interruptclosing, press the lock button again.
WARNING
If the sunroof is closed with the remote control key, check that no one risks beingtrapped.
SunscreenThe sunroof features a manual, sliding interior sunscreen. The sunscreen slides back auto-matically when the sunroof is opened. Gripthe handle and slide the screen forward toclose it.
ProCarManuals.co’
Page 153 of 442
06 Locks and alarm
06
151
Mes- sageSpecification
Insert car keyError when reading the remote control key duringstarting - Remove the keyfrom the ignition switch, pressit in again and make a newstart attempt.
Car key notfoundError reading the remote con- trol key during starting - Try tostart again. If the error persists: Insert the remote control key into theignition switch and try to startagain.
Immobi- liser TrystartagainError in immobiliser system during starting. If the errorpersists: Contact a workshop- an authorised Volvo work-shop is recommended.
For starting the car, see Starting the engine (p. 264).
Related information
•Remote-controlled immobiliser with tracking system (p. 151)
Remote-controlled immobiliser with tracking system
Remote-controlled immobiliser with tracking system makes it possible to track and locatethe car, and to remotely activate the immobi-liser to switch off the engine. Contact your nearest Volvo dealer for more information and assistance with activating thesystem.
Related information
•Remote control key with key blade (p. 149)
• Immobiliser (p. 150)
Remote control key - functions
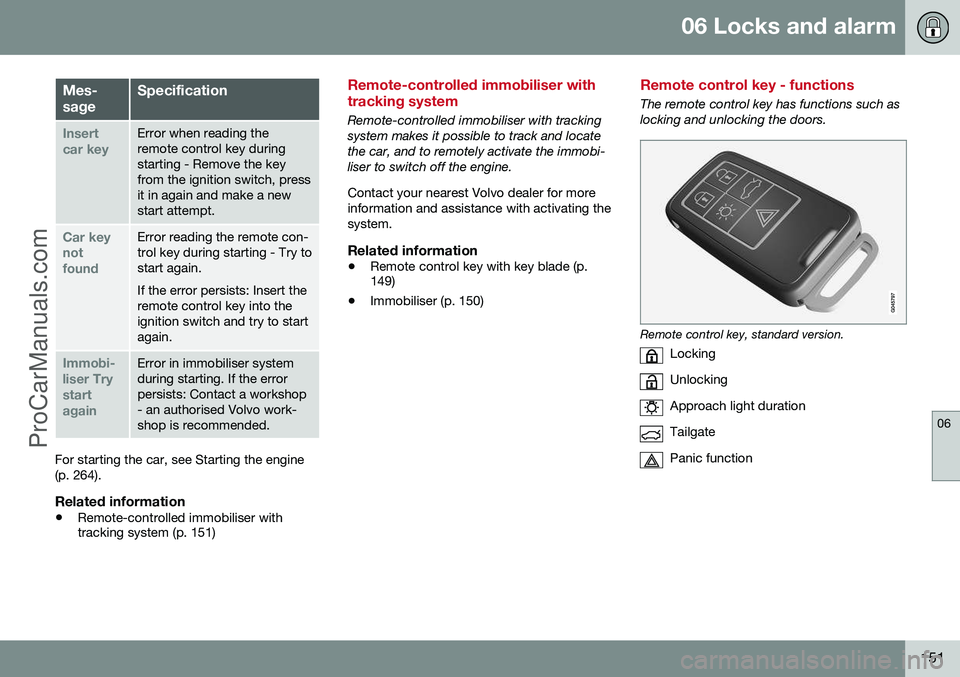
The remote control key has functions such as locking and unlocking the doors.
Remote control key, standard version.
Locking
Unlocking
Approach light duration
Tailgate
Panic function
ProCarManuals.co’