buttons VOLVO V60 2017 Owner´s Manual
[x] Cancel search | Manufacturer: VOLVO, Model Year: 2017, Model line: V60, Model: VOLVO V60 2017Pages: 406, PDF Size: 9.65 MB
Page 174 of 406
DRIVER SUPPORT
* Option/accessory, for more information, see Introduction.
172
Active chassis * (Four C)
Active chassis, Four-C (Continuously Controlled Chassis Concept), regulates the characteristicsof the shock absorbers so that the vehicle's driv-ing characteristics can be adjusted. There arethree settings: Comfort, Sport and Advanced.
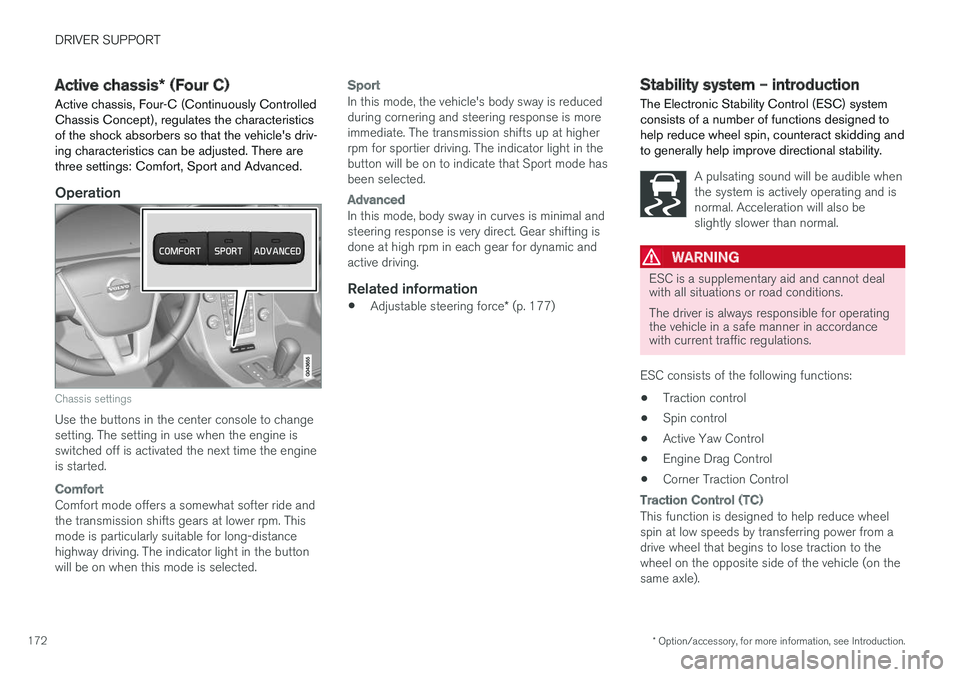
Operation
Chassis settings
Use the buttons in the center console to change setting. The setting in use when the engine isswitched off is activated the next time the engineis started.
Comfort
Comfort mode offers a somewhat softer ride and the transmission shifts gears at lower rpm. Thismode is particularly suitable for long-distancehighway driving. The indicator light in the buttonwill be on when this mode is selected.
Sport
In this mode, the vehicle's body sway is reduced during cornering and steering response is moreimmediate. The transmission shifts up at higherrpm for sportier driving. The indicator light in thebutton will be on to indicate that Sport mode hasbeen selected.
Advanced
In this mode, body sway in curves is minimal and steering response is very direct. Gear shifting isdone at high rpm in each gear for dynamic andactive driving.
Related information
• Adjustable steering force
* (p. 177)
Stability system – introduction The Electronic Stability Control (ESC) system consists of a number of functions designed tohelp reduce wheel spin, counteract skidding andto generally help improve directional stability.
A pulsating sound will be audible when the system is actively operating and isnormal. Acceleration will also beslightly slower than normal.
WARNING
ESC is a supplementary aid and cannot deal with all situations or road conditions. The driver is always responsible for operating the vehicle in a safe manner in accordancewith current traffic regulations.
ESC consists of the following functions: • Traction control
• Spin control
• Active Yaw Control
• Engine Drag Control
• Corner Traction Control
Traction Control (TC)
This function is designed to help reduce wheel spin at low speeds by transferring power from adrive wheel that begins to lose traction to thewheel on the opposite side of the vehicle (on thesame axle).
Page 182 of 406
||
DRIVER SUPPORT
180Before a speed can be set, the cruise control system must be engaged (put in standby mode).
–Press the
CRUISE button (1).
> The symbol
illuminates and the text(---) mph (5) indicates that cruise control
is in standby mode.
NOTE
Putting cruise control in standby mode does not set a cruising speed.
Setting a speed
Use the or buttons set the vehicle's cur-
rent speed. The set speed is shown in the display.
NOTE
Cruise control cannot be engaged at speeds below 20 mph (30 km/h).
Adjusting the set speedAfter a speed has been set, it can be increased or decreased by using the
or buttons.
1. Press
or briefly and release the but-
ton to increase or decrease vehicle speed by approximately 1 mph or 1 km/h.
> This will become the set speed when the button is released. 2. Press and hold one of these buttons to
increase/decrease the speed in 1-mph or 1- km/h increments. Release the button whenyou have reached the desired speed.
NOTE
• A temporary increase in speed by press- ing the accelerator pedal, for less than1 minute (e.g. when passing another car),does not affect the current cruise controlsetting. The vehicle will automaticallyreturn to the previously set speed whenthe accelerator pedal is released.
• If one of the cruise control buttons iskept depressed for more than approx.1 minute cruise control is disengaged.The engine must then be switched off inorder to reset cruise control.
Related information
•Cruise control (CC) – introduction (p. 179)
• Cruise control (CC) – deactivating (p. 181)
Toggling between ACC and CC (standard Cruise Control)
Adaptive Cruise Control (ACC) helps the driver maintain a safe distance/time interval to the vehi-cle ahead.
Switching from ACC to CCThis may be useful if, for example, the radar sen- sor is obstructed in some way. See AdaptiveCruise Control – limitations (p. 192) for addi-tional information.
• Press and hold the
button; the symbol in
the instrument panel will switch from
to
.
> This activates the standard cruise control function (see Cruise control (CC) – introduc- tion (p. 179)).
WARNING
Switching from ACC to CC means that:
• Your vehicle will
no longer automatically
maintain a set distance to a vehicle ahead.
• Only the set speed will be maintained andthe driver will have to apply the brakeswhen needed.
Switching from CC to ACC
Switch off cruise control by pressing once or
twice as needed according to the instructions in
Page 188 of 406
DRIVER SUPPORT
186
Adaptive Cruise Control – setting speed
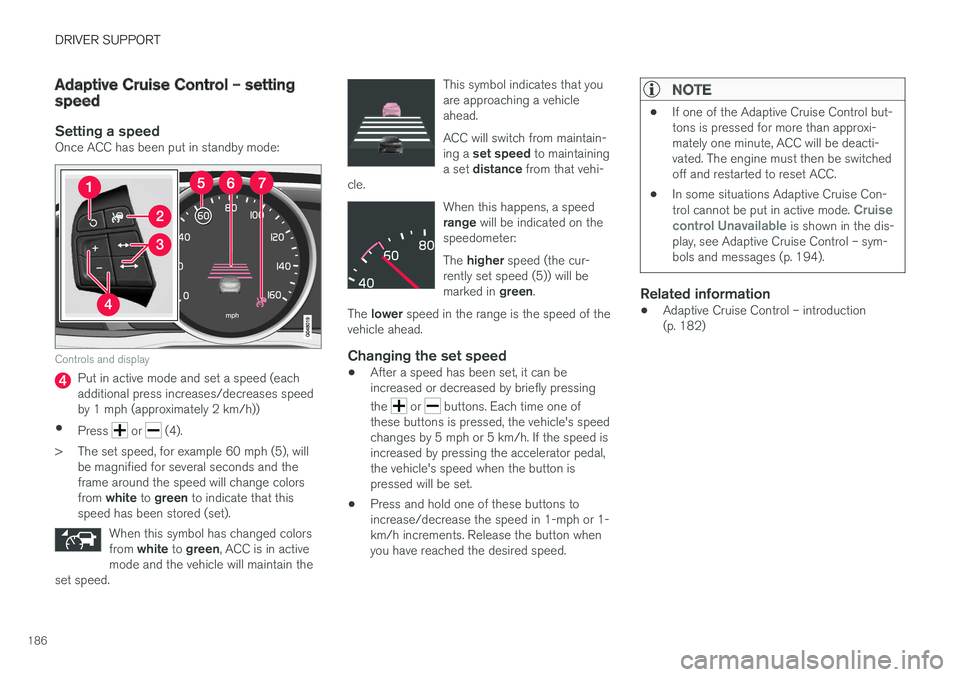
Setting a speedOnce ACC has been put in standby mode:
Controls and display
Put in active mode and set a speed (each additional press increases/decreases speedby 1 mph (approximately 2 km/h))
• Press
or (4).
> The set speed, for example 60 mph (5), will be magnified for several seconds and the frame around the speed will change colors from white to green to indicate that this
speed has been stored (set).
When this symbol has changed colorsfrom white to green , ACC is in active
mode and the vehicle will maintain the
set speed.
This symbol indicates that you are approaching a vehicleahead. ACC will switch from maintain- ing a set speed to maintaining
a set distance from that vehi-
cle.
When this happens, a speed range will be indicated on the
speedometer: The higher speed (the cur-
rently set speed (5)) will be marked in green.
The lower speed in the range is the speed of the
vehicle ahead.
Changing the set speed
• After a speed has been set, it can be increased or decreased by briefly pressing the
or buttons. Each time one of
these buttons is pressed, the vehicle's speed changes by 5 mph or 5 km/h. If the speed isincreased by pressing the accelerator pedal,the vehicle's speed when the button ispressed will be set.
• Press and hold one of these buttons toincrease/decrease the speed in 1-mph or 1-km/h increments. Release the button whenyou have reached the desired speed.
NOTE
•
If one of the Adaptive Cruise Control but- tons is pressed for more than approxi-mately one minute, ACC will be deacti-vated. The engine must then be switchedoff and restarted to reset ACC.
• In some situations Adaptive Cruise Con- trol cannot be put in active mode.
Cruise
control Unavailable is shown in the dis-
play, see Adaptive Cruise Control – sym- bols and messages (p. 194).
Related information
• Adaptive Cruise Control – introduction (p. 182)
Page 189 of 406
DRIVER SUPPORT
}}
187
Adaptive Cruise Control – setting time interval
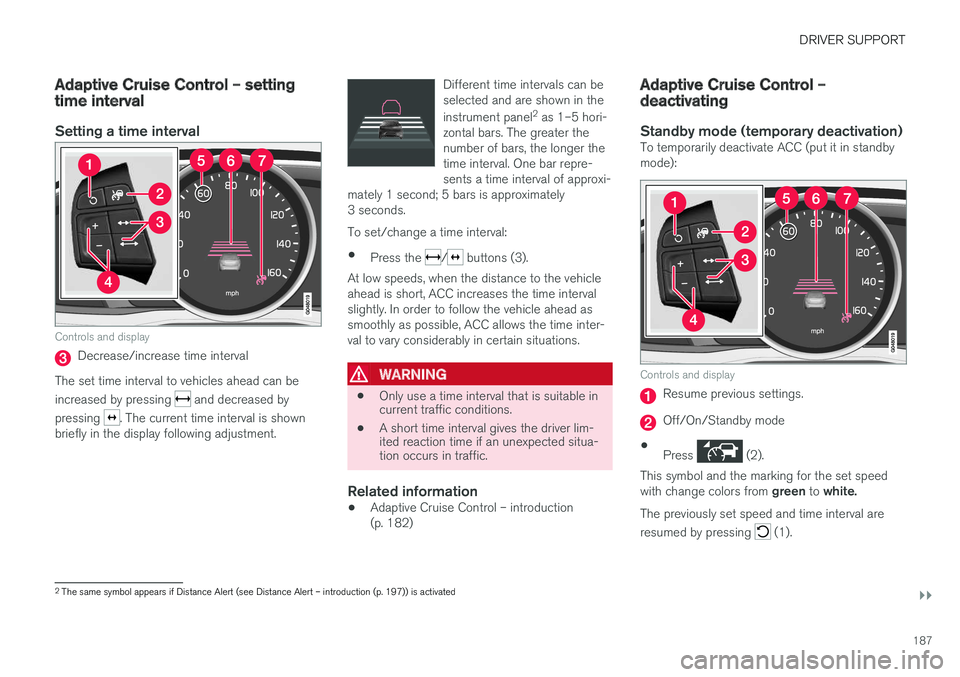
Setting a time interval
Controls and display
Decrease/increase time interval
The set time interval to vehicles ahead can be increased by pressing
and decreased by
pressing
. The current time interval is shown
briefly in the display following adjustment. Different time intervals can be selected and are shown in the instrument panel
2
as 1–5 hori-
zontal bars. The greater the number of bars, the longer thetime interval. One bar repre-sents a time interval of approxi-
mately 1 second; 5 bars is approximately3 seconds.
To set/change a time interval:
• Press the
/ buttons (3).
At low speeds, when the distance to the vehicle ahead is short, ACC increases the time intervalslightly. In order to follow the vehicle ahead assmoothly as possible, ACC allows the time inter-val to vary considerably in certain situations.
WARNING
• Only use a time interval that is suitable in current traffic conditions.
• A short time interval gives the driver lim-ited reaction time if an unexpected situa-tion occurs in traffic.
Related information
• Adaptive Cruise Control – introduction (p. 182)
Adaptive Cruise Control – deactivating
Standby mode (temporary deactivation)To temporarily deactivate ACC (put it in standby mode):
Controls and display
Resume previous settings.
Off/On/Standby mode
• Press
(2).
This symbol and the marking for the set speed with change colors from green to white.
The previously set speed and time interval are resumed by pressing
(1).
2 The same symbol appears if Distance Alert (see Distance Alert – introduction (p. 197)) is activated
Page 262 of 406
STARTING AND DRIVING
* Option/accessory, for more information, see Introduction.
260
Engine Remote Start (ERS) * –
introduction
ERS is a feature that makes it possible to remotely start the engine using the remote key tocool or heat the passenger compartment beforedriving.
The climate system will start using automatic set- tings. When the engine is started using ERS, it will run for a maximum of 15 minutes before automati-cally switching off again. After 2 ERS starts, theengine must be started in the normal way beforeERS can be used again.
NOTE
• Always adhere to applicable State, Prov- ince and/or Local laws regarding engineidling when using ERS.
• The service life of the remote key's bat-tery is affected by ERS use. If this featureis used frequently, the battery should bereplaced once a year, see Remote key –replacing the battery (p. 157).
WARNING
Keep the following in mind before using ERS:
• The vehicle should be in view.
• The vehicle should be unoccupied.
• The vehicle must not be parked indoors or in an enclosed area. Exhaust fumes areharmful to the health.
Related information
•
Engine Remote Start (ERS)
* – starting the
engine (p. 260)
• Engine Remote Start (ERS)
* – switching off
the engine (p. 261)
Engine Remote Start (ERS) * –
starting the engine
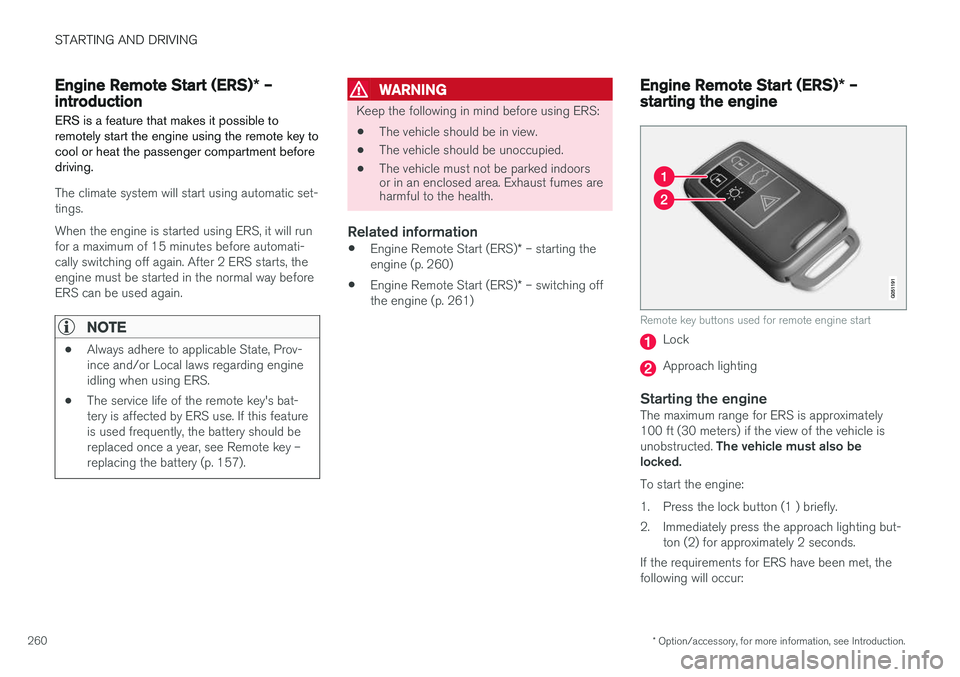
Remote key buttons used for remote engine start
Lock
Approach lighting
Starting the engineThe maximum range for ERS is approximately 100 ft (30 meters) if the view of the vehicle is unobstructed. The vehicle must also be
locked. To start the engine:
1. Press the lock button (1 ) briefly.
2. Immediately press the approach lighting but- ton (2) for approximately 2 seconds.
If the requirements for ERS have been met, the following will occur:
Page 375 of 406
MAINTENANCE AND SERVICING
}}
373
Cleaning the seat beltsClean only with lukewarm water and a mild soap solution.
Cleaning floor matsThe floor mats should be vacuumed or brushedclean regularly, especially during winter whenthey should be taken out for drying. Spots on tex-tile mats can be removed with a mild detergent.For best protection in winter, Volvo recommendsthe use of Volvo rubber floor mats. Consult yourVolvo retailer.
Spots on interior plastic, metal, or wood
surfaces
Cleaning interior plastic components should bedone with a cleaning agent specially designed forthis purpose. Consult your Volvo retailer.
CAUTION
• Do not use cleaning agents with high alcohol content such as washer fluid toclean instrument panel glass.
• Never spray cleaning agents or waterdirectly onto components with electricalbuttons or controls. Clean components ofthis type by applying the cleaning agent/water sparingly to a cloth and wiping thecomponents so that no liquid penetratesinto these components.
Related information
•Washing the car (p. 369)
Touching up paintwork
Paint damage requires immediate attention to avoid rusting. Make it a habit to check the finishregularly, for instance washing the vehicle.Touch-up if necessary.
Paint repairs require special equipment and skill. Contact your Volvo retailer for any extensive dam-age. Minor scratches can be repaired by using Volvo touch-up paint.
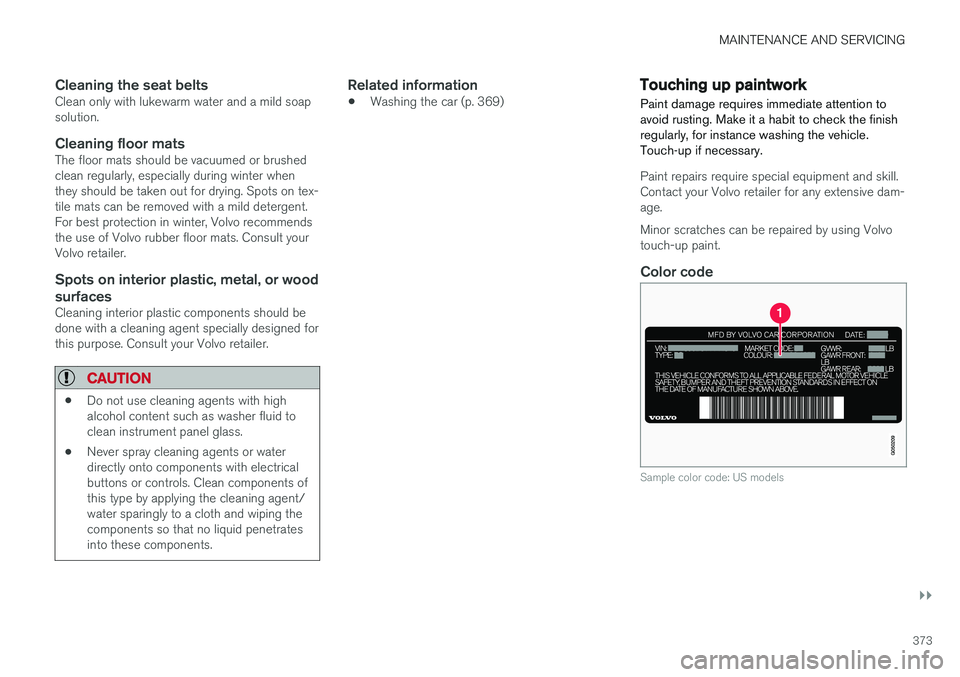
Color code
Sample color code: US models