parking sensors VOLVO V60 2021 Owners Manual
[x] Cancel search | Manufacturer: VOLVO, Model Year: 2021, Model line: V60, Model: VOLVO V60 2021Pages: 661, PDF Size: 12.68 MB
Page 154 of 661
LIGHTING
* Option/accessory.
152
Parking lights
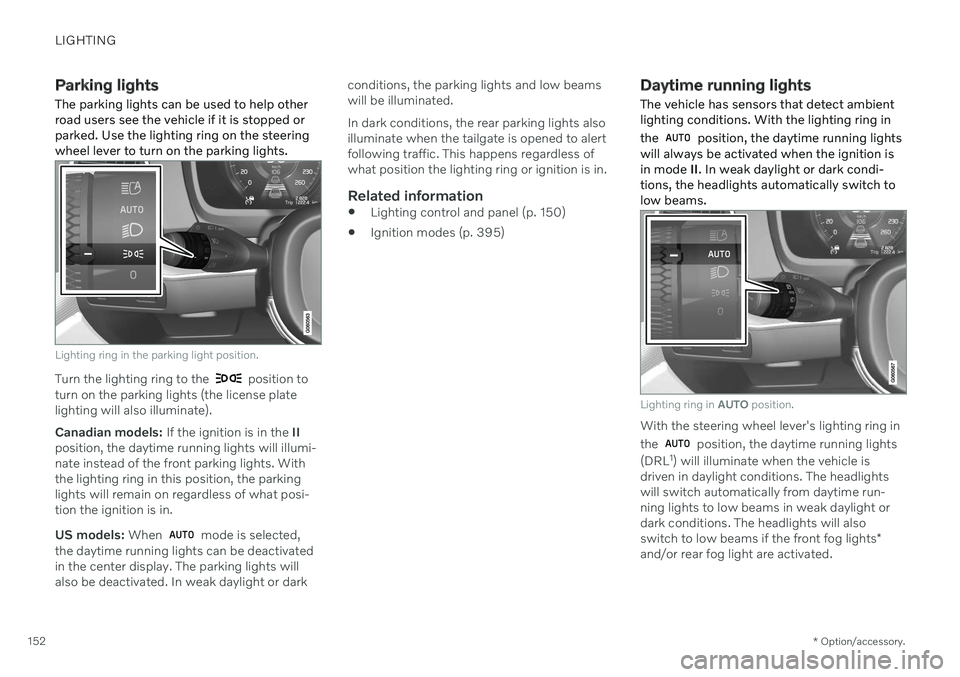
The parking lights can be used to help other road users see the vehicle if it is stopped orparked. Use the lighting ring on the steeringwheel lever to turn on the parking lights.
Lighting ring in the parking light position.
Turn the lighting ring to the position to
turn on the parking lights (the license plate lighting will also illuminate). Canadian models: If the ignition is in the II
position, the daytime running lights will illumi- nate instead of the front parking lights. Withthe lighting ring in this position, the parkinglights will remain on regardless of what posi-tion the ignition is in. US models: When
mode is selected,
the daytime running lights can be deactivated in the center display. The parking lights willalso be deactivated. In weak daylight or dark conditions, the parking lights and low beamswill be illuminated. In dark conditions, the rear parking lights also illuminate when the tailgate is opened to alertfollowing traffic. This happens regardless ofwhat position the lighting ring or ignition is in.
Related information
Lighting control and panel (p. 150)
Ignition modes (p. 395)
Daytime running lights
The vehicle has sensors that detect ambient lighting conditions. With the lighting ring in the
position, the daytime running lights
will always be activated when the ignition is in mode II. In weak daylight or dark condi-
tions, the headlights automatically switch tolow beams.
Lighting ring in AUTO position.
With the steering wheel lever's lighting ring in the
position, the daytime running lights
(DRL 1
) will illuminate when the vehicle is
driven in daylight conditions. The headlights will switch automatically from daytime run-ning lights to low beams in weak daylight ordark conditions. The headlights will also switch to low beams if the front fog lights *
and/or rear fog light are activated.
Page 170 of 661
WINDOWS, GLASS AND MIRRORS
* Option/accessory.
168
Adjusting the rearview mirror dimming function
Bright light entering the vehicle from behind, e.g. from the headlights of following vehicles,could reflect in the rearview mirror and doormirrors and cause a glare. Use the dimmingfunction when light from behind is distract-ing.
Auto-dimIf bright light enters the vehicle from behind, the door mirrors will automatically dim when itis dark outside or when lighting conditions arelow, for example when driving in tunnels.Auto-dim is always active when the engine isrunning, except when reverse gear is engaged.
NOTE
Adjustments to the sensitivity level will not be noticeable immediately but will insteadtake effect after a short period of time.
The sensitivity level for dimming will affect both the rearview mirror and door mirrors. To change the dimming sensitivity level:1. Tap
Settings in the Top view in the center
display.
2. Tap
My CarMirrors and Convenience.
3. Under
Rearview Mirror Auto Dimming,
select Normal, Dark or Light. The rearview mirror has two sensors - one pointing forward and one pointing rearward -which work together to identify and eliminateglare. The forward-pointing sensor monitorsambient light, while the rearward-pointingsensor monitors light from the headlights offollowing vehicles. For the door mirrors to be equipped with auto- dim, the rearview mirror must also be equip-ped with auto-dim.
NOTE
If the sensors are obstructed by e.g. a parking permit, transponder, sunshade orobjects on the seats or in the cargo com-partment in a way that prevents light fromreaching the sensors, the auto-dim func-tion in the door and rearview mirrors willbe reduced.
Related information
Rearview/door mirrors (p. 167)
Adjusting the door mirrors (p. 168)
Adjusting the door mirrors
To improve visibility to the rear, the door mir- rors need to be adjusted to the driver's heightand seating position. There are several automatic settings that can also be connected to the memory function buttons for the power seat *.
Controls used for door mirrors
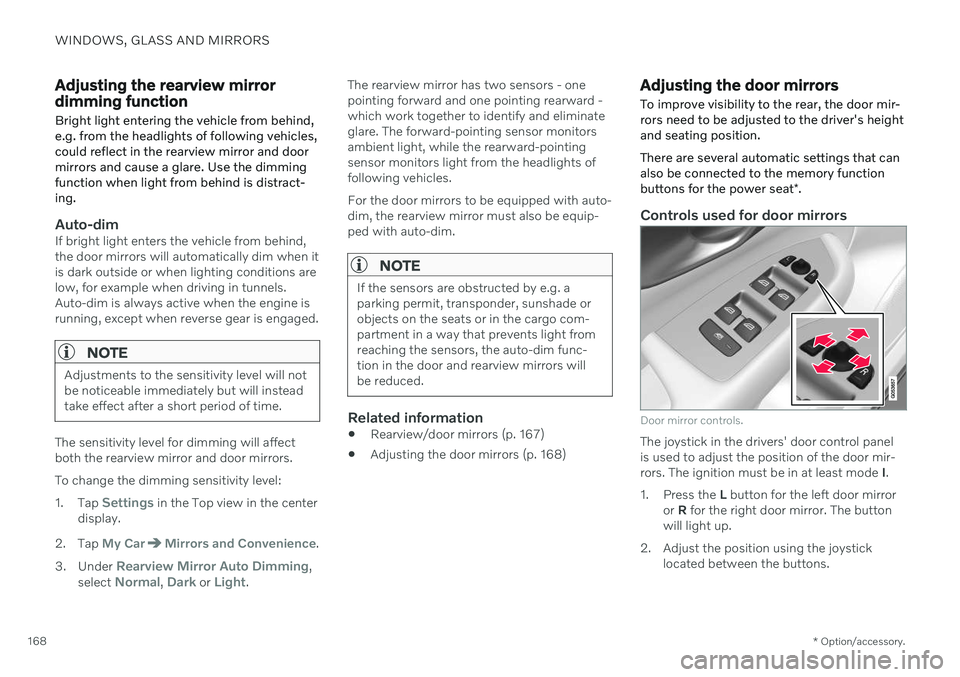
Door mirror controls.
The joystick in the drivers' door control panel is used to adjust the position of the door mir-rors. The ignition must be in at least mode I.
1. Press the L button for the left door mirror
or R for the right door mirror. The button
will light up.
2. Adjust the position using the joystick located between the buttons.
Page 200 of 661
CLIMATE CONTROL
* Option/accessory.
198
Climate The vehicle is equipped with electronic cli- mate control. The climate system cools, heatsand dehumidifies the air in the passengercompartment.
All of the climate system functions are con- trolled from the center display and the buttonson the center console. Certain rear seat functions can also be con- trolled from the climate controls * on the rear
of the tunnel console.
NOTE
The climate system can be used to cool down the media system in the center dis-play if needed. In these cases, the message
Climate system Cooling the
infotainment system will be shown in the
instrument panel.
Related information
Climate zones (p. 198)
Climate control sensors (p. 199)
Perceived temperature (p. 200)
Climate control system voice commands (p. 200)
Parking climate
* (p. 226)
Air quality (p. 201)
Air distribution (p. 204)
Climate system controls (p. 210)
Climate zones The vehicle is divided into climate zones to make it possible to set different temperaturesfor different parts of the passenger compart-ment.
2-zone climate system
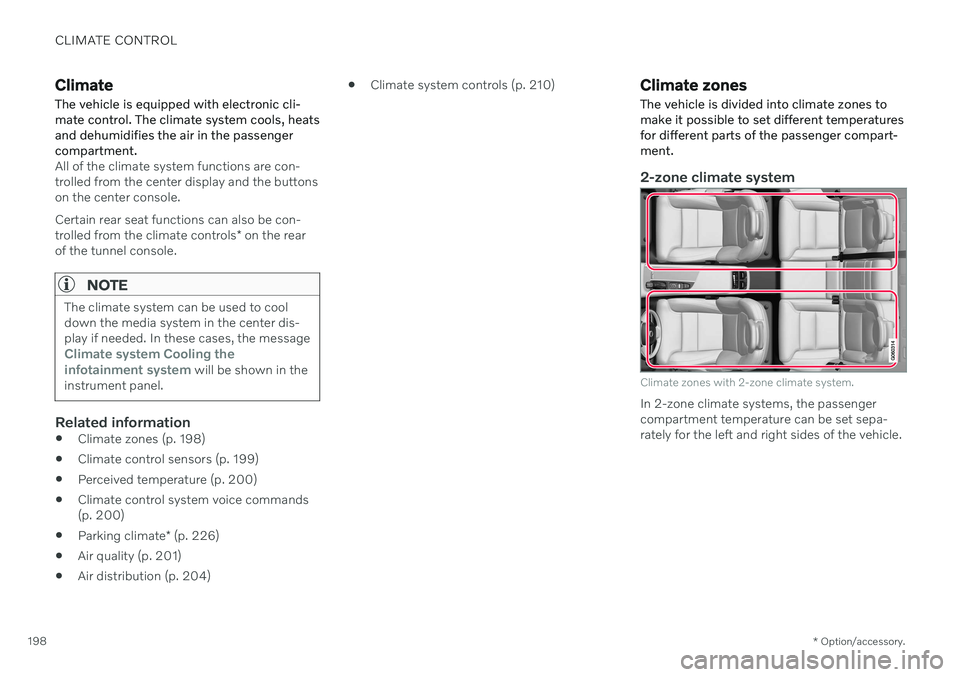
Climate zones with 2-zone climate system.
In 2-zone climate systems, the passenger compartment temperature can be set sepa-rately for the left and right sides of the vehicle.
Page 335 of 661
DRIVER SUPPORT
}}
333
City Safety limitationsCity Safety 81
functionality may be reduced in
certain situations.
Surroundings
Low objects
Hanging objects, such as flags for overhang- ing loads or accessories such as auxiliarylights or front protective grids that extendbeyond the height of the hood, may limit City Safety functionality.
Slippery road conditions
The extended braking distance on slippery roads may reduce City Safety's capacity tohelp avoid a collision. In these types of situa-tions, the Anti-lock Braking System and Elec- tronic Stability Control (ESC 82
) are designed
for optimal braking power with maintained stability.
Backlighting
The visual warning signal in the windshield may be difficult to detect in bright sunlight, ifthere are reflections, or if the driver is wearingsunglasses or not looking straight ahead.
Heat
If the temperature in the passenger compart- ment is high due to e.g. bright sunlight, thevisual warning signal in the windshield may betemporarily disabled.
Camera and radar sensor's field of vision
The camera's field of vision is limited and in certain situations, it may be unable to detectpedestrians, large animals, cyclists or vehicles,or it may detect them later than expected. Vehicles that are dirty may be detected later than clean vehicles, and in dark conditions,motorcycles may be detected late or not at all. If a text message displayed in the instrument panel indicates that the camera or radar sen-sor is obstructed, it may be difficult for CitySafety to detect pedestrians, large animals,cyclists, vehicles or lane markings in front ofthe vehicle. City Safety functionality maytherefore be reduced. Text messages may not be displayed for all sit- uations in which the windshield sensors areblocked. The driver must therefore alwayskeep the windshield in front of the camera/radar sensor clean.
CAUTION
Only a workshop may perform mainte- nance on driver support components – anauthorized Volvo workshop is recom-mended.
Driver intervention
Backing up
City Safety is temporarily deactivated when the vehicle is backing up.
Low speed
City Safety is not activated at very low speeds under 4 km/h (3 mph). The system will there-fore not intervene in situations in which yourvehicle is approaching another vehicle veryslowly, such as when parking.
Active driver
Action by the driver always has priority. City Safety will therefore not react or will react at alater stage with a warning or intervention insituations in which the driver is clearly steeringand operating the accelerator pedal, even if acollision is unavoidable. An active and aware driving style may there- fore delay collision warnings and interventionin order to minimize unnecessary warnings.
81 This function is not available on all markets.
82 Electronic Stability Control
Page 356 of 661
||
DRIVER SUPPORT
* Option/accessory.
354
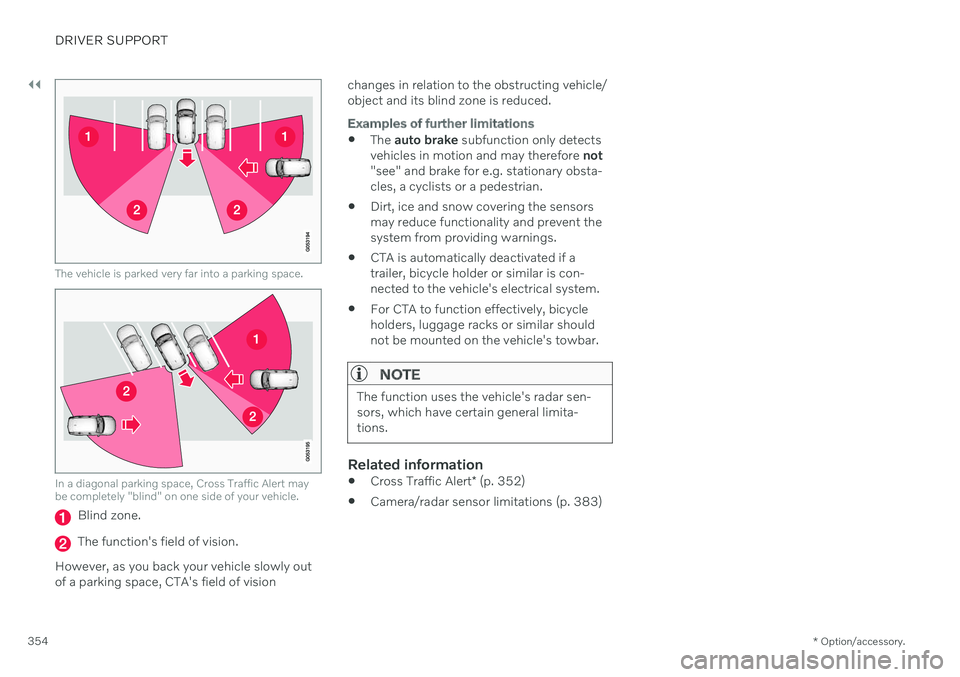
The vehicle is parked very far into a parking space.
In a diagonal parking space, Cross Traffic Alert may be completely "blind" on one side of your vehicle.
Blind zone.
The function's field of vision.
However, as you back your vehicle slowly out of a parking space, CTA's field of vision changes in relation to the obstructing vehicle/object and its blind zone is reduced.
Examples of further limitations
The
auto brake subfunction only detects
vehicles in motion and may therefore not
"see" and brake for e.g. stationary obsta- cles, a cyclists or a pedestrian.
Dirt, ice and snow covering the sensorsmay reduce functionality and prevent thesystem from providing warnings.
CTA is automatically deactivated if atrailer, bicycle holder or similar is con-nected to the vehicle's electrical system.
For CTA to function effectively, bicycleholders, luggage racks or similar shouldnot be mounted on the vehicle's towbar.
NOTE
The function uses the vehicle's radar sen- sors, which have certain general limita-tions.
Related information
Cross Traffic Alert
* (p. 352)
Camera/radar sensor limitations (p. 383)
Page 359 of 661
DRIVER SUPPORT
}}
* Option/accessory.357
Related information
Driver support systems (p. 270)
Park Assist front, rear and sides
* (p. 357)
Activating or deactivating Park Assist
*
(p. 358)
Park Assist symbols and messages (p. 360)
Park Assist limitations (p. 359)
Park Assist front, rear and sides
*
Park Assist (PAS 102
) behaves differently
depending on which part of the vehicle is approaching an obstacle.
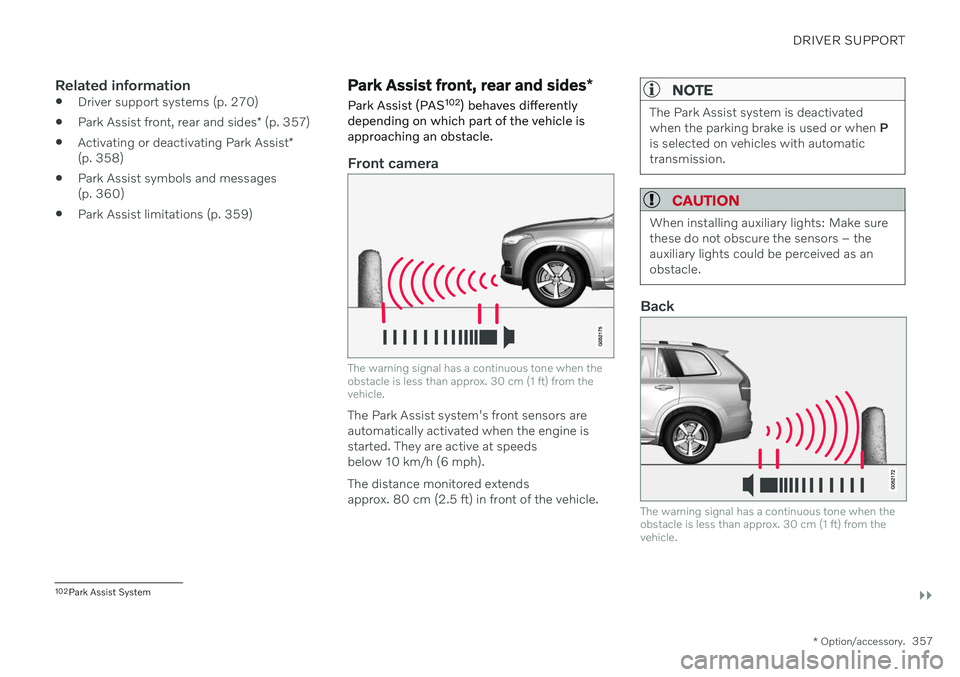
Front camera
The warning signal has a continuous tone when the obstacle is less than approx. 30 cm (1 ft) from thevehicle.
The Park Assist system's front sensors are automatically activated when the engine isstarted. They are active at speedsbelow 10 km/h (6 mph). The distance monitored extends approx. 80 cm (2.5 ft) in front of the vehicle.
NOTE
The Park Assist system is deactivated when the parking brake is used or when P
is selected on vehicles with automatictransmission.
CAUTION
When installing auxiliary lights: Make sure these do not obscure the sensors – theauxiliary lights could be perceived as anobstacle.
Back
The warning signal has a continuous tone when the obstacle is less than approx. 30 cm (1 ft) from thevehicle.
102 Park Assist System
Page 360 of 661
||
DRIVER SUPPORT
* Option/accessory.
358 The rear sensors will be activated if the vehicle begins rolling backward or if reverse gear isengaged. The distance monitored extends approx. 1.5 meters (5 ft) behind the vehicle. The Park Assist system's rear sensors will be automatically deactivated if the vehicle isbacking up with a trailer connected to thevehicle's electrical system.
NOTE
When reversing with e.g. a trailer or bike carrier on the trailer hitch – without Volvooriginal trailer cables – the Parking Assistsystem may have to be turned off manuallyto prevent the sensors from reacting tothese.
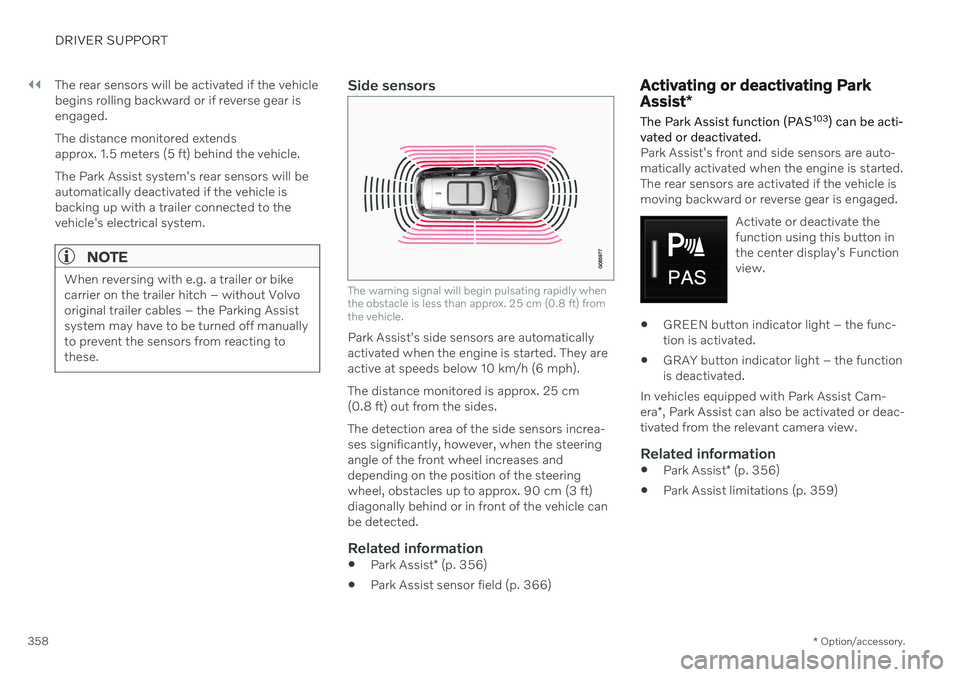
Side sensors
The warning signal will begin pulsating rapidly when the obstacle is less than approx. 25 cm (0.8 ft) fromthe vehicle.
Park Assist's side sensors are automatically activated when the engine is started. They areactive at speeds below 10 km/h (6 mph). The distance monitored is approx. 25 cm (0.8 ft) out from the sides. The detection area of the side sensors increa- ses significantly, however, when the steeringangle of the front wheel increases anddepending on the position of the steeringwheel, obstacles up to approx. 90 cm (3 ft)diagonally behind or in front of the vehicle canbe detected.
Related information
Park Assist
* (p. 356)
Park Assist sensor field (p. 366)
Activating or deactivating Park Assist
*
The Park Assist function (PAS 103
) can be acti-
vated or deactivated.
Park Assist's front and side sensors are auto- matically activated when the engine is started.The rear sensors are activated if the vehicle ismoving backward or reverse gear is engaged.
Activate or deactivate thefunction using this button inthe center display's Functionview.
GREEN button indicator light – the func- tion is activated.
GRAY button indicator light – the functionis deactivated.
In vehicles equipped with Park Assist Cam- era *, Park Assist can also be activated or deac-
tivated from the relevant camera view.
Related information
Park Assist
* (p. 356)
Park Assist limitations (p. 359)
Page 361 of 661
DRIVER SUPPORT
* Option/accessory.359
Park Assist limitations Park Assist (PAS104
) may not be able to
detect all conditions in all situations and func- tionality may therefore be limited in certaincases.
The driver should be aware of the following limitations for Park Assist:
WARNING
The parking sensors have dead/blind spots where objects cannot bedetected.
Pay particular attention to people andanimals near the vehicle.
Bear in mind that the front end of thevehicle may swing out towards oncom-ing traffic during the parking maneuver.
WARNING
Be extra cautious when reversing if this symbol isshown when a trailer, bikecarrier or similar isattached and electricallyconnected to the vehicle. The symbol indicates that
the rear parking assist sensors are deacti-
vated and will not warn of any obstacles.
CAUTION
Objects such as chains, thin and glossy poles or low obstacles may end up in the"signal shadow" and then go temporarilyundetected by the sensors – the pulsatingtone may then unexpectedly stop insteadof becoming a constant tone as expected. The sensors cannot detect high objects, such as protruding ramps. In such situations, pay extra attention and maneuver/drive the vehicle veryslowly or stop the current parkingmaneuver – there may be a high risk ofdamage to the vehicle or other objectssince information from the sensors isnot always reliable in such situations.
CAUTION
In some circumstances, the Park Assist System may produce false warnings due toexternal sound sources with the sameultrasonic frequencies as those the systemworks with. Examples of such sources are horns, wet tires on asphalt, pneumatic brakes, exhaustnoise from motorcycles, etc.
NOTE
When a trailer hitch is configured with the vehicle electrical system, the trailer hitchprotrusion is included when the functionmeasures the distance to objects behindthe vehicle.
Related information
Park Assist
* (p. 356)
103
Park Assist System
104 Park Assist System
Page 363 of 661
DRIVER SUPPORT
}}
* Option/accessory.361
Park Assist Camera *
The Park Assist Camera (PAC 106
) can assist
the driver when maneuvering in tight spaces by indicating obstacles using the camerascreen and graphics in the center display.
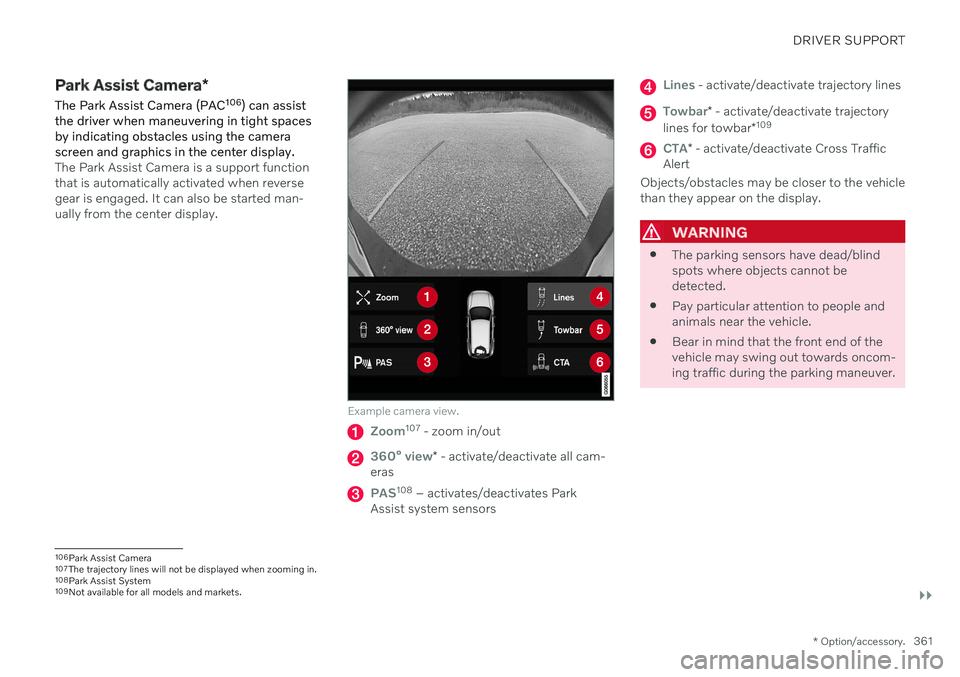
The Park Assist Camera is a support function that is automatically activated when reversegear is engaged. It can also be started man-ually from the center display.
Example camera view.
Zoom107 - zoom in/out
360° view* - activate/deactivate all cam-
eras
PAS108 – activates/deactivates Park
Assist system sensors
Lines - activate/deactivate trajectory lines
Towbar* - activate/deactivate trajectory
lines for towbar *109
CTA*
- activate/deactivate Cross Traffic
Alert
Objects/obstacles may be closer to the vehicle than they appear on the display.
WARNING
The parking sensors have dead/blind spots where objects cannot bedetected.
Pay particular attention to people andanimals near the vehicle.
Bear in mind that the front end of thevehicle may swing out towards oncom-ing traffic during the parking maneuver.
106
Park Assist Camera
107 The trajectory lines will not be displayed when zooming in.
108 Park Assist System
109 Not available for all models and markets.
Page 377 of 661
DRIVER SUPPORT
* Option/accessory.375
Positioning the vehicle in the parking space
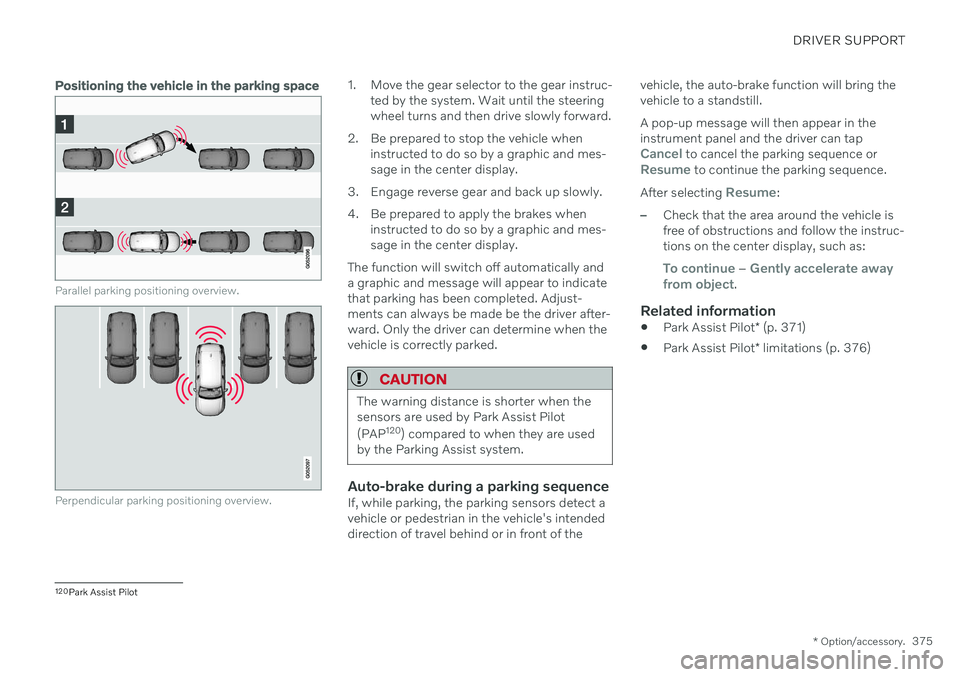
Parallel parking positioning overview.
Perpendicular parking positioning overview.
1. Move the gear selector to the gear instruc-
ted by the system. Wait until the steering wheel turns and then drive slowly forward.
2. Be prepared to stop the vehicle when instructed to do so by a graphic and mes-sage in the center display.
3. Engage reverse gear and back up slowly.
4. Be prepared to apply the brakes when instructed to do so by a graphic and mes- sage in the center display.
The function will switch off automatically anda graphic and message will appear to indicatethat parking has been completed. Adjust-ments can always be made be the driver after-ward. Only the driver can determine when thevehicle is correctly parked.
CAUTION
The warning distance is shorter when the sensors are used by Park Assist Pilot (PAP 120
) compared to when they are used
by the Parking Assist system.
Auto-brake during a parking sequenceIf, while parking, the parking sensors detect a vehicle or pedestrian in the vehicle's intendeddirection of travel behind or in front of the vehicle, the auto-brake function will bring thevehicle to a standstill. A pop-up message will then appear in the instrument panel and the driver can tap
Cancel to cancel the parking sequence orResume to continue the parking sequence.
After selecting
Resume:
–Check that the area around the vehicle is free of obstructions and follow the instruc-tions on the center display, such as:
To continue – Gently accelerate away
from object.
Related information
Park Assist Pilot
* (p. 371)
Park Assist Pilot
* limitations (p. 376)
120
Park Assist Pilot