VOLVO V60 CROSS COUNTRY 2016 Owner´s Manual
Manufacturer: VOLVO, Model Year: 2016, Model line: V60 CROSS COUNTRY, Model: VOLVO V60 CROSS COUNTRY 2016Pages: 402, PDF Size: 10.32 MB
Page 61 of 402
02 Safety
02
59
Integrated booster cushion – using
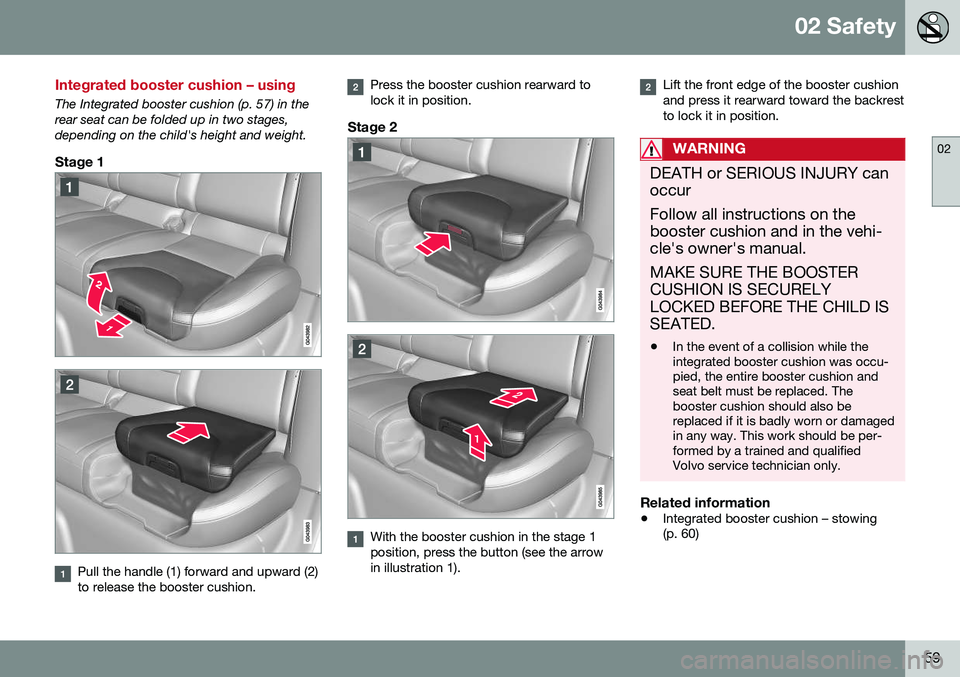
The Integrated booster cushion (p. 57) in the rear seat can be folded up in two stages,depending on the child's height and weight.
Stage 1
Pull the handle (1) forward and upward (2) to release the booster cushion.
Press the booster cushion rearward to lock it in position.
Stage 2
With the booster cushion in the stage 1 position, press the button (see the arrowin illustration 1).
Lift the front edge of the booster cushion and press it rearward toward the backrestto lock it in position.
WARNING
DEATH or SERIOUS INJURY can occur Follow all instructions on the booster cushion and in the vehi-cle's owner's manual. MAKE SURE THE BOOSTER CUSHION IS SECURELYLOCKED BEFORE THE CHILD ISSEATED. •In the event of a collision while the integrated booster cushion was occu-pied, the entire booster cushion andseat belt must be replaced. Thebooster cushion should also bereplaced if it is badly worn or damagedin any way. This work should be per-formed by a trained and qualifiedVolvo service technician only.
Related information
•
Integrated booster cushion – stowing (p. 60)
Page 62 of 402
02 Safety
02
60
Integrated booster cushion – stowing
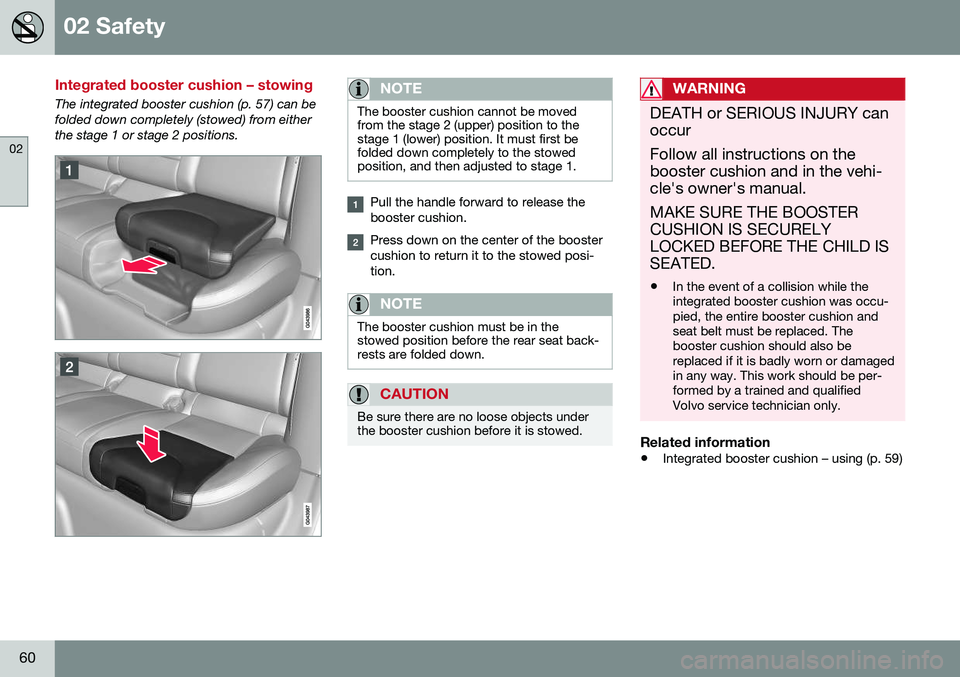
The integrated booster cushion (p. 57) can be folded down completely (stowed) from eitherthe stage 1 or stage 2 positions.NOTE
The booster cushion cannot be moved from the stage 2 (upper) position to thestage 1 (lower) position. It must first befolded down completely to the stowedposition, and then adjusted to stage 1.
Pull the handle forward to release the booster cushion.
Press down on the center of the booster cushion to return it to the stowed posi-tion.
NOTE
The booster cushion must be in the stowed position before the rear seat back-rests are folded down.
CAUTION
Be sure there are no loose objects under the booster cushion before it is stowed.
WARNING
DEATH or SERIOUS INJURY can occur Follow all instructions on the booster cushion and in the vehi-cle's owner's manual. MAKE SURE THE BOOSTER CUSHION IS SECURELYLOCKED BEFORE THE CHILD ISSEATED. •In the event of a collision while the integrated booster cushion was occu-pied, the entire booster cushion andseat belt must be replaced. Thebooster cushion should also bereplaced if it is badly worn or damagedin any way. This work should be per-formed by a trained and qualifiedVolvo service technician only.
Related information
•
Integrated booster cushion – using (p. 59)
Page 63 of 402
02 Safety
02
* Option/accessory, for more information, see Introduction.61
Child safety locks
Power child safety locks* help prevent chil- dren from inadvertently opening one of therear doors or windows from inside the vehicle.
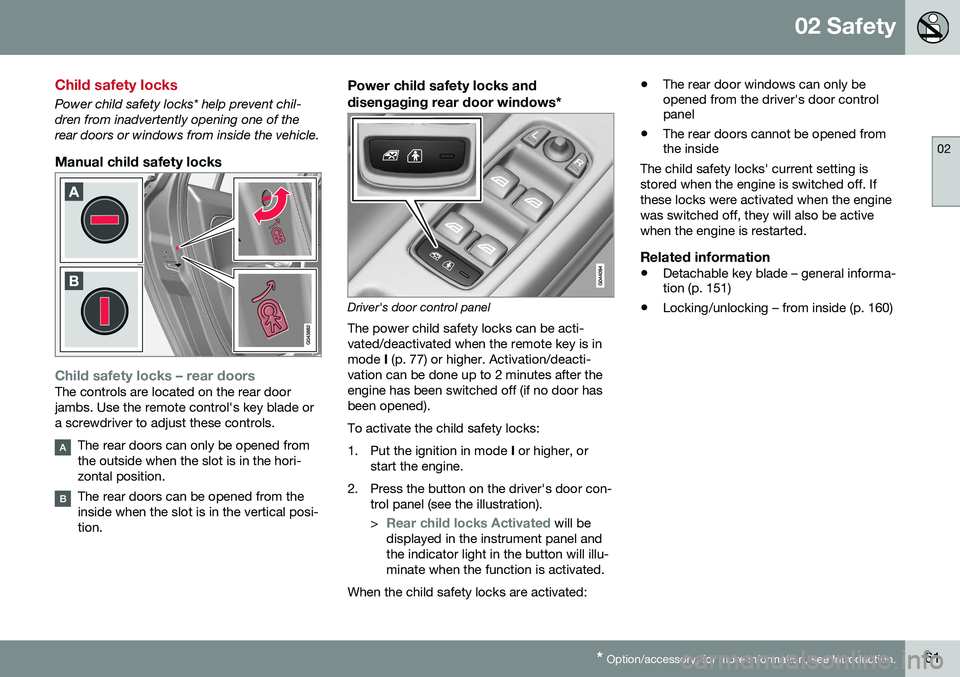
Manual child safety locks
Child safety locks – rear doorsThe controls are located on the rear door jambs. Use the remote control's key blade ora screwdriver to adjust these controls.
The rear doors can only be opened from the outside when the slot is in the hori-zontal position.
The rear doors can be opened from the inside when the slot is in the vertical posi-tion.
Power child safety locks and
disengaging rear door windows*
Driver's door control panel
The power child safety locks can be acti- vated/deactivated when the remote key is inmode I (p. 77) or higher. Activation/deacti-
vation can be done up to 2 minutes after theengine has been switched off (if no door hasbeen opened). To activate the child safety locks:
1. Put the ignition in mode I or higher, or
start the engine.
2. Press the button on the driver's door con- trol panel (see the illustration). >
Rear child locks Activated will be
displayed in the instrument panel and the indicator light in the button will illu-minate when the function is activated.
When the child safety locks are activated: •
The rear door windows can only be opened from the driver's door controlpanel
• The rear doors cannot be opened fromthe inside
The child safety locks' current setting is stored when the engine is switched off. Ifthese locks were activated when the enginewas switched off, they will also be activewhen the engine is restarted.
Related information
• Detachable key blade – general informa- tion (p. 151)
• Locking/unlocking – from inside (p. 160)
Page 64 of 402
I N S T R U M E N T S A N D C O N T R O L S
Page 65 of 402
03 Instruments and controls
03
}}
63
Instrument overview
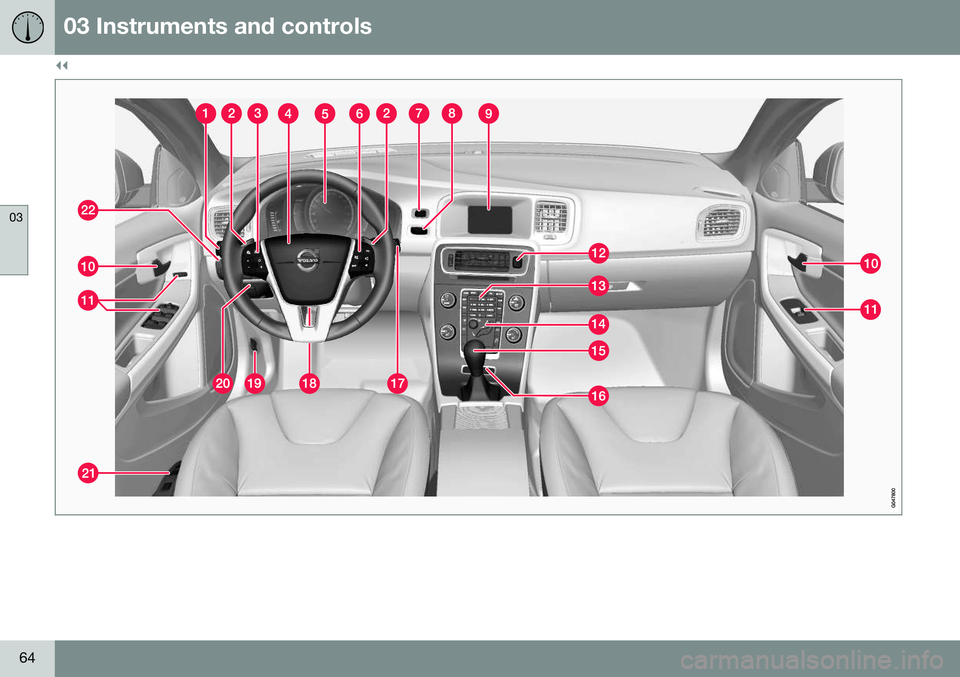
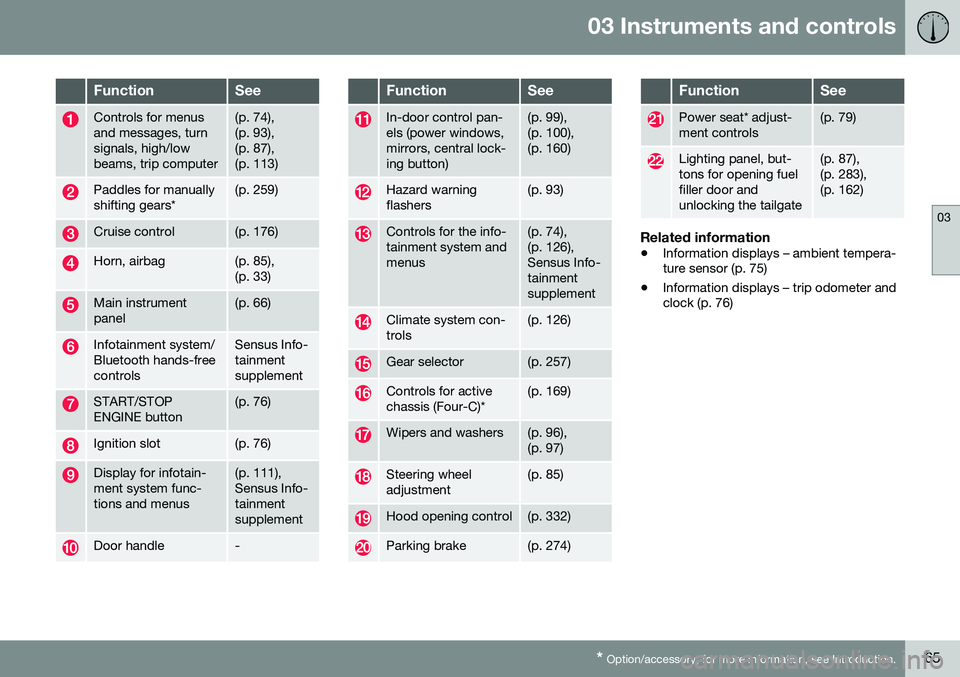
This overview shows the location of the instrument panel and center console displays,and controls/buttons/switches.
Page 66 of 402
||
03 Instruments and controls
03
64
Page 67 of 402
03 Instruments and controls
03
* Option/accessory, for more information, see Introduction.65
FunctionSee
Controls for menus and messages, turnsignals, high/lowbeams, trip computer(p. 74), (p. 93),(p. 87),(p. 113)
Paddles for manually shifting gears*(p. 259)
Cruise control(p. 176)
Horn, airbag(p. 85), (p. 33)
Main instrument panel(p. 66)
Infotainment system/ Bluetooth hands-freecontrolsSensus Info- tainmentsupplement
START/STOP ENGINE button(p. 76)
Ignition slot(p. 76)
Display for infotain- ment system func-tions and menus(p. 111), Sensus Info-tainmentsupplement
Door handle-
FunctionSee
In-door control pan- els (power windows,mirrors, central lock-ing button)(p. 99), (p. 100),(p. 160)
Hazard warning flashers(p. 93)
Controls for the info- tainment system andmenus(p. 74), (p. 126),Sensus Info-tainmentsupplement
Climate system con- trols(p. 126)
Gear selector(p. 257)
Controls for active chassis (Four-C)*(p. 169)
Wipers and washers(p. 96), (p. 97)
Steering wheel adjustment(p. 85)
Hood opening control(p. 332)
Parking brake(p. 274)
FunctionSee
Power seat* adjust- ment controls(p. 79)
Lighting panel, but- tons for opening fuelfiller door andunlocking the tailgate(p. 87), (p. 283),(p. 162)
Related information
• Information displays – ambient tempera- ture sensor (p. 75)
• Information displays – trip odometer andclock (p. 76)
Page 68 of 402
03 Instruments and controls
03
66* Option/accessory, for more information, see Introduction.
Information displays – introduction
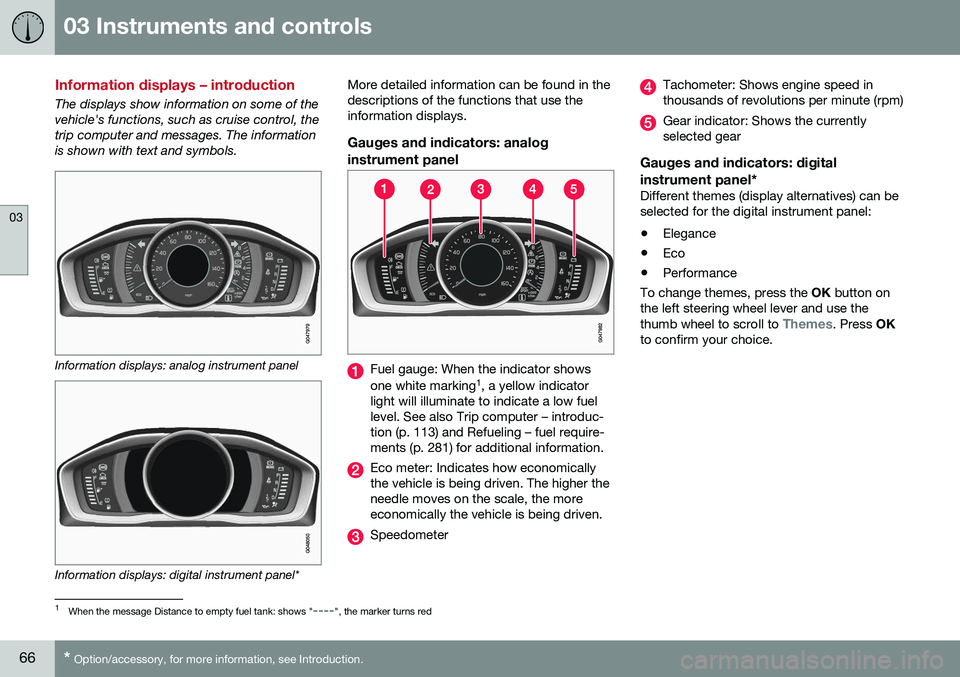
The displays show information on some of the vehicle's functions, such as cruise control, thetrip computer and messages. The informationis shown with text and symbols.
Information displays: analog instrument panel
Information displays: digital instrument panel* More detailed information can be found in the descriptions of the functions that use theinformation displays.
Gauges and indicators: analog
instrument panel
Fuel gauge: When the indicator shows one white marking 1
, a yellow indicator
light will illuminate to indicate a low fuel level. See also Trip computer – introduc-tion (p. 113) and Refueling – fuel require-ments (p. 281) for additional information.
Eco meter: Indicates how economically the vehicle is being driven. The higher theneedle moves on the scale, the moreeconomically the vehicle is being driven.
Speedometer
Tachometer: Shows engine speed in thousands of revolutions per minute (rpm)
Gear indicator: Shows the currently selected gear
Gauges and indicators: digital instrument panel*
Different themes (display alternatives) can be selected for the digital instrument panel: • Elegance
• Eco
• Performance
To change themes, press the OK button on
the left steering wheel lever and use the thumb wheel to scroll to
Themes. Press OK
to confirm your choice.
1 When the message Distance to empty fuel tank: shows "----", the marker turns red
Page 69 of 402
03 Instruments and controls
03
}}
* Option/accessory, for more information, see Introduction.67
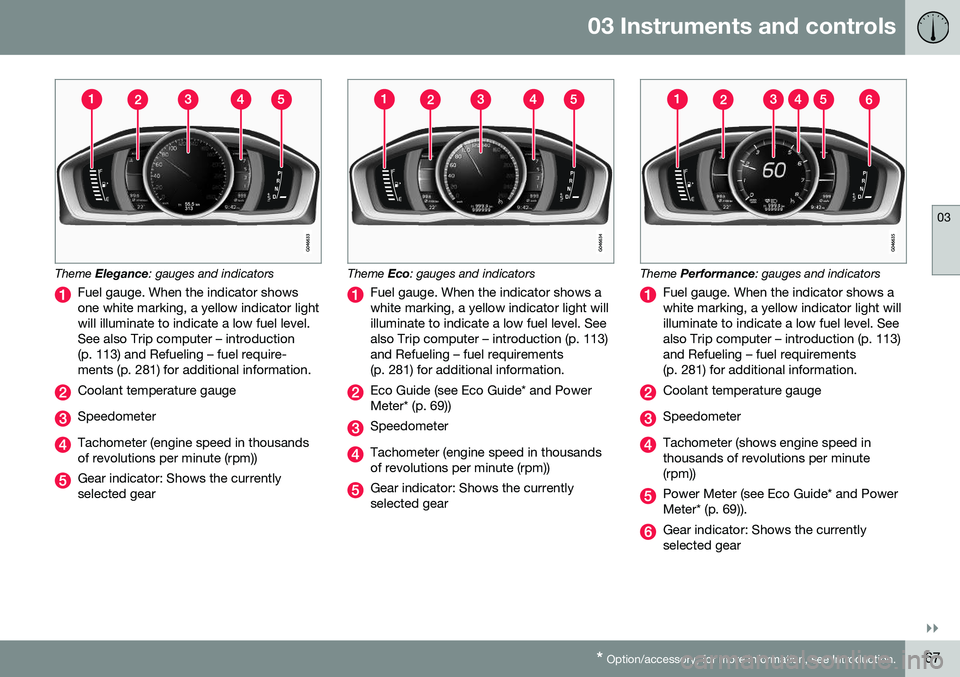
Theme Elegance : gauges and indicators
Fuel gauge. When the indicator shows one white marking, a yellow indicator lightwill illuminate to indicate a low fuel level.See also Trip computer – introduction(p. 113) and Refueling – fuel require-ments (p. 281) for additional information.
Coolant temperature gauge
Speedometer
Tachometer (engine speed in thousands of revolutions per minute (rpm))
Gear indicator: Shows the currently selected gear
Theme Eco: gauges and indicators
Fuel gauge. When the indicator shows a white marking, a yellow indicator light willilluminate to indicate a low fuel level. Seealso Trip computer – introduction (p. 113)and Refueling – fuel requirements(p. 281) for additional information.
Eco Guide (see Eco Guide* and Power Meter* (p. 69))
Speedometer
Tachometer (engine speed in thousands of revolutions per minute (rpm))
Gear indicator: Shows the currently selected gear
Theme Performance : gauges and indicators
Fuel gauge. When the indicator shows a white marking, a yellow indicator light willilluminate to indicate a low fuel level. Seealso Trip computer – introduction (p. 113)and Refueling – fuel requirements(p. 281) for additional information.
Coolant temperature gauge
Speedometer
Tachometer (shows engine speed in thousands of revolutions per minute(rpm))
Power Meter (see Eco Guide* and Power Meter* (p. 69)).
Gear indicator: Shows the currently selected gear
Page 70 of 402
||
03 Instruments and controls
03
68
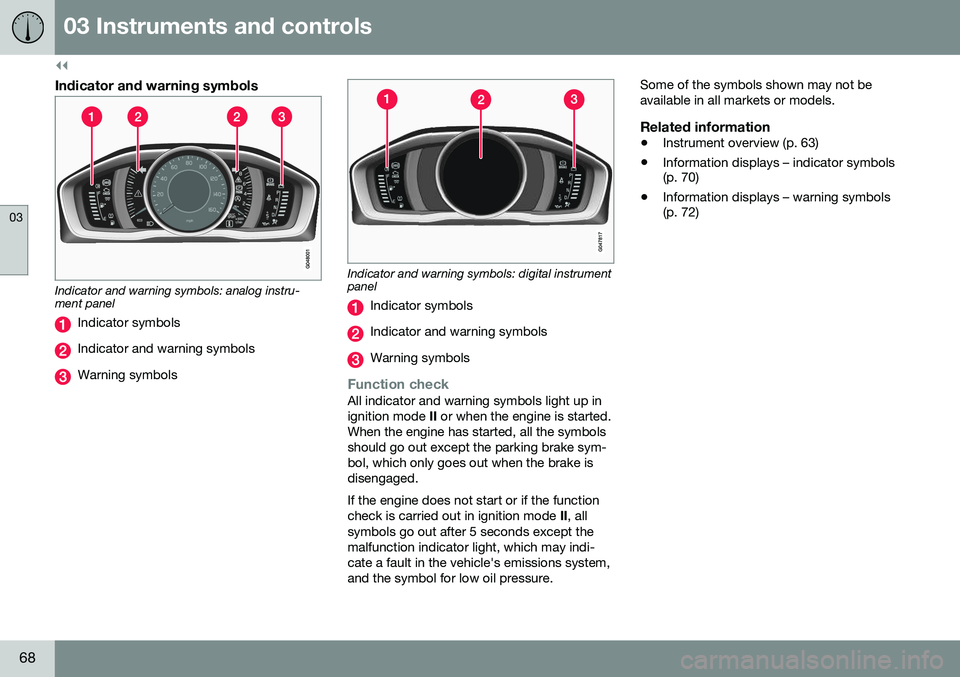
Indicator and warning symbols
Indicator and warning symbols: analog instru- ment panel
Indicator symbols
Indicator and warning symbols
Warning symbols
Indicator and warning symbols: digital instrument panel
Indicator symbols
Indicator and warning symbols
Warning symbols
Function checkAll indicator and warning symbols light up in ignition mode II or when the engine is started.
When the engine has started, all the symbolsshould go out except the parking brake sym-bol, which only goes out when the brake isdisengaged. If the engine does not start or if the function check is carried out in ignition mode II, all
symbols go out after 5 seconds except themalfunction indicator light, which may indi-cate a fault in the vehicle's emissions system,and the symbol for low oil pressure. Some of the symbols shown may not beavailable in all markets or models.
Related information
•
Instrument overview (p. 63)
• Information displays – indicator symbols (p. 70)
• Information displays – warning symbols(p. 72)