washer fluid VOLVO V60 CROSS COUNTRY 2016 Owner´s Manual
[x] Cancel search | Manufacturer: VOLVO, Model Year: 2016, Model line: V60 CROSS COUNTRY, Model: VOLVO V60 CROSS COUNTRY 2016Pages: 402, PDF Size: 10.32 MB
Page 11 of 402
Contents
9
10
Wiper blades – service position.............. 347
Wiper blades – windshield...................... 348
Wiper blades – tailgate........................... 349
Engine compartment – washer fluid....... 349
Battery – symbols................................... 350
Battery – handling................................... 350
Battery – maintenance............................ 351
Battery – changing.................................. 352
Fuses – introduction............................... 354
Fuses – engine compartment................. 355
Fuses – glove compartment................... 358
Fuses – cargo area/trunk........................ 361Fuses – engine compartment cold zone
(Start/Stop only)...................................... 362
Washing the car...................................... 364
Automatic car wash................................ 365
Polishing and waxing.............................. 365
Cleaning the interior................................ 366
Touching up paintwork........................... 368
11
11 Specifications
Label information.................................... 371
Dimensions............................................. 374
Weights................................................... 378
Engine specifications.............................. 379
Oil specifications..................................... 380
Oil volume............................................... 381
Coolant – specification and volume........ 382Transmission oil – specification and vol-
umes....................................................... 382
Brake fluid – specification and volume... 382
Power steering – specification................ 383Fuel tank volume – specification and vol-
ume......................................................... 383 Air conditioning – specification and vol-
ume......................................................... 383
Battery specifications............................. 384
Symbols – general information............... 385
Warning symbols.................................... 385
Indicator symbols.................................... 386
Information symbols............................... 387
Information symbols – ceiling console.... 388
Information symbols – center console.... 388
12
12 Index
Index....................................................... 390
Page 98 of 402
03 Instruments and controls
03
96* Option/accessory, for more information, see Introduction.
Approach lighting
Approach lighting activates the parking lights, door mirror lights, license plate lighting, domelighting and door step lighting when youapproach the vehicle. This function is activated by pressing the approach light button on the remote key (see
the illustration in Remote key – functions(p. 149)). The time interval for this lighting can be set by pressing MY CAR and going to
Car
settings
Light settingsApproach light
duration. See My Car – introduction (p. 74)
for a description of the menu system.
Related information
• Home safe lighting (p. 95)
Windshield wipers
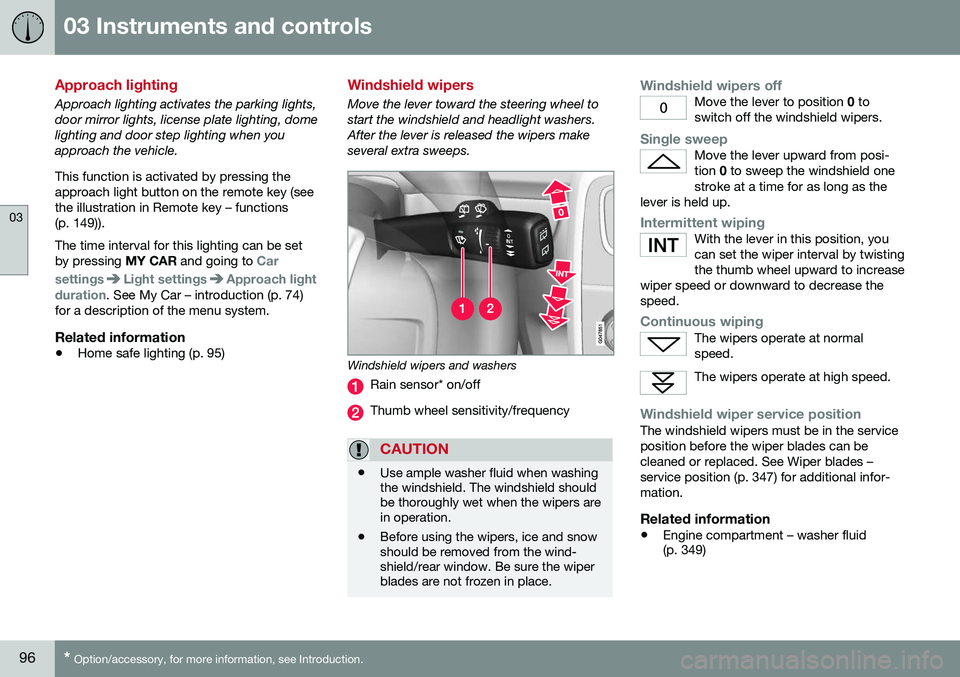
Move the lever toward the steering wheel to start the windshield and headlight washers.After the lever is released the wipers makeseveral extra sweeps.
Windshield wipers and washers
Rain sensor* on/off
Thumb wheel sensitivity/frequency
CAUTION
•Use ample washer fluid when washing the windshield. The windshield shouldbe thoroughly wet when the wipers arein operation.
• Before using the wipers, ice and snowshould be removed from the wind-shield/rear window. Be sure the wiperblades are not frozen in place.
Windshield wipers offMove the lever to position
0 to
switch off the windshield wipers.
Single sweepMove the lever upward from posi- tion 0 to sweep the windshield one
stroke at a time for as long as the
lever is held up.
Intermittent wipingWith the lever in this position, you can set the wiper interval by twistingthe thumb wheel upward to increase
wiper speed or downward to decrease thespeed.
Continuous wipingThe wipers operate at normal speed.
The wipers operate at high speed.
Windshield wiper service positionThe windshield wipers must be in the service position before the wiper blades can becleaned or replaced. See Wiper blades –service position (p. 347) for additional infor-mation.
Related information
• Engine compartment – washer fluid (p. 349)
Page 99 of 402
03 Instruments and controls
03
}}
* Option/accessory, for more information, see Introduction.97
Rain sensor*
The rain sensor automatically regulates wiper speed according to the amount of water onthe windshield. The sensitivity of the rain sensor can be adjusted moving the thumb wheel up (thewipers will sweep the windshield more fre-quently) or down (the wipers will sweep thewindshield less frequently).
NOTE
The wipers will make an extra sweep each time the thumb wheel is adjusted upward.
When the rain sensor is activated, the symbol
will illuminate in the instrument panel.
Activating and setting the sensitivityWhen activating the rain sensor, the vehicle must be running or in ignition mode II and the
windshield wiper lever must be in position 0
or in the single sweep position. Activate the rain sensor by pressing the but- ton
. The windshield wipers will make
one sweep. Press the lever up for the wipers to make an extra sweep. The rain sensor returns to activemode when the stalk is released back toposition 0.
DeactivatingDeactivate the rain sensor by pressing the button
or press the lever down to
another wiper position. The rain sensor is automatically deactivated when the key is removed from the ignitionslot or five minutes after the ignition has beenswitched off.
CAUTION
The rain sensor should be deactivated when washing the car in an automatic carwash, etc. If the rain sensor function is lefton, the wipers will start inadvertently in thecar wash and could be damaged.
Windshield washer
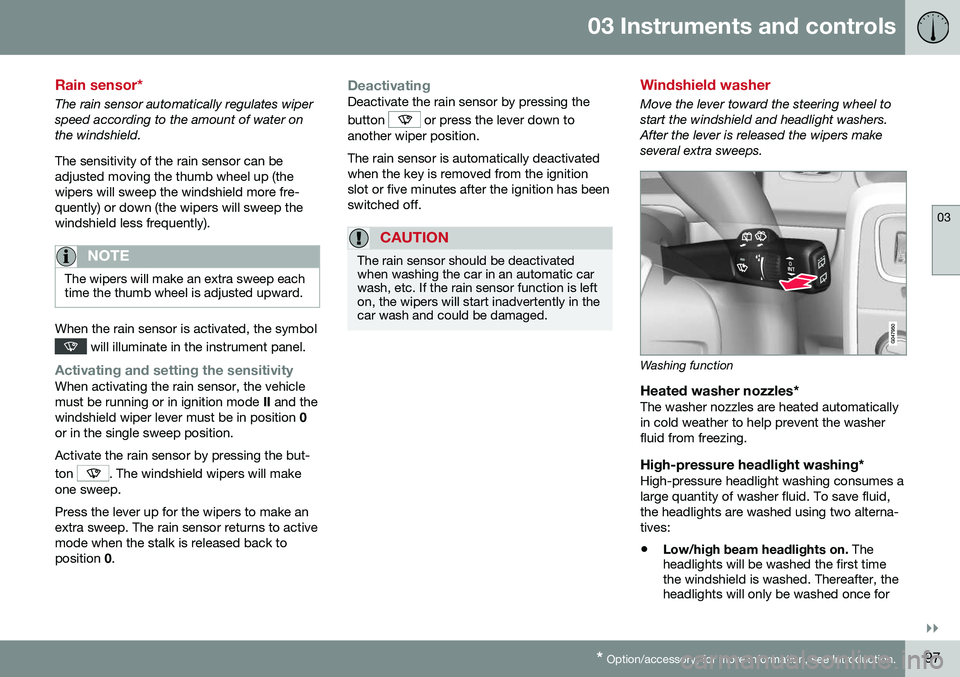
Move the lever toward the steering wheel to start the windshield and headlight washers.After the lever is released the wipers makeseveral extra sweeps.
Washing function
Heated washer nozzles*The washer nozzles are heated automatically in cold weather to help prevent the washerfluid from freezing.
High-pressure headlight washing*High-pressure headlight washing consumes alarge quantity of washer fluid. To save fluid,the headlights are washed using two alterna-tives:
• Low/high beam headlights on.
The
headlights will be washed the first time the windshield is washed. Thereafter, theheadlights will only be washed once for
Page 100 of 402
||
03 Instruments and controls
03
98
every five times the windshield is washed within a 10-minute period.
• Parking lights on.
Optional Active Bend-
ing Lights will be washed once for everyfive times the windshield is washed. Nor-mal halogen headlights will not bewashed.
CAUTION
• Use ample washer fluid when washing the windshield. The windshield shouldbe thoroughly wet when the wipers arein operation.
• When approx. 1 US quart (1 liter) ofwasher fluid remains in the reservoir,the headlights will no longer bewashed. A text message will also bedisplayed to remind the driver to fill thewasher fluid reservoir.
Related information
•
Engine compartment – washer fluid (p. 349)
Tailgate wiper/washer
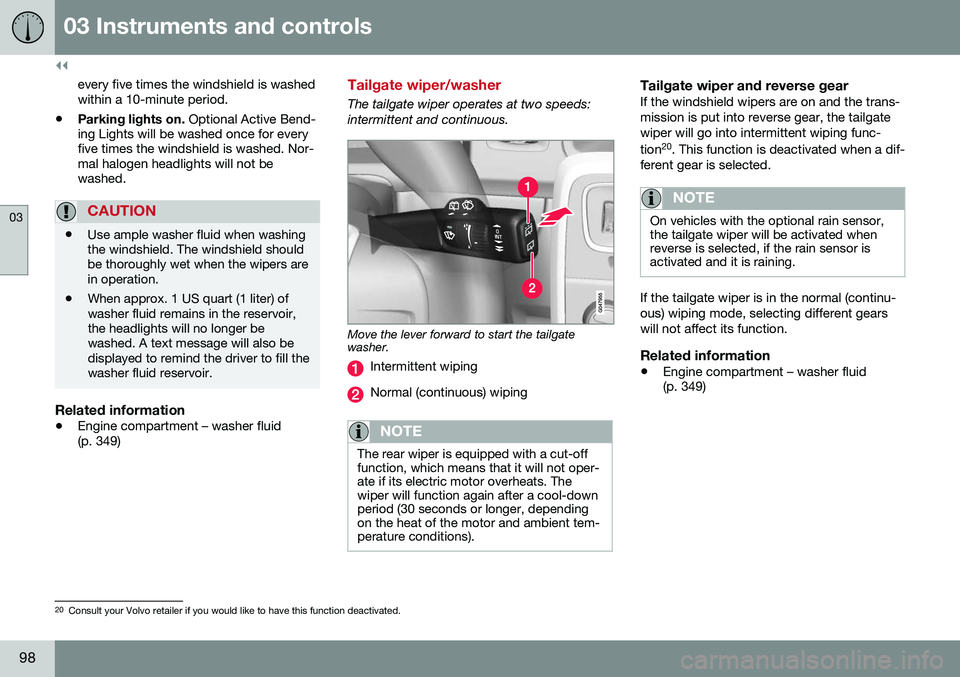
The tailgate wiper operates at two speeds: intermittent and continuous.
Move the lever forward to start the tailgate washer.
Intermittent wiping
Normal (continuous) wiping
NOTE
The rear wiper is equipped with a cut-off function, which means that it will not oper-ate if its electric motor overheats. Thewiper will function again after a cool-downperiod (30 seconds or longer, dependingon the heat of the motor and ambient tem-perature conditions).
Tailgate wiper and reverse gearIf the windshield wipers are on and the trans- mission is put into reverse gear, the tailgatewiper will go into intermittent wiping func- tion20
. This function is deactivated when a dif-
ferent gear is selected.
NOTE
On vehicles with the optional rain sensor, the tailgate wiper will be activated whenreverse is selected, if the rain sensor isactivated and it is raining.
If the tailgate wiper is in the normal (continu- ous) wiping mode, selecting different gearswill not affect its function.
Related information
• Engine compartment – washer fluid (p. 349)
20
Consult your Volvo retailer if you would like to have this function deactivated.
Page 282 of 402
||
08 Starting and driving
08
280
drive in countries where it may be difficult to obtain the correct fuel.
• Consider your destination. If you will bedriving through an area where snow or iceare likely to occur, consider snowtires (p. 310).
Related information
•Changing a wheel – removing wheel(p. 296)
• Bulbs – introduction (p. 339)
Driving in cold weather
Check your vehicle before the approach of cold weather. The following advice is worth noting:
• Make sure that the engine cool- ant (p. 336) contains 50 percent anti-freeze. Any other mixture will reducefreeze protection. This gives protectionagainst freezing down to –31 °F (–35 °C).The use of "recycled" antifreeze is notapproved by Volvo. Different types ofantifreeze must not be mixed.
• Volvo recommends using only genuineVolvo antifreeze in your vehicle's radiator.
• Try to keep the fuel tank well filled – thishelps prevent the formation of condensa-tion in the tank. In addition, in extremelycold weather conditions it is worthwhileto add fuel line de-icer before refueling.
• The viscosity of the engine oil is impor-tant. Oil with low viscosity (thinner oil)improves cold-weather starting as well asdecreasing fuel consumption while theengine is warming up. Full synthetic0W-30 oil is recommended for driving inareas with sustained low temperatures.
• The load placed on the battery is greaterduring the winter since the windshieldwipers, lighting, etc., are used moreoften. Moreover, the capacity of the bat-tery decreases as the temperature drops.In very cold weather, a poorly chargedbattery can freeze and be damaged. It is therefore advisable to check the state ofcharge more frequently and spray an anti-rust oil on the battery posts.
• Volvo recommends the use of snow tireson all four wheels for winter driving, seeSnow tires/studded tires (p. 310).
• To prevent the washer fluid (p. 349)reser-voir from freezing, add washer solventscontaining antifreeze. This is importantsince dirt is often splashed on the wind-shield during winter driving, requiring thefrequent use of the washers and wipers.Volvo Washer Solvent should be dilutedas follows: Down to 14 °F (–10 °C): 1 partwasher solvent and 4 parts water Downto 5 °F (–15 °C): 1 part washer solventand 3 parts water Down to 0 °F (–18 °C):1 part washer solvent and 2 parts waterDown to –18 °F (–28 °C): 1 part washersolvent and 1 part water.
• Use Volvo Teflon Lock Spray in the locks.
• Avoid using de-icing sprays as they cancause damage to the locks.
Page 330 of 402
10 Maintenance and servicing
10
328
Maintenance – owner maintenance
Periodic maintenance requirements and inter- vals are described in your vehicle's Warrantyand Service Records Information booklet. The following points can be carried out between the normally scheduled maintenanceservices.
Owner maintenance
Each time the car is refueled:
•Check the engine oil level.
• Clean the windshield, windshield wipers, headlights, and taillights.
Monthly:
• Check cold tire pressure in all tires. Inspect the tires for wear.
• Check that engine coolant and other fluidlevels are between the indicated "min"and "max" markings.
• Clean interior glass surfaces with a glasscleaner and soft paper towels.
• Wipe driver information displays with asoft cloth.
• Visually inspect battery terminals for cor-rosion. Corrosion may indicate a looseterminal connector, or a battery near theend of its useful service life. Consult yourVolvo retailer for additional information.
As needed:Wash the car, including the undercarriage, to reduce wear that can be caused by a buildup of dirt, and corrosion that can be caused bysalt residues. Clean leaves and twigs from air intake vents at the base of the windshield, and from otherplaces where they may collect.
NOTE
Complete service information for qualified technicians is available online for purchaseor subscription at www.volvotechinfo.com.
Related information
•
Maintenance – opening/closing hood (p. 332)
• Engine compartment – overview (p. 333)
• Engine compartment – coolant (p. 336)
• Engine compartment – engine oil (p. 334)
• Engine compartment – power steeringfluid (p. 338)
• Engine compartment – washer fluid(p. 349)
• Cleaning the interior (p. 366)
• Washing the car (p. 364)
• Tire inflation – checking pressure (p. 302)
• Tires – tread wear indicator (p. 295)
Page 335 of 402
10 Maintenance and servicing
10
}}
333
Engine compartment – overview
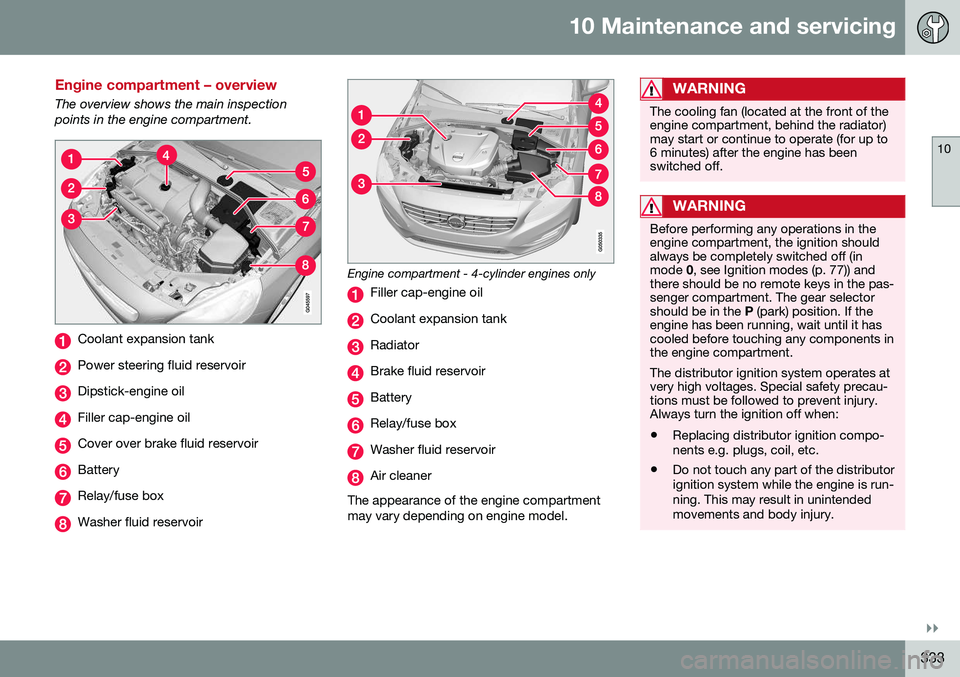
The overview shows the main inspection points in the engine compartment.
Coolant expansion tank
Power steering fluid reservoir
Dipstick-engine oil
Filler cap-engine oil
Cover over brake fluid reservoir
Battery
Relay/fuse box
Washer fluid reservoir
Engine compartment - 4-cylinder engines only
Filler cap-engine oil
Coolant expansion tank
Radiator
Brake fluid reservoir
Battery
Relay/fuse box
Washer fluid reservoir
Air cleaner
The appearance of the engine compartment may vary depending on engine model.
WARNING
The cooling fan (located at the front of the engine compartment, behind the radiator)may start or continue to operate (for up to6 minutes) after the engine has beenswitched off.
WARNING
Before performing any operations in the engine compartment, the ignition shouldalways be completely switched off (inmode 0, see Ignition modes (p. 77)) and
there should be no remote keys in the pas-senger compartment. The gear selectorshould be in the P (park) position. If the
engine has been running, wait until it hascooled before touching any components inthe engine compartment. The distributor ignition system operates at very high voltages. Special safety precau-tions must be followed to prevent injury.Always turn the ignition off when:
• Replacing distributor ignition compo- nents e.g. plugs, coil, etc.
• Do not touch any part of the distributorignition system while the engine is run-ning. This may result in unintendedmovements and body injury.
Page 349 of 402
10 Maintenance and servicing
10
347
Wiper blades – service position
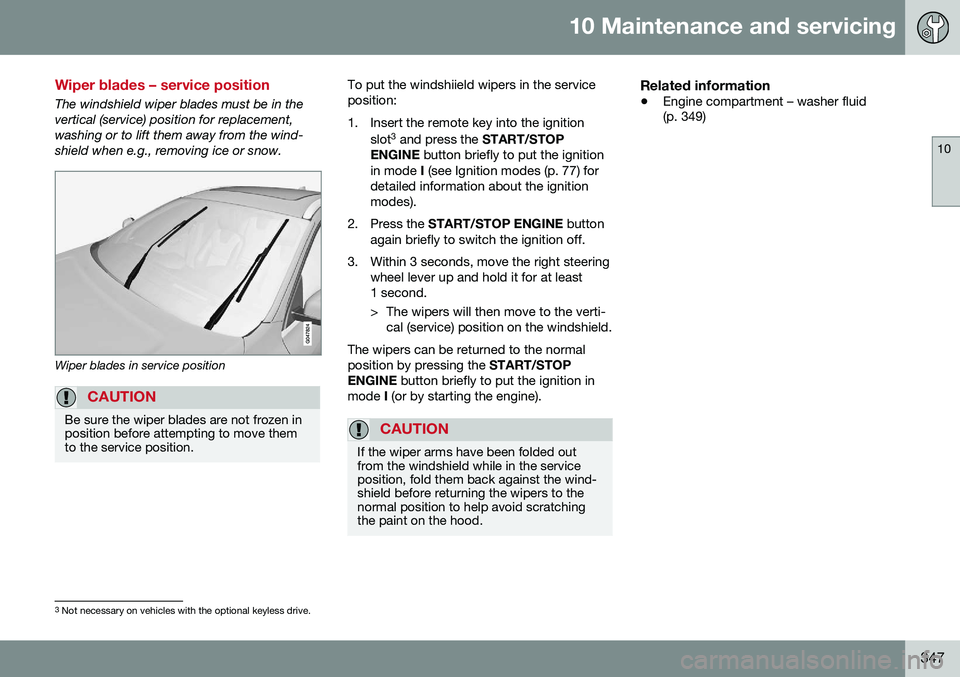
The windshield wiper blades must be in the vertical (service) position for replacement,washing or to lift them away from the wind-shield when e.g., removing ice or snow.
Wiper blades in service position
CAUTION
Be sure the wiper blades are not frozen in position before attempting to move themto the service position.
To put the windshiield wipers in the service position:
1. Insert the remote key into the ignitionslot3
and press the START/STOP
ENGINE button briefly to put the ignition
in mode I (see Ignition modes (p. 77) for
detailed information about the ignition modes).
2. Press the START/STOP ENGINE button
again briefly to switch the ignition off.
3. Within 3 seconds, move the right steering wheel lever up and hold it for at least1 second.
> The wipers will then move to the verti-cal (service) position on the windshield.
The wipers can be returned to the normal position by pressing the START/STOP
ENGINE button briefly to put the ignition in
mode I (or by starting the engine).
CAUTION
If the wiper arms have been folded out from the windshield while in the serviceposition, fold them back against the wind-shield before returning the wipers to thenormal position to help avoid scratchingthe paint on the hood.
Related information
• Engine compartment – washer fluid (p. 349)
3
Not necessary on vehicles with the optional keyless drive.
Page 350 of 402
10 Maintenance and servicing
10
348
Wiper blades – windshield
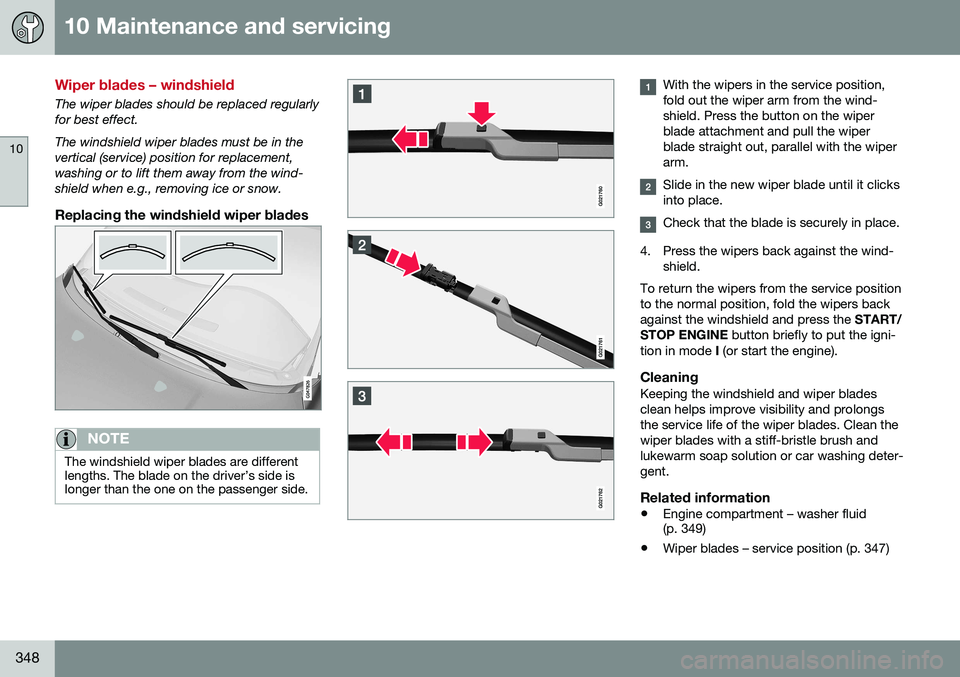
The wiper blades should be replaced regularly for best effect. The windshield wiper blades must be in the vertical (service) position for replacement,washing or to lift them away from the wind-shield when e.g., removing ice or snow.
Replacing the windshield wiper blades
NOTE
The windshield wiper blades are different lengths. The blade on the driver’s side islonger than the one on the passenger side.
With the wipers in the service position, fold out the wiper arm from the wind-shield. Press the button on the wiperblade attachment and pull the wiperblade straight out, parallel with the wiperarm.
Slide in the new wiper blade until it clicks into place.
Check that the blade is securely in place.
4. Press the wipers back against the wind- shield.
To return the wipers from the service position to the normal position, fold the wipers backagainst the windshield and press the START/
STOP ENGINE button briefly to put the igni-
tion in mode I (or start the engine).
CleaningKeeping the windshield and wiper bladesclean helps improve visibility and prolongsthe service life of the wiper blades. Clean thewiper blades with a stiff-bristle brush andlukewarm soap solution or car washing deter-gent.
Related information
• Engine compartment – washer fluid (p. 349)
• Wiper blades – service position (p. 347)
Page 351 of 402
10 Maintenance and servicing
10
349
Wiper blades – tailgate
The wiper blades should be replaced regularly for best effect.
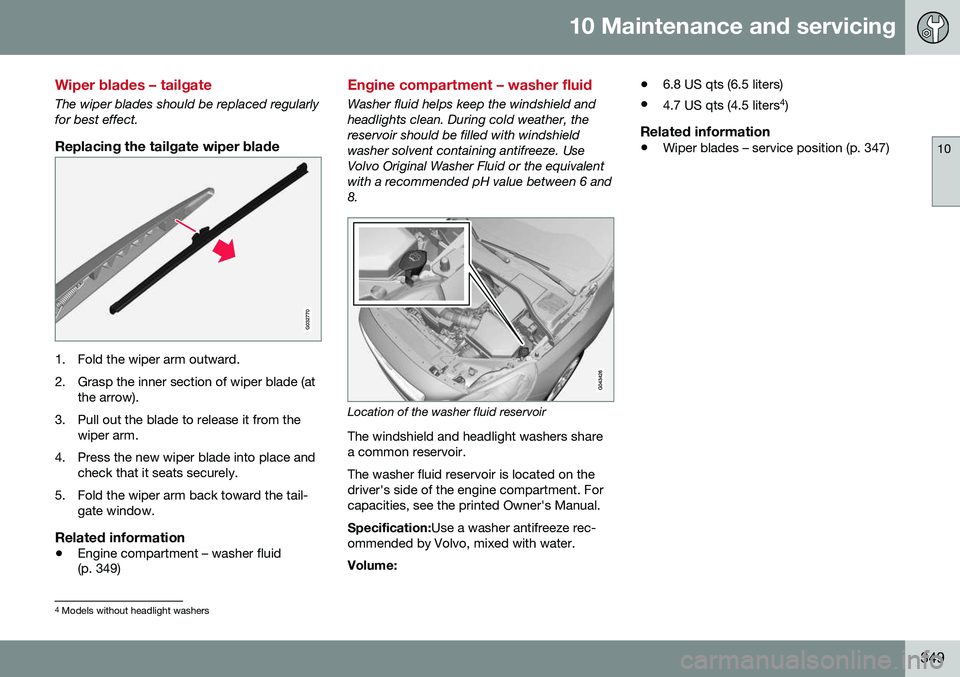
Replacing the tailgate wiper blade
G032770
1. Fold the wiper arm outward.
2. Grasp the inner section of wiper blade (atthe arrow).
3. Pull out the blade to release it from the wiper arm.
4. Press the new wiper blade into place and check that it seats securely.
5. Fold the wiper arm back toward the tail- gate window.
Related information
• Engine compartment – washer fluid (p. 349)
Engine compartment – washer fluid
Washer fluid helps keep the windshield and headlights clean. During cold weather, thereservoir should be filled with windshieldwasher solvent containing antifreeze. UseVolvo Original Washer Fluid or the equivalentwith a recommended pH value between 6 and8.
Location of the washer fluid reservoir
The windshield and headlight washers share a common reservoir. The washer fluid reservoir is located on the driver's side of the engine compartment. Forcapacities, see the printed Owner's Manual. Specification: Use a washer antifreeze rec-
ommended by Volvo, mixed with water. Volume: •
6.8 US qts (6.5 liters)
• 4.7 US qts (4.5 liters 4
)
Related information
• Wiper blades – service position (p. 347)
4
Models without headlight washers