weight VOLVO V60 CROSS COUNTRY 2017 Owner´s Manual
[x] Cancel search | Manufacturer: VOLVO, Model Year: 2017, Model line: V60 CROSS COUNTRY, Model: VOLVO V60 CROSS COUNTRY 2017Pages: 406, PDF Size: 9.66 MB
Page 52 of 406
||
SAFETY
50
WARNING
•When not in use, keep the child restraint system secured or remove it from thepassenger compartment to help prevent itfrom injuring passengers in the event of asudden stop or collision.
• A small child's head represents a consid-erable part of its total weight and its neckis still very weak. Volvo recommends thatchildren up to age 4 travel, properlyrestrained, facing rearward. In addition,Volvo recommends that children shouldride rearward facing, properly restrained,as long as possible.
Automatic Locking Retractor/ Emergency Locking Retractor (ALR/ELR)
To make child seat installation easier, each seat belt (except for the driver's belt) is equipped witha locking mechanism to help keep the seat belttaut.
When attaching the seat belt to a child seat:
1. Attach the seat belt to the child seat accord-
ing to the child seat manufacturer's instruc- tions.
2. Pull the seat belt out as far as possible.
3. Insert the seat belt latch plate into the buckle (lock) in the usual way.
4. Release the seat belt and pull it taut around the child seat. A sound from the seat belt retractor will be audi- ble at this time and is normal. The belt will nowbe locked in place. This function is automaticallydisabled when the seat belt is unlocked and thebelt is fully retracted.
WARNING
Do not use child safety seats or child booster cushions/backrests in the front passenger'sseat. We also recommend that children whohave outgrown these devices sit in the rearseat with the seat belt properly fastened.
Child restraint registration and recallsChild restraints could be recalled for safety rea- sons. You must register your child restraint to bereached in a recall. To stay informed about childsafety seat recalls, be sure to fill out and returnthe registration card that comes with new childrestraints. Child restraint recall information is readily availa- ble in both the U.S. and Canada. For recall infor-mation in the U.S., call the U.S. Government'sAuto Safety Hotline at 1-800-424-9393 or go tohttp://www-odi.nhtsa.dot.gov/cars/problems/recalls/register/childseat/index.cfm. In Canada,visit Transport Canada's Child Safety website athttp://www.tc.gc.ca/roadsafety/childsafety/menu.htm.
Related information
•
Child safety locks (p. 63)
• Integrated booster cushion – general infor-mation (p. 59)
Page 54 of 406
||
SAFETY
52
WARNING
A child seat should never be used in the front passenger seat of any vehicle with a frontpassenger airbag – not even if the "Passen-ger airbag off" symbol near the rear-view mir-ror is illuminated (on vehicles equipped withOccupant Weight Sensor). If the severity of anaccident were to cause the airbag to inflate,this could lead to serious injury or death to achild seated in this position.
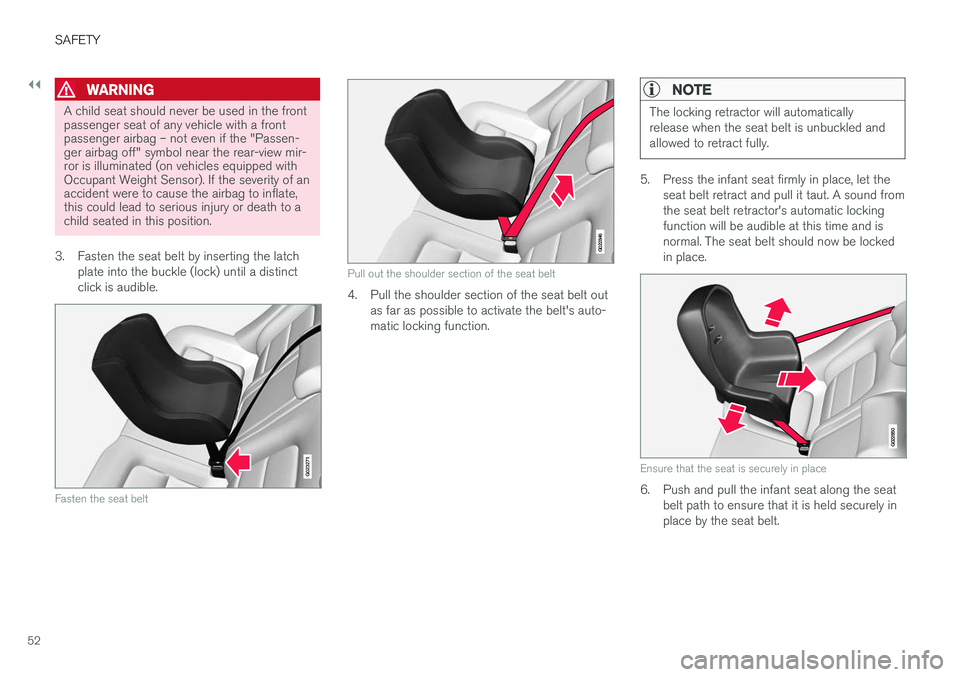
3. Fasten the seat belt by inserting the latch plate into the buckle (lock) until a distinct click is audible.
G023271
Fasten the seat belt
G022846
Pull out the shoulder section of the seat belt
4. Pull the shoulder section of the seat belt outas far as possible to activate the belt's auto- matic locking function.
NOTE
The locking retractor will automatically release when the seat belt is unbuckled andallowed to retract fully.
5. Press the infant seat firmly in place, let the seat belt retract and pull it taut. A sound from the seat belt retractor's automatic lockingfunction will be audible at this time and isnormal. The seat belt should now be lockedin place.
G022850
Ensure that the seat is securely in place
6. Push and pull the infant seat along the seatbelt path to ensure that it is held securely in place by the seat belt.
Page 56 of 406
||
SAFETY
54
WARNING
•A small child's head represents a consider- able part of its total weight and its neck isstill very weak. Volvo recommends thatchildren up to age 4 travel, properlyrestrained, facing rearward. In addition,Volvo recommends that children shouldride rearward facing, properly restrained, aslong as possible.
• Convertible child seats should be installedin the rear seat only.
• A rear-facing convertible seat should notbe positioned behind the driver's seatunless there is adequate space for safeinstallation.
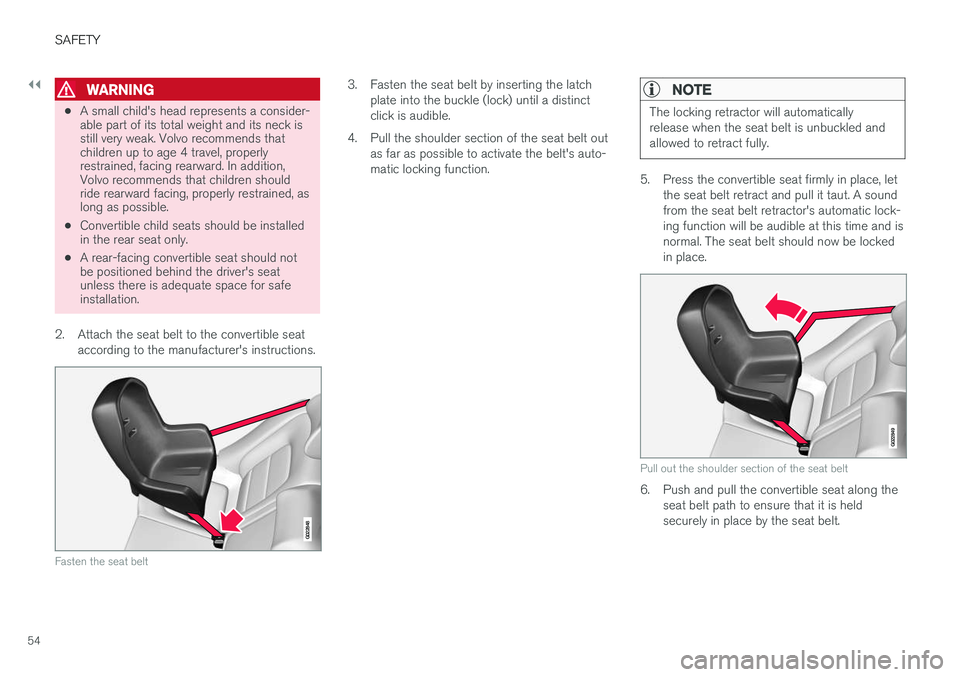
2. Attach the seat belt to the convertible seat according to the manufacturer's instructions.
G022848
Fasten the seat belt
3. Fasten the seat belt by inserting the latchplate into the buckle (lock) until a distinct click is audible.
4. Pull the shoulder section of the seat belt out as far as possible to activate the belt's auto-matic locking function.NOTE
The locking retractor will automatically release when the seat belt is unbuckled andallowed to retract fully.
5. Press the convertible seat firmly in place, let the seat belt retract and pull it taut. A sound from the seat belt retractor's automatic lock-ing function will be audible at this time and isnormal. The seat belt should now be lockedin place.
G022849
Pull out the shoulder section of the seat belt
6. Push and pull the convertible seat along theseat belt path to ensure that it is held securely in place by the seat belt.
Page 59 of 406
SAFETY
57
To access the anchors
1. Put the child restraint in position.
2. Kneel on the child restraint to press downthe seat cushion and locate the anchors by feel.
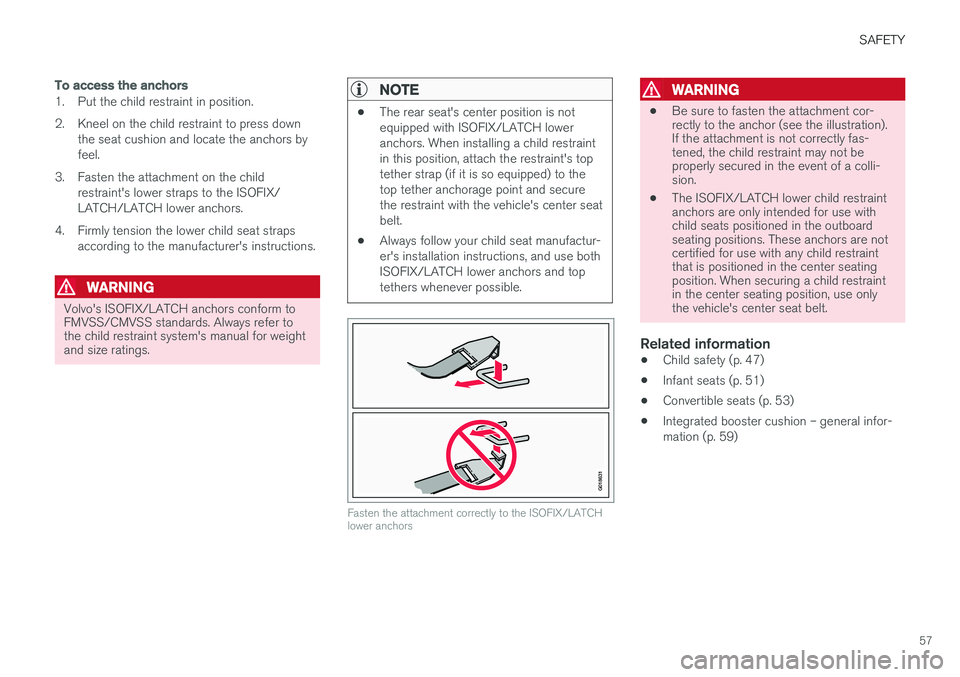
3. Fasten the attachment on the child restraint's lower straps to the ISOFIX/LATCH/LATCH lower anchors.
4. Firmly tension the lower child seat straps according to the manufacturer's instructions.
WARNING
Volvo's ISOFIX/LATCH anchors conform to FMVSS/CMVSS standards. Always refer tothe child restraint system's manual for weightand size ratings.
NOTE
• The rear seat's center position is not equipped with ISOFIX/LATCH loweranchors. When installing a child restraintin this position, attach the restraint's toptether strap (if it is so equipped) to thetop tether anchorage point and securethe restraint with the vehicle's center seatbelt.
• Always follow your child seat manufactur-er's installation instructions, and use bothISOFIX/LATCH lower anchors and toptethers whenever possible.
G018631
Fasten the attachment correctly to the ISOFIX/LATCH lower anchors
WARNING
•
Be sure to fasten the attachment cor- rectly to the anchor (see the illustration).If the attachment is not correctly fas-tened, the child restraint may not beproperly secured in the event of a colli-sion.
• The ISOFIX/LATCH lower child restraintanchors are only intended for use withchild seats positioned in the outboardseating positions. These anchors are notcertified for use with any child restraintthat is positioned in the center seatingposition. When securing a child restraintin the center seating position, use onlythe vehicle's center seat belt.
Related information
• Child safety (p. 47)
• Infant seats (p. 51)
• Convertible seats (p. 53)
• Integrated booster cushion – general infor- mation (p. 59)
Page 62 of 406
||
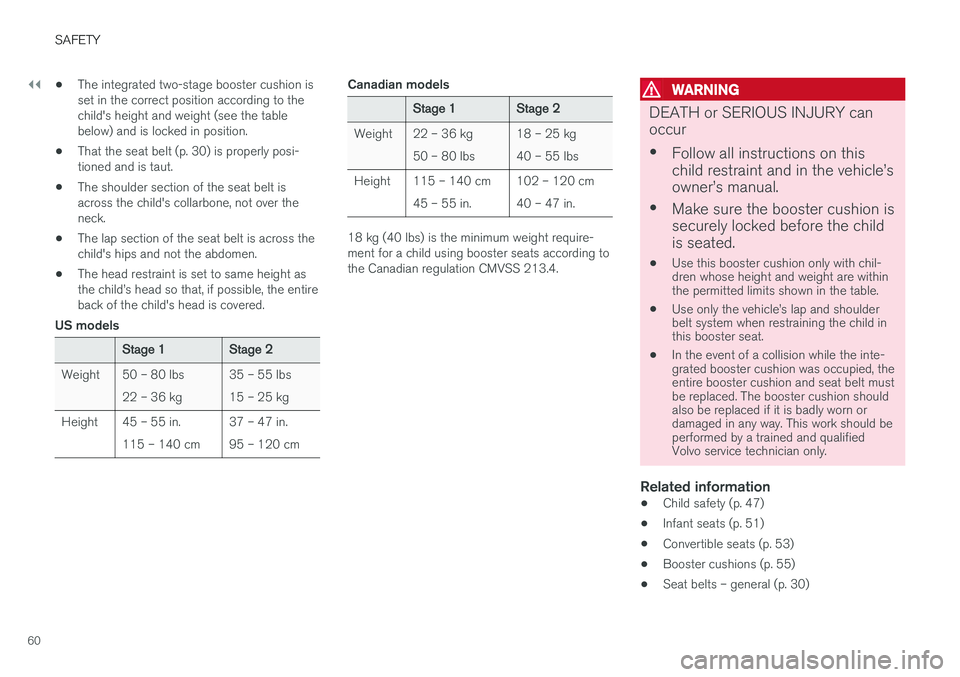
SAFETY
60•
The integrated two-stage booster cushion is set in the correct position according to thechild's height and weight (see the tablebelow) and is locked in position.
• That the seat belt (p. 30) is properly posi-tioned and is taut.
• The shoulder section of the seat belt isacross the child's collarbone, not over theneck.
• The lap section of the seat belt is across thechild's hips and not the abdomen.
• The head restraint is set to same height asthe child
Page 63 of 406
SAFETY
}}
61
Integrated booster cushion – using
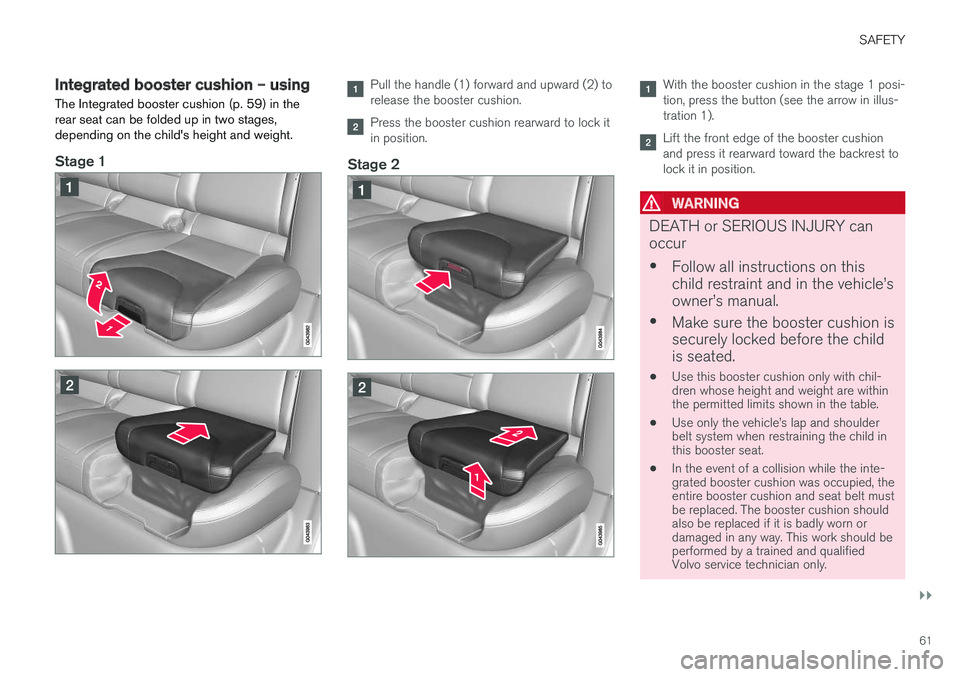
The Integrated booster cushion (p. 59) in the rear seat can be folded up in two stages,depending on the child's height and weight.
Stage 1
Pull the handle (1) forward and upward (2) to release the booster cushion.
Press the booster cushion rearward to lock it in position.
Stage 2
With the booster cushion in the stage 1 posi- tion, press the button (see the arrow in illus-tration 1).
Lift the front edge of the booster cushion and press it rearward toward the backrest tolock it in position.
WARNING
DEATH or SERIOUS INJURY can occur • Follow all instructions on this child restraint and in the vehicle
Page 64 of 406
||
SAFETY
62The table showing the permitted heights and weights can be found in the article "Integratedbooster cushion – general information."
Related information
•
Integrated booster cushion – stowing(p. 62)
• Integrated booster cushion – general infor-mation (p. 59)
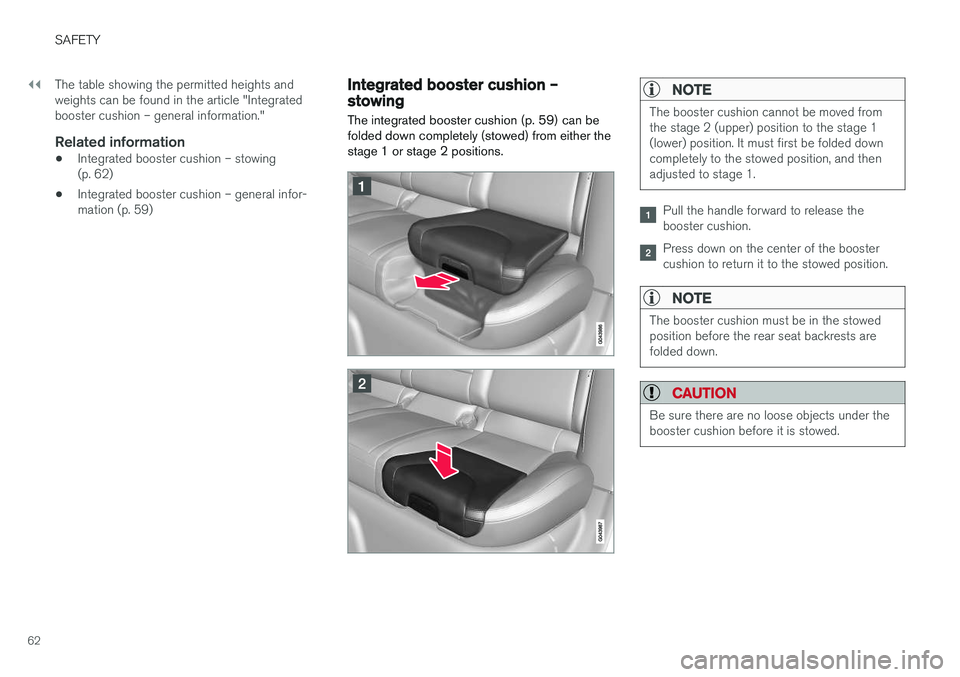
Integrated booster cushion – stowing
The integrated booster cushion (p. 59) can be folded down completely (stowed) from either thestage 1 or stage 2 positions.NOTE
The booster cushion cannot be moved from the stage 2 (upper) position to the stage 1(lower) position. It must first be folded downcompletely to the stowed position, and thenadjusted to stage 1.
Pull the handle forward to release the booster cushion.
Press down on the center of the booster cushion to return it to the stowed position.
NOTE
The booster cushion must be in the stowed position before the rear seat backrests arefolded down.
CAUTION
Be sure there are no loose objects under the booster cushion before it is stowed.
Page 146 of 406

LOADING AND STORAGE
144
Loading – general
The load carrying capacity of your vehicle is determined by factors such as the number ofpassengers, the amount of cargo, the weight ofany accessories that may be installed, etc.
To increase loading space, the rear seat back- rests can be folded down, see Rear seats – fold-
ing backrest (p. 87).
When loading the cargo area, keep the following
in mind:
• Load objects in the cargo area against thebackrest whenever possible.
• Unstable loads can be secured to the loadanchoring eyelets with straps or web lash-ings to help keep them from shifting.
• Stop the engine and apply the parking brakewhen loading or unloading long objects. Thegear selector can be knocked out of positionby long loads, which could set the vehicle inmotion.
WARNING
• Stop the engine, put the gear selector in P
, and apply the parking brake when
loading or unloading long objects.
• The vehicle's driving characteristics may change depending on the weight and dis-tribution of the load.
• A 44-pound (20 kg) object produces aforce of 2,200 pounds (1,000 kg) in ahead-on collision at 30 mph (50 km/h).
• The cargo area and rear seat should notbe loaded to a level higher than 2 in.(5 cm) below the upper edge of the rearside windows. Objects placed higher thanthis level could impede the function ofthe Inflatable Curtain.
Related information
• Load anchoring eyelets (p. 145)
• Steel cargo grid (p. 148)
• Loading – roof load carriers (p. 144)
Loading – roof load carriers
Using load carriersLoad carriers are available as Volvo accessories. Observe the following points when in use:
• To avoid damaging your vehicle and toachieve maximum safety when driving, werecommend using the load carriers that Volvohas developed especially for your vehicle.
• Volvo-approved removable roof racks aredesigned to carry the maximum allowableroof load for this vehicle: 220 lbs (100 kg).For non-Volvo roof racks, check the manu-facturer's weight limits for the rack.
• Never exceed the rack manufacturer's weighlimits and never exceed the maximum ratedroof load of 220 lbs (100 kg).
• Avoid single-point loads. Distribute loadsevenly.
• Place heavier cargo at the bottom of theload.
• Secure the cargo correctly with appropriatetie-down equipment.
• Check periodically that the load carriers andload are properly secured.
• Remember that the vehicle's center of gravityand handling change when you carry a loadon the roof.
Page 294 of 406
||
STARTING AND DRIVING
292
WARNING
Driving with the tailgate open: Driving with
the tailgate open could lead to poisonous exhaust gases entering the passenger com-partment. If the tailgate must be kept open forany reason, proceed as follows:
• Close the windows
• Set the ventilation system control to airflow to floor, windshield and side windowsand the blower control to its highest set-ting.
Handling and roadholdingAt the specified curb weight your vehicle has a tendency to understeer, which means that thesteering wheel has to be turned more than mightseem appropriate for the curvature of a bend.This ensures good stability and reduces the riskof rear wheel skid. Remember that these proper-ties can alter with the vehicle load. The heavierthe load in the cargo area, the less the tendencyto understeer.
• Vehicle load, tire design and inflation pres-sure all affect vehicle handling. Therefore,check that the tires are inflated to the rec-ommended pressure according to the vehicleload. Loads should be distributed so thatcapacity weight or maximum permissible axleloads are not exceeded.
• At the specified curb weight your vehicle hasa tendency to understeer, which means thatthe steering wheel has to be turned more than might seem appropriate for the curva-ture of a bend. This ensures good stabilityand reduces the risk of rear wheel skid.Remember that these properties can alterwith the vehicle load. The heavier the load inthe cargo compartment, the less the ten-dency to understeer.
Related information
•
Climate – general information (p. 126)
Towing a trailer When towing a trailer, always observe the legal requirements of the state/province.
NOTE
For the maximum trailer and tongue weights recommended by Volvo, see Weights (p. 381)
• All Volvo models are equipped with energy- absorbing shock-mounted bumpers. Trailerhitch installation should not interfere with theproper operation of this bumper system.
Trailer towing does not normally present any par-ticular problems, but take into consideration:
• Increase tire pressure to recommended fullpressure, see the tire inflation decal on thedriver's door opening.
• When your vehicle is new, avoid towing heavytrailers during the first 620 miles (1,000 km).
• Maximum speed when towing a trailer:50 mph (80 km/h).
• Engine and transmission are subject toincreased loads. Therefore, engine coolanttemperature should be closely watched whendriving in hot climates or hilly terrain. Use alower gear and turn off the air conditioner ifthe temperature gauge needle enters the redrange.
Page 295 of 406
STARTING AND DRIVING
}}
293
•
If the automatic transmission begins to over- heat, a message will be displayed in the textwindow.
• Avoid overload and other abusive operation.
• Hauling a trailer affects handling, durability,and economy.
• It is necessary to balance trailer brakes withthe towing vehicle brakes to provide a safestop (check and observe state/local regula-tions).
• Do not connect the trailer's brake systemdirectly to the vehicle's brake system.
• More frequent vehicle maintenance isrequired.
• Remove the ball holder when the hitch is notbeing used.
NOTE
•When parking the vehicle with a trailer on a hill, apply the parking brake before put- ting the gear selector in
P. Always follow
the trailer manufacturer's recommenda- tions for wheel chocking.
• When starting on a hill, put the gear selector in
D before releasing the parking
brake.
• If you use the manual (Geartronic) shift positions while towing a trailer, make surethe gear you select does not put toomuch strain on the engine (using toohigh a gear).
• The drawbar assembly/trailer hitch maybe rated for trailers heavier than the vehi-cle is designed to tow. Please adhere toVolvo's recommended trailer weights.
• Avoid driving with a trailer on inclines ofmore than 15%.
CAUTION
The maximum trailer weights listed are only applicable for altitudes up to 3,280 ft(1000 m) above sea level. With increasingaltitude the engine power and therefore thecar's climbing ability are impaired because ofthe reduced air density, so the maximumtrailer weight has to be reduced accordingly.The weight of the vehicle and trailer must bereduced by 10% for every further 3,280 ft(1,000 m) (or part thereof). When towing5,000 lbs (2,250 kg) hill inclination is restric-ted to 14%.