odometer VOLVO V60 CROSS COUNTRY 2017 Owner´s Manual
[x] Cancel search | Manufacturer: VOLVO, Model Year: 2017, Model line: V60 CROSS COUNTRY, Model: VOLVO V60 CROSS COUNTRY 2017Pages: 406, PDF Size: 9.66 MB
Page 5 of 406
3
INSTRUMENTS AND CONTROLS
Instrument overview 66
Information displays – introduction 69
Eco Guide * and Power Meter *
72
Information displays – indicator symbols 73
Information displays – warning symbols 75
My Car – introduction 77
Information displays – ambient tem- perature sensor 78
Information displays – trip odometerand clock 79
Inserting/removing remote key 79
Ignition modes 80
Front seats 81
Front seats – folding backrest *
82
Front seats – power seat 82
Key memory – power driver's seat *
and door mirrors 84
Rear seats – head restraints 85
Rear seats – folding backrest 87
Steering wheel 89
Electrically heated * steering wheel
90
Lighting panel 90
High/low beam headlights 91
Active high beams (AHB) *
92
Tunnel detection (models with the rain sensor * only) 93
Active Bending Lights (ABL)
*
93
Auxiliary lights *
94
Instrument and "theater" lighting 95
Parking lights 95
Rear fog lights 96
Hazard warning flashers 96
Turn signals 97
Front interior lighting 98
Rear interior lighting 99
Home safe lighting 99
Approach lighting 99
Windshield wipers 100
Rain sensor *
101
Windshield washer 101
Tailgate wiper/washer 102
Power windows 103
Power door mirrors 104
Power door mirrors – automatic tilt- ing/retraction 105
Heated windshield *, rear window and
door mirror defrosters 106
Interior rearview mirror 106
Digital compass *
107
Power moonroof * – introduction
108
Power moonroof * – operation
109
HomeLink®
Wireless Control Sys-
tem * – introduction 110
HomeLink ®
Wireless Control Sys-
tem * – programming 111
Volvo Sensus 113
Information display – menu controls 114
Information display – menu overview 115
Information display – messages 115
Trip computer – introduction 116
Trip computer – functions, analog instrument panel 118
Trip computer – functions, digitalinstrument panel 121
Trip computer – Supplementaryinformation 123
Trip computer – Trip statistics 124
Page 70 of 406
||
INSTRUMENTS AND CONTROLS
* Option/accessory, for more information, see Introduction.
68
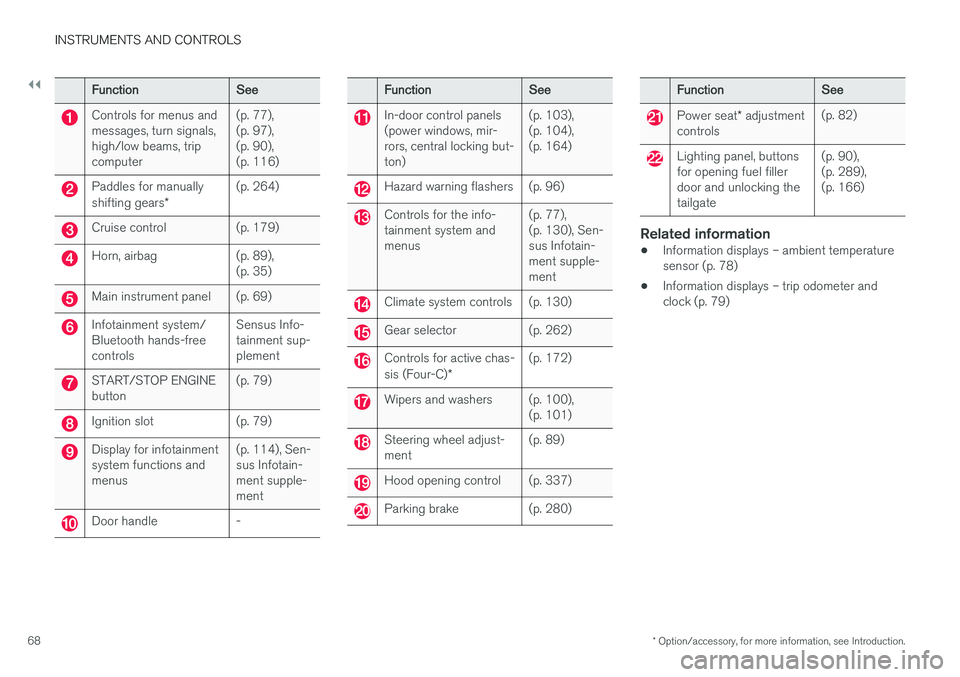
FunctionSee
Controls for menus and messages, turn signals,high/low beams, tripcomputer(p. 77), (p. 97),(p. 90),(p. 116)
Paddles for manually shifting gears *(p. 264)
Cruise control(p. 179)
Horn, airbag(p. 89), (p. 35)
Main instrument panel(p. 69)
Infotainment system/ Bluetooth hands-freecontrolsSensus Info- tainment sup-plement
START/STOP ENGINE button(p. 79)
Ignition slot(p. 79)
Display for infotainment system functions andmenus(p. 114), Sen- sus Infotain-ment supple-ment
Door handle-
FunctionSee
In-door control panels (power windows, mir-rors, central locking but-ton)(p. 103), (p. 104),(p. 164)
Hazard warning flashers(p. 96)
Controls for the info- tainment system andmenus(p. 77), (p. 130), Sen-sus Infotain-ment supple-ment
Climate system controls(p. 130)
Gear selector(p. 262)
Controls for active chas- sis (Four-C)*(p. 172)
Wipers and washers(p. 100), (p. 101)
Steering wheel adjust- ment(p. 89)
Hood opening control(p. 337)
Parking brake(p. 280)
FunctionSee
Power seat* adjustment
controls(p. 82)
Lighting panel, buttons for opening fuel fillerdoor and unlocking thetailgate(p. 90), (p. 289),(p. 166)
Related information
• Information displays – ambient temperature sensor (p. 78)
• Information displays – trip odometer andclock (p. 79)
Page 81 of 406
INSTRUMENTS AND CONTROLS
}}
* Option/accessory, for more information, see Introduction.79
Information displays – trip odometer and clock The trip odometers
T1 and T2 and clock are dis-
played in the instrument panel.
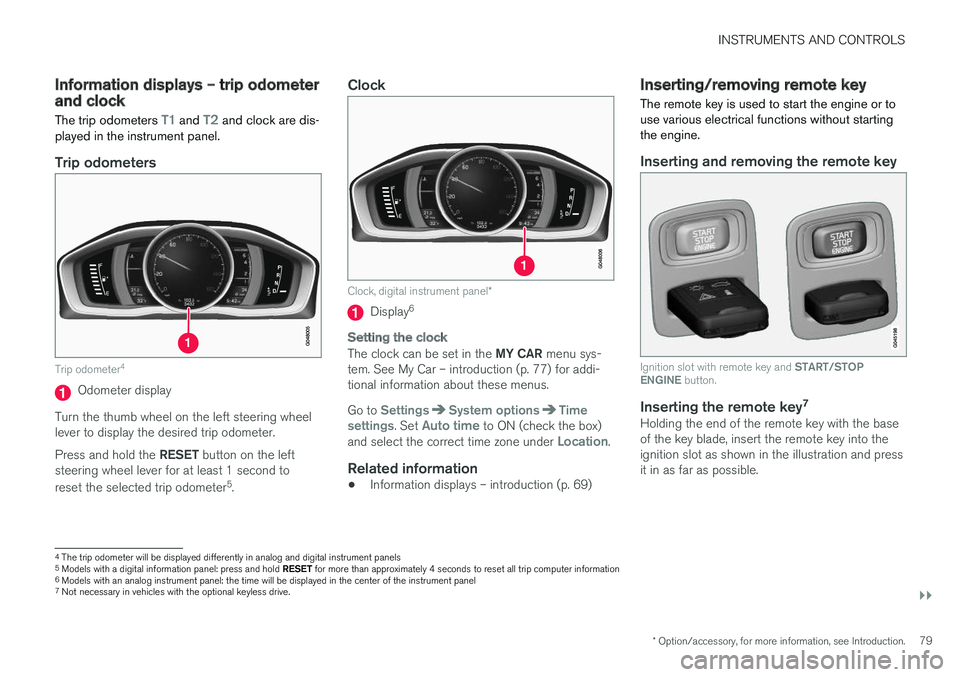
Trip odometers
Trip odometer 4
Odometer display
Turn the thumb wheel on the left steering wheel lever to display the desired trip odometer. Press and hold the RESET button on the left
steering wheel lever for at least 1 second to reset the selected trip odometer 5
.
Clock
Clock, digital instrument panel *
Display6
Setting the clock
The clock can be set in the
MY CAR menu sys-
tem. See My Car – introduction (p. 77) for addi- tional information about these menus. Go to
SettingsSystem optionsTime
settings. Set Auto time to ON (check the box)
and select the correct time zone under Location.
Related information
• Information displays – introduction (p. 69)
Inserting/removing remote key The remote key is used to start the engine or to use various electrical functions without startingthe engine.
Inserting and removing the remote key
Ignition slot with remote key and
START/STOP
ENGINE button.
Inserting the remote key 7Holding the end of the remote key with the base of the key blade, insert the remote key into theignition slot as shown in the illustration and pressit in as far as possible.
4
The trip odometer will be displayed differently in analog and digital instrument panels
5 Models with a digital information panel: press and hold RESET for more than approximately 4 seconds to reset all trip computer information
6 Models with an analog instrument panel: the time will be displayed in the center of the instrument panel
7
Not necessary in vehicles with the optional keyless drive.
Page 82 of 406
||
INSTRUMENTS AND CONTROLS
* Option/accessory, for more information, see Introduction.
80
CAUTION
Foreign objects in the ignition slot can impair function or cause damage.
Removing the remote keyThe remote key can be removed from the ignition slot by pulling it out.
Related information
• Ignition modes (p. 80)
Ignition modes
The vehicle's ignition has 3 modes: 0, I, and II
that can be used without starting the engine. The following table shows examples of whichfunctions are available in the respective modes.
NOTE
To access ignition modes I or II without star-
ting the engine, the brake pedal must not be
depressed.
ModeFunction
0The odometer, clock and temperature gauge are illuminated. Power seats *
can be adjusted and the infotainment system can be used for a limited time(to minimize battery drain, see theSensus Infotainment Supplement).
IThe Moonroof *, power windows,12-
volt sockets in the passenger com- partment, navigation system *, climate
system blower, windshield wipers can be used.
IIThe headlights/taillights illuminate. Warning/indicator lights illuminate for5 seconds. Other systems are acti- vated. However, the heated seats * and
heated rear window function can only be activated when the engine is run- ning. Mode II should only be used
for very short periods to help avoid draining the battery.
Ignition modes
Ignition mode 0
–The vehicle is unlocked.
Page 121 of 406
INSTRUMENTS AND CONTROLS
}}
119
FunctionDescription
Digital speed– km/h – mph– NoneThis displays the vehicle's speed digitally in the center of the instrument panel • Open by pressing
OK, scroll using the thumb wheel, confirm by pressing OK and exit by pressing ENTER.
Trip comp. opt.
–
Distance to empty
– Fuel consumption
– Average speed
– Trip odometer T1 and total dist.
– Trip odometer T2 and total dist.
Selections among the trip computer information headings are made here. The symbols that have already been selected have a check mark and are displayed in white. Those not selected are not checked and are displayed in
gray :
1. Open the function by pressing OK and scroll to the desired heading using the thumb wheel.
2. Confirm by pressing OK. The symbol will change colors from gray to white and will be checked.
3. Continue this procedure or exit by pressing RESET.
Service statusShows the number of months and mileage until the next scheduled service.
Messages (##)For additional information, see Information display – menu controls (p. 114).
Information headingsAny of the information headings in the following table can be displayed. To do so:
1. Ensure that none of the trip computer con-
trols are being used in a command sequence; reset them by pressing RESET
twice. 2.
Turn the thumb wheel to begin displaying
the information headings. Stop on the desired heading.
3. See the table for an explanation of the head- ing or the actions that can be taken.
Page 122 of 406
||
INSTRUMENTS AND CONTROLS
120
Information headings in the instrument panelDescription
Trip odometer T1 and total dist.•Press and hold
RESET to reset trip odometer T1.
Trip odometer T2 and total dist.•Press and hold
RESET to reset trip odometer T2.
Distance to emptySee Distance to empty in Trip computer – Supplementary information (p. 123).
Fuel consumptionCurrent fuel consumption.
Average speedPress and hold RESET to reset Average speed.
-No information will be displayed. This also indicates the beginning/end of the list of information headings.
Scroll among the trip computer information head- ings at any time by turning the thumb wheel
until the desired heading is displayed.
Related information
• Trip computer – introduction (p. 116)
• Trip computer – functions, digital instrument panel (p. 121)
• Trip computer – Supplementary information(p. 123)
• Trip computer – Trip statistics (p. 124)
Page 123 of 406
INSTRUMENTS AND CONTROLS
}}
* Option/accessory, for more information, see Introduction.121
Trip computer – functions, digital instrument panel
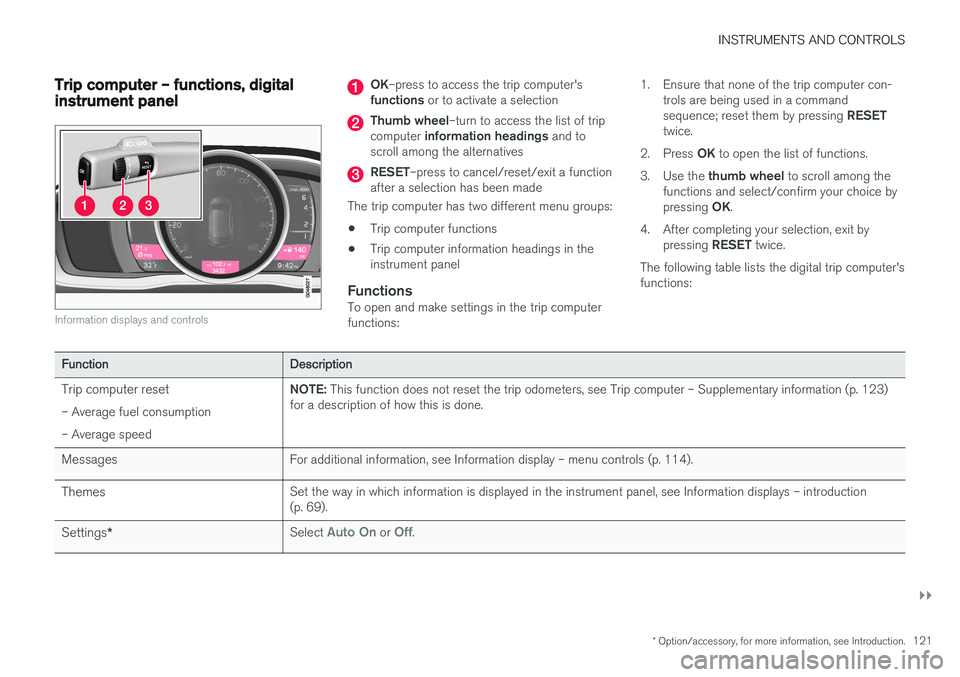
Information displays and controls
OK–press to access the trip computer's
functions or to activate a selection
Thumb wheel –turn to access the list of trip
computer information headings and to
scroll among the alternatives
RESET –press to cancel/reset/exit a function
after a selection has been made
The trip computer has two different menu groups: • Trip computer functions
• Trip computer information headings in the instrument panel
FunctionsTo open and make settings in the trip computerfunctions: 1. Ensure that none of the trip computer con-
trols are being used in a command sequence; reset them by pressing RESET
twice.
2. Press OK to open the list of functions.
3. Use the thumb wheel to scroll among the
functions and select/confirm your choice bypressing OK.
4. After completing your selection, exit by pressing RESET twice.
The following table lists the digital trip computer's functions:
FunctionDescription
Trip computer reset – Average fuel consumption – Average speedNOTE: This function does not reset the trip odometers, see Trip computer – Supplementary information (p. 123)
for a description of how this is done.
MessagesFor additional information, see Information display – menu controls (p. 114).
ThemesSet the way in which information is displayed in the instrument panel, see Information displays – introduction (p. 69).
Settings *Select Auto On or Off.
Page 124 of 406
||
INSTRUMENTS AND CONTROLS
122
FunctionDescription
Contrast mode/Color modeAdjust the instrument panel's contrast and color.
Service statusShows the number of months and mileage until the next scheduled service.
Information headingsThree trip computer headings can be displayed at the same time; one in each of the displays (seethe previous illustration). One of the combinationsof information headings in the following table canbe displayed. To do so: 1. Ensure that none of the trip computer con-
trols are being used in a command sequence; reset them by pressing RESET
twice.
2. Turn the thumb wheel to begin displaying
the combinations of information headings. Stop on the desired combination. 3. See the table for an explanation of the head-
ing or the actions that can be taken.
Scroll among the combinations of trip computerinformation headings at any time by turning the thumb wheel until the desired combination is
displayed.
Heading combinationsDescription
Average fuel consumptionTrip odometer T1 + mileageAverage speed• Press and hold
RESET to reset trip odometer T1.
Current fuel consumptionTrip odometer T2 + mileageDistance to empty•Press and hold
RESET to reset trip odometer T2.
Current fuel consumptionMileagemph<>km/hChange between mph<>km/h – see "Digital speed display" in Trip com- puter – Supplementary information (p. 123).
-No trip computer information
displayed-No information will be displayed. This also indicates the beginning/end of the list of information headings.
Scroll among the trip computer information head- ings at any time by turning the thumb wheel
until the desired heading is displayed.Related information
• Trip computer – introduction (p. 116)
• Trip computer – functions, analog instrument panel (p. 118) •
Trip computer – Supplementary information(p. 123)
• Trip computer – Trip statistics (p. 124)
Page 125 of 406
INSTRUMENTS AND CONTROLS
* Option/accessory, for more information, see Introduction.123
Trip computer – Supplementary information
General information for both Analog and Digital trip computer functions.
Average fuel consumptionFuel consumption since the last time this func- tion was reset.
Average speedThe vehicle's average speed since the last timethis function was reset.
Current fuel consumptionCurrent fuel consumption is calculated approxi-mately once a second. When the vehicle is mov-ing at low speed, fuel consumption is displayedper unit of time. At higher speeds, it is displayedin terms of distance. Miles or kilometers can be displayed, see the heading "Changing units".
Distance to emptyThis function shows the approximate distancethat can be driven on the fuel remaining in the tank. When
Distance to empty shows "----",
there is very little useable fuel remaining in that tank; refuel as soon as possible. The calculationis based on average fuel consumption during thelast 20 miles (30 km) of driving and the amountof fuel remaining in the tank (the accuracy of thisfigure may vary if your driving style changes). An economical driving style will generally increasethis distance. See Economical driving (p. 291) for information about driving economically.
Digital speed display
*Speed is expressed in the unit not used by theinstrument panel's speedometer e.g., if the nor-mal speedometer is in mph, the trip computer willdisplay in the speed in km/h and vice versa.
Resetting an analog instrument panel
Trip odometer(s) and average speed
1. Display trip odometer T1 or T1, or Average
speed.
2. Press and hold RESET until selected func-
tion is reset.
Each trip computer heading must be reset indi- vidually.
Resetting a digital instrument panel
Trip odometer
1. Turn the thumb wheel to select the combi-
nation of headings containing the trip odom- eter to be reset.
2. Press and hold RESET until selected trip
odometer is reset.
Average speed and fuel consumption
1. Select Trip computer reset and press OK. 2. Select one of the following alternatives using
the thumb wheel and press OK:
• mpg
• mph
• Reset both
3. Finish by pressing RESET.
Changing unitsTo change the unit (miles/km) used to measure distance and speed, go to
MY CARSettings
System optionsDistance and fuel units.
NOTE
In addition to changing units in the trip com- puter, this also changes the units used in the Volvo Navigation System (VNS) *.
Related information
• Trip computer – introduction (p. 116)
• Trip computer – functions, analog instrument panel (p. 118)
• Trip computer – functions, digital instrumentpanel (p. 121)
• Trip computer – Trip statistics (p. 124)
Page 338 of 406
||
MAINTENANCE AND SERVICING
336
CSB menu accessOnce the prerequisites have been established, all CSB-related menus can be accessed in MY CAR
by pressing OK/MENU and then selecting
Maintenance & repair.
Booking information and data from the
vehicle
If you request an appointment from your vehicle, with your consent, booking information and data about your vehicle 1
will be transmitted to your
preferred retailer.
Using the serviceOnce the prerequisites have been established, all CSB-related menus can be accessed in MY CAR
by pressing OK/MENU and then selecting
Maintenance & repair.
If the time for the next regularly scheduled serv- ice is approaching, if the vehicle requires certaintypes of repairs or if a system needs to bechecked, a message will be displayed. You willthen by guided through the steps required tobook service or repairs.
On-screen service messages
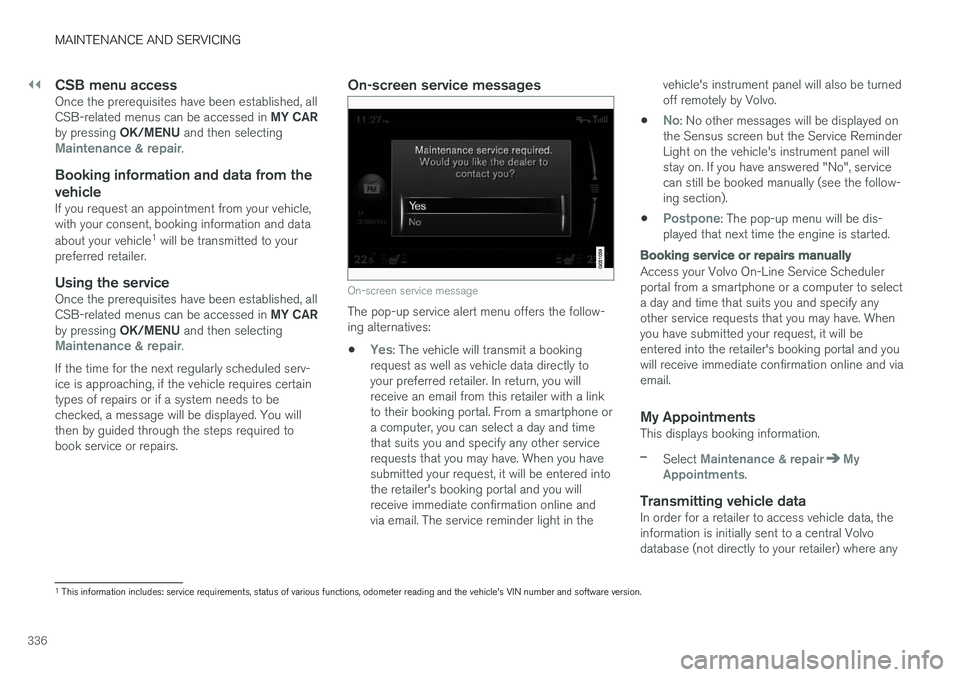
On-screen service message
The pop-up service alert menu offers the follow- ing alternatives:
•
Yes: The vehicle will transmit a booking
request as well as vehicle data directly to your preferred retailer. In return, you willreceive an email from this retailer with a linkto their booking portal. From a smartphone ora computer, you can select a day and timethat suits you and specify any other servicerequests that you may have. When you havesubmitted your request, it will be entered intothe retailer's booking portal and you willreceive immediate confirmation online andvia email. The service reminder light in the vehicle's instrument panel will also be turnedoff remotely by Volvo.
•
No: No other messages will be displayed on
the Sensus screen but the Service Reminder Light on the vehicle's instrument panel willstay on. If you have answered "No", servicecan still be booked manually (see the follow-ing section).
•
Postpone: The pop-up menu will be dis-
played that next time the engine is started.
Booking service or repairs manually
Access your Volvo On-Line Service Scheduler portal from a smartphone or a computer to selecta day and time that suits you and specify anyother service requests that you may have. Whenyou have submitted your request, it will beentered into the retailer's booking portal and youwill receive immediate confirmation online and viaemail.
My AppointmentsThis displays booking information.
–Select Maintenance & repairMy
Appointments.
Transmitting vehicle dataIn order for a retailer to access vehicle data, the information is initially sent to a central Volvodatabase (not directly to your retailer) where any
1 This information includes: service requirements, status of various functions, odometer reading and the vehicle's VIN number and software version.