VOLVO V60 CROSS COUNTRY 2018 Owner´s Manual
Manufacturer: VOLVO, Model Year: 2018, Model line: V60 CROSS COUNTRY, Model: VOLVO V60 CROSS COUNTRY 2018Pages: 404, PDF Size: 9.6 MB
Page 61 of 404
SAFETY
}}
59
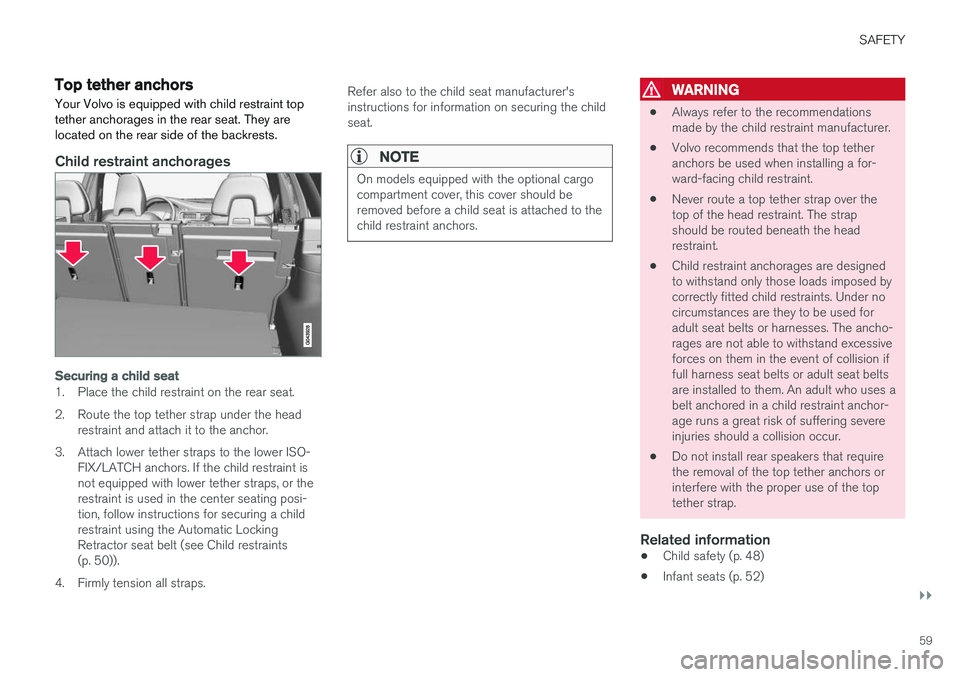
Top tether anchorsYour Volvo is equipped with child restraint top tether anchorages in the rear seat. They arelocated on the rear side of the backrests.
Child restraint anchorages
Securing a child seat
1. Place the child restraint on the rear seat.
2. Route the top tether strap under the head restraint and attach it to the anchor.
3. Attach lower tether straps to the lower ISO- FIX/LATCH anchors. If the child restraint is not equipped with lower tether straps, or therestraint is used in the center seating posi-tion, follow instructions for securing a childrestraint using the Automatic LockingRetractor seat belt (see Child restraints(p. 50)).
4. Firmly tension all straps. Refer also to the child seat manufacturer'sinstructions for information on securing the childseat.
NOTE
On models equipped with the optional cargo compartment cover, this cover should beremoved before a child seat is attached to thechild restraint anchors.
WARNING
•
Always refer to the recommendations made by the child restraint manufacturer.
• Volvo recommends that the top tetheranchors be used when installing a for-ward-facing child restraint.
• Never route a top tether strap over thetop of the head restraint. The strapshould be routed beneath the headrestraint.
• Child restraint anchorages are designedto withstand only those loads imposed bycorrectly fitted child restraints. Under nocircumstances are they to be used foradult seat belts or harnesses. The ancho-rages are not able to withstand excessiveforces on them in the event of collision iffull harness seat belts or adult seat beltsare installed to them. An adult who uses abelt anchored in a child restraint anchor-age runs a great risk of suffering severeinjuries should a collision occur.
• Do not install rear speakers that requirethe removal of the top tether anchors orinterfere with the proper use of the toptether strap.
Related information
•Child safety (p. 48)
• Infant seats (p. 52)
Page 62 of 404
SAFETY
60•
Convertible seats (p. 54)
• Integrated booster cushion – general infor- mation (p. 60)
• ISOFIX/LATCH lower anchors (p. 57)
Integrated booster cushion – general information
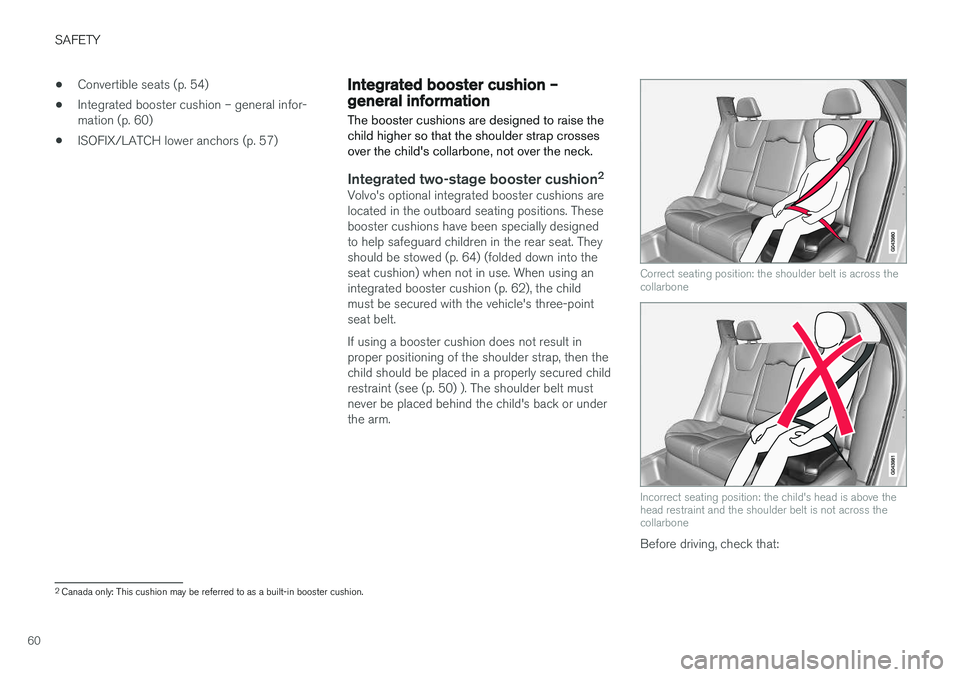
The booster cushions are designed to raise the child higher so that the shoulder strap crossesover the child's collarbone, not over the neck.
Integrated two-stage booster cushion 2Volvo's optional integrated booster cushions are located in the outboard seating positions. Thesebooster cushions have been specially designedto help safeguard children in the rear seat. Theyshould be stowed (p. 64) (folded down into theseat cushion) when not in use. When using anintegrated booster cushion (p. 62), the childmust be secured with the vehicle's three-pointseat belt. If using a booster cushion does not result in proper positioning of the shoulder strap, then thechild should be placed in a properly secured childrestraint (see (p. 50) ). The shoulder belt mustnever be placed behind the child's back or underthe arm.
Correct seating position: the shoulder belt is across the collarbone
Incorrect seating position: the child's head is above the head restraint and the shoulder belt is not across thecollarbone
Before driving, check that:
2
Canada only: This cushion may be referred to as a built-in booster cushion.
Page 63 of 404
SAFETY
}}
61
•
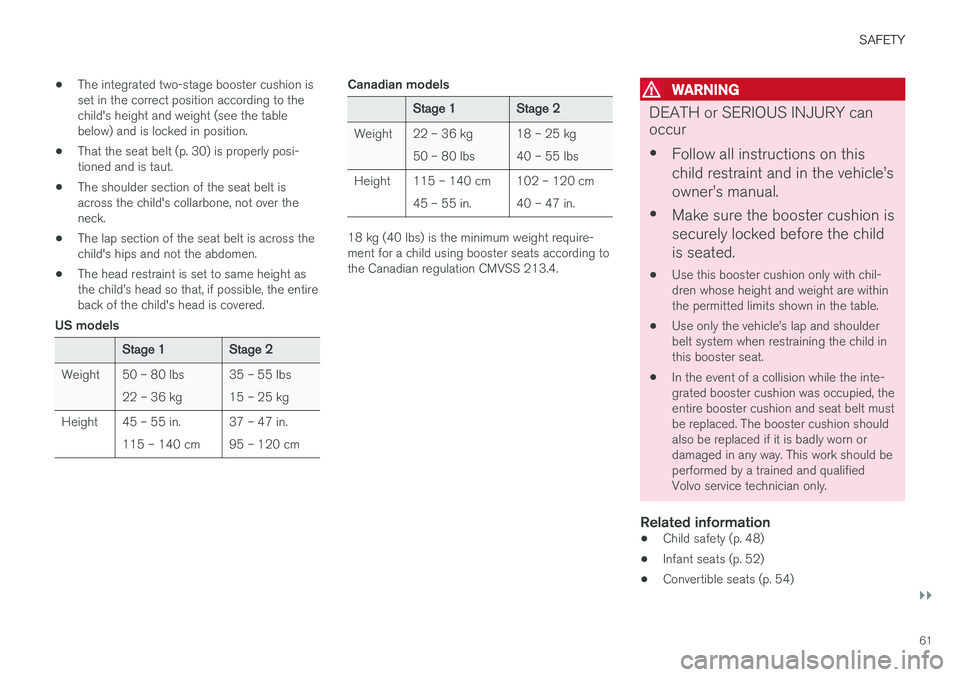
The integrated two-stage booster cushion is set in the correct position according to thechild's height and weight (see the tablebelow) and is locked in position.
• That the seat belt (p. 30) is properly posi-tioned and is taut.
• The shoulder section of the seat belt isacross the child's collarbone, not over theneck.
• The lap section of the seat belt is across thechild's hips and not the abdomen.
• The head restraint is set to same height asthe child
Page 64 of 404
SAFETY
62•
Booster cushions (p. 56)
• Seat belts – general (p. 30)
Integrated booster cushion – using
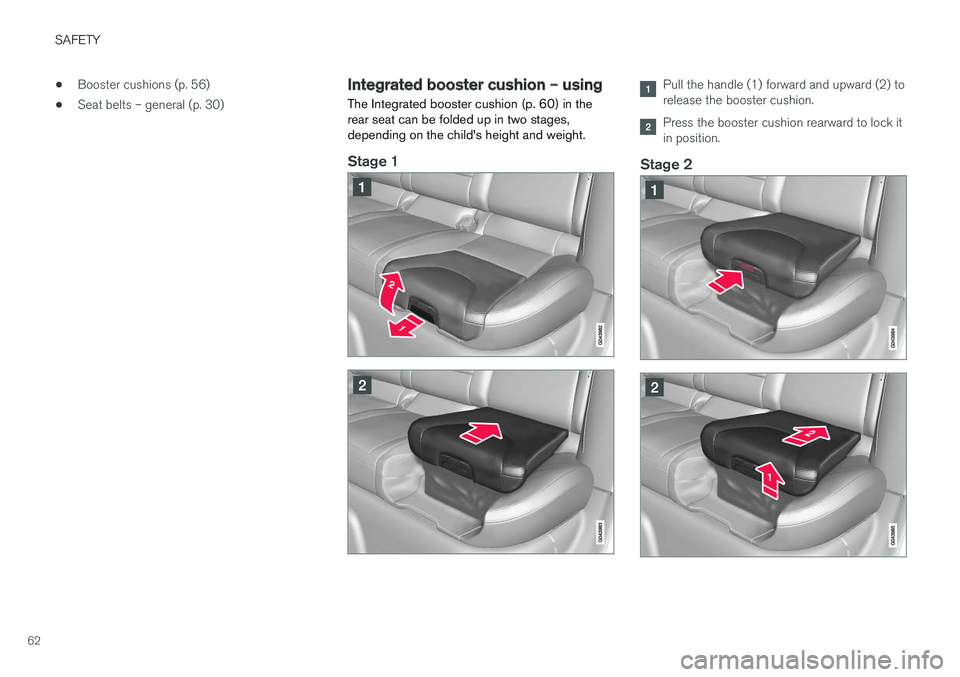
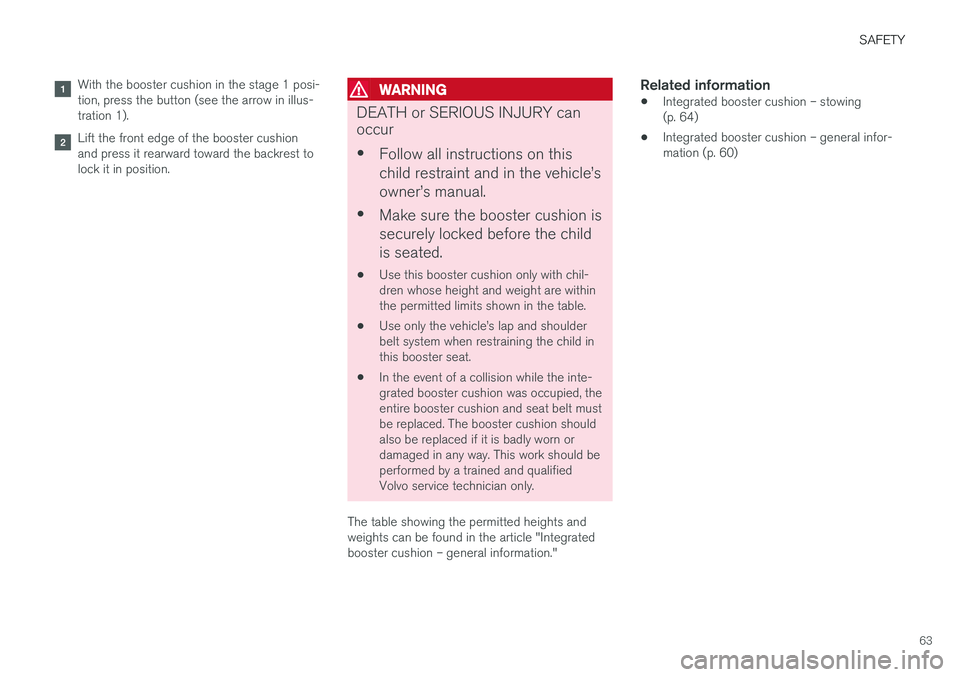
The Integrated booster cushion (p. 60) in the rear seat can be folded up in two stages,depending on the child's height and weight.
Stage 1
Pull the handle (1) forward and upward (2) to release the booster cushion.
Press the booster cushion rearward to lock it in position.
Stage 2
Page 65 of 404
SAFETY
63
With the booster cushion in the stage 1 posi- tion, press the button (see the arrow in illus-tration 1).
Lift the front edge of the booster cushion and press it rearward toward the backrest tolock it in position.
WARNING
DEATH or SERIOUS INJURY can occur •Follow all instructions on this child restraint and in the vehicle
Page 66 of 404
SAFETY
64
Integrated booster cushion – stowing
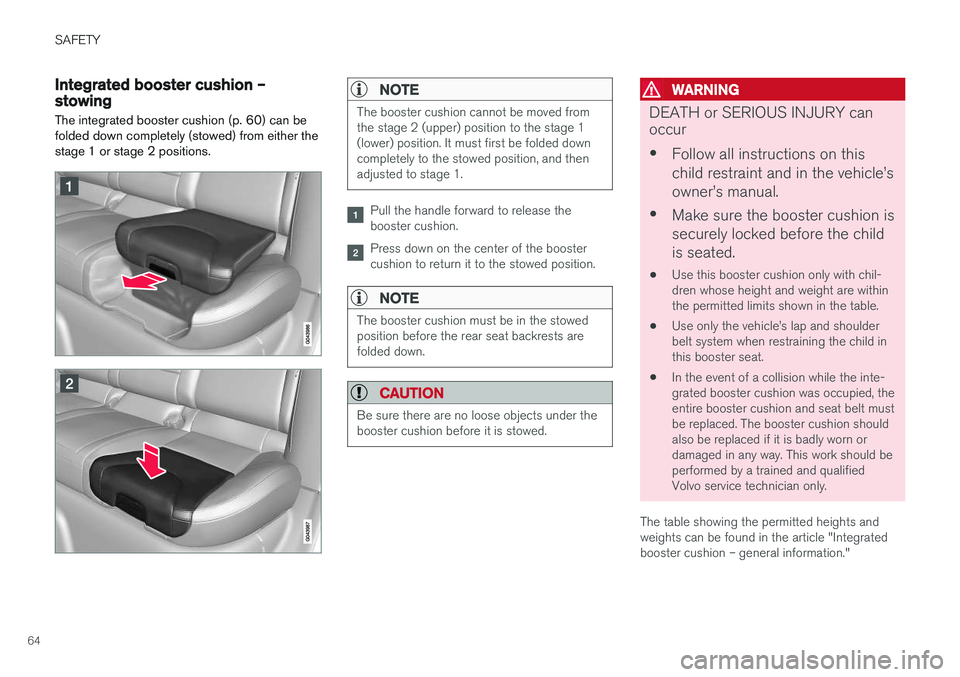
The integrated booster cushion (p. 60) can be folded down completely (stowed) from either thestage 1 or stage 2 positions.NOTE
The booster cushion cannot be moved from the stage 2 (upper) position to the stage 1(lower) position. It must first be folded downcompletely to the stowed position, and thenadjusted to stage 1.
Pull the handle forward to release the booster cushion.
Press down on the center of the booster cushion to return it to the stowed position.
NOTE
The booster cushion must be in the stowed position before the rear seat backrests arefolded down.
CAUTION
Be sure there are no loose objects under the booster cushion before it is stowed.
WARNING
DEATH or SERIOUS INJURY can occur • Follow all instructions on this child restraint and in the vehicle
Page 67 of 404
SAFETY
}}
* Option/accessory.65
Related information
•Integrated booster cushion – using (p. 62)
• Integrated booster cushion – general infor- mation (p. 60)
Child safety locks
Power child safety locks * help prevent children
from inadvertently opening one of the rear doors or windows from inside the vehicle.
Manual child safety locks
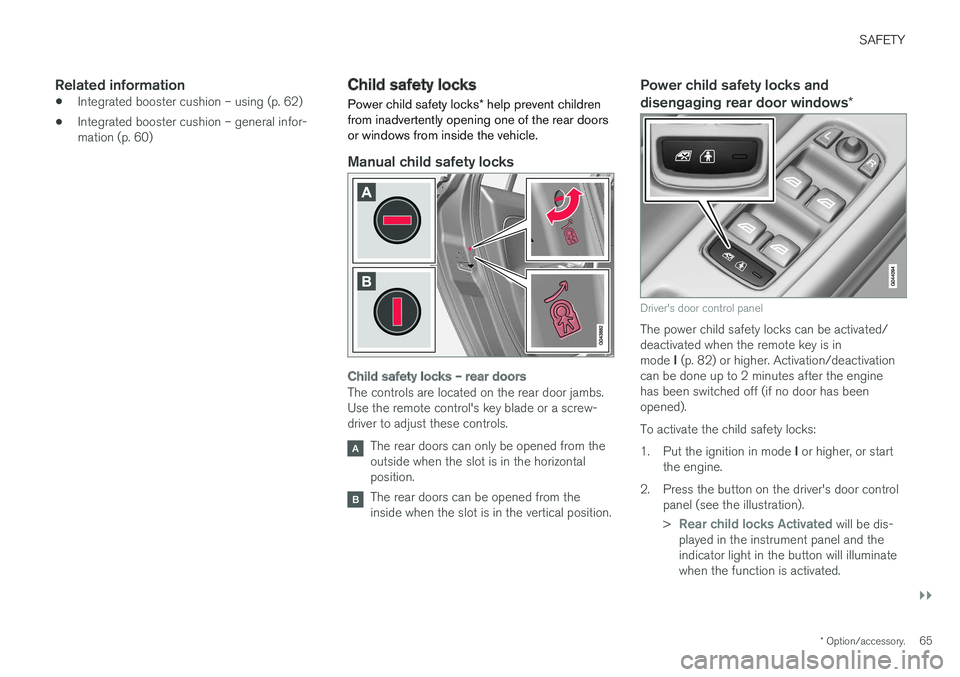
Child safety locks – rear doors
The controls are located on the rear door jambs. Use the remote control's key blade or a screw-driver to adjust these controls.
The rear doors can only be opened from the outside when the slot is in the horizontalposition.
The rear doors can be opened from the inside when the slot is in the vertical position.
Power child safety locks and disengaging rear door windows *
Driver's door control panel
The power child safety locks can be activated/ deactivated when the remote key is in mode I (p. 82) or higher. Activation/deactivation
can be done up to 2 minutes after the engine has been switched off (if no door has beenopened). To activate the child safety locks:1. Put the ignition in mode I or higher, or start
the engine.
2. Press the button on the driver's door control panel (see the illustration). >
Rear child locks Activated will be dis-
played in the instrument panel and the indicator light in the button will illuminatewhen the function is activated.
Page 68 of 404
||
SAFETY
66When the child safety locks are activated: •
The rear door windows can only be opened from the driver's door control panel
• The rear doors cannot be opened from theinside
The child safety locks' current setting is storedwhen the engine is switched off. If these lockswere activated when the engine was switched off,they will also be active when the engine is restar-ted.
Related information
• Detachable key blade – general information(p. 157)
• Locking/unlocking – from inside (p. 166)
Page 69 of 404
I N S T R U M E N T S A N D C O N T R O L S
Page 70 of 404
INSTRUMENTS AND CONTROLS
68
Instrument overview This overview shows the location of the instru- ment panel and center console displays, andcontrols/buttons/switches.