brake VOLVO V70 1998 Owners Manual
[x] Cancel search | Manufacturer: VOLVO, Model Year: 1998, Model line: V70, Model: VOLVO V70 1998Pages: 52, PDF Size: 0.89 MB
Page 2 of 52
In production, Volvo has partly or completely phased out several chemicals including freons, lead chromates,
naphtanates, asbestos, mercury and cadmium; and reduced the amount of chemicals used in our plants 50% since 1991.
In use, Volvo was the first in the world to introduce into production a three-way catalytic converter with a Lambda
sond, now called oxygen sensor, in 1976. The current version of this highly efficient system reduces emissions of
harmful substances (CO, HC, NOx) from the exhaust pipe by approximately 95% and the search to eliminate the
remaining emissions continues. Volvo is the only automobile manufacturer to offer CFC-free retrofit kits for the air
conditioning system for all models back to the M/Y 1975 240. Advanced electronic engine controls, refined
purification systems and cleaner fuels are bringing us closer to our goal.
After Volvo cars and parts have fulfilled their use, recycling is the next critical step in completing the life cycle. The
metal content is about 75% of the total weight of the car, which makes the car among the most recycled industrial
products. In order to have efficient and well controlled recycling, many Volvo variants have printed dismantling
manuals indication the weight and material of individual components. For Volvo, all homogeneous plastic parts
weighing more than 1.7 oz. (50 grams)are marked with international symbols that indicate how the component is to be
sorted for recycling.
In addition to continuous environmental refinement of conventional gasoline-powered internal combustion engines,
Volvo is actively looking at advanced technology alternative-fuel vehicles.
When you drive a Volvo, you become our partner in the work to lessen the car's impact on the environment. To reduce
your vehicle's environmental impact, you can:
Maintain proper air pressure in your tires. Tests have shown decreased fuel economy with improperly inflated
tires Follow the recommended maintenance schedule
Drive at a constant speed
See an authorized Volvo retailer as soon as possible for inspection if the check engine (malfunction indicator)
lamp illuminates, or stays on after the vehicle has started
Properly dispose of any vehicle related waste such as used motor oil, used batteries, brake pads, etc.
When cleaning your car, use Volvo's own car care products, all of which have systematically been adapted to
the environment.
Contents
Important
Before you operate your car for the first time, please familiarize yourself with the BREAK-IN information on page 66.
You should also be familiar with the information in the first three chapters of this manual.
Information contained in the balance of the manual is extremely useful and should be studied after operating the
vehicle for the first time.
This manual is structured so that it can be used for reference. It should thus be kept in the car for ready access.
Do not export your Volvo to another country before investigating the country's applicable safety and exhaust emission
requirements. In some cases it may be difficult or impossible to comply with these requirements. Modifications to the
emission control system(s) may render your Volvo not certifiable for legal operation in the U.S., Canada or other
countries.
ProCarManuals.com
Page 8 of 52

Chapter 2 - Instruments and controls
pg. 16 Instruments, switches and controls
NumberSubjectPage No.
33Trunk/ tailgate open control pg. 47
34Power window controls pg. 40
35Power mirror control pg. 50
36Fuel tank open control pg. 67
37Central locking button pg. 43
pg. 17 Instruments, switches and controls (cont.)
Shiftlock (automatic transmission only)
When your car is parked, the gear selector is locked in the (P)ark position. To release the selector from this position,
turn the ignition key to position II (or start the engine), depress the brake pedal, press the button on the front side of th
e gear selector and move the selector from (P)ark.
If it is necessary to manually override the shiftlock system:
Turn the starting (ignition) key to position I
Press firmly on the "SHIFTLOCK OVERRIDE" button located near the base of the gear selector.
While holding the override button down, press the button on the front of the gear selector.
Move the gear selector from the ( P )ark position.
ProCarManuals.com
Page 9 of 52

Keylock (automatic transmission only)
This means that when you switch off the ignition, the gear selector must be in the (P)ark position before the starting
(ignition) key can be removed from the ignition switch.
Anti-lock Brake System (ABS)
The ABS system in your car performs a self -diagnostic test when the vehicle first reaches the speed of approximately
12 mph (20 km/h). The brake pedal will pulsate several times and a sound may be audible from the ABS control
module. This is normal.
Fuel tank cover
The fuel tank cover is locked and must be popped open using the control on the driver's door (see illustration on page
16).
The pages in this section provide detailed descriptions of the vehicle's instruments and controls. Note that vehicles may
be equipped differently, depending on special legal requirements.Chart for Picture of Instruments and Controls
Number
Page No.Subject
1 pg. 35Air vents
2 pg. 22
Headlights, parking lights
3 pg. 24
Instrument illumination
4 pg. 24
Rear fog light
5 pg. 24
Front fog lights
6 Space for additional equipment
7 Space for additional equipment
8 pg. 6-17
Instruments
9 pg. 25
Traction control system (optional)
10 pg. 28-30
Trip computer (optional)
11 pg. 52
Electrically operated sun roof (optional)
12 pg. 25
Rear window demister/heated door mirrors
13 pg. 35
Air mix
14 pg. 35
Air vents
15 pg. 4-6
Passenger side SRS (air bag) hatch
16 pg. 35
Air vents
17 pg. 53
Hood release
ProCarManuals.com
Page 10 of 52
18pg. 22Turn signals, high/low beams
pg. 31Cruise control
19 pg. 34
Adjustable steering wheel
20 pg. 23
Windshield wiper/washer
pg. 26
Tailgate wiper/washer (wagons)
21 pg. 32
Heated front seats (optional)
22 pg. 33
Auxiliary socket
23 pg. 141
Audio system
24 pg. 35-39
Heating and ventilation controls
25 pg. 25
Hazard warning flashers
26 pg. 33
Ash tray
27 Coin holder
28 pg. 108
Shiftlock release button (automatic transmission only)
29 pg. 70-71
Gear selector shift positions
30 pg. 72
Transmission mode selectors
31 pg. 32
Parking brake
32 pg. 4-6
Horn/SRS
Some of the items above are available on certain models only.
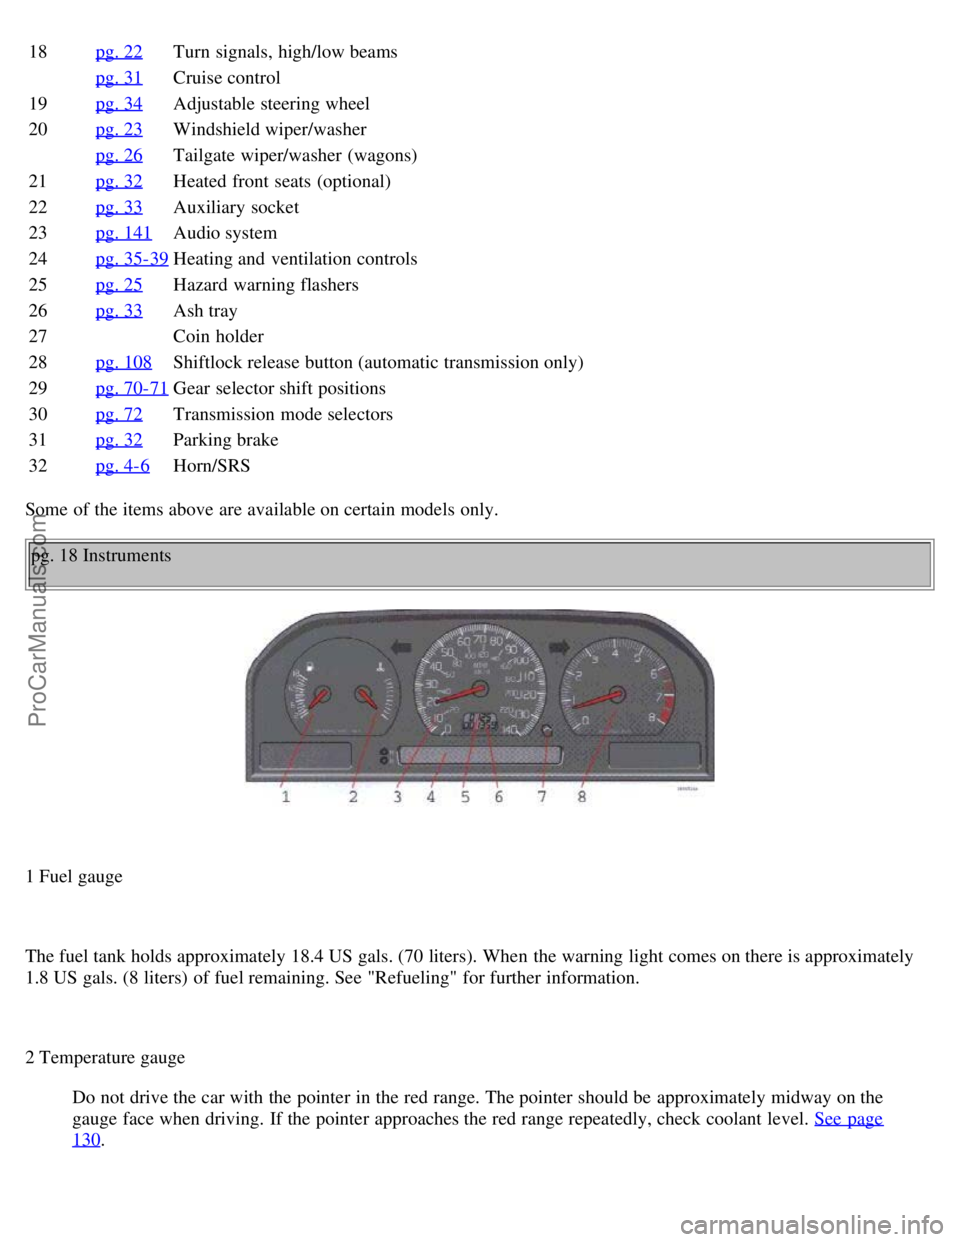
pg. 18 Instruments
1 Fuel gauge
The fuel tank holds approximately 18.4 US gals. (70 liters). When the warning light comes on there is approximately
1.8 US gals. (8 liters) of fuel remaining. See "Refueling" for further information.
2 Temperature gauge Do not drive the car with the pointer in the red range. The pointer should be approximately midway on the
gauge face when driving. If the pointer approaches the red range repeatedly, check coolant level. See page
130.
ProCarManuals.com
Page 17 of 52
Chapter 4 - Starting and driving
pg. 65 Starting and driving
Starting and driving
This section on starting and driving contains items such as starting the engine, operating the gear selector, towing,
trailers, etc. Page No.
Subject
pg. 66Break-in period
pg. 66-67
Fuel requirements, Refueling
pg. 68
Driving economy
pg. 69
Starting the engine
pg. 70
Manual transmission
pg. 70-73
Automatic transmission, All Wheel Drive (AWD)
pg. 74-75
Points to remember
pg. 76
Emergency towing
pg. 77
Vehicle towing information
pg. 78
Jump starting
pg. 79
Three-way catalytic converter
pg. 80
Brake system, ABS
pg. 81
Trailer towing
pg. 82
Winter driving
pg. 83
Long distance trips
pg. 66 Break-in period, Fuel requirements
A new car should be broken-in
Refrain from utilizing your car's full driving potential during the first 1,200 miles (2,000 km) including the "kick -
down" function (automatic transmission).
NOTE - ENGINE OIL:
Although some oil consumption occurs during normal engine operation, more oil is consumed when the engine is new
as the internal parts generate higher friction while wearing-in to each other. From the time the engine is new until the
first service is performed, the oil consumption could be higher than normal. For this reason, it is especially important
to check the oil every time you refuel your car during this period. See page 124
.
In general, the rate of oil consumption depends on such factors as: engine temperature, length of trip, driving
conditions, oil viscosity and quality, engine speed and acceleration/deceleration.
Checking your engine oil level each time the car is refueled is one of the most important items you can perform to
help keep your car in good running order.
ProCarManuals.com
Page 21 of 52
Other factors which decrease gas mileage are:
Worn or dirty spark plugs
Incorrect spark plug gap
Dirty air cleaner
Dirty engine oil and clogged oil filter
Dragging brakes
Incorrect front end alignment
Some of the above mentioned items and others are checked at the standard Maintenance Service intervals.
NOTE: ( D )rive or 5th gear (manual transmissions) should be used as often as possible to help improve fuel economy.
Contents | Top of Page
ProCarManuals.com
Page 24 of 52

Snow chains should be installed on front wheels only (this applies to cars with front wheel drive and to cars
equipped with All Wheel Drive) . Use only Volvo approved snow chains.
Snow chains may be mounted on tire dimension 185/65R15 and 195/60R15. Tire dimension 205/55R15 and
205/50R16 require a special type of snow chain. Consult your Volvo retailer. Snow chains may not be used on
205/55R16 tires. *
If accessory, aftermarket or "custom" tires and wheels are installed and are of a size different than the original tires
and wheels, chains in some cases CANNOT be used. Snow chains cannot be used on those turbo-charged models fitted
with all-season tires 205/55 R16. Models equipped with 205/55 R15 or 205/50 R16 need specially designed snow
chains. Sufficient clearances between chains and brakes, suspension and body components must be maintained.
Some strap -on type chains will interfere with brake components and therefore CANNOT be used.
Consult your Volvo retailer for additional snow chain information. CAUTION:
Check local regulations regarding the use of snow chains before installing.
Always follow the chains manufacturer's installation instructions carefully. Install chains as tightly as possible and
re-tighten periodically.
Never exceed the chain manufacture's specified maximum speed limit. (Under no circumstances should that limit
be higher than 30 mph (45 km/h).
Avoid bumps, holes or sharp turns when driving with snow chains.
The handling of the vehicle can be adversely affected when driving with chains. Avoid fast or sharp turns as well
as locked wheel braking.
Snow tires, studded tires *
Tires for winter use:
Owners who live in or regularly commute through areas with sustained periods of snow or icy driving conditions are
strongly advised to fit suitable winter tires to help retain the highest degree of traction.
It is important to install winter tires on all four wheels to help retain traction during cornering, braking and
accelerating. Failure to do so could reduce traction to an unsafe level or adversely affect handling. Do not mix tires of
different design as this could also negatively affect overall tire road grip. Volvo recommends 185/65 R15 winter tires
on 15" wheels on all S/V 70 models including models equipped with 16" or 17" wheels.
Winter tires wear more quickly on dry roads in warm weather. They should be removed when the winter driving
season has ended.
Studded tires should be run-in 300-600 miles (500-1000 km) during which the car should be driven as smoothly as
possible to give the studs the opportunity to seat properly in the tires. The car tires should have the same rotational
direction throughout theirentire lifetime. In other words, if you wish to rotate the wheels, make sure that the same
wheels are always on the same side of the car.
ProCarManuals.com
Page 27 of 52
Chapter 6 - In case of emergency
pg. 91 In case of an emergency
In case of an emergency
Even if you maintain your car in good running condition, there is always the possibility that something might go wrong
and prevent you from driving, such as a punctured tire, blown fuse or bulb, etc. For additional information, see section
"ON CALL Road Assistance". pg. 92-93
Wheel changing
pg. 94
Spare tire
pg. 95-101
Replacing bulbs
pg. 102-104
Replacing fuses
pg. 105
Installation of accessories
pg. 106-107
Replacing wiper blades
pg. 108
In case of emergency
pg. 92 Wheel changing
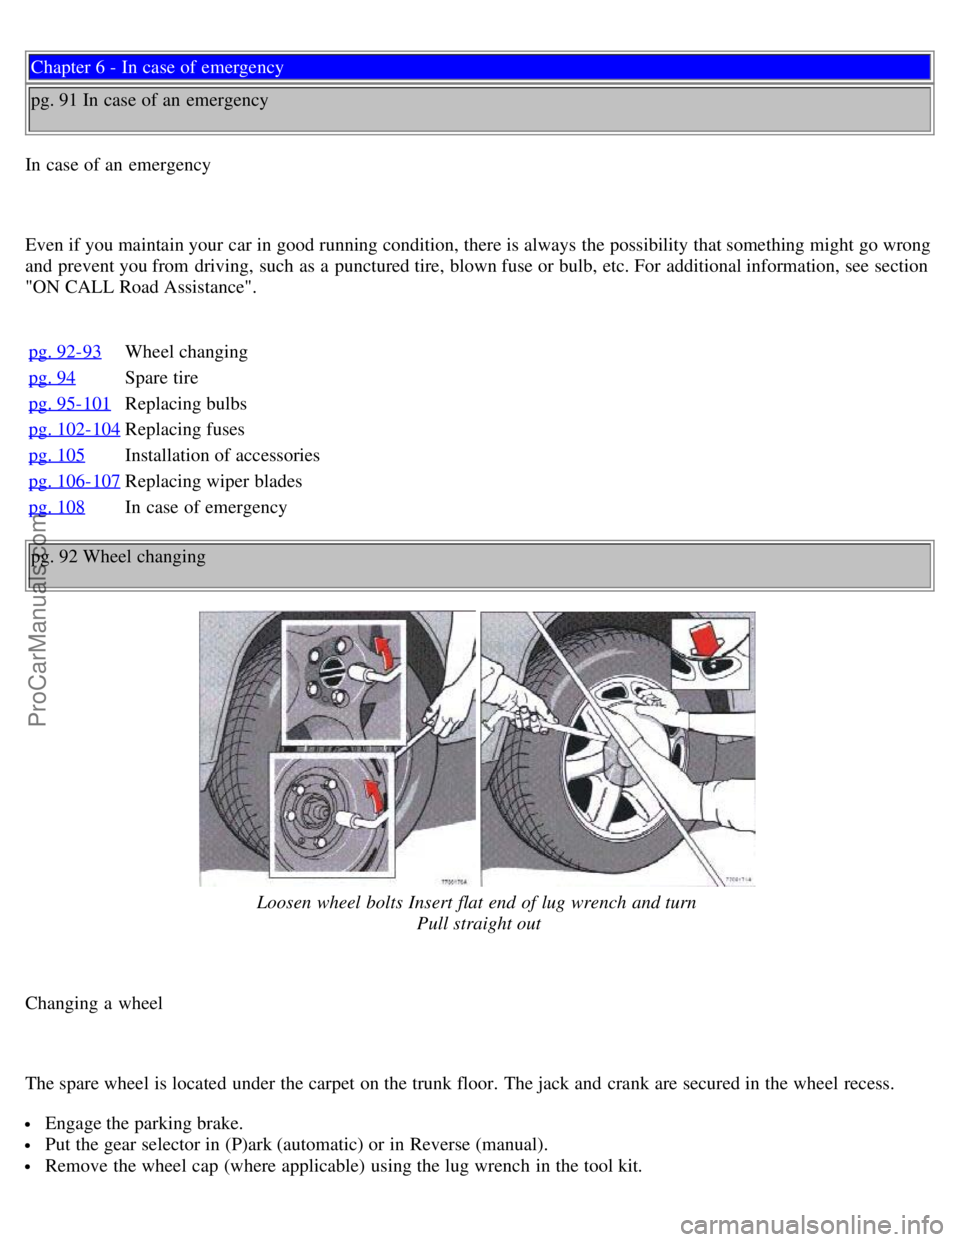
Loosen wheel bolts Insert flat end of lug wrench and turn Pull straight out
Changing a wheel
The spare wheel is located under the carpet on the trunk floor. The jack and crank are secured in the wheel recess.
Engage the parking brake.
Put the gear selector in (P)ark (automatic) or in Reverse (manual).
Remove the wheel cap (where applicable) using the lug wrench in the tool kit.
ProCarManuals.com
Page 29 of 52
Attaching the jack on cars with All Wheel Drive (AWD)
Due to the greater weight of AWD-equipped cars, these models have an additional jack attachment point, located
directly in front of the rear axle. When using a workshop floor jack, make sure that the correct attachment is used and
that the jack does not damage the fuel tank.
The attachment is, of course, also intended for use with the standard jack supplied with the car.
Installing the wheel
Clean the contact surfaces on the wheel and hub. Lift the wheel and place it on the hub. Make sure that you align the
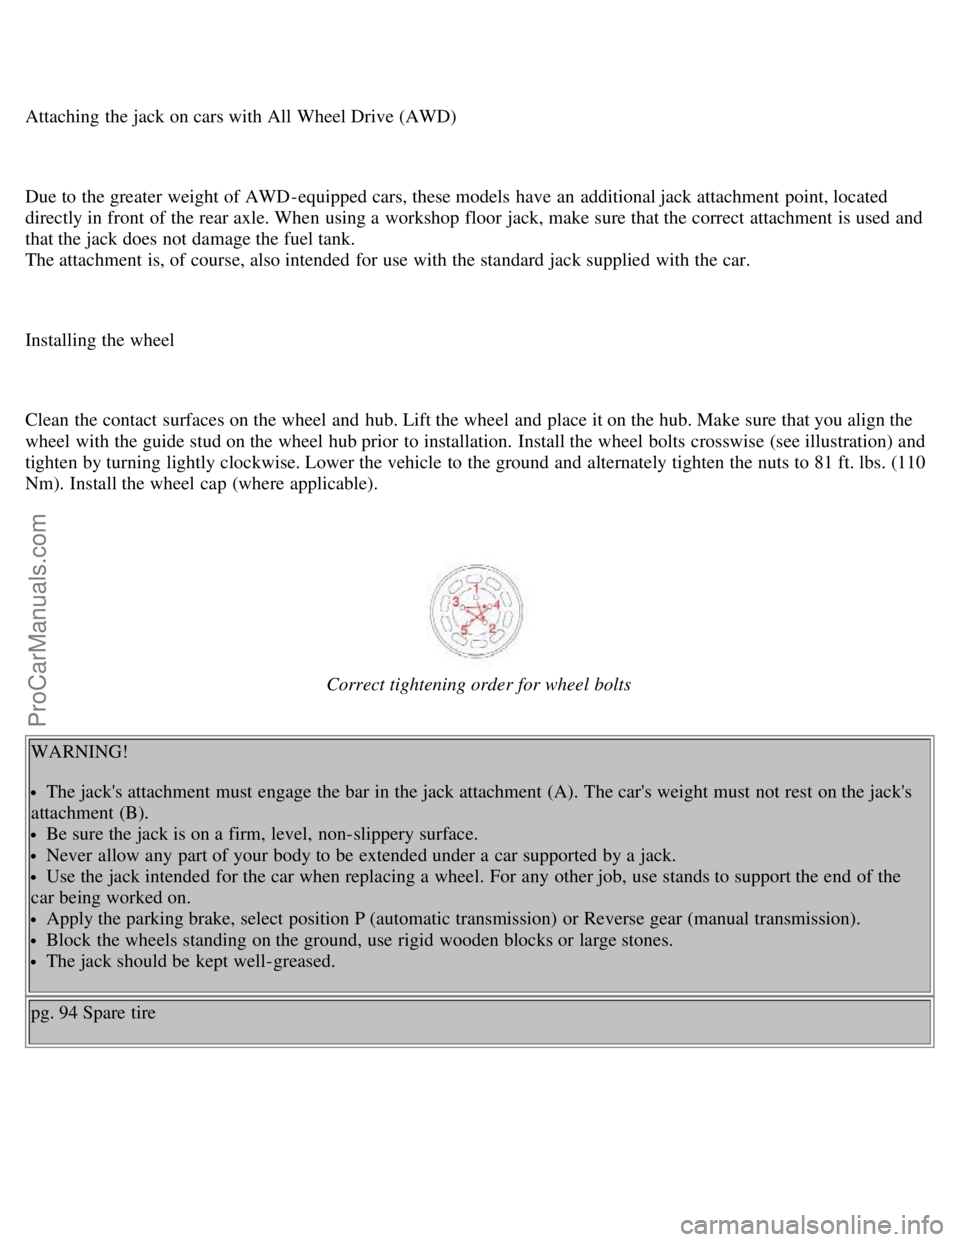
wheel with the guide stud on the wheel hub prior to installation. Install the wheel bolts crosswise (see illustration) and
tighten by turning lightly clockwise. Lower the vehicle to the ground and alternately tighten the nuts to 81 ft. lbs. (110
Nm). Install the wheel cap (where applicable).
Correct tightening order for wheel bolts
WARNING!
The jack's attachment must engage the bar in the jack attachment (A). The car's weight must not rest on the jack's
attachment (B).
Be sure the jack is on a firm, level, non-slippery surface.
Never allow any part of your body to be extended under a car supported by a jack.
Use the jack intended for the car when replacing a wheel. For any other job, use stands to support the end of the
car being worked on.
Apply the parking brake, select position P (automatic transmission) or Reverse gear (manual transmission).
Block the wheels standing on the ground, use rigid wooden blocks or large stones.
The jack should be kept well-greased.
pg. 94 Spare tire
ProCarManuals.com
Page 34 of 52

with clean water.
WARNING!
When the car is driven immediately after being washed, apply the brake several times in order to remove any
moisture from the brake linings.
Engine cleaning agents should not be used when the engine is warm. This constitutes a fire risk.
NOTE: When washing the car, remember to remove dirt from the drain holes in the doors and sills. Bumpers: Wash
the bumpers with the same cleaning agent used on the rest of the car. Never clean the bumpers with gasoline or paint
thinner. Difficultspots can be removed with denatured alcohol. To avoid scratches, do not dry the bumpers with paper.
* Pay special attention to the drain holes near the base of the windshield in the cowl under the rear edge of the hood.
pg. 113 Automatic car washing, Polishing and waxing
Automatic washing - simple and quick
An automatic wash is a simple and quick way to clean your car, but it is worth remembering that it may not be as
thorough as when you yourself go over the car with sponge and water. Keeping the underbody clean is most important,
especially in the winter. Some automatic washers do not have facilities for washing the underbody.
Before driving into an automatic wash, make sure that the side view mirrors, auxiliary lamps, etc., are secure,
otherwise there is risk of the machine dislodging them. You should also lower the antenna (sedans).
We do NOT recommend washing your car in an automatic wash during the first six months (because the paint will not
have hardened sufficiently).
Polishing and waxing
Normally, polishing is not required during the first year after delivery, however, waxing may be beneficial.
ProCarManuals.com