clock VOLVO V70 1998 Owners Manual
[x] Cancel search | Manufacturer: VOLVO, Model Year: 1998, Model line: V70, Model: VOLVO V70 1998Pages: 52, PDF Size: 0.89 MB
Page 11 of 52

3 Speedometer
4 Clock, ambient temperature sensor, trip computer (certain models)
5 Trip odometerUsed for measuring shorter distances. The last digit indicates 1/10 mile/kilometer.
6 Odometer
7 Trip odometer reset button
8 Tachometer Reads thousands of engine rpm. The engine should not be operated in red range. The highest permitted
constant engine speed is 6,200 rpm.
Contents | Top of Page
ProCarManuals.com
Page 20 of 52

accommodate possible expansion of the fuel in hot weather. Be aware that the "usable" tank will be somewhat less than
the specified maximum. When the fuel level is low, such factors as ambient temperature, the fuel's "vapor pressure"
characteristics, and terrain can affect the fuel pumps' ability to supply the engine with an adequate supply of fuel.
Therefore, it is advisable to refuel as soon as possible when the needle nears the red zone, or when the fuel warning
light comes on.CAUTION:
Do not refuel with the engine running. After refueling, close the fuel filler cap by turning it clockwise until it
clicks into place.
Allow for fuel expansion by not overfilling the tank. Overfilling could also cause damage to the emission control
systems.
NOTE: If the fuel filler cap is not closed tightly or if the engine is running when the car is refueled, the Malfunction
Indicator Lamp may indicate a fault. Use only Volvo original or approved fuel filler caps. CAUTION: Avoid spilling gasoline during refueling. Gasolines containing alcohol can cause damage to painted
surfaces, which may not be covered under the New Vehicle Limited Warranty.
Do not use gasoline containing methanol (methyl alcohol, wood alcohol). This practice can result in vehicle
performance deterioration and can damage critical parts in the fuel system. Such damage may not be covered under
the New Vehicle LimitedWarranty.
pg. 68 Driving economy
Economical driving conserves natural resources
Better driving economy may be obtained by thinking ahead, avoiding rapid starts and stops and adjusting the speed of
your vehicle to immediate traffic conditions. Observe the following rules:
Bring the engine to normal operating temperature as soon as possible by driving with a light foot on the accelerator
pedal for the first few minutes of operation. A cold engine uses more fuel and is subject to increased wear.
Whenever possible, avoid using the car for driving short distances. This does not allow the engine to reach normal
operating temperature.
Drive carefully and avoid rapid acceleration and hard braking.
Do not exceed speed limit.
Avoid carrying unnecessary items (extra load) in the car.
Check tire pressure regularly (check when tires are cold).
Remove snow tires when threat of snow or ice has ended.
Note that roof racks, ski racks, etc., increase air resistance and thereby fuel consumption.
Avoid using automatic transmission kick-down feature unless necessary.
Avoid using the air conditioning when it is not required. When engaged, the air conditioner's compressor places an
additional load on the engine. However, please note that fuel consumption is lower with the air conditioning on than it
is when driving with the air conditioning switched off and the windows down.
If your car is equipped with the optional Trip Computer, utilizing the fuel consumption modes can help you "learn"
how to drive more economically.
ProCarManuals.com
Page 28 of 52

With the car still on the ground, use the lug wrench to loosen the wheel bolts 1/2 - 1 turn. Turn the bolts
counterclockwise to loosen.
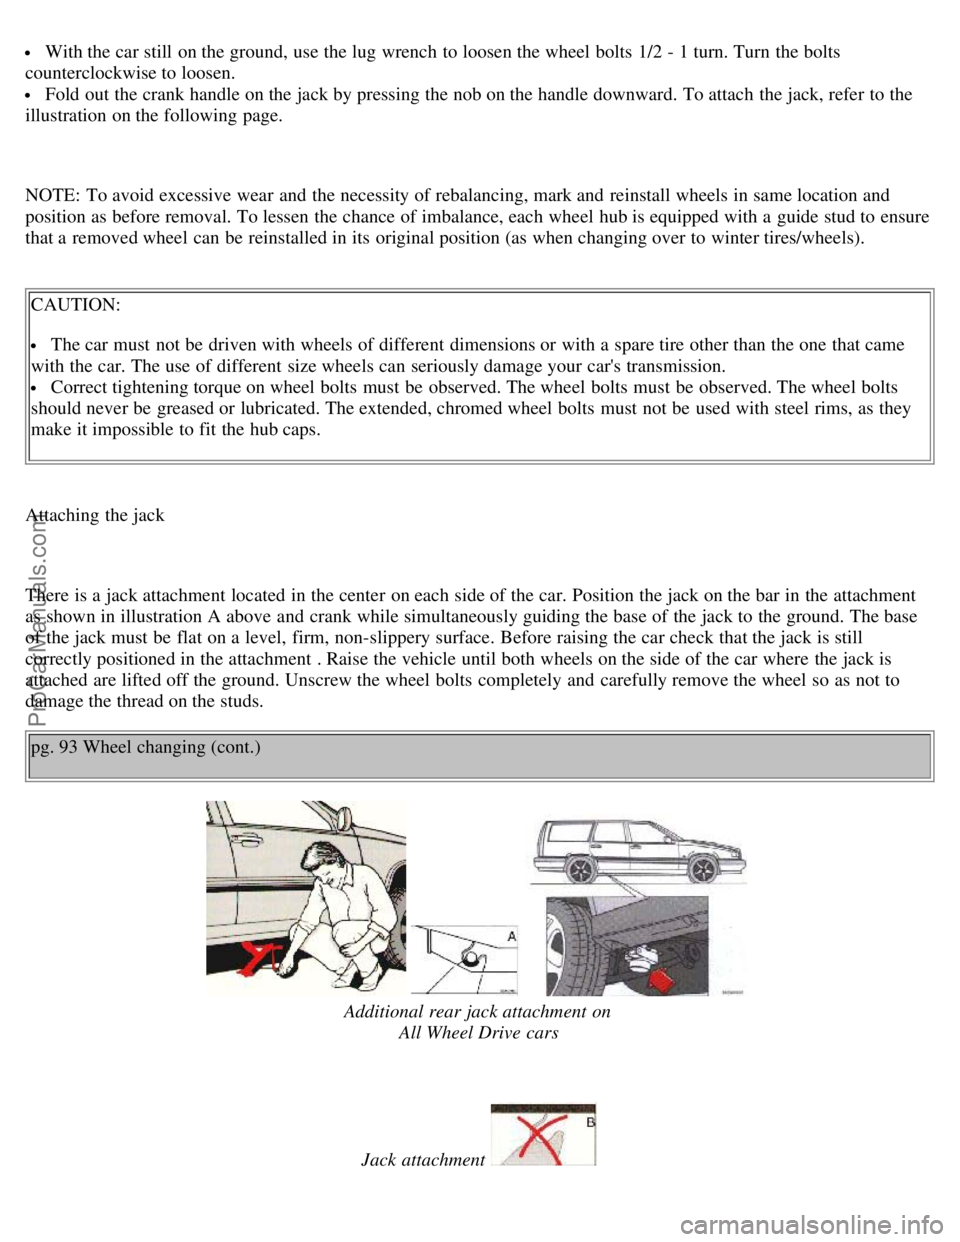
Fold out the crank handle on the jack by pressing the nob on the handle downward. To attach the jack, refer to the
illustration on the following page.
NOTE: To avoid excessive wear and the necessity of rebalancing, mark and reinstall wheels in same location and
position as before removal. To lessen the chance of imbalance, each wheel hub is equipped with a guide stud to ensure
that a removed wheel can be reinstalled in its original position (as when changing over to winter tires/wheels).
CAUTION:
The car must not be driven with wheels of different dimensions or with a spare tire other than the one that came
with the car. The use of different size wheels can seriously damage your car's transmission.
Correct tightening torque on wheel bolts must be observed. The wheel bolts must be observed. The wheel bolts
should never be greased or lubricated. The extended, chromed wheel bolts must not be used with steel rims, as they
make it impossible to fit the hub caps.
Attaching the jack
There is a jack attachment located in the center on each side of the car. Position the jack on the bar in the attachment
as shown in illustration A above and crank while simultaneously guiding the base of the jack to the ground. The base
of the jack must be flat on a level, firm, non-slippery surface. Before raising the car check that the jack is still
correctly positioned in the attachment . Raise the vehicle until both wheels on the side of the car where the jack is
attached are lifted off the ground. Unscrew the wheel bolts completely and carefully remove the wheel so as not to
damage the thread on the studs. pg. 93 Wheel changing (cont.)
Additional rear jack attachment on All Wheel Drive cars
Jack attachment
ProCarManuals.com
Page 29 of 52

Attaching the jack on cars with All Wheel Drive (AWD)
Due to the greater weight of AWD-equipped cars, these models have an additional jack attachment point, located
directly in front of the rear axle. When using a workshop floor jack, make sure that the correct attachment is used and
that the jack does not damage the fuel tank.
The attachment is, of course, also intended for use with the standard jack supplied with the car.
Installing the wheel
Clean the contact surfaces on the wheel and hub. Lift the wheel and place it on the hub. Make sure that you align the
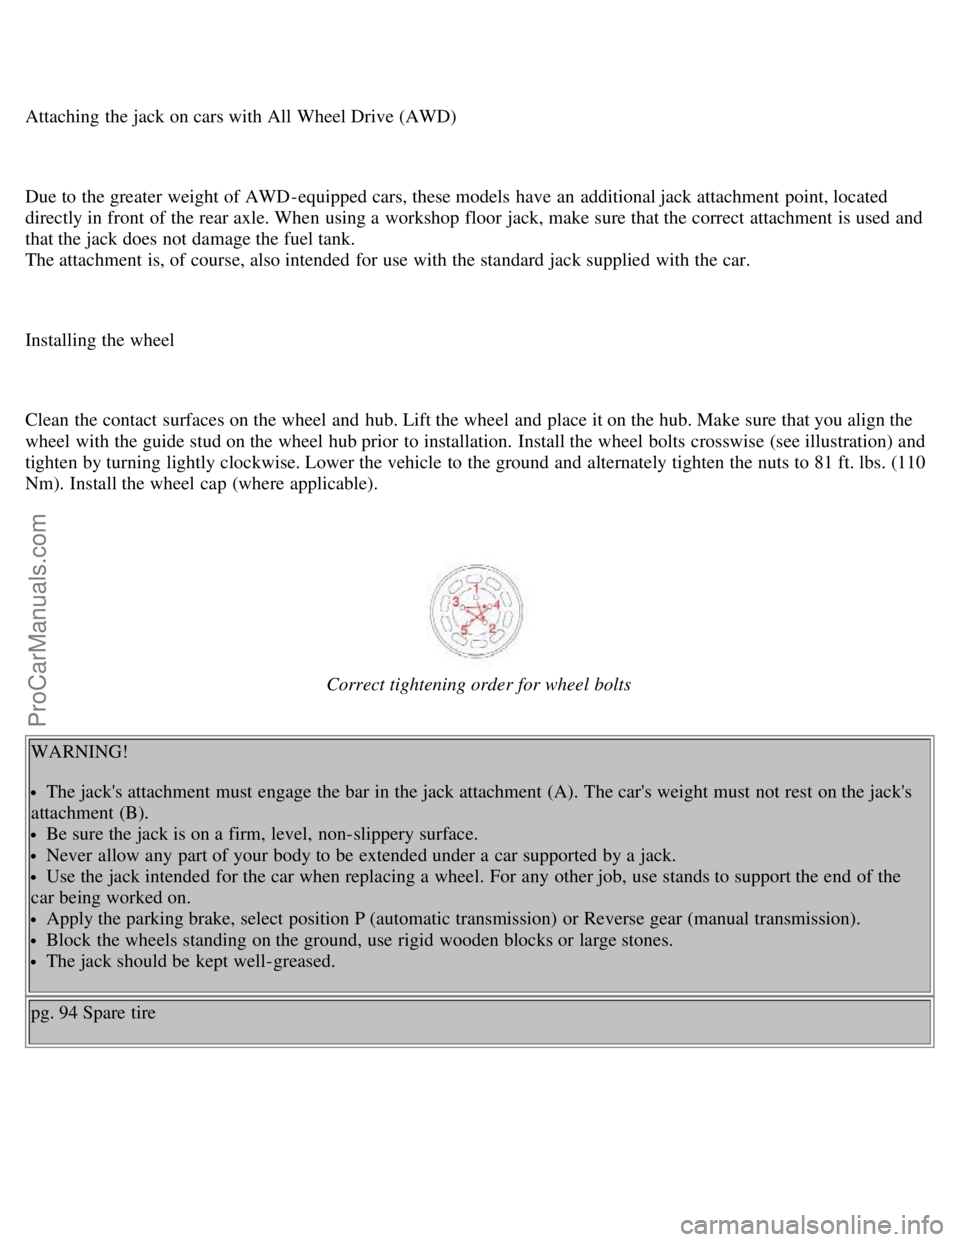
wheel with the guide stud on the wheel hub prior to installation. Install the wheel bolts crosswise (see illustration) and
tighten by turning lightly clockwise. Lower the vehicle to the ground and alternately tighten the nuts to 81 ft. lbs. (110
Nm). Install the wheel cap (where applicable).
Correct tightening order for wheel bolts
WARNING!
The jack's attachment must engage the bar in the jack attachment (A). The car's weight must not rest on the jack's
attachment (B).
Be sure the jack is on a firm, level, non-slippery surface.
Never allow any part of your body to be extended under a car supported by a jack.
Use the jack intended for the car when replacing a wheel. For any other job, use stands to support the end of the
car being worked on.
Apply the parking brake, select position P (automatic transmission) or Reverse gear (manual transmission).
Block the wheels standing on the ground, use rigid wooden blocks or large stones.
The jack should be kept well-greased.
pg. 94 Spare tire
ProCarManuals.com
Page 49 of 52

Turn the button clockwise to increase the volume. The volume control is electronic and has no end stop.
C - Waveband selector
The desired waveband is set by pressing one of the waveband selector buttons. The frequency and waveband is shown
on the display.
NOTE: There are two FM wavebands and one AM waveband. This makes it possible to store 2 x 6 FM stations and 6
AM stations in memory.
D - Setting frequency selection
The radio can be used in most parts of the world by changing the frequency selection intervals as follows:
Depress and hold preset button 5 and turn the radio ON. "USA" will flash on the display. Each time button 5 is
pressed, the frequency selection will change from "USA" to "AUS", etc. When the correct country name is displayed,
wait 5 seconds andthe radio will be ready for use.
E - Manual tuning
Press the left side button to tune to lower frequencies and the right side to tune to higher frequencies. The tuned
frequency is displayed.
ST will be displayed to indicate stereo FM reception.pg. 145 Radio SC-813 (cont.)
ProCarManuals.com
Page 51 of 52

B - Bass control
Adjust the bass by sliding the control up or down (up to increase, down to decrease). A "detent" indicates "equalized"
bass.
C - Treble control
Adjust the treble by sliding the control up or down (up to increase, down to decrease). A "detent" indicates "equalized"
treble.pg. 147 Radio SC-813 (cont.)
A - Fader control
Adjust front/rear speaker balance by sliding the control up or down.
(Up to direct more sound to the front speakers, down to direct more sound to the rear speakers.
The "detent" indicates "equalized" front/rear balance position.
B - Pause function
Press the "volume" knob to temporarily mute the sound. "PAUSE" is displayed.
C - Balance control
Pull out the "volume" knob and adjust the left/right balance by turning the knob counter-clockwise or clockwise.
ProCarManuals.com