remote control VOLVO V70 2002 Owners Manual
[x] Cancel search | Manufacturer: VOLVO, Model Year: 2002, Model line: V70, Model: VOLVO V70 2002Pages: 123, PDF Size: 3.25 MB
Page 38 of 123

Electrically operated seats - general information
Adjusting the front seats:
<="" b="">The passenger's seat can only be adjusted if the ignition key is in position I or II.
Driver's seat: The driver's seat can be adjusted if the ignition key is in position I or II (see page 52
). However, it can
also be adjusted:
Within 40 seconds after the ignition has been switched off (even if the key has been removed from the ignition
switch).
Within 40 seconds after the driver's door has been unlocked with the key or remote control and opened. The key
does not have to be in the ignition switch during this period.
Remote keyless entry system and driver's seat
The remote control transmitter also controls the electrically operated driver's seat in the following way:
Adjust the seat to your preferences.
When you leave your car, lock it using the remote control.
The next time you unlock the driver's door with the same remote control(the one you used to lock the doors with(
and open the driver's door, the driver's seat will automatically move to the position in which you left it. The seat will
move to this position even if someone else has adjusted it since you last drove the car.
NOTE:
This feature will work in the same way with all of the remote control transmitters (up to 3) that you use with your
car.
This feature will not function if you lock your car with the key.
Folding front seat backrest
The passenger seat backrest can be folded down to the horizontal position for carrying long loads. To fold down the
backrest:
Move the seat as far rearward as possible
Adjust the backrest tilt to the most upright position
Lift the catches on the lower rear side of the backrest
Without releasing the catches, push the backrest forward
Move the seat as far forward as possible
WARNING!
ProCarManuals.com
Page 45 of 123

2 0 0 2
VOLVO V70
Chapter 5 - Keys, Locks, Alarm
pg.71 Keys, Locks, Alarm
Keys, Exterior courtesy lights, Locking and unlocking the car72
Remote keyless entry system73
Unlocking the tailgate, Central locking buttons, "Trunk lock" function75
Alarm76
Child safety locks - rear doors78
pg. 72 Keys, Exterior courtesy lights, Locking and unlocking the car
Keys
Two keys are provided with your car; a master key and a service key. The master key, the remote control, and the
central locking button may all be used to lock and unlock all of your car's locks.
The service key will operate only the driver's door and the ignition switch. It is intended to help deter unwanted entry
into the glove compartment and trunk.
Turn the key once to unlock the driver's door and the fuel filler door.
Turn the key again (within 10 seconds) to unlock all doors and the tailgate. One turn with the key towards lock in
the drivers door locks all doors and tailgate.
ProCarManuals.com
Page 46 of 123

Use the switch on the front door armrests to lock/unlock the car from the inside.WARNING!
If the doors are locked while driving, this may hinder rapid access to the occupants of the car in the event of an
accident. (Also see information on "Child safety locks").
NOTE: To help prevent accidentally locking the keys in the car, the central locking system is designed to unlock the
doors immediately if the key is left in the ignition switch, the car is locked using the lock button on the door and the
door is then closed. A sound from the lock will be audible at this time.
Please note that this function will not unlock the doors if the engine is running.
Immobilizer (start inhibitor)
Each of the keys supplied with your car contains a coded transmitter. The code in the key is transmitted to an antenna
in the ignition switch where it is compared to the code stored in the start inhibitor module. The car will start only with
a properly coded key. If you misplace a key, take the other keys to an authorized Volvo retailer for reprogramming as
an antitheft measure.
*This key operates only driver's door and ignition switch/steering wheel lock.
This device complies with part 15 of the FCC rules. Operation is subject to the following condition: (1) This device
may not cause harmful interference, and (2) this device must accept any interference received, including interference
that may cause undesired operation.
Exterior courtesy lights
Home Safe System
When you leave your car at night, you can make use of the courtesy lighting function:
Remove the key from the ignition switch.
Pull the direction indicator lever towards the steering wheel (as when activating the high beams).
Exit the car and lock the doors.
The headlights, parking lights, license plate lights and the lights in the sideview mirrors will now come on and remain
on for 30, 60 or 90 seconds (the time interval is at your discretion and can be changed by an authorized Volvo retailer).
Approach lighting
When approaching the car at night, press the yellow button in the central locking remote control (see illustration on
page 73
). This lights up the interior courtesy light, parking lights, license plate lights and the lights in the sideview
mirrors.
pg. 73 Remote keyless entry system
ProCarManuals.com
Page 47 of 123

Remote keyless entry system
Your car is equipped with a remote control transmitter. This transmitter uses a radio frequency which will allow
"keyless" entry into the passenger compartment or the tailgate. Your car is supplied with two coded key ring
transmitters, which will enable you to lock/ unlock all doors and the tailgate from a distance of 10-15 feet (3-5 meters).
The remote transmitter will also activate or deactivate the your car's alarm system(s). The car can also be
locked/unlocked with the key.
As an extra security precaution in certain situations (valet parking, etc.), Volvo recommends that the transmitter not be
included when the keys are given to anyone. The service key can be used instead. If one of the transmitters is
misplaced, contact your nearest authorized Volvo retailer for assistance.
Using the remote control
Press the LOCK button once to lock all doors, fuel filler door and tailgate.
Press the UNLOCK button once to unlock the driver's door only. Press this button again (within 10 seconds) to
unlock all doors, fuel filler door and tailgate.
To open the tailgate (without unlocking the other doors), press the tailgate -unlock button twice.
NOTE:
If the doors are unlocked with the remote, the locks will automatically reengage (re-lock) and the alarm will reset
after 2 minutes unless a door has been opened.
The lock/unlock and alarm features can also be utilized by using the keys.
FCC ID:LQNP2T-APU
This device complies with part 15 of the FCC rules. Operation is subject to the following conditions: (1) This device
may not cause harmful interference, and (2) this device must accept any interference received, including interference
that may cause undesired operation.
Canadian 2306104388
ProCarManuals.com
Page 49 of 123

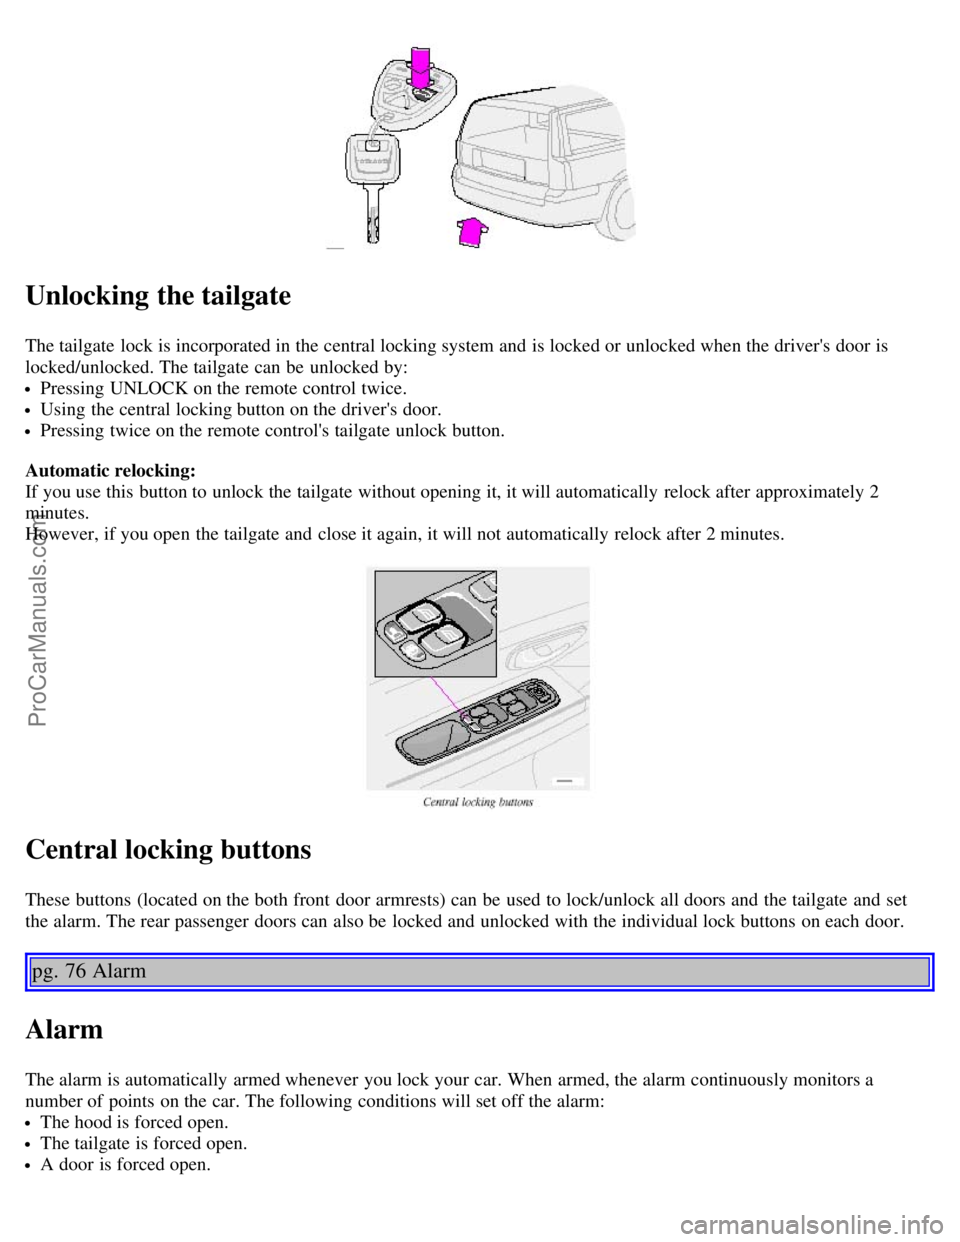
Unlocking the tailgate
The tailgate lock is incorporated in the central locking system and is locked or unlocked when the driver's door is
locked/unlocked. The tailgate can be unlocked by:
Pressing UNLOCK on the remote control twice.
Using the central locking button on the driver's door.
Pressing twice on the remote control's tailgate unlock button.
Automatic relocking:
If you use this button to unlock the tailgate without opening it, it will automatically relock after approximately 2
minutes.
However, if you open the tailgate and close it again, it will not automatically relock after 2 minutes.
Central locking buttons
These buttons (located on the both front door armrests) can be used to lock/unlock all doors and the tailgate and set
the alarm. The rear passenger doors can also be locked and unlocked with the individual lock buttons on each door.
pg. 76 Alarm
Alarm
The alarm is automatically armed whenever you lock your car. When armed, the alarm continuously monitors a
number of points on the car. The following conditions will set off the alarm:
The hood is forced open.
The tailgate is forced open.
A door is forced open.
ProCarManuals.com
Page 50 of 123

The ignition switch is tampered with.
If there is movement in the passenger compartment (if the car is equipped with the optional movement sensor).
The car is lifted or towed (if the car is equipped with the optional inclination sensor).
The battery is disconnected (while the alarm is armed).
Arming the alarm
Press the LOCK button on the remote control, lock the car using the key in the driver's door or press the central lock
button on one of the front doors with the door open. One long flash of the turn signals will confirm that the alarm is
armed.
Disarming the alarm
Press the UNLOCK button on the remote control or unlock the doors with the key.
Turning off (stopping) the alarm
If the alarm is sounding, it can be stopped by pressing the UNLOCK button on the remote control or by unlocking the
driver's door with the key.
Visual alarm signal
The visual alarm signal is given by flashing all turn signals and turning on the interior lighting for approximately 5
minutes.
Audible alarm signal
An audible alarm signal is given by a battery powered siren. One alarm cycle lasts for 25 seconds.
"Panic" button
In an emergency situation, this feature can be used to attract attention. Activate the "panic" function by pressing the
red button on the remote control (see illustration on page 73
) for at least 3 seconds or by pressing this button twice
within 3 seconds. The turn signals will flash, the interior lights will go on and the car's horn will sound.
The function can be turned off by pressing any of the buttons on the remote control or will stop automatically
after 25 seconds. When a button is pressed, there is a 5 second delay before the panic alarm is deactivated.
NOTE: This function will NOT unlock the car.
pg. 77 Alarm
ProCarManuals.com
Page 109 of 123

2 0 0 2
VOLVO V70
HomeLink® Universal Transceiver (option)
pg. 162 HomeLink® Universal Transceiver (option)
HomeLink® Universal Transceiver
HomeLink® is an advanced system that can be programmed to learn the codes of three different remote controlled-
devices (e.g., garage door openers, remote lighting, entry door lock). HomeLink®'s sun visor-mounted transceiver,
powered by your car's electrical system, may then be used in place of your hand -held remote controls.
NOTE: For your security, the HomeLink® Universal Transceiver is designed to not function if you lock your car
from the outside.
Programming the transceiver
1. The ignition switch must be turned to the "accessory" position (II) before programming the HomeLink® Universal
Transceiver.
2. Begin by erasing all 3 factory default channels. Hold down the two outside buttons (buttons 1 and 3 in the
illustration) on the HomeLink® Universal Transceiver for about 20 seconds, until HomeLink®'s indicator light begins
to flash. Then release the buttons.
3. Hold your hand -held transmitter (garage door opener, for example) 2 to 5 in. (5 to 12 cm) away from the
HomeLink® surface, keeping the indicator light in view. For placement questions, contact HomeLink® toll-free 1-
800-355-3515 (Internet: www.HomeLink.com
).
4. Using two hands, push and hold both your hand -held transmitter's button and the transceiver button you wish to
program. The indicator light will flash first slowly, then rapidly. Rapid flashing tells you the HomeLink® button has
ProCarManuals.com
Page 114 of 123

Cold weather driving99
Combination filter44, 47
Coolant127
Cooling system - general information90
Courtesy light70
Courtesy lights (front) - replacing121
Courtesy lights - exterior72
Cruise control31
Cup holder55, 56
Cup holder in the center console55
D
Detachable trailer hitch - installing96
Detachable trailer hitch - removing97
Dimensions139
Direction indicators34
Distributor ignition system142
Door step courtesy lights - replacing120
Doors and locks72
Drive belt127
Driver's seat and remote keyless entry system53
Driving economy89
Driving mode indicator25
Driving mode W86, 88, 99
Driving with trunk open90
E
Economical driving89
Electric socket in cargo compartment63
Electrical system143
Electrical system - general information90
Electrically operated front seats52
Electrically operated sideview mirrors39
Electrically operated sun roof40
Electrically operated windows38
Electronic Brake Force Distribution19
Electronic Climate Control (ECC)44 - 47
Emergency Locking Retractor (ELR)14
Emergency towing93, 94
Emergency warning flashers36
Emissions systems126
Engine - specifications140
Engine - starting83
Engine air filter128
Engine compartment130
Engine oil99, 131, 132
ProCarManuals.com
Page 117 of 123

Maintenance schedule125
Malfunction indicator lamp27
Manual climate control with air conditioning48-50
Manual transmission84, 140
Memory function - front seats52
Mirrors39
Mirrors, sideview - memory function39
N
Net - cargo65
Nylon cargo net65
O
Occupant safety17
Octane rating80
Odometer25
Oil - engine99, 131, 132
Oil pressure warning light26
Opening the hood130
P
Paint touch-up122
Panic function (alarm)76
Parking brake37
Parking brake reminder light26
Parking lights32
Passenger's seat backrest - folding53
PCV system128
Pen holder57
Polishing124
Power seats52
Power steering fluid133
Power windows38
R
Radio145
Reading lights - front/rear70
Rear fog light27, 32
Rear reading lights70
Rear seat backrest62
Rear window - heated36
Rearview mirror39
Refrigerant43
Refueling82
Remote central locking system and sideview mirrors system93
Remote control - keyless entry system73
Remote control - Homelink® Univeral Transceiver163
Remote keyless entry system73
ProCarManuals.com
Page 118 of 123

Remote keyless entry system - replacing batteries74
Remote keyless entry system and driver's seat53
Removing the seat cushion62
Replacing bulbs116 - 121
Replacing fuses112
Replacing wiper blades136
Road assistance144
Roadholding89
Roof load - maximum139
Roof racks91
S
Safety locks - child78
Seat belt maintenance17
Seat belts2, 3, 14
Seat belts - cleaning124
Seats - front52
Securing cargo64
Servicing129
Shiftlock83, 85, 87
Side direction indicator - replacing119
Side impact airbag system (SIPS)8
Sideview mirrors39
Sideview mirrors - folding29
Sideview mirrors - heated36
Sideview mirrors - memory function39
Snow chains106
Snow tires106
Spare tire68, 107
Spark plugs128, 142
Specifications140
SRS6
SRS diagnostic system26
Stability Traction Control (STC)20, 29
Stain removal124
Start inhibitor (immobilizer)72, 83
Starting the engine83
Steel grid65
Steering wheel adjustment33
Steering wheel lock33
Stop and Store bag60
Storage compartments55
Storage in the glove compartment56
Studded tires106
Subwoofer68, 161
ProCarManuals.com