headlights VOLVO V70 2005 Owners Manual
[x] Cancel search | Manufacturer: VOLVO, Model Year: 2005, Model line: V70, Model: VOLVO V70 2005Pages: 139, PDF Size: 3.84 MB
Page 47 of 139
Use the switch on the front door armrests to lock/unlock the car from the inside.
WARNING!
If the doors are locked while driving, this may hinder rapid access to the occupants of the car in the event of an
accident. (Also see information on "Child safety locks").
NOTE: To help prevent accidentally locking the keys in the car, the central locking system is designed to unlock the
doors immediately if the key is left in the ignition switch, the car is locked using the lock button on the door and the
door is then closed. A sound from the lock will be audible at this time.
Please note that this function will not unlock the doors if the engine is running.
Immobilizer (start inhibitor)
Each of the keys supplied with your car contains a coded transmitter. The code in the key is transmitted to an antenna
in the ignition switch where it is compared to the code stored in the start inhibitor module. The car will start only with
a properly coded key.
If you misplace a key, take the other keys to an authorized Volvo retailer for reprogramming as an antitheft measure.
*This key operates only driver's door and ignition switch/steering wheel lock.
This device complies with part 15 of the FCC rules. Operation is subject to the following condition: (1) This device
may not cause harmful interference, and (2) this device must accept any interference received, including interference
that may cause undesired operation.
Exterior courtesy lights
Home Safe System
When you leave your car at night, you can make use of the courtesy lighting function:
Remove the key from the ignition switch.
Pull the direction indicator lever towards the steering wheel (as when activating the high beams).
Exit the car and lock the doors.
The headlights, parking lights, license plate lights and the lights in the sideview mirrors will now come on and remain
on for 30, 60 or 90 seconds (the time interval is at your discretion and can be changed by an authorized Volvo retailer).
Approach lighting
When approaching the car at night, press the yellow button in the central locking remote control (see illustration on
page 81
). This lights up the interior courtesy light, parking lights, license plate lights and the lights in the sideview
mirrors.
pg. 81 Remote keyless entry system
ProCarManuals.com
Page 68 of 139

Front park assist: it may not be possible to combine auxiliary headlights and front park assist since these lights
could trigger the system's sensors.
Faults in the system
If a fault should occur in the system, the LED in the button will be switched off and a message will be displayed in the
text window.
Cleaning the sensors
For the system to function properly, the sensors in the front and/or rear bumpers should be kept clean. They can be
cleaned with car washing detergent and a sponge.
WARNING!
These systems are designed to be a supplementary aid when parking the vehicle. They are not, however, intended to
replace the driver's attention and judgement.
pg. 101 Driving economy, Handling
Economical driving conserves natural resources
Better driving economy may be obtained by thinking ahead, avoiding rapid starts and stops and adjusting the speed of
your vehicle to immediate traffic conditions. Observe the following rules:
Bring the engine to normal operating temperature as soon as possible by driving with a light foot on the accelerator
pedal for the first few minutes of operation. A cold engine uses more fuel and is subject to increased wear.
Whenever possible, avoid using the car for driving short distances. This does not allow the engine to reach normal
operating temperature.
Drive carefully and avoid rapid acceleration and hard braking.
Do not exceed posted speed limits.
Avoid carrying unnecessary items (extra load) in the car.
Maintain correct tire pressure. Check tire pressure regularly (when tires are cold).
Remove snow tires when threat of snow or ice has ended.
Note that roof racks, ski racks, etc., increase air resistance and fuel consumption.
Avoid using automatic transmission kickdown feature unless necessary.
Avoid using the air conditioning when it is not required. When engaged, the A/C compressor places an additional
load on the engine. However, at higher driving speeds, fuel consumption will be lower with the air conditioning on and
the windows closed than with the air conditioning off and the windows open.
Using the onboard trip computer's fuel consumption modes can help you learn how to drive more economically.
Other factors that decrease gas mileage are:
Dirty air cleaner
Dirty engine oil and clogged oil filter
Dragging brakes
Incorrect front end alignment Some of the above mentioned items and others are checked at the standard
Maintenance Service intervals.
NOTE: Vehicles equipped with automatic transmissions should use (D)rive as often as possible and avoid using
"kick -down" to help improve fuel economy. Vehicles equipped with manual transmissions should use fifth gear at
highway speeds. At other times, choose the highest gear that still allows smooth acceleration.
Handling, roadholding
Vehicle load, tire design and inflation pressure all affect vehicle handling. Therefore, check that the tires are inflated to
the recommended pressure according to the vehicle load. See "Tire pressure" section. Loads should be distributed so
that capacity weight or maximum permissible axle loads are not exceeded.
ProCarManuals.com
Page 92 of 139
35 -
36 -
37 -
38 -
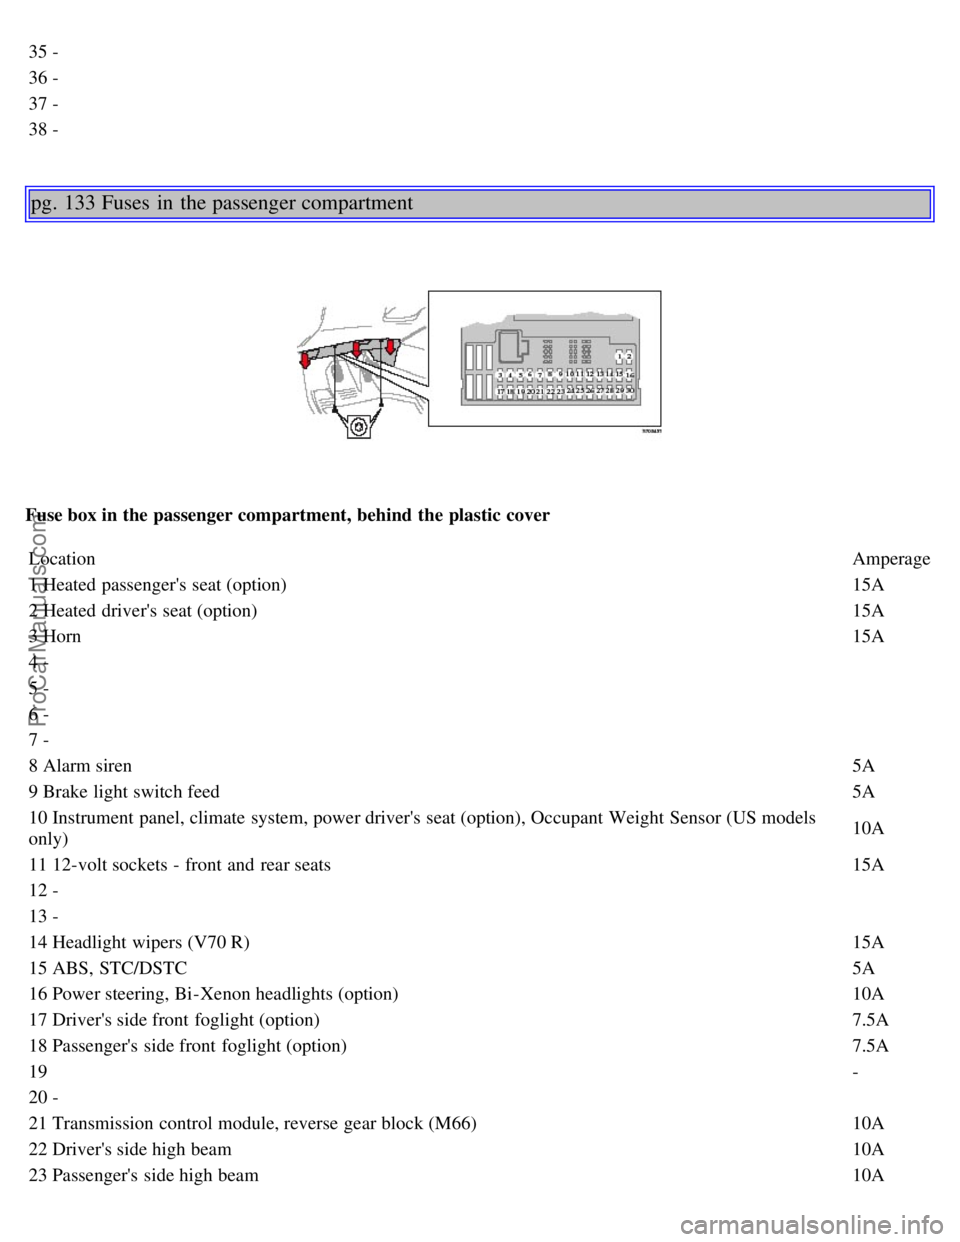
pg. 133 Fuses in the passenger compartment
Fuse box in the passenger compartment, behind the plastic coverLocation Amperage
1 Heated passenger's seat (option) 15A
2 Heated driver's seat (option) 15A
3 Horn 15A
4 -
5 -
6 -
7 -
8 Alarm siren 5A
9 Brake light switch feed 5A
10 Instrument panel, climate system, power driver's seat (option), Occupant Weight Sensor (US models
only) 10A
11 12-volt sockets - front and rear seats 15A
12 -
13 -
14 Headlight wipers (V70 R) 15A
15 ABS, STC/DSTC 5A
16 Power steering, Bi -Xenon headlights (option) 10A
17 Driver's side front foglight (option) 7.5A
18 Passenger's side front foglight (option) 7.5A
19 -
20 -
21 Transmission control module, reverse gear block (M66) 10A
22 Driver's side high beam 10A
23 Passenger's side high beam10A
ProCarManuals.com
Page 95 of 139
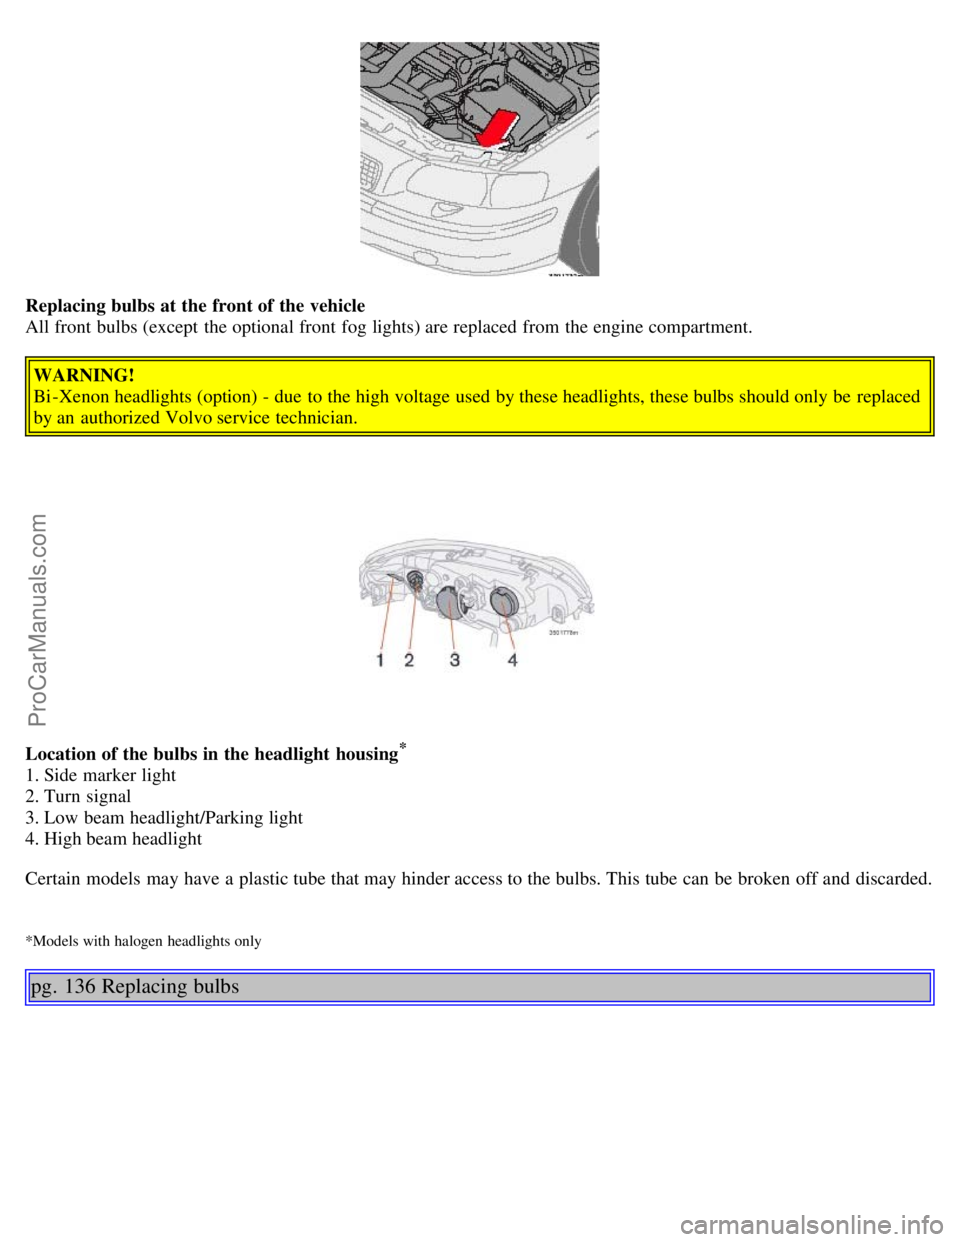
Replacing bulbs at the front of the vehicle
All front bulbs (except the optional front fog lights) are replaced from the engine compartment.
WARNING!
Bi -Xenon headlights (option) - due to the high voltage used by these headlights, these bulbs should only be replaced
by an authorized Volvo service technician.
Location of the bulbs in the headlight housing
*
1. Side marker light
2. Turn signal
3. Low beam headlight/Parking light
4. High beam headlight
Certain models may have a plastic tube that may hinder access to the bulbs. This tube can be broken off and discarded.
*Models with halogen headlights only
pg. 136 Replacing bulbs
ProCarManuals.com
Page 96 of 139
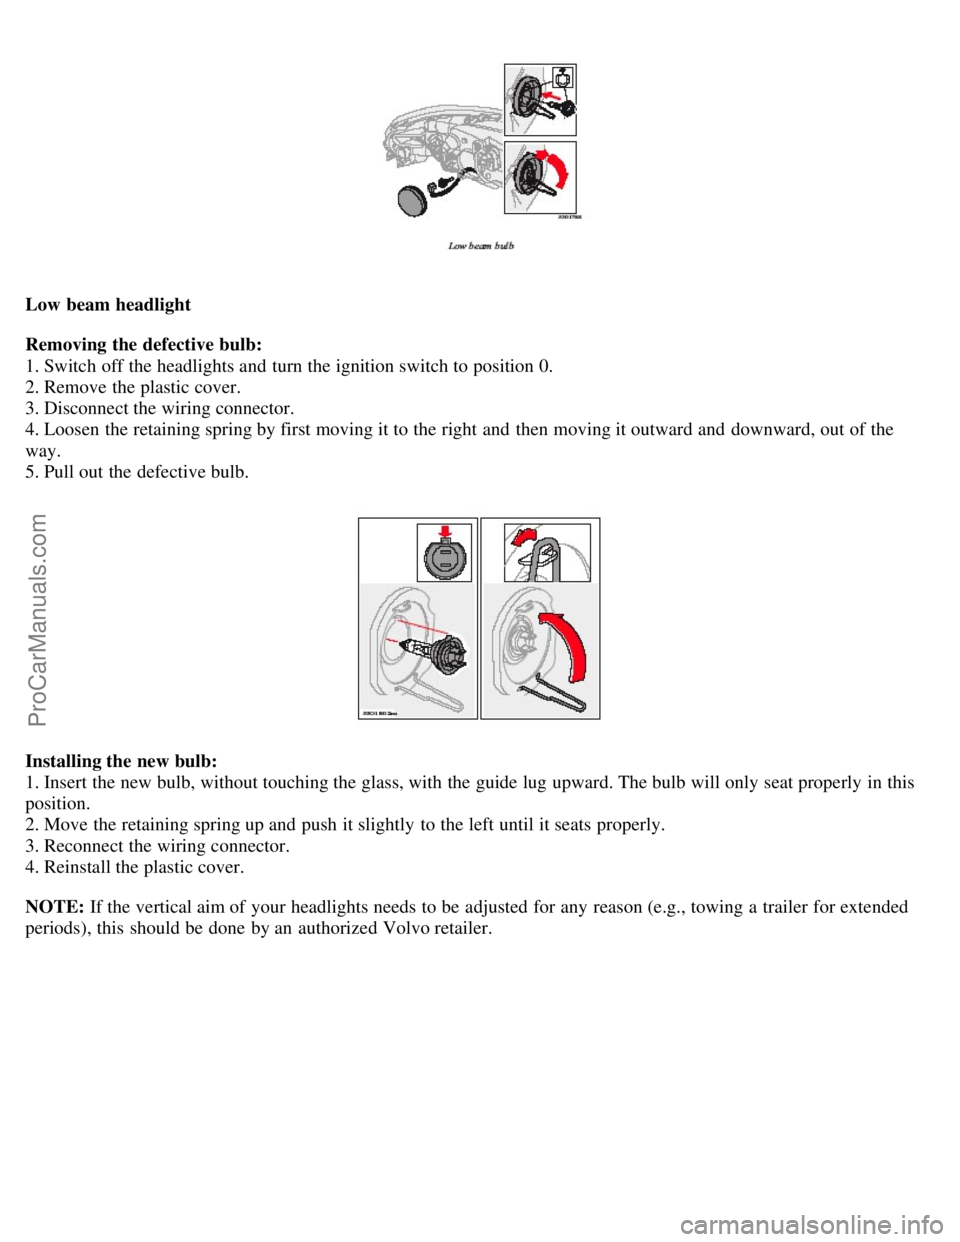
Low beam headlight
Removing the defective bulb:
1. Switch off the headlights and turn the ignition switch to position 0.
2. Remove the plastic cover.
3. Disconnect the wiring connector.
4. Loosen the retaining spring by first moving it to the right and then moving it outward and downward, out of the
way.
5. Pull out the defective bulb.
Installing the new bulb:
1. Insert the new bulb, without touching the glass, with the guide lug upward. The bulb will only seat properly in this
position.
2. Move the retaining spring up and push it slightly to the left until it seats properly.
3. Reconnect the wiring connector.
4. Reinstall the plastic cover.
NOTE: If the vertical aim of your headlights needs to be adjusted for any reason (e.g., towing a trailer for extended
periods), this should be done by an authorized Volvo retailer.
ProCarManuals.com
Page 97 of 139
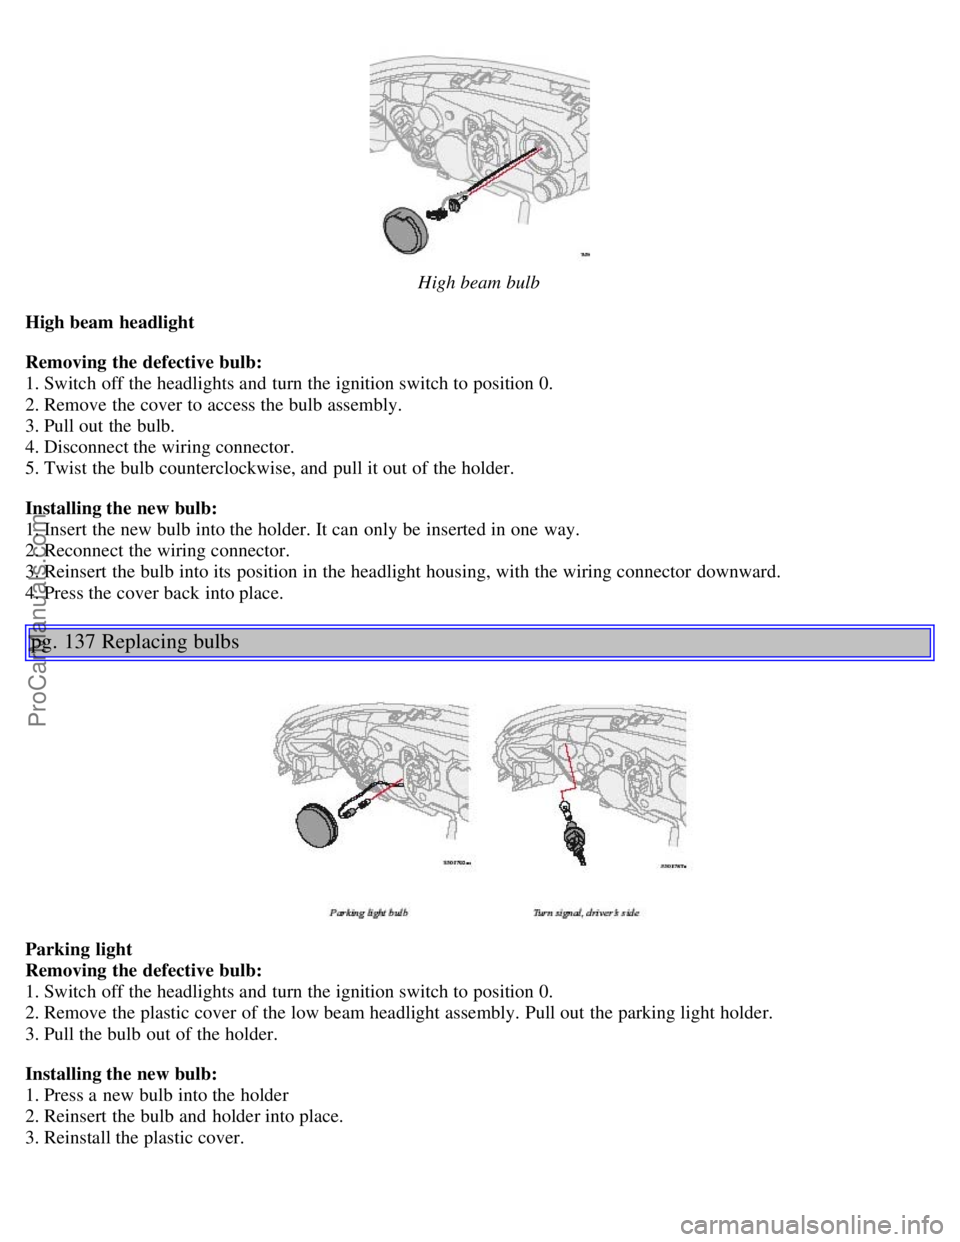
High beam bulb
High beam headlight
Removing the defective bulb:
1. Switch off the headlights and turn the ignition switch to position 0.
2. Remove the cover to access the bulb assembly.
3. Pull out the bulb.
4. Disconnect the wiring connector.
5. Twist the bulb counterclockwise, and pull it out of the holder.
Installing the new bulb:
1. Insert the new bulb into the holder. It can only be inserted in one way.
2. Reconnect the wiring connector.
3. Reinsert the bulb into its position in the headlight housing, with the wiring connector downward.
4. Press the cover back into place.
pg. 137 Replacing bulbs
Parking light
Removing the defective bulb:
1. Switch off the headlights and turn the ignition switch to position 0.
2. Remove the plastic cover of the low beam headlight assembly. Pull out the parking light holder.
3. Pull the bulb out of the holder.
Installing the new bulb:
1. Press a new bulb into the holder
2. Reinsert the bulb and holder into place.
3. Reinstall the plastic cover.
ProCarManuals.com
Page 98 of 139
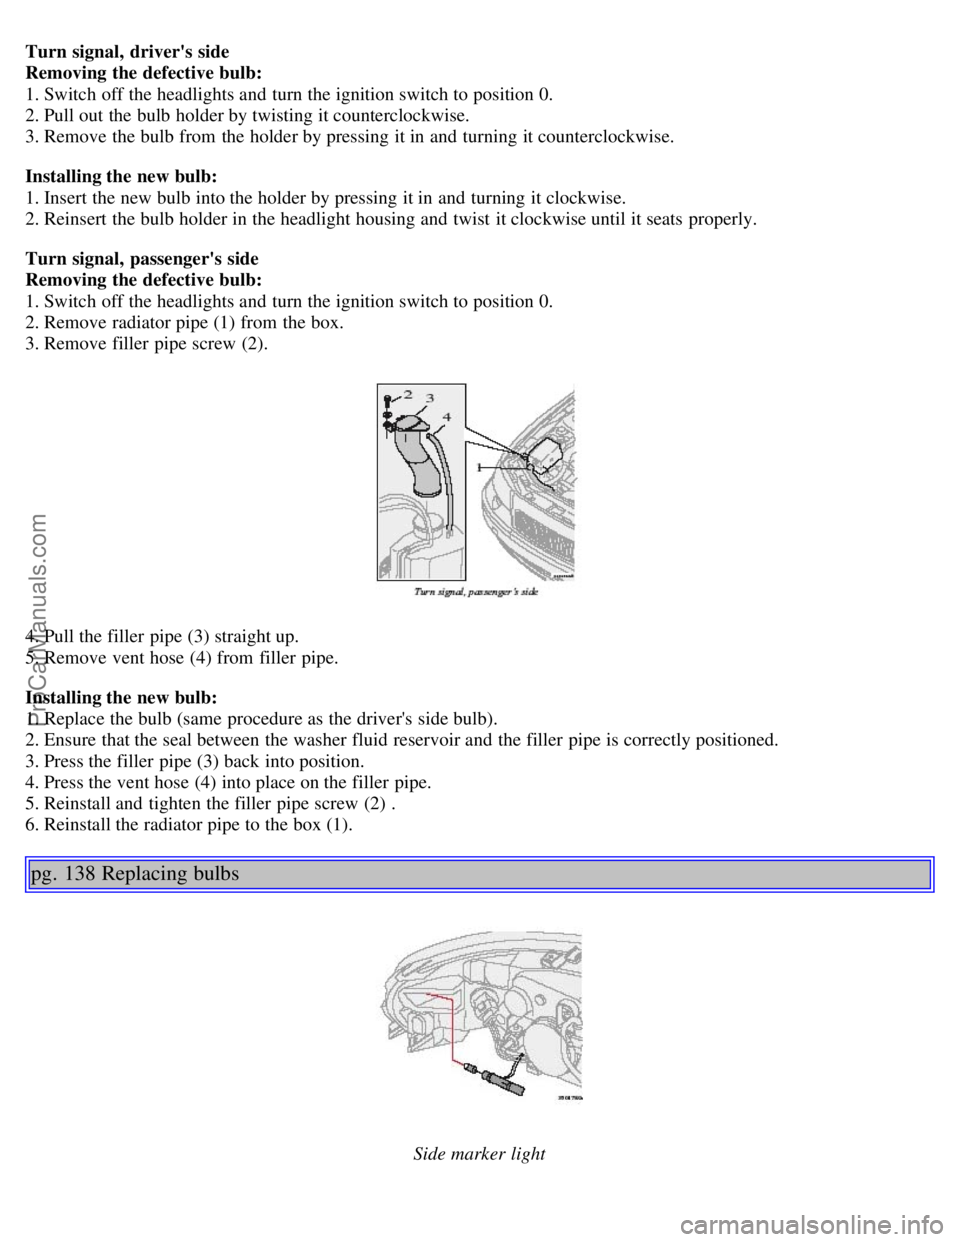
Turn signal, driver's side
Removing the defective bulb:
1. Switch off the headlights and turn the ignition switch to position 0.
2. Pull out the bulb holder by twisting it counterclockwise.
3. Remove the bulb from the holder by pressing it in and turning it counterclockwise.
Installing the new bulb:
1. Insert the new bulb into the holder by pressing it in and turning it clockwise.
2. Reinsert the bulb holder in the headlight housing and twist it clockwise until it seats properly.
Turn signal, passenger's side
Removing the defective bulb:
1. Switch off the headlights and turn the ignition switch to position 0.
2. Remove radiator pipe (1) from the box.
3. Remove filler pipe screw (2).
4. Pull the filler pipe (3) straight up.
5. Remove vent hose (4) from filler pipe.
Installing the new bulb:
1. Replace the bulb (same procedure as the driver's side bulb).
2. Ensure that the seal between the washer fluid reservoir and the filler pipe is correctly positioned.
3. Press the filler pipe (3) back into position.
4. Press the vent hose (4) into place on the filler pipe.
5. Reinstall and tighten the filler pipe screw (2) .
6. Reinstall the radiator pipe to the box (1).
pg. 138 Replacing bulbs
Side marker light
ProCarManuals.com
Page 99 of 139
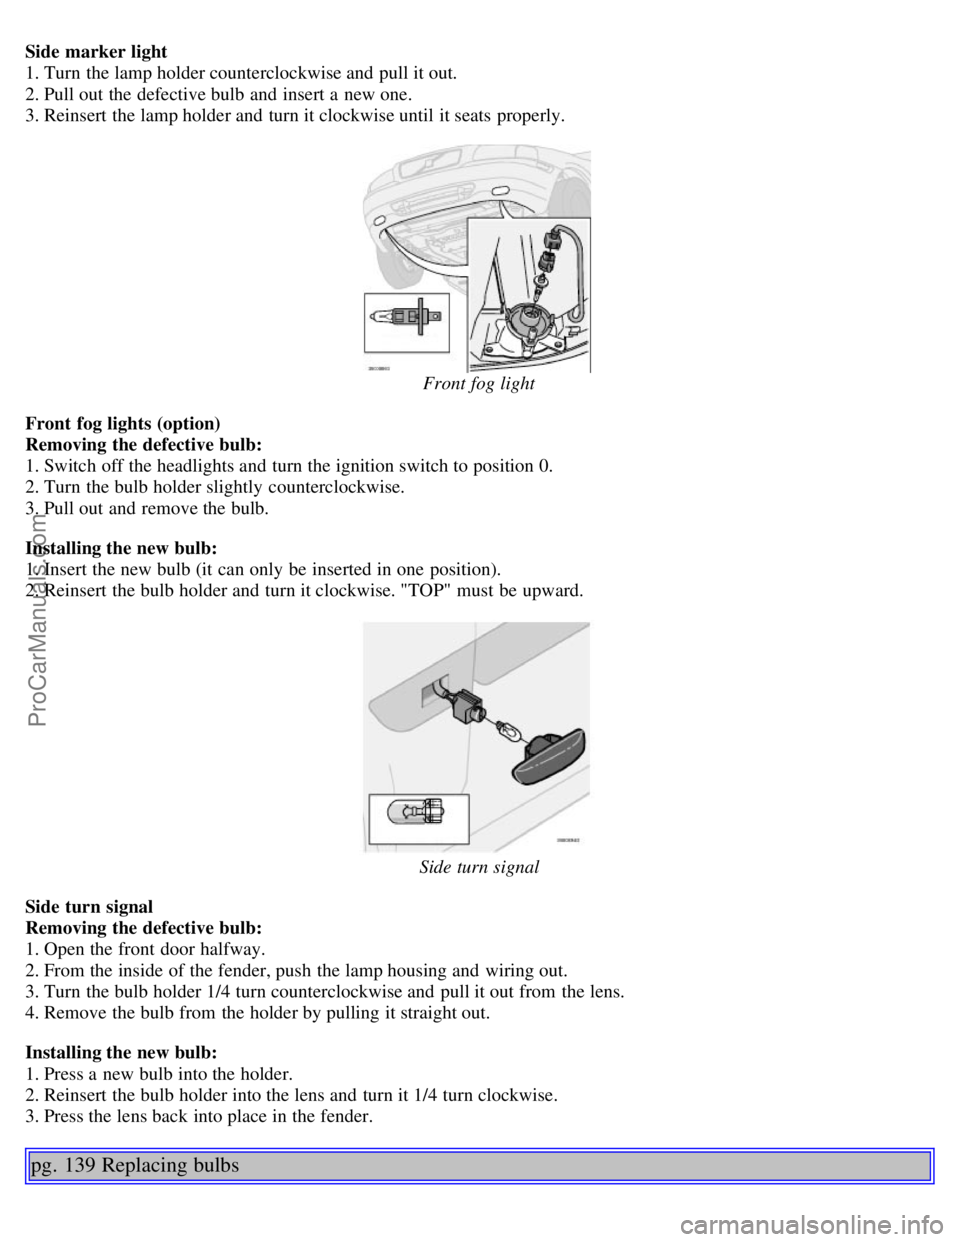
Side marker light
1. Turn the lamp holder counterclockwise and pull it out.
2. Pull out the defective bulb and insert a new one.
3. Reinsert the lamp holder and turn it clockwise until it seats properly.
Front fog light
Front fog lights (option)
Removing the defective bulb:
1. Switch off the headlights and turn the ignition switch to position 0.
2. Turn the bulb holder slightly counterclockwise.
3. Pull out and remove the bulb.
Installing the new bulb:
1. Insert the new bulb (it can only be inserted in one position).
2. Reinsert the bulb holder and turn it clockwise. "TOP" must be upward.
Side turn signal
Side turn signal
Removing the defective bulb:
1. Open the front door halfway.
2. From the inside of the fender, push the lamp housing and wiring out.
3. Turn the bulb holder 1/4 turn counterclockwise and pull it out from the lens.
4. Remove the bulb from the holder by pulling it straight out.
Installing the new bulb:
1. Press a new bulb into the holder.
2. Reinsert the bulb holder into the lens and turn it 1/4 turn clockwise.
3. Press the lens back into place in the fender.
pg. 139 Replacing bulbs
ProCarManuals.com
Page 114 of 139
The battery contains corrosive and poisonous acids. It is of the utmost importance that old batteries are disposed of
correctly. Your Volvo retailer can assist you in this matter.
Generator
Rated output: max. current: 140 A
Starter motor:
Output: 1.7 kW
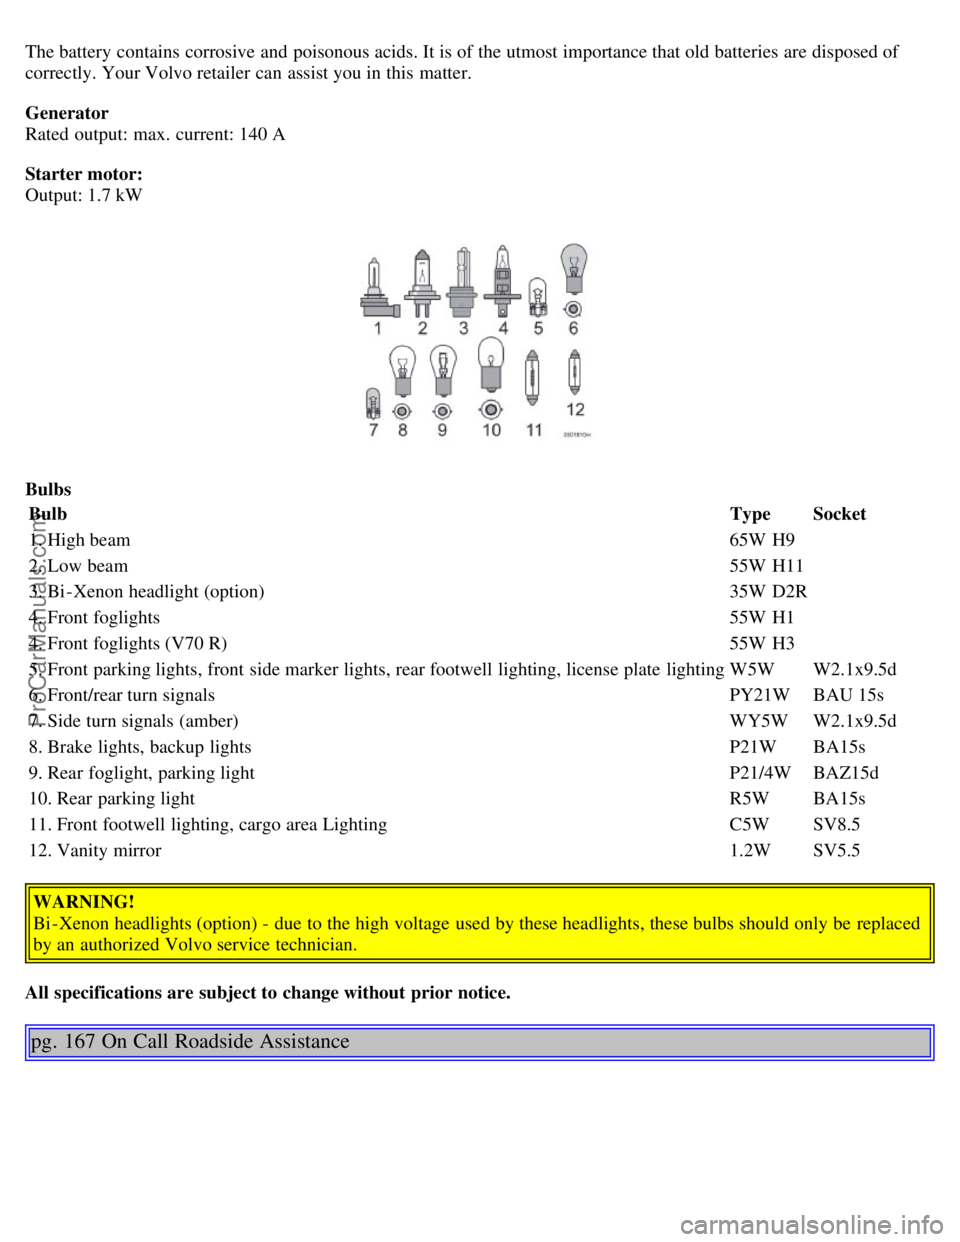
BulbsBulb Type Socket
1. High beam 65W H9
2. Low beam 55W H11
3. Bi -Xenon headlight (option) 35W D2R
4. Front foglights 55W H1
4. Front foglights (V70 R) 55W H3
5. Front parking lights, front side marker lights, rear footwell lighting, license plate lighting W5W W2.1x9.5d
6. Front/rear turn signals PY21W BAU 15s
7. Side turn signals (amber) WY5W W2.1x9.5d
8. Brake lights, backup lights P21W BA15s
9. Rear foglight, parking light P21/4W BAZ15d
10. Rear parking light R5W BA15s
11. Front footwell lighting, cargo area Lighting C5W SV8.5
12. Vanity mirror 1.2W SV5.5
WARNING!
Bi -Xenon headlights (option) - due to the high voltage used by these headlights, these bulbs should only be replaced
by an authorized Volvo service technician.
All specifications are subject to change without prior notice.
pg. 167 On Call Roadside Assistance
ProCarManuals.com
Page 131 of 139

Four-C active chassis system99
Front airbags - SRS4 - 9
Front airbags - SRS - warning light30
Front courtesy lights - replacing140
Front fog lights38
Front park assist (accessory)100
Front reading lights78
Front seats - adjusting60, 61
Front seats - heated42
Front suspension165
Fuel88
Fuel filler cap90
Fuel filler door, unlocking37
Fuel filter149
Fuel formulations89
Fuel gauge29
Fuel requirements88
Fuel system147, 149, 165
Fuel/emissions systems147
Fuses130-134
G
Gas cap90
Gasoline88
Gear indicator29
Geartronic (automatic transmission)96, 97
Generator166
Generator warning light30
Glossary of tire terminology121
H
Hand brake43
Handgrip - XC7059, 77
Handling101
Hazard warning flashers42
Head restraint (center) - 3-section rear seat68
Head restraint - center rear3
Headlight wiper blades - replacing157
Headlights37
Heated front seats42
Heated rear window42
Heated sideview mirrors42
Heating52-55
Hoisting the car150
Holder for grocery bags71
Home Safe System80
ProCarManuals.com