towing VOLVO V70 2006 Owners Manual
[x] Cancel search | Manufacturer: VOLVO, Model Year: 2006, Model line: V70, Model: VOLVO V70 2006Pages: 138, PDF Size: 3.53 MB
Page 21 of 138
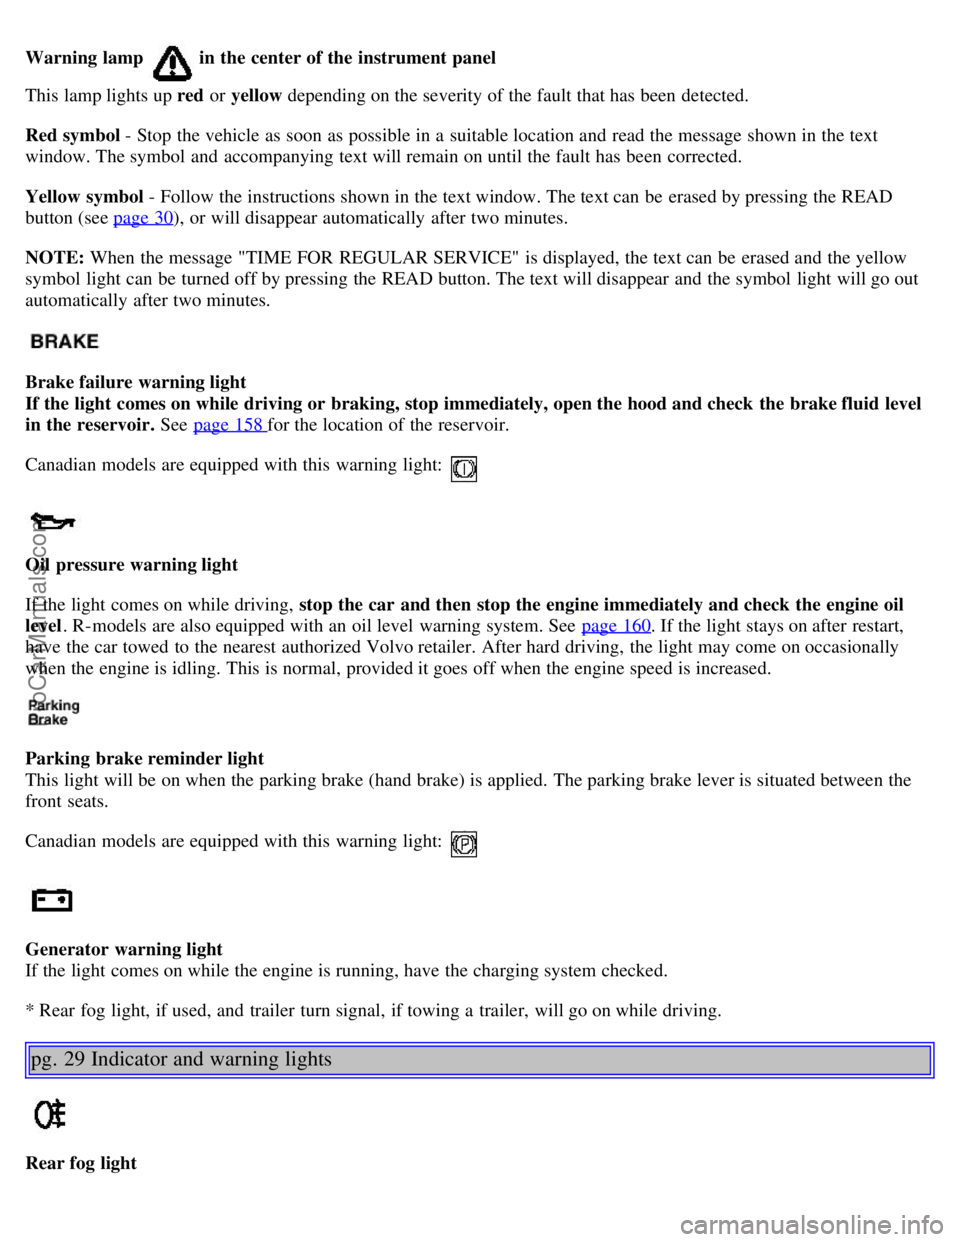
Warning lamp in the center of the instrument panel
This lamp lights up red or yellow depending on the severity of the fault that has been detected.
Red symbol - Stop the vehicle as soon as possible in a suitable location and read the message shown in the text
window. The symbol and accompanying text will remain on until the fault has been corrected.
Yellow symbol - Follow the instructions shown in the text window. The text can be erased by pressing the READ
button (see page 30
), or will disappear automatically after two minutes.
NOTE: When the message "TIME FOR REGULAR SERVICE" is displayed, the text can be erased and the yellow
symbol light can be turned off by pressing the READ button. The text will disappear and the symbol light will go out
automatically after two minutes.
Brake failure warning light
If the light comes on while driving or braking, stop immediately, open the hood and check the brake fluid level
in the reservoir. See page 158
for the location of the reservoir.
Canadian models are equipped with this warning light:
Oil pressure warning light
If the light comes on while driving, stop the car and then stop the engine immediately and check the engine oil
level . R-models are also equipped with an oil level warning system. See page 160
. If the light stays on after restart,
have the car towed to the nearest authorized Volvo retailer. After hard driving, the light may come on occasionally
when the engine is idling. This is normal, provided it goes off when the engine speed is increased.
Parking brake reminder light
This light will be on when the parking brake (hand brake) is applied. The parking brake lever is situated between the
front seats.
Canadian models are equipped with this warning light:
Generator warning light
If the light comes on while the engine is running, have the charging system checked.
* Rear fog light, if used, and trailer turn signal, if towing a trailer, will go on while driving.
pg. 29 Indicator and warning lights
Rear fog light
ProCarManuals.com
Page 22 of 138

This light indicates that the rear fog light is on.
Malfunction indicator lamp
On-Board Diagnostic II (OBDII): As you drive, a computer called "OBDII" monitors your car's engine, transmission,
electrical and emission systems. The CHECK ENGINE light will light up if the computer senses a condition that
potentially may need correcting. When this happens, please have your car checked by a Volvo retailer as soon as
possible.
A CHECK ENGINE light may have many causes. Sometimes, you may not notice a change in your car's behavior.
Even so, an uncorrected condition could hurt fuel economy, emission cleanliness, and driveability. Extended driving
without correcting the cause could even damage other components in your car.
Canadian models are equipped with this warning light:
NOTE : If the fuel filler cap is not closed tightly or if the engine is running when the car is refueled, the Malfunction
Indicator Lamp may indicate a fault. However, your vehicle's performance will not be affected. Use only Volvo
original or approved fuel filler caps.
Anti-lock Brake System ABS
If the warning light comes on, there is a malfunction of the ABS system (the standard braking system will still
function). The vehicle should be driven to a Volvo retailer for inspection. See page 114
for additional information.
Stability Traction Control (STC) system (option), or Dynamic Stability and Traction Control (DSTC) system
(option)
An indicator light will flash when STC or DSTC is actively working to stabilize the car. See pages 115-116
for more
detailed information.
Turn signal indicator - trailer (certain models)
If you are towing a trailer, this light will flash simultaneously with the turn signals on the trailer. If the light does not
flash when signaling, neither the trailer's turn signals nor the car's turn signals are functioning.
Seat belt reminder
This symbol lights up to indicate that the driver has not fastened his/her seat belt.
Tire pressure warning light
See page 123
for more information on this function.
ProCarManuals.com
Page 52 of 138

2 0 0 6
VOLVO V70
Chapter 6 - Starting and driving
pg. 87 Starting and driving
Fuel requirements88
Refueling90
Starting the engine91
Manual transmission93
Automatic transmission (AW5)94
Automatic transmission (Geartronic)96
All Wheel Drive98
Four-C active chassis system (option)99
Front/rear park assist (option/accessory)100
Driving economy, Handling101
Points to remember102
Roof racks/load carriers103
Emergency towing105
Vehicle towing information106
Towing a trailer107
Detachable trailer hitch108
Jump starting109
Winter driving110
Long distance trips111
Three-way catalytic converter112
Brake system113
Anti-lock brake system114
STC/DSTC115
ProCarManuals.com
Page 59 of 138

L (Low gears)
The transmission is locked in gears 1 and 2 when the selector is in this position.
NOTE:
Gears 4, 3, or L can be used if you are driving in a mountainous area, towing a trailer or to increase engine braking
effect.
The transmission has a built-in limiter designed to help prevent excessive engine speeds (high rpm) when gears 4, 3
or L are selected.
pg. 95 Automatic transmission AW5
Automatic transmission - shift gate positions
The gear selector can be moved freely between N and D.
Depressing the button on the front of the gear selector knob enables you to move the gear selector to positions P, R, N,
D, 4, 3 and L.
W Winter/Wet driving mode - enhanced vehicle traction
Mode W will only function if the gear selector is in the (D)rive position.
Press the button at the base of the gear selector to engage/disengage this driving mode (see illustration).
An LED in the button will light up to indicate that W is engaged and this will also be displayed in the instrument
panel (see page 27
).
This mode may be selected for starting/moving off on slippery roads.
NOTE: R-models are not equipped with this button.
ProCarManuals.com
Page 64 of 138

A - front (accessory as available), B - rear (option)
Front/rear park assist
The park assist system(s) are designed to assist you when driving into parking spaces, garages, etc. They utilize
ultrasound sensors located in the bumpers to measure the distance to a vehicle or other object, or a person who may be
close to the front or rear of the vehicle.
When is park assist active?
Front: the system is active from the time the engine is started until the car exceeds a speed of approximately 10 mph
(15 km/h).
Rear: when the engine is running and reverse gear is selected.
NOTE:
If the vehicle is equipped with front and rear park assist, both systems will either be activated or deactivated
together. They cannot be used separately.
The indicator light in the button (see the illustration on page 31) will light up to indicate that park assist system(s)
are activated.
When park assist is actively working:
1. The audio system's volume will be reduced.
2. An intermittent signal will be audible from the speakers to indicate that you are approaching a person, object,
parked vehicle, etc.
The signals begin when the distance between the bumper and the object is:
Rear: approximately 5 feet (1.5 meters)
Front: approximately 2.5 ft (0.8 meters)
3. At a distance of approximately 1 foot (30 cm), the signal will become constant.
Deactivating the system(s)
Press the Park assist button on the center console (see page 33) to temporarily deactivate the system(s).
The indicator light in the button will go out when the system(s) have been deactivated.
If the vehicle is equipped with front and rear park assist, both systems will be deactivated by pressing the button.
NOTE:
It may be necessary to deactivate one or both of the park assist systems in certain cases.
Rear park assist: towing a trailer, carrying bicycles in a rear-mounted carrier, etc, could trigger the rear park assist
system's sensors.
Front park assist: it may not be possible to combine auxiliary headlights and front park assist since these lights
could trigger the system's sensors.
Faults in the system
ProCarManuals.com
Page 66 of 138

With this feature, the steering is most responsive at lower speeds to make parking, driving in city traffic, etc., easier.
The effect of the power steering diminishes as you accelerate for greater stability at highway speeds.
Weight distribution affects handling
At the specified curb weight your car has a tendency to understeer, which means that the steering wheel has to be
turned more than might seem appropriate for the curvature of a bend. This ensures good stability and reduces the risk
of rear wheel skid. Remember that these properties can alter with the vehicle load. The heavier the load on the rear of
the vehicle (e.g., heavily loaded (max. 220 lbs, 100 kg) cargo area or when towing a trailer, the less the tendency to
understeer.
pg. 102 Points to remember
Cooling system
The risk for engine overheating is greatest, especially in hot weather, when:
Towing a trailer up steep inclines for prolonged periods at wide open throttle and low engine rpm.
Stopping the engine suddenly after high speed driving (so-called "after-boiling" can occur).
To avoid overheating, the following rules should be followed:
Do not drive for prolonged periods at engine speeds above 4500 rpm if you are towing a trailer in hilly terrain.
Reduce speed when towing a trailer up long, steep inclines. The risk of overheating can be reduced by switching off
the air conditioning system for a short time.
Do not let the engine idle unnecessarily for prolonged periods.
Do not mount auxiliary lamps in front of the grill.
When the risk of overheating is imminent, or in the event of overheating (the temperature gauge goes repeatedly into,
or stays continually in, the red section), the following precautions should be taken:
Switch off the air conditioning system.
Pull off the road, away from traffic, stop the car and put the gear selector into neutral.
Switch the heater to full (maximum) position. Increase the engine speed to approx. 2000 rpm (twice idling speed)
until the temperature begins to drop.
WARNING!
Do not remove coolant expansion tank cap. The coolant will be extremely hot.
If necessary, see page 154
for information on checking and topping-up the coolant level.
CAUTION: Drive slowly and carefully if going through standing water (i.e. flooded roadways, etc.). Damage to the
engine could result if excess water is drawn in through the air intake system. Never drive the vehicle in water deeper
than 1 foot (300 mm). See the flood warning on page 5
.
WARNING!
Driving with the tailgate open : Driving with the tailgate open could mean that poisonous exhaust gases enter the
passenger compartment.
If the tailgate must be kept open for any reason, proceed as follows:
- Close the windows.
- Set the ventilation system to air flow to floor, windshield and side windows and blower control to its highest
setting.
Floor mats : An extra mat on the driver's floor can cause the accelerator pedal to catch. Check that the movement
ProCarManuals.com
Page 79 of 138
• PSI: Pounds per square inch, a standard unit of air pressure.
• B-pillar: The structural member at the side of the vehicle behind the front door.
• Bead area of the tire: Area of the tire next to the rim.
• Sidewall of the tire: Area between the bead area and the tread.
• Tread area of the tire: Area of the perimeter of the tire that contacts the road when mounted on the vehicle.
• Rim: The metal support (wheel) for a tire or a tire and tube assembly upon which the tire beads are seated.
• Maximum load rating: a figure indicating the maximum load in pounds and kilograms that can be carried by the
tire. This rating is established by the tire manufacturer.
• Maximum permissible inflation pressure: the greatest amount of air pressure that should ever be put in the tire.
This limit is set by the tire manufacturer.
• Recommended tire inflation pressure: inflation pressure, established by Volvo, which is based on the type of tires
that are mounted on a vehicle at the factory. This inflation pressure is affected by the number of occupants in the car,
the amount of cargo, and the speed at which the vehicle will be driven for a prolonged period. This information can be
found on the tire inflation placard(s) located on the driver's side B-pillar or on the inside of the fuel filler door on
Canadian models, and in the tire inflation table in this chapter.
• Cold tires: The tires are considered to be cold when they have the same temperature as the surrounding (ambient)
air. This temperature is normally reached after the car has been parked for at least 3 hours.
pg. 128 Wheels and tires
Vehicle loading
Properly loading your vehicle will provide maximum return of vehicle design performance.
Before loading your vehicle, familiarize yourself with the following terms for deter-mining your vehicle's weight
ratings, with or without a trailer, from the vehicle's Federal/ Canadian Motor Vehicle Safety Standards
(FMVSS/CMVSS) label, and the vehicle's tire information placard:
Curb weight
The weight of the vehicle including a full tank of fuel and all standard equipment. It does not include passengers,
cargo, or optional equipment.
Capacity weight
All weight added to the curb weight, including cargo and optional equipment. When towing, trailer hitch tongue load
is also part of cargo weight.
NOTE: For trailer towing information, please refer to the section "Towing a trailer" on page 107
.
Permissible axle weight
The maximum allowable weight that can be carried by a single axle (front or rear). These numbers are shown on the
Federal/Canadian Motor Vehicle Safety Standards (FMVSS/ CMVSS) label. The total load on each axle must never
exceed its maximum permissible weight.
Gross vehicle weight (GVW)
The vehicle's curb weight + cargo + passengers.
NOTE:
• The location of the various labels in your vehicle can be found on page 160
.
• A table listing important weight limits for your vehicle can be found on page 166
.
Steps for Determining Correct Load Limit
(1) Locate the statement "the combined weight of occupants and cargo should never exceed XXX pounds" on your
vehicle's placard.
(2) Determine the combined weight of the driver and passengers that will be riding in your vehicle.
(3) Subtract the combined weight of the driver and passengers from XXX kilograms or XXX pounds.
(4) The resulting figure equals the available amount of cargo and luggage load capacity. For example, if the "XXX"
ProCarManuals.com
Page 80 of 138
amount equals 1400 lbs. and there will be five 150 lb. passengers in your vehicle, the amount of available cargo and
luggage load capacity is 650 lbs. (1400-750 (5 x 150) = 650 lbs.)
(5) Determine the combined weight of luggage and cargo being loaded on the vehicle. That weight may not safely
exceed the available cargo and luggage load capacity calculated in Step 4.
(6) If your vehicle will be towing a trailer, load from your trailer will be transferred to your vehicle. Consult this
manual
1 to determine how this reduces the available cargo and luggage load capacity of your vehicle.
WARNING!
- Exceeding the permissible axle weight, gross vehicle weight, or any other weight rating limits can cause tire
overheating resulting in permanent deformation or catastrophic failure.
- Do not use replacement tires with lower load carrying capacities than the tires that were original equipment on the
vehicle because this will lower the vehicle's GVW rating. Replacement tires with a higher limit than the originals do
not increase the vehicle's GVW rating limitations.
1 See "Towing a trailer" on page 107.
pg. 129 Wheels and tires
Uniform tire quality grading
ALL PASSENGER VEHICLE TIRES MUST CONFORM TO FEDERAL SAFETY REQUIREMENTS IN
ADDITION TO THESE GRADES>
Quality grades can be found, where applicable, on the tire sidewall between the tread shoulder and maximum
section width. For example:
Treadwear 200 Traction AA Temperature A
TREADWEAR
The treadwear grade is a comparative rating based on the wear rate of the tire when tested under controlled conditions
on a specified government test course. For example, a tire graded 150 would wear one and one half (1 1/2) times as
well on the government course as a tire graded 100. The relative performance of tires depends upon the actual
conditions of their use, however, and many depart significantly from the norm due to variation in driving habits,
maintenance practices and differences in road characteristics and climate.
TRACTION
The traction grades, from highest to lowest, are AA, A, B, and C, as measured under controlled conditions on specified
government test surfaces of asphalt and concrete. A tire marked C may have poor traction performance. WARNING!
The traction grade assigned to this tire is based on braking (straight-ahead) traction tests and is not a measure of
cornering (turning) traction.
TEMPERATURE
The temperature grades are AA (the highest), A, B, and C, representing the tire's resistance to the generation of heat
and its ability to dissipate heat when tested under controlled conditions on a specified indoor laboratory test wheel.
Sustained high temperature can cause the material of the tire to degenerate and reduce tire life, and excessive
temperature can lead to sudden tire failure. The grade C corresponds to a minimum level of performance that all
ProCarManuals.com
Page 94 of 138
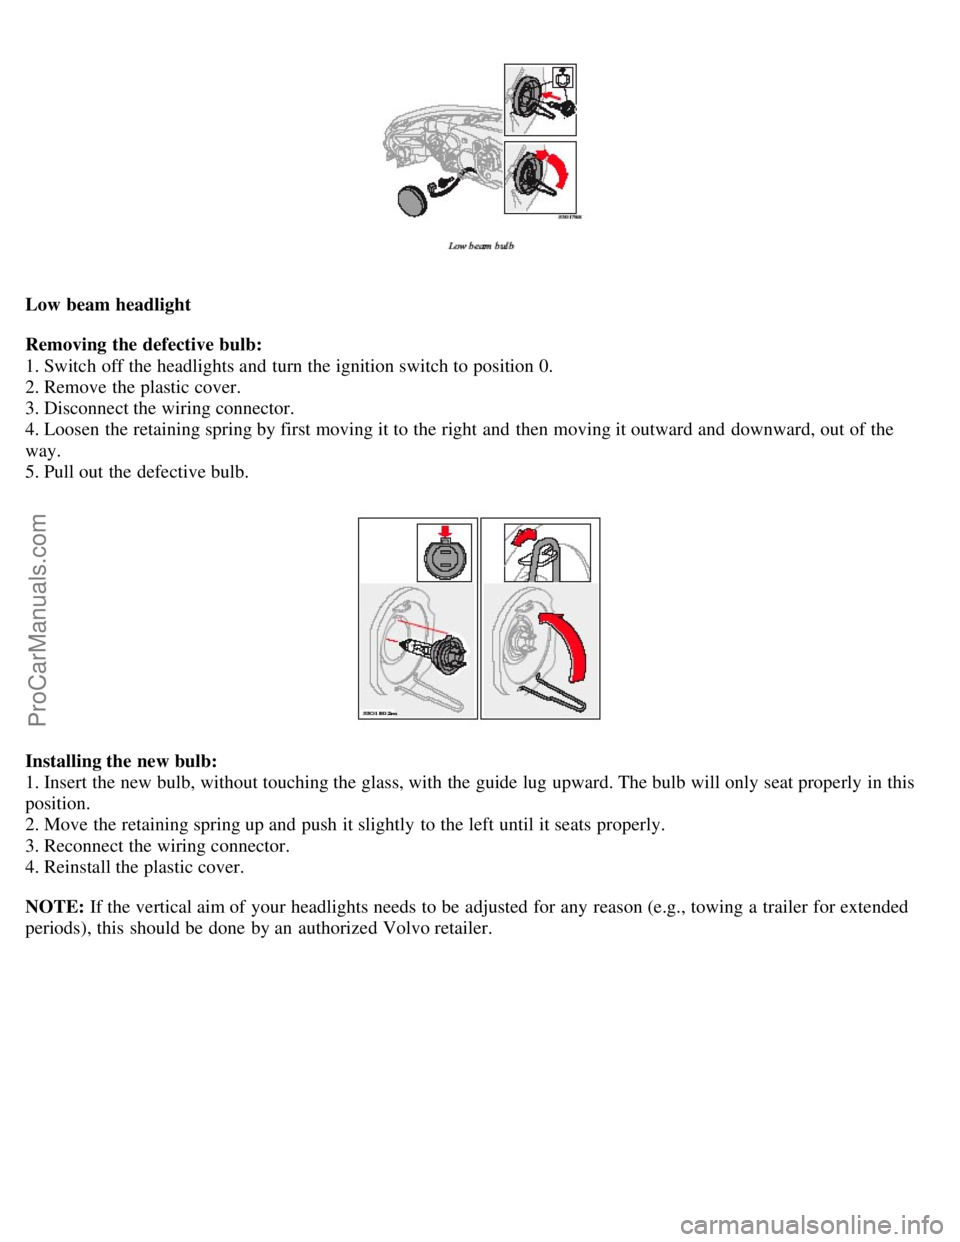
Low beam headlight
Removing the defective bulb:
1. Switch off the headlights and turn the ignition switch to position 0.
2. Remove the plastic cover.
3. Disconnect the wiring connector.
4. Loosen the retaining spring by first moving it to the right and then moving it outward and downward, out of the
way.
5. Pull out the defective bulb.
Installing the new bulb:
1. Insert the new bulb, without touching the glass, with the guide lug upward. The bulb will only seat properly in this
position.
2. Move the retaining spring up and push it slightly to the left until it seats properly.
3. Reconnect the wiring connector.
4. Reinstall the plastic cover.
NOTE: If the vertical aim of your headlights needs to be adjusted for any reason (e.g., towing a trailer for extended
periods), this should be done by an authorized Volvo retailer.
ProCarManuals.com
Page 109 of 138
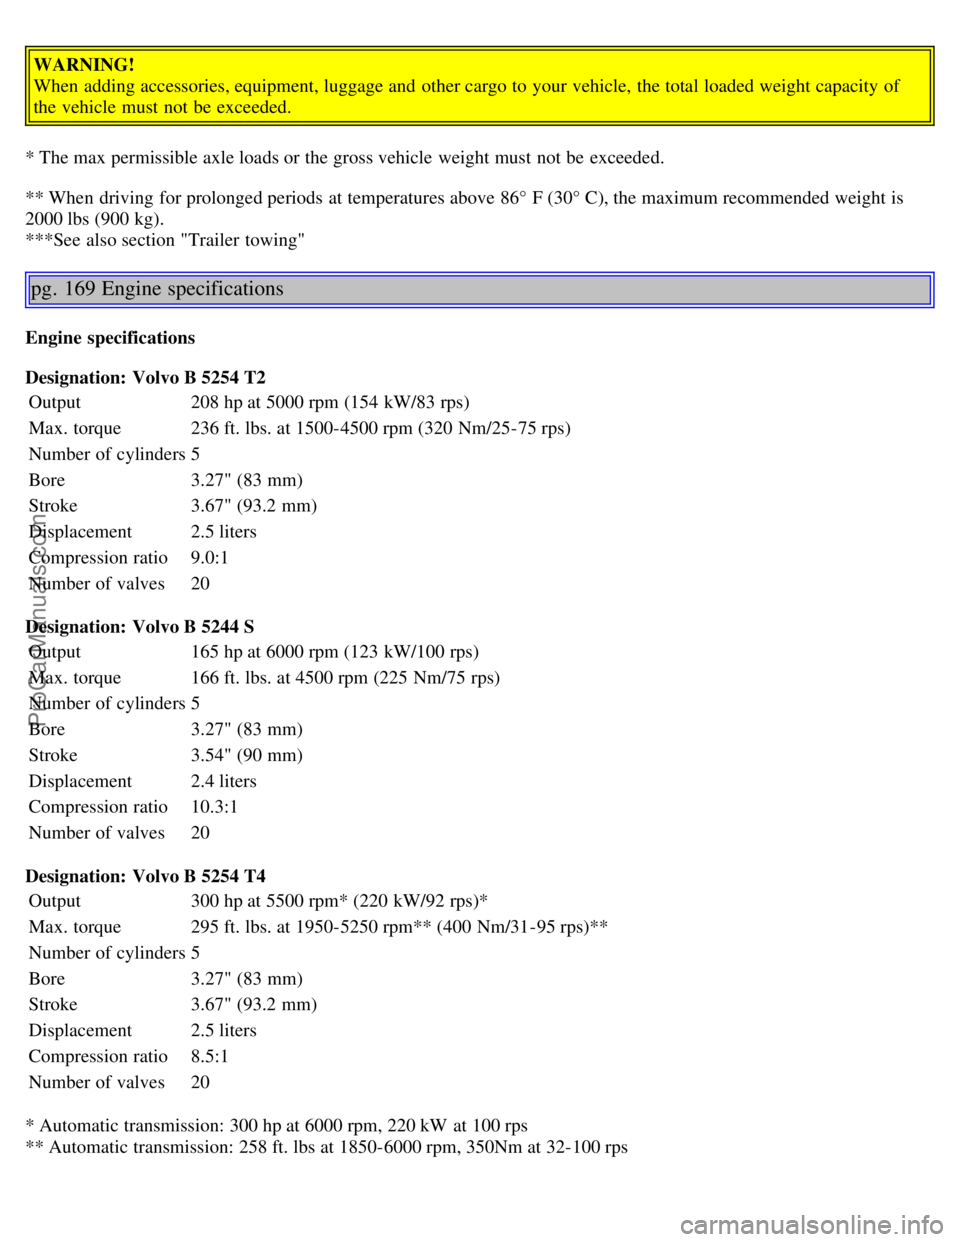
WARNING!
When adding accessories, equipment, luggage and other cargo to your vehicle, the total loaded weight capacity of
the vehicle must not be exceeded.
* The max permissible axle loads or the gross vehicle weight must not be exceeded.
** When driving for prolonged periods at temperatures above 86° F (30° C), the maximum recommended weight is
2000 lbs (900 kg).
***See also section "Trailer towing"
pg. 169 Engine specifications
Engine specifications
Designation: Volvo B 5254 T2 Output 208 hp at 5000 rpm (154 kW/83 rps)
Max. torque 236 ft. lbs. at 1500-4500 rpm (320 Nm/25-75 rps)
Number of cylinders 5
Bore 3.27" (83 mm)
Stroke 3.67" (93.2 mm)
Displacement 2.5 liters
Compression ratio 9.0:1
Number of valves 20
Designation: Volvo B 5244 S Output 165 hp at 6000 rpm (123 kW/100 rps)
Max. torque 166 ft. lbs. at 4500 rpm (225 Nm/75 rps)
Number of cylinders 5
Bore 3.27" (83 mm)
Stroke 3.54" (90 mm)
Displacement 2.4 liters
Compression ratio 10.3:1
Number of valves 20
Designation: Volvo B 5254 T4 Output 300 hp at 5500 rpm* (220 kW/92 rps)*
Max. torque 295 ft. lbs. at 1950-5250 rpm** (400 Nm/31-95 rps)**
Number of cylinders 5
Bore 3.27" (83 mm)
Stroke 3.67" (93.2 mm)
Displacement 2.5 liters
Compression ratio 8.5:1
Number of valves 20
* Automatic transmission: 300 hp at 6000 rpm, 220 kW at 100 rps
** Automatic transmission: 258 ft. lbs at 1850-6000 rpm, 350Nm at 32-100 rps
ProCarManuals.com