battery VOLVO V90 2017 Owner's Manual
[x] Cancel search | Manufacturer: VOLVO, Model Year: 2017, Model line: V90, Model: VOLVO V90 2017Pages: 594, PDF Size: 15.07 MB
Page 387 of 594
STARTING AND DRIVING
}}
385
Ignition positions The car's electrical system can be set in different levels/positions and in this way make the differ-ent functions available.
In order to facilitate the use of a limited number of functions with the engine switched off, thecar's electrical system can be set in 3 different levels - 0, I and II. These levels are described
with the denomination "ignition position" throughout the owner's manual. The following table shows the functions available in each ignition position/level:
Level Functions
0 •Odometer, clock and temperature gauge are illuminated.
• Power seats can be adjusted.
• The power windows can be used.
• The centre display is started andcan be used.
• It is possible to start the audio.
The functions are time-controlled inthis ignition position and are switchedoff automatically after a period of time.
I •Panorama roof, power windows,12V socket in the passenger com-partment, navigation, phone, venti-lation fan and windscreen wiperscan be used.
• Power seats can be adjusted.
• 12 V sockets in the cargo areacan be used.
• The audio is started automaticallyif it was running when the car wasleft.
Power is taken from the battery inthis ignition position.Level Functions
II •The headlamps come on.
• Warning/indicator lamps illuminate for 5 seconds.
• Several other systems are acti-vated. However, heating in seatcushions and the rear window canonly be activated after the car hasbeen started.
This ignition position consumes alot of current from the battery andshould therefore be avoided!
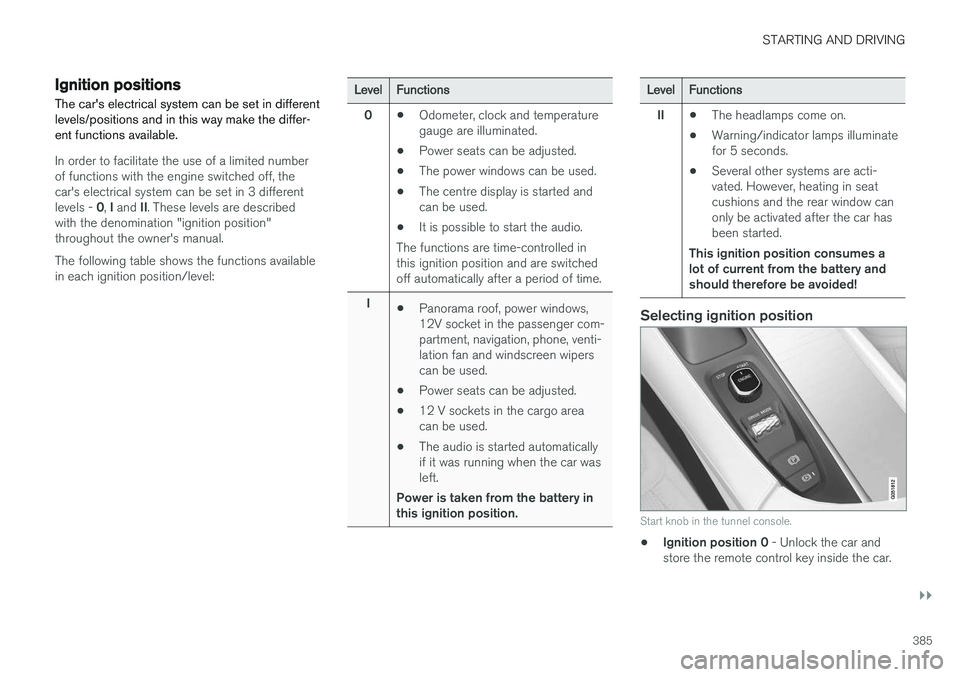
Selecting ignition position
Start knob in the tunnel console.
• Ignition position 0
- Unlock the car and
store the remote control key inside the car.
Page 389 of 594
STARTING AND DRIVING
387
If the message
Car key not found is shown in
the driver display when starting, place the remote control key on the backup reader in the cupholder. Then try to start again.
NOTE
When the remote control key is placed in the cup holder, make sure that no other car keys,metal objects or electronic apparatus (e.g.mobile phones, tablets, laptops or chargers)are in the cup holder. Several car keys closeto each other in the cup holder can causeinterference with each other.
IMPORTANT
If the engine fails to start after 3 attempts - wait for 3 minutes before making a furtherattempt. Starting capacity increases if the bat-tery is allowed to recover.
WARNING
Never remove the remote control key from
the car while driving or during towing.
WARNING
Always take the remote control key out from the car when leaving the car and make surethe car's electrical system is in ignition posi- tion 0 - especially if there are children in the
car.
NOTE
The idling speed can be noticeably higher than normal for certain engine types duringcold starting. This is done in order that theemissions system can reach normal operatingtemperature as quickly as possible, whichminimises exhaust emissions and protects theenvironment.
Related information
• Ignition positions (p. 385)
• Switching off the car (p. 387)
• Remote control key (p. 236)
• Replacing the battery in the remote control key (p. 257)
Switching off the car
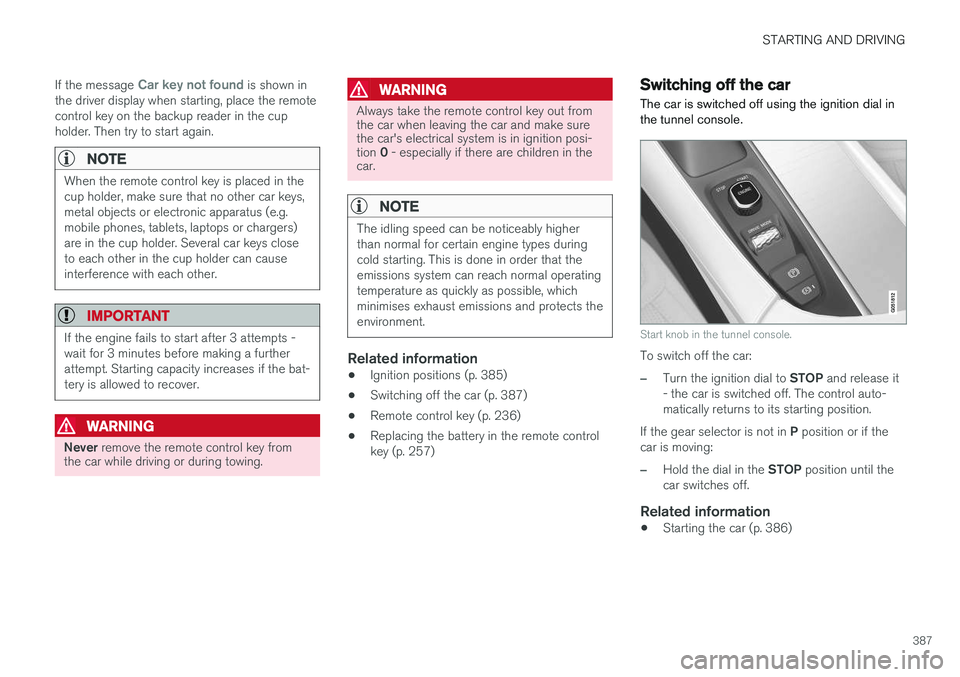
The car is switched off using the ignition dial in the tunnel console.
Start knob in the tunnel console.
To switch off the car:
–Turn the ignition dial to STOP and release it
- the car is switched off. The control auto- matically returns to its starting position.
If the gear selector is not in P position or if the
car is moving:
–Hold the dial in the STOP position until the
car switches off.
Related information
• Starting the car (p. 386)
Page 390 of 594
STARTING AND DRIVING
388
Steering lock
The steering lock makes steering difficult if the car is e.g. taken unlawfully. A mechanical noisecan be perceived when the steering lock locksor unlocks.
Activating the steering lockThe steering lock is activated when the car is locked from the outside and the engine isswitched off. If the car is left unlocked then thesteering lock will lock automatically after a while.
Deactivating the steering lockThe steering lock is deactivated when the car isunlocked from outside. If the car is not locked, itis sufficient that the remote control key is insidethe passenger compartment and the engine is started by turning the start knob towards START
in order to unlock the steering lock.
Related information
• Starting the car (p. 386)
• Switching off the car (p. 387)
• Steering wheel (p. 131)
Using jump starting with another battery
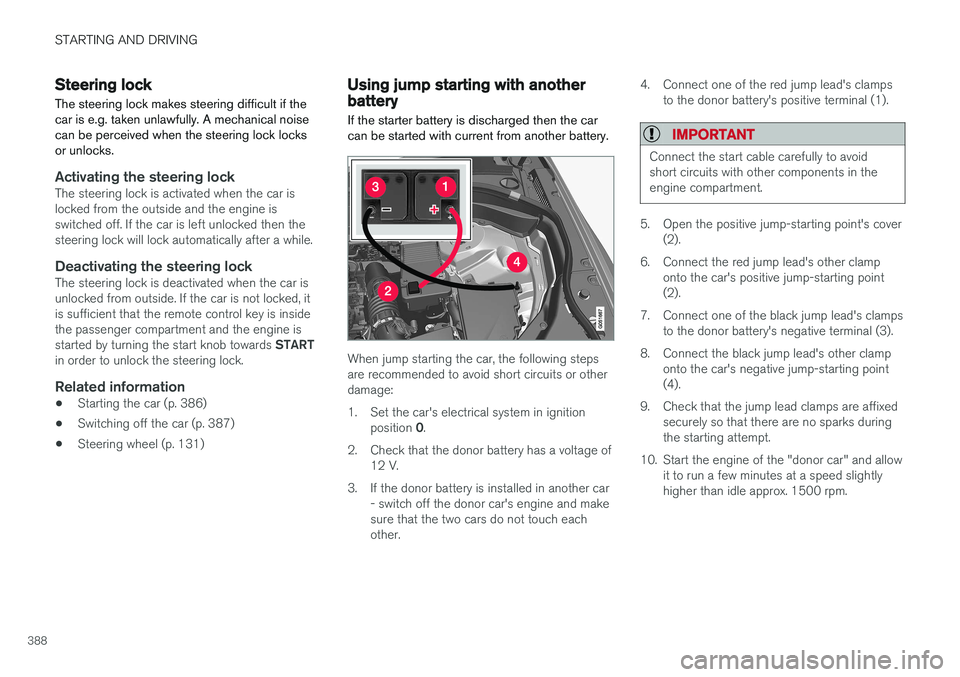
If the starter battery is discharged then the car can be started with current from another battery.
When jump starting the car, the following steps are recommended to avoid short circuits or otherdamage:
1. Set the car's electrical system in ignition position 0.
2. Check that the donor battery has a voltage of 12 V.
3. If the donor battery is installed in another car - switch off the donor car's engine and make sure that the two cars do not touch eachother. 4. Connect one of the red jump lead's clamps
to the donor battery's positive terminal (1).
IMPORTANT
Connect the start cable carefully to avoid short circuits with other components in theengine compartment.
5. Open the positive jump-starting point's cover(2).
6. Connect the red jump lead's other clamp onto the car's positive jump-starting point (2).
7. Connect one of the black jump lead's clamps to the donor battery's negative terminal (3).
8. Connect the black jump lead's other clamp onto the car's negative jump-starting point(4).
9. Check that the jump lead clamps are affixed securely so that there are no sparks duringthe starting attempt.
10. Start the engine of the "donor car" and allow it to run a few minutes at a speed slightlyhigher than idle approx. 1500 rpm.
Page 391 of 594
STARTING AND DRIVING
}}
389
11. Start the engine in the car with the dis-
charged battery.
IMPORTANT
Do not touch the connections between cable and car during the starting attempt. There is arisk of sparks forming.
12. Remove the jump leads in reverse order -first the black and then the red. Make sure that none of the black jump lead's clamps comes into contact with the car'spositive jump-starting point/donor battery'spositive terminal or the clamp connected tothe red jump lead.
WARNING
• The battery can generate oxyhydrogen gas, which is highly explosive. A spark canbe formed if a jump lead is connectedincorrectly, and this can be enough forthe battery to explode.
• The battery contains sulphuric acid, whichcan cause serious burns.
• If sulphuric acid comes into contact witheyes, skin or clothing, flush with largequantities of water. If acid splashes intothe eyes - seek medical attention imme-diately.
Related information
•Starter battery (p. 530)
• Ignition positions (p. 385)
• Starting the car (p. 386)
• Opening and closing the bonnet (p. 514)
Gearbox
The gearbox is part of the car's driveline (power transmission) between engine and drive wheels.The function of the gearbox is to change thegear ratio depending on speed and powerrequirements.
There are two main types of gearbox, manual and automatic. The manual gearbox has six gears. The automatic gearbox can have either eight gears or six gearsdepending on which engine the car is equippedwith. The number of gear changes means thatthe engine's torque and power range can beused effectively. It is also possible to select gears manually with the automatic gearbox. The driver display respec-tively shows which gear or gear position is cur-rently in use.
IMPORTANT
To prevent damage to any drive system com- ponents, the working temperature of thegearbox is checked. If there is a risk of over-heating, a warning symbol illuminates in thedriver display and a text message is shown -follow the recommendation given.
Symbols in the driver displayIf a fault should occur in the gearbox, the driver display shows a symbol and a message.
Page 396 of 594
STARTING AND DRIVING
394
Gear selector inhibitorThe gear selector inhibitor prevents accidental changing between different gear positions in anautomatic gearbox.
There are two different types of gear selector inhibitor - mechanical and automatic.
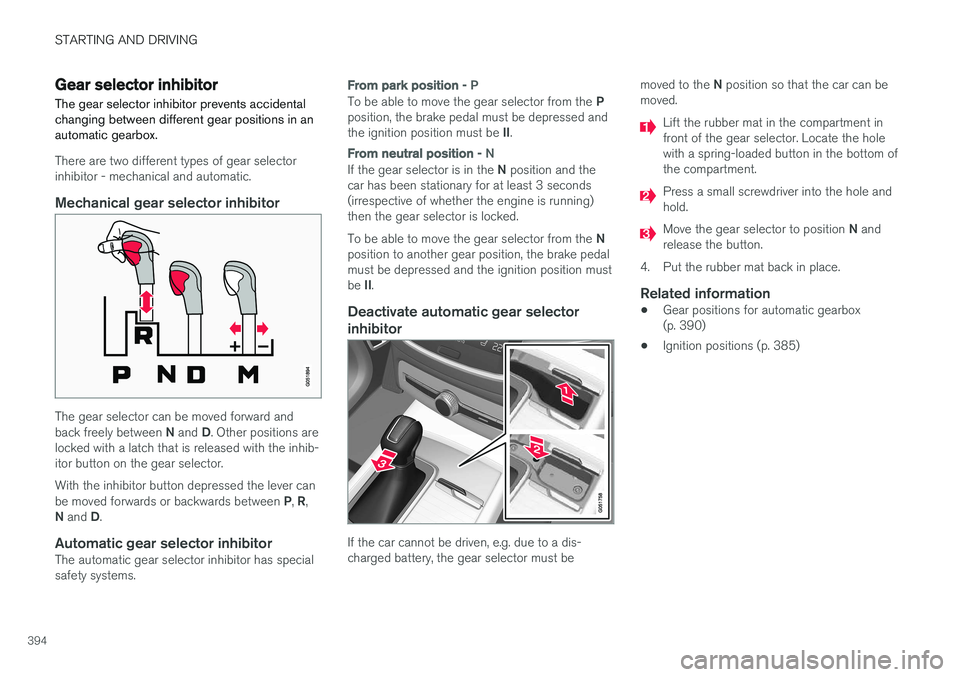
Mechanical gear selector inhibitor
The gear selector can be moved forward and back freely between N and D. Other positions are
locked with a latch that is released with the inhib- itor button on the gear selector. With the inhibitor button depressed the lever can be moved forwards or backwards between P, R ,
N and D.
Automatic gear selector inhibitorThe automatic gear selector inhibitor has special safety systems.
From park position - P
To be able to move the gear selector from the P
position, the brake pedal must be depressed and the ignition position must be II.
From neutral position - N
If the gear selector is in the N position and the
car has been stationary for at least 3 seconds (irrespective of whether the engine is running)then the gear selector is locked. To be able to move the gear selector from the N
position to another gear position, the brake pedal must be depressed and the ignition position must be II.
Deactivate automatic gear selector
inhibitor
If the car cannot be driven, e.g. due to a dis- charged battery, the gear selector must be moved to the
N position so that the car can be
moved.
Lift the rubber mat in the compartment in front of the gear selector. Locate the holewith a spring-loaded button in the bottom ofthe compartment.
Press a small screwdriver into the hole and hold.
Move the gear selector to position N and
release the button.
4. Put the rubber mat back in place.
Related information
• Gear positions for automatic gearbox (p. 390)
• Ignition positions (p. 385)
Page 400 of 594
||
STARTING AND DRIVING
* Option/accessory.
398
With 8-inch driver display
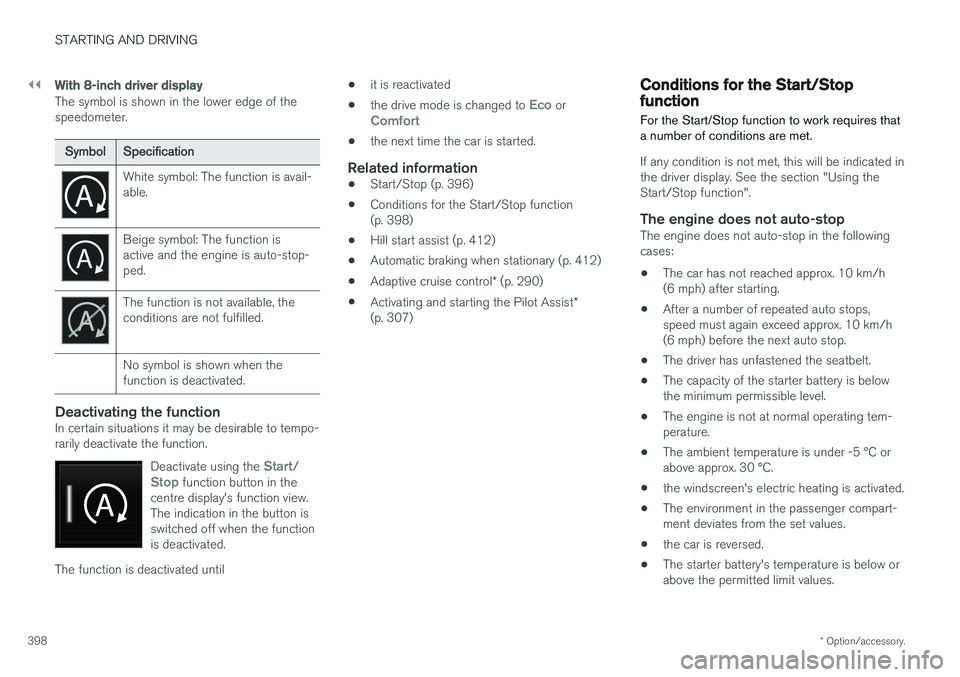
The symbol is shown in the lower edge of the speedometer.
Symbol Specification
White symbol: The function is avail- able.
Beige symbol: The function is active and the engine is auto-stop-ped.
The function is not available, the conditions are not fulfilled. No symbol is shown when the function is deactivated.
Deactivating the functionIn certain situations it may be desirable to tempo- rarily deactivate the function.
Deactivate using the
Start/
Stop function button in the
centre display's function view. The indication in the button isswitched off when the functionis deactivated.
The function is deactivated until •
it is reactivated
• the drive mode is changed to
Eco orComfort
• the next time the car is started.
Related information
•
Start/Stop (p. 396)
• Conditions for the Start/Stop function (p. 398)
• Hill start assist (p. 412)
• Automatic braking when stationary (p. 412)
• Adaptive cruise control
* (p. 290)
• Activating and starting the Pilot Assist
*
(p. 307)
Conditions for the Start/Stop function For the Start/Stop function to work requires that a number of conditions are met.
If any condition is not met, this will be indicated in the driver display. See the section "Using theStart/Stop function".
The engine does not auto-stopThe engine does not auto-stop in the followingcases: • The car has not reached approx. 10 km/h (6 mph) after starting.
• After a number of repeated auto stops,speed must again exceed approx. 10 km/h(6 mph) before the next auto stop.
• The driver has unfastened the seatbelt.
• The capacity of the starter battery is belowthe minimum permissible level.
• The engine is not at normal operating tem-perature.
• The ambient temperature is under -5 °C orabove approx. 30 °C.
• the windscreen's electric heating is activated.
• The environment in the passenger compart-ment deviates from the set values.
• the car is reversed.
• The starter battery's temperature is below orabove the permitted limit values.
Page 402 of 594
||
STARTING AND DRIVING
* Option/accessory.
400
Related information
• Start/Stop (p. 396)
• Using the Start/Stop function (p. 396)
• Support battery (p. 533)
Drive modes
*
Selection of drive mode affects the car's driving characteristics in order to enhance the drivingexperience and facilitate driving in special situa-tions.
Using the drive modes it is possible to quickly have access to the car's numerous functions andsettings for different driving needs. The followingsystems are adapted to obtain the best possibledriving characteristics in each respective drivemode: • Steering
• Engine/gearbox 5
/all-wheel drive *
• Brakes
• Shock absorption
• Driver display
• Start/Stop function
• Climate settings
Select the drive mode that best suits the current driving conditions. Remember that not all drivemodes can be selected in all situations.
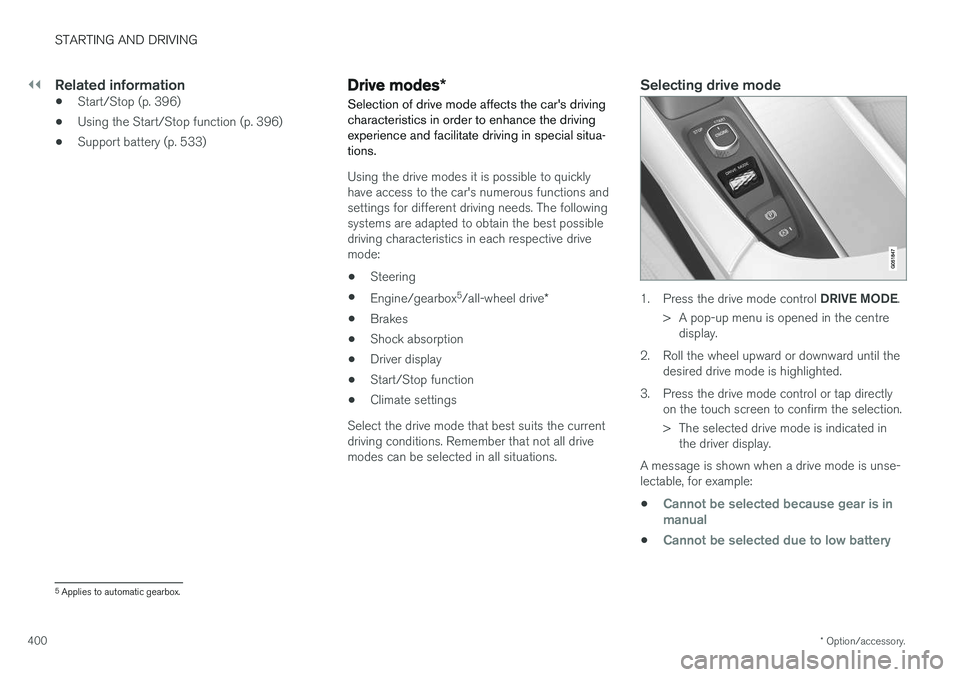
Selecting drive mode
1. Press the drive mode control DRIVE MODE.
> A pop-up menu is opened in the centre display.
2. Roll the wheel upward or downward until the desired drive mode is highlighted.
3. Press the drive mode control or tap directly on the touch screen to confirm the selection.
> The selected drive mode is indicated inthe driver display.
A message is shown when a drive mode is unse- lectable, for example:
•
Cannot be selected because gear is in manual
•Cannot be selected due to low battery
5 Applies to automatic gearbox.
Page 413 of 594
STARTING AND DRIVING
}}
411
Releasing automatically
1. Put the seatbelt on.
2. Start the car.
3. With automatic gearbox:Select gear position D or R and depress the
accelerator pedal.With manual gearbox:Engage a suitable gear, release the clutch and depress the accelerator pedal.
> The parking brake releases and the sym- bol in the driver display extinguishes.
Parking on a hill
WARNING
Always use the parking brake when parking on an inclined surface. Engaging a gear or the automatic transmission's P position is not suf-
ficient to hold the car stationary in all situa- tions.
If the car is parked facing uphill: • Turn the wheels
away from the kerb.
If the car is parked facing downhill:
• Turn the wheels
towards the kerb.
Heavy load uphill
A heavy load, such as a trailer, can cause the car to roll backward when the parking brake isreleased automatically on a steep incline. Avoid this by pulling the control upwards while drivingthe car away. Release the control when theengine achieves traction.
Settings for parking brake
Automatic activation of the parking brake isselected via the centre display. Automatic activation when the car is switched off:1.
Press
Settings in the top view.
2. Press
My CarParking Brake and
Suspension and deselect/select the func-
tion Auto Activate Parking Brake.
Related information
• Parking brake (p. 409)
• In the event of a fault in the parking brake (p. 411)
• Automatic braking when stationary (p. 412)
In the event of a fault in the parking brake
Contact an authorised Volvo workshop if it is not possible to release or apply the parking brakeafter several attempts.
An acoustic warning signal sounds when driving with the parking brake applied. If the car has to be parked before a possible fault is rectified then the wheels must be turned as ifparking on a hill and the gear selector must be in position P, or engage first gear if the car has a
manual gearbox.
Low battery voltageIf the battery voltage is too low then the parking brake can neither be released nor applied. Con-nect a donor battery if the battery voltage is toolow.
Replacing the brake liningsThe rear brake linings must be replaced at aworkshop due to the design of the electrically-operated parking brake - an authorised Volvoworkshop is recommended.
Page 414 of 594
||
STARTING AND DRIVING
412
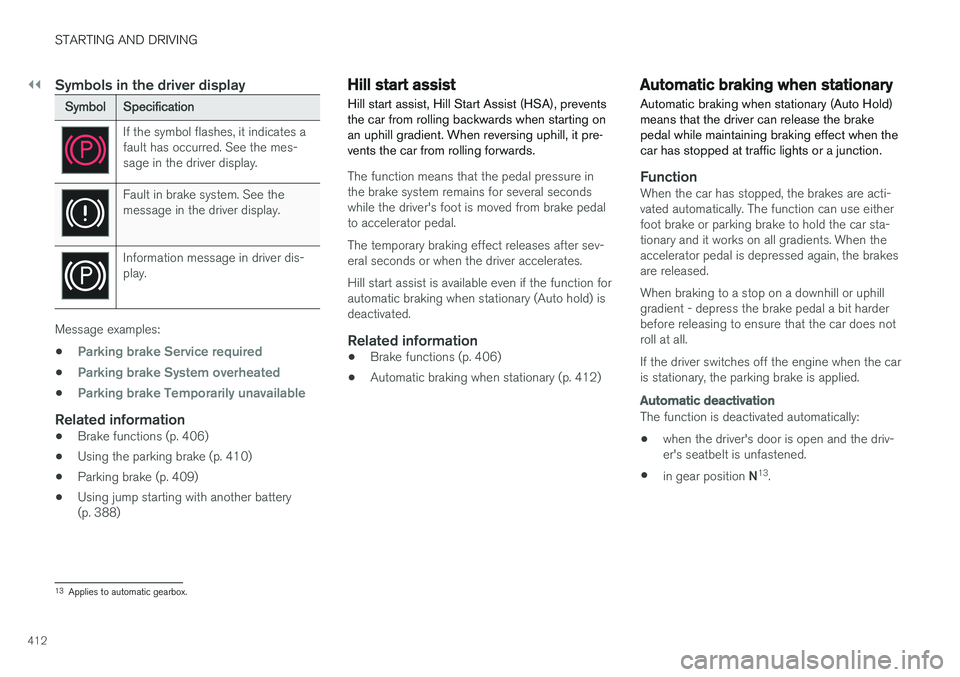
Symbols in the driver display
SymbolSpecification
If the symbol flashes, it indicates a fault has occurred. See the mes-sage in the driver display.
Fault in brake system. See the message in the driver display.
Information message in driver dis- play.
Message examples:
•
Parking brake Service required
•Parking brake System overheated
•Parking brake Temporarily unavailable
Related information
• Brake functions (p. 406)
• Using the parking brake (p. 410)
• Parking brake (p. 409)
• Using jump starting with another battery (p. 388)
Hill start assist
Hill start assist, Hill Start Assist (HSA), prevents the car from rolling backwards when starting onan uphill gradient. When reversing uphill, it pre-vents the car from rolling forwards.
The function means that the pedal pressure in the brake system remains for several secondswhile the driver's foot is moved from brake pedalto accelerator pedal. The temporary braking effect releases after sev- eral seconds or when the driver accelerates. Hill start assist is available even if the function for automatic braking when stationary (Auto hold) isdeactivated.
Related information
• Brake functions (p. 406)
• Automatic braking when stationary (p. 412)
Automatic braking when stationary
Automatic braking when stationary (Auto Hold) means that the driver can release the brakepedal while maintaining braking effect when thecar has stopped at traffic lights or a junction.
FunctionWhen the car has stopped, the brakes are acti- vated automatically. The function can use eitherfoot brake or parking brake to hold the car sta-tionary and it works on all gradients. When theaccelerator pedal is depressed again, the brakesare released. When braking to a stop on a downhill or uphill gradient - depress the brake pedal a bit harderbefore releasing to ensure that the car does notroll at all. If the driver switches off the engine when the car is stationary, the parking brake is applied.
Automatic deactivation
The function is deactivated automatically: • when the driver's door is open and the driv- er's seatbelt is unfastened.
• in gear position
N13
.
13 Applies to automatic gearbox.
Page 417 of 594
STARTING AND DRIVING
}}
* Option/accessory.415
Related information
•Driving with a trailer under special conditions (p. 428)
• Preparations for a long trip (p. 415)
Overloading the starter battery
The electrical functions in the car load the starter battery to varying degrees. Avoid using the igni-tion position II when the car is switched off.
Instead, use ignition position I - which uses less
power.
Also, be aware of different accessories that load the electrical system. Do not use functions whichuse a lot of power when the car is switched off.Examples of such functions are:
• ventilation fan
• headlamps
• windscreen wiper
• audio system (high volume).
If the starter battery voltage is low, the message
12 V Battery Low charge, will soon enter
power save mode is shown in the driver display.
The energy-saving function then shuts down cer- tain functions or reduces certain functions suchas the ventilation fan and/or audio system.
–In which case, charge the starter battery by starting the car and then running it for atleast 15 minutes - starter battery charging ismore effective during driving than runningthe engine at idling speed while stationary.
Related information
• Ignition positions (p. 385)
• Starter battery (p. 530)
Preparations for a long trip
Before a driving holiday or some other type of long journey, it is important to check the car'sfunctions and equipment particularly carefully.
Check that:
• the engine is working normally and that fuel consumption is normal
• there are no leaks (fuel, oil or other fluid)
• all bulbs are working
• the tyres have sufficient tread depth andpressure
• a warning triangle and high-visibility vest arelocated in the car - legally required in certaincountries
• the wiper blades are in good condition.
Related information
•
Fuel consumption and CO2 emissions(p. 572)
• Checking the tyre pressures (p. 484)
• Filling washer fluid (p. 529)
• Winter driving (p. 416)
• Economical driving (p. 422)
• Settings for car modem
* (p. 468)
• Loading (p. 227)
• Pilot Assist
* (p. 304)
• Speed limiter
* (p. 277)