clock VOLVO V90 CROSS COUNTRY 2017 Quick Guide
[x] Cancel search | Manufacturer: VOLVO, Model Year: 2017, Model line: V90 CROSS COUNTRY, Model: VOLVO V90 CROSS COUNTRY 2017Pages: 184, PDF Size: 5.75 MB
Page 25 of 184
INTRODUCTION
* Option/accessory.23
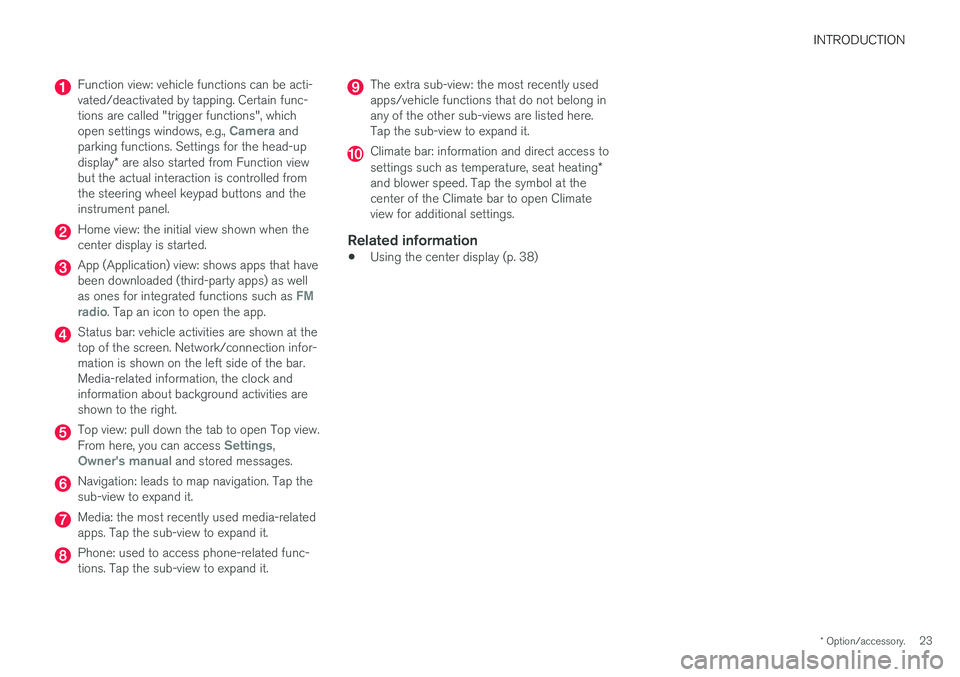
Function view: vehicle functions can be acti- vated/deactivated by tapping. Certain func-tions are called "trigger functions", which open settings windows, e.g.,
Camera and
parking functions. Settings for the head-up display * are also started from Function view
but the actual interaction is controlled from the steering wheel keypad buttons and theinstrument panel.
Home view: the initial view shown when the center display is started.
App (Application) view: shows apps that have been downloaded (third-party apps) as well as ones for integrated functions such as
FM
radio. Tap an icon to open the app.
Status bar: vehicle activities are shown at the top of the screen. Network/connection infor-mation is shown on the left side of the bar.Media-related information, the clock andinformation about background activities areshown to the right.
Top view: pull down the tab to open Top view. From here, you can access Settings,Owner's manual and stored messages.
Navigation: leads to map navigation. Tap the sub-view to expand it.
Media: the most recently used media-related apps. Tap the sub-view to expand it.
Phone: used to access phone-related func- tions. Tap the sub-view to expand it.
The extra sub-view: the most recently used apps/vehicle functions that do not belong inany of the other sub-views are listed here.Tap the sub-view to expand it.
Climate bar: information and direct access to settings such as temperature, seat heating *
and blower speed. Tap the symbol at the center of the Climate bar to open Climateview for additional settings.
Related information
• Using the center display (p. 38)
Page 36 of 184
||
INTRODUCTION
34tive app's basic functions. When a sub-view is expanded, the Home view's fourth sub-view will temporarily not be displayed.
• To minimize a sub-view, tap anywhere on thescreen.
Opening/closing a sub-view in full-screen
mode
The extra sub-view and the Navigation sub-view
can be opened in full-screen mode to show addi- tional information and possible settings.
In expanded mode, open theapp in full-screen mode by tap-ping the symbol.
Tap on the symbol or the Home button below the screen toreturn to the expanded view.
It is always possible to return to Home view by pressing the Home button. Press the Home but- ton twice to return to Home view's standard view
from full-screen.
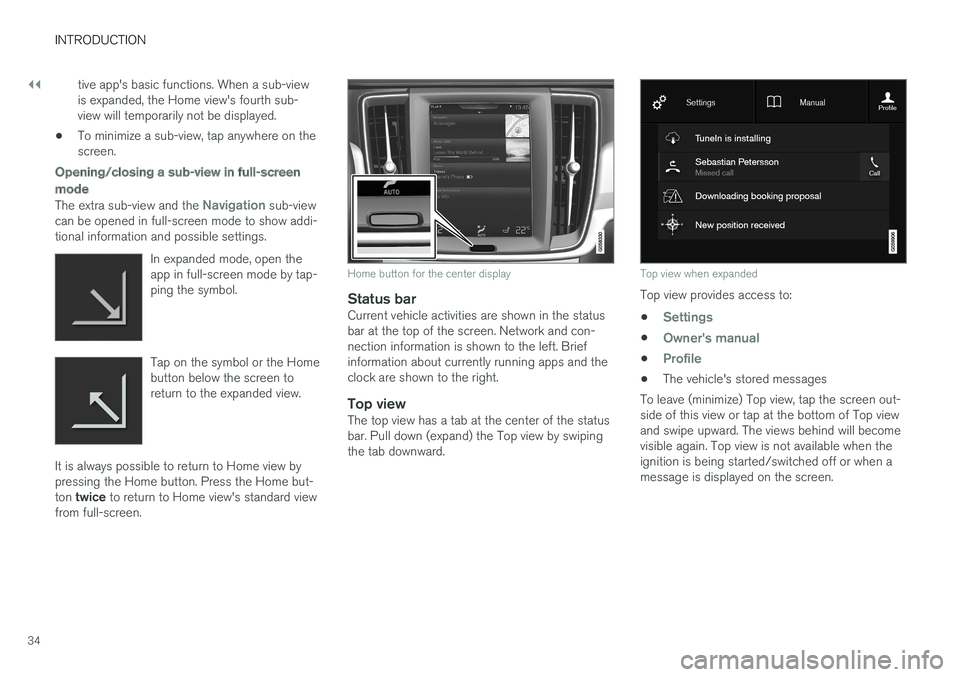
Home button for the center display
Status barCurrent vehicle activities are shown in the status bar at the top of the screen. Network and con-nection information is shown to the left. Briefinformation about currently running apps and theclock are shown to the right.
Top viewThe top view has a tab at the center of the statusbar. Pull down (expand) the Top view by swipingthe tab downward.
Top view when expanded
Top view provides access to: •
Settings
•Owner's manual
•Profile
• The vehicle's stored messages
To leave (minimize) Top view, tap the screen out- side of this view or tap at the bottom of Top viewand swipe upward. The views behind will becomevisible again. Top view is not available when theignition is being started/switched off or when amessage is displayed on the screen.
Page 39 of 184
INTRODUCTION
37
Symbols in the center display status bar
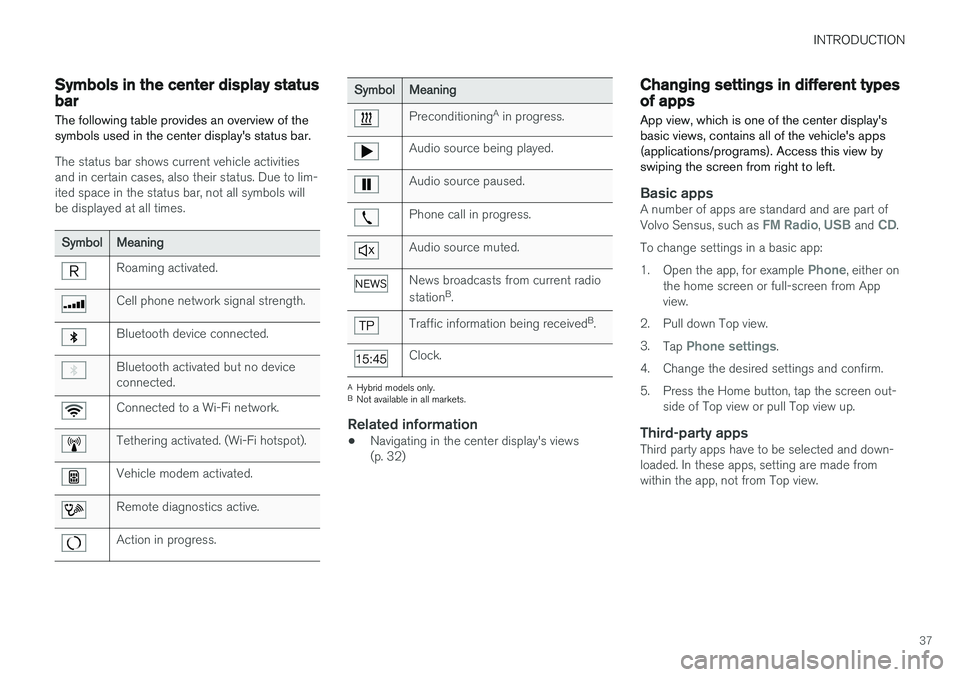
The following table provides an overview of the symbols used in the center display's status bar.
The status bar shows current vehicle activities and in certain cases, also their status. Due to lim-ited space in the status bar, not all symbols willbe displayed at all times.
Symbol Meaning
Roaming activated.
Cell phone network signal strength.
Bluetooth device connected.
Bluetooth activated but no device connected.
Connected to a Wi-Fi network.
Tethering activated. (Wi-Fi hotspot).
Vehicle modem activated.
Remote diagnostics active.
Action in progress.
SymbolMeaning
Preconditioning A
in progress.
Audio source being played.
Audio source paused.
Phone call in progress.
Audio source muted.
News broadcasts from current radio station B
.
Traffic information being received B
.
Clock.
A Hybrid models only.
B Not available in all markets.
Related information
• Navigating in the center display's views (p. 32)
Changing settings in different types of apps
App view, which is one of the center display's basic views, contains all of the vehicle's apps(applications/programs). Access this view byswiping the screen from right to left.
Basic appsA number of apps are standard and are part of Volvo Sensus, such as FM Radio, USB and CD.
To change settings in a basic app: 1. Open the app, for example
Phone, either on
the home screen or full-screen from App view.
2. Pull down Top view. 3. Tap
Phone settings.
4. Change the desired settings and confirm.
5. Press the Home button, tap the screen out- side of Top view or pull Top view up.
Third-party appsThird party apps have to be selected and down- loaded. In these apps, setting are made fromwithin the app, not from Top view.
Page 92 of 184
PRACTICAL INFORMATION
* Option/accessory.
90
Using the glove compartment
The glove compartment provides storage space for small items.
The owner's manual and maps can be kept here. There are also holders for pens on the inside ofthe glove compartment door.
Locking/unlocking the glove
compartment *
The glove compartment and tailgate can belocked when e.g., the vehicle is in a workshop forservice, etc. See also the article "Private locking"for additional information.
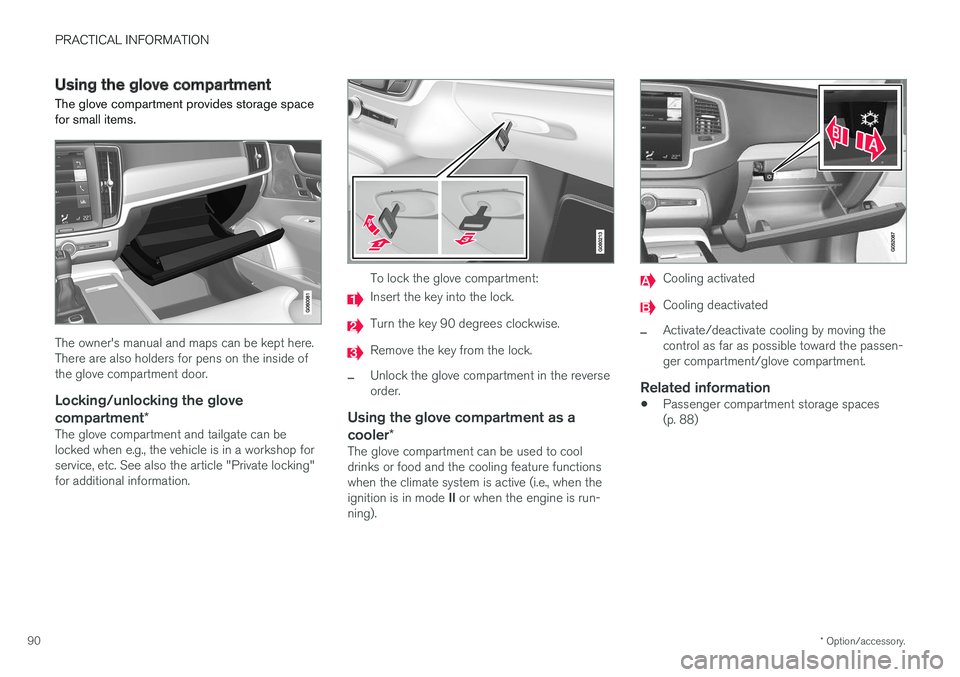
To lock the glove compartment:
Insert the key into the lock.
Turn the key 90 degrees clockwise.
Remove the key from the lock.
–Unlock the glove compartment in the reverse order.
Using the glove compartment as a cooler*
The glove compartment can be used to cool drinks or food and the cooling feature functionswhen the climate system is active (i.e., when the ignition is in mode II or when the engine is run-
ning).
Cooling activated
Cooling deactivated
–Activate/deactivate cooling by moving the control as far as possible toward the passen-ger compartment/glove compartment.
Related information
• Passenger compartment storage spaces(p. 88)
Page 139 of 184
PRACTICAL INFORMATION
}}
137
Replacing front turn signal bulbs On models with halogen headlights, the front turn signal bulb can be replaced by the owner.
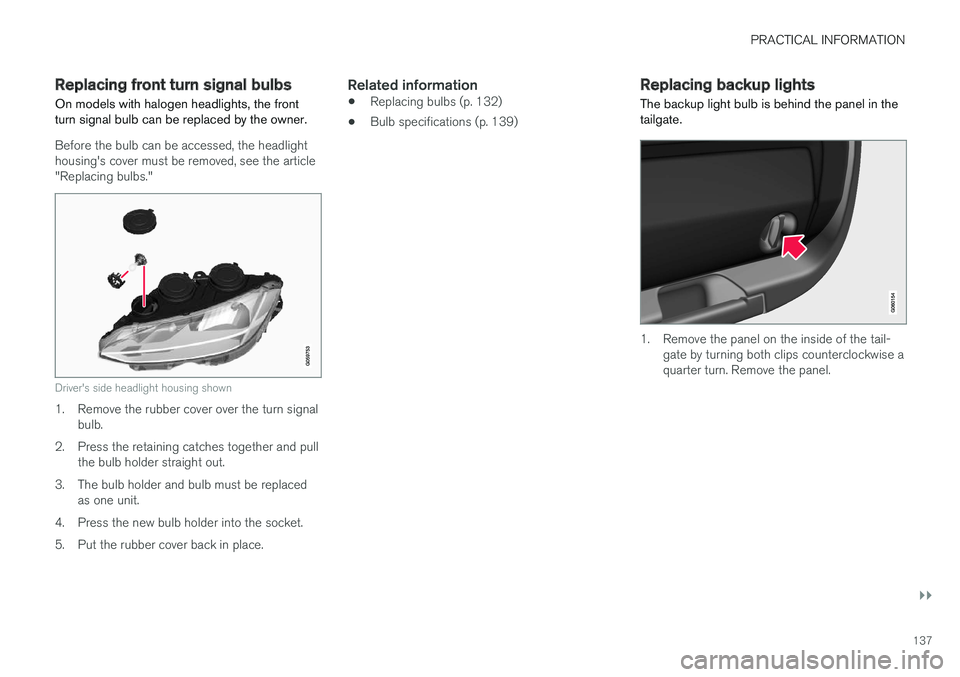
Before the bulb can be accessed, the headlight housing's cover must be removed, see the article"Replacing bulbs."
Driver's side headlight housing shown
1. Remove the rubber cover over the turn signalbulb.
2. Press the retaining catches together and pull the bulb holder straight out.
3. The bulb holder and bulb must be replaced as one unit.
4. Press the new bulb holder into the socket.
5. Put the rubber cover back in place.
Related information
• Replacing bulbs (p. 132)
• Bulb specifications (p. 139)
Replacing backup lights The backup light bulb is behind the panel in the tailgate.
1. Remove the panel on the inside of the tail-
gate by turning both clips counterclockwise a quarter turn. Remove the panel.
Page 140 of 184
||
PRACTICAL INFORMATION
138
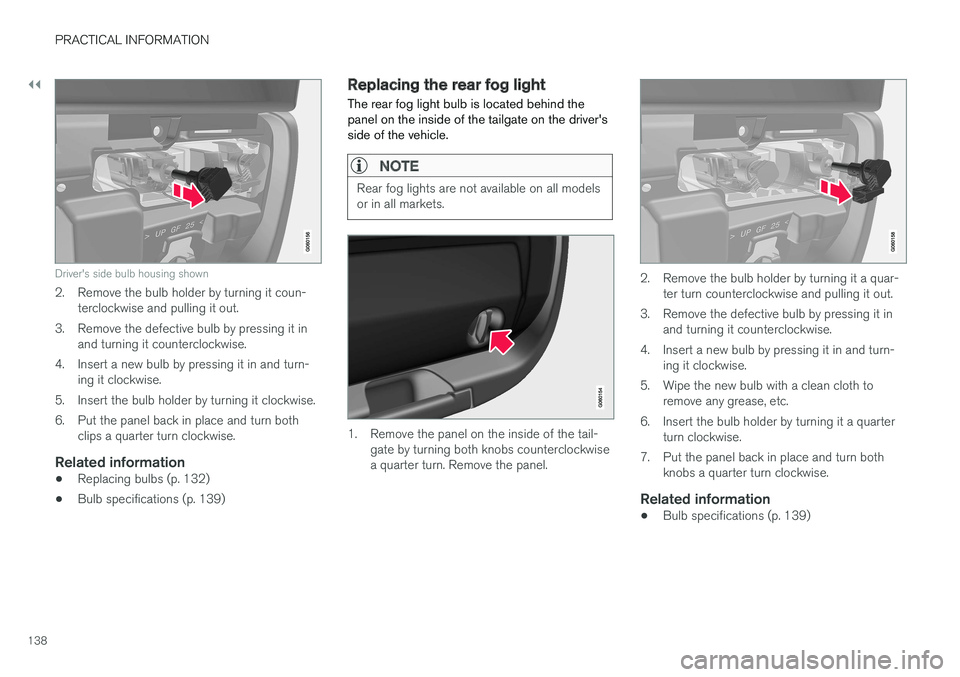
Driver's side bulb housing shown
2. Remove the bulb holder by turning it coun-terclockwise and pulling it out.
3. Remove the defective bulb by pressing it in and turning it counterclockwise.
4. Insert a new bulb by pressing it in and turn- ing it clockwise.
5. Insert the bulb holder by turning it clockwise.
6. Put the panel back in place and turn both clips a quarter turn clockwise.
Related information
• Replacing bulbs (p. 132)
• Bulb specifications (p. 139)
Replacing the rear fog light The rear fog light bulb is located behind the panel on the inside of the tailgate on the driver'sside of the vehicle.
NOTE
Rear fog lights are not available on all models or in all markets.
1. Remove the panel on the inside of the tail-
gate by turning both knobs counterclockwise a quarter turn. Remove the panel.
2. Remove the bulb holder by turning it a quar- ter turn counterclockwise and pulling it out.
3. Remove the defective bulb by pressing it in and turning it counterclockwise.
4. Insert a new bulb by pressing it in and turn- ing it clockwise.
5. Wipe the new bulb with a clean cloth to remove any grease, etc.
6. Insert the bulb holder by turning it a quarter turn clockwise.
7. Put the panel back in place and turn both knobs a quarter turn clockwise.
Related information
• Bulb specifications (p. 139)
Page 145 of 184
PRACTICAL INFORMATION
143
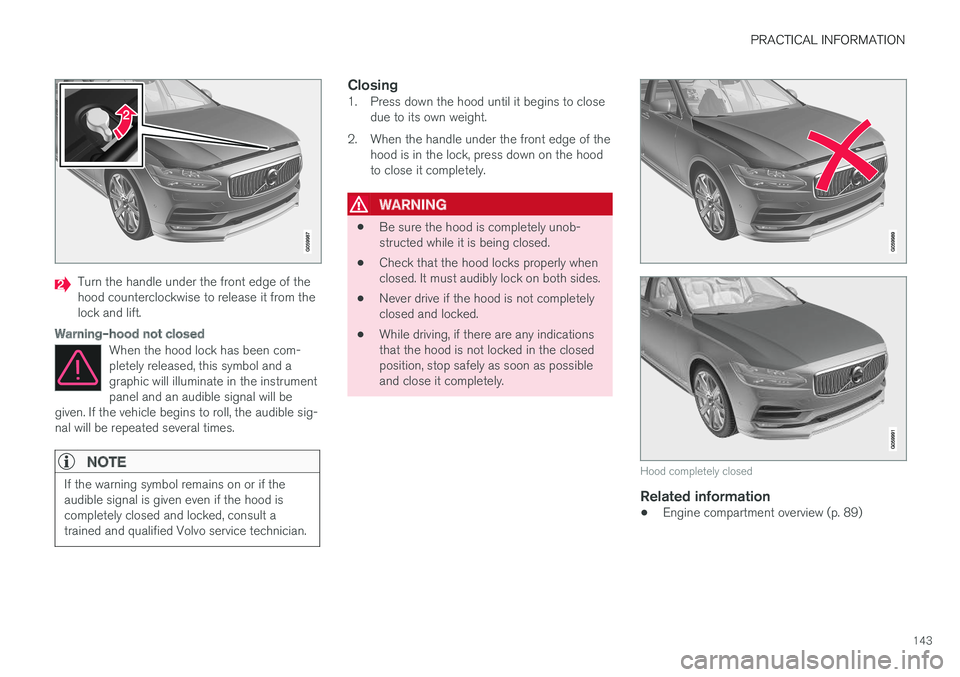
Turn the handle under the front edge of the hood counterclockwise to release it from thelock and lift.
Warning–hood not closed
When the hood lock has been com- pletely released, this symbol and agraphic will illuminate in the instrumentpanel and an audible signal will be
given. If the vehicle begins to roll, the audible sig-nal will be repeated several times.
NOTE
If the warning symbol remains on or if the audible signal is given even if the hood iscompletely closed and locked, consult atrained and qualified Volvo service technician.
Closing1. Press down the hood until it begins to close due to its own weight.
2. When the handle under the front edge of the hood is in the lock, press down on the hood to close it completely.
WARNING
• Be sure the hood is completely unob- structed while it is being closed.
• Check that the hood locks properly whenclosed. It must audibly lock on both sides.
• Never drive if the hood is not completelyclosed and locked.
• While driving, if there are any indicationsthat the hood is not locked in the closedposition, stop safely as soon as possibleand close it completely.
Hood completely closed
Related information
•
Engine compartment overview (p. 89)