lights VOLVO V90 CROSS COUNTRY 2017 Quick Guide
[x] Cancel search | Manufacturer: VOLVO, Model Year: 2017, Model line: V90 CROSS COUNTRY, Model: VOLVO V90 CROSS COUNTRY 2017Pages: 184, PDF Size: 5.75 MB
Page 6 of 184

4
Replacing backup lights137
Replacing the rear fog light 138
Bulb specifications 139
Replacing wiper blades 139
Windshield wipers in the service position 140
Refilling the windshield washer fluid reservoir 142
Opening and closing the hood 142
Retractable towbar *
144
FUSES
Fuses
148
Replacing fuses 148
Fuses in the engine compartment 149
Fuses in the passenger compartment 153
Fuses in the cargo compartment 157
SPECIFICATIONS
Label information162
Dimensions 165
Weights 167
Air conditioning refrigerant 169
Brake fluid specification and volume 169
Coolant specifications 170
Engine specifications 171
Engine oil specifications and volume 173
Fuel tank volume 173
Tire inflation pressure table 174
Transmission fluid specification and volume 175
Page 53 of 184

IMPORTANT INFORMATION
}}
51
Occupant safety reminders
How safely you drive doesn't depend on how old you are but rather on:
• How well you see.
• Your ability to concentrate.
• How quickly you make decisions understress to avoid an accident.
The following suggestions are intended to helpyou cope with the ever changing traffic environ-ment.
• Never drink and drive.
• If you are taking any medication, consult yourphysician about its potential effects on yourdriving abilities.
• Take a driver-retraining course.
• Have your eyes checked regularly.
• Keep your windshield and headlights clean.
• Replace wiper blades when they start toleave streaks.
• Take into account the traffic, road, andweather conditions, particularly with regard tostopping distance.
• Never send text messages while driving.
• Refrain from using or minimize the use of acell phone while driving.
Related information
• Recall information (p. 52)
• Reporting safety defects (p. 51)
Reporting safety defects
The following information will help you report any perceived safety-related defects in your vehicle.
Reporting safety defects in the U.S.
If you believe that your vehicle has a defect which could cause a crash orcould cause injury or death, you shouldimmediately inform the National High-way Traffic Safety Administration(NHTSA) in addition to notifying VolvoCar USA, LLC. If NHTSA receives simi-lar complaints, it may open an investi-gation, and if it finds that a safetydefect exists in a group of vehicles, itmay order a recall and remedy cam-paign. However, NHTSA cannotbecome involved in individual problemsbetween you, your retailer, or Volvo CarUSA, LLC. To contact NHTSA, you mayeither call the Auto Safety Hotline toll-free at 1-888-327-4236(TTY: 1-800-424-9153) or write to: NHTSA, U.S. Department of Transpor-tation, Washington D.C. 20590. You can also obtain other informationabout motor vehicle safety from http://www.safercar.gov, where you can alsoenter your vehicle's VIN (Vehicle Identi-fication Number) to see if it has anyopen recalls. Volvo strongly recommends that if your vehicle is covered under a service cam-paign, safety or emission recall or simi-lar action, it should be completed assoon as possible. Please check withyour local retailer or Volvo Car USA,LLC if your vehicle is covered underthese conditions. NHTSA can be reached at:Internet:http://www.nhtsa.govTelephone:1-888-DASH-2-DOT (1-888-327-4236).
Reporting safety defects in CanadaIf you believe your vehicle has a defect that could cause a crash or could cause injury or death, youshould immediately inform Transport Canada inaddition to notifying Volvo Cars of Canada Corp.
Page 66 of 184

||
IMPORTANT INFORMATION
64
Passenger's seat occu-pancy statusOWS indi-cator lightstatusPassenger'sside front air-bag status
Seat unoccu- pied OWS indi-cator lightlights up.Passenger'sside front air-bag disabled
Seat occu-pied by lowweight occu- pant/object AOWS indi-
cator light lights up Passenger'sside front air-
bag disabled
Seat occu-pied by heavyoccupant/object OWS indi-cator light is
not lit Passenger'sside front air-bag enabled
A
Volvo recommends that children always be properly restrained in appropriate child restraints in the rear seats. Do not assumethat the passenger's side front airbag is disabled unless thePASSENGER AIRBAG OFF indicator lamp is lit. Make sure thechild restraint is properly installed. If there is any doubt as to thestatus of the passenger's side front airbag, move the childrestraint to the rear seat.
The OWS is designed to enable (may inflate) the passenger's side front airbag in the event of acollision anytime the system senses that a per-son of adult size is sitting properly in the frontpassenger's seat. The PASSENGER AIRBAGOFF indicator lamp will be off and remain off. If a person of adult size is sitting in the front pas- senger's seat, but the PASSENGER AIRBAGOFF indicator lamp is on, it is possible that the person isn't sitting properly in the seat. If thishappens:
• Turn the vehicle off and ask the person toplace the seatback in an upright position.
• Have the person sit upright in the seat, cen-tered on the seat cushion, with the person'slegs comfortably extended.
• Restart the vehicle and have the personremain in this position for about two minutes.This will allow the system to detect that per-son and enable the passenger's frontal air-bag.
• If the PASSENGER AIRBAG OFF indicatorlamp remains on even after this, the personshould be advised to ride in the rear seat.
This condition reflects limitations of the OWSclassification capability. It does not indicate OWSmalfunction.
ModificationsIf you are considering modifying your vehicle inany way to accommodate a disability, for exampleby altering or adapting the driver's or front pas-senger's seat(s) and/or airbag systems, pleasecontact Volvo at: In the USA Volvo Car USA, LLC Customer Care Center1 Volvo Drive P.O. Box 914Rockleigh, New Jersey 076471-800-458-1552 In Canada Volvo Cars of Canada Corp. National Customer Service9130 Leslie Street, Suite 101Richmond Hill, Ontario L4B 0B91-800-663-8255
Page 134 of 184

PRACTICAL INFORMATION
132
Replacing bulbs
The halogen headlight and backup light bulbs 10
can be replaced by the owner.
Before the halogen headlight bulbs can be replaced, that plastic covering over the headlighthousing has to be removed and the housing hasto be lifted out of the vehicle.
NOTE
Halogen headlights are not available on all models or in all markets. Consult your Volvo retailer if you are uncertain about the type of headlights in your vehicle.
The turn signal, high/low beam, Daytime Running Light and parking light bulbs will be accessiblewhen the plastic covering has been removed.
–Release the pins in the plastic covering's four clips by pressing them down with ascrewdriver or similar object and remove thecovering.
NOTE
The pins in the clips have to be pressed back completely before the clips are placed in theplastic covering. When the covering is put back in place, the pins must be pressed so that their upper sur-face is flush with the surface of the clip.
NOTE
• For information regarding any bulbs not mentioned in this section, please contactyour Volvo retailer or a trained andauthorized Volvo service technician.
• Always switch off the ignition before star-ting to replace a bulb.
• If an error message remains in the dis-play after a faulty bulb has been replaced,contact an authorized Volvo workshop.
• Condensation may form temporarily onthe inside of the lenses of exterior lightssuch as headlights, fog lights, or taillights.This is normal and the lights aredesigned to withstand moisture. Normally,condensation will dissipate after thelights have been on for a short time.
• The optional Active Bending Light bulbscontain trace amounts of mercury. Thesebulbs should always be disposed of by atrained and qualified Volvo service techni-cian.
10
Halogen bulbs are not available on all models.
Page 135 of 184

PRACTICAL INFORMATION
}}
* Option/accessory.133
CAUTION
Never touch the glass of bulbs with your fin- gers. Grease and oils from your fingers vapor-ize in the heat and will leave a deposit on thereflector, which will damage it.
WARNING
•The ignition should be switched off com- pletely (be in ignition mode
0) when
replacing bulbs.
• If the engine has been running just prior to replacing bulbs in the headlight hous-ing, please keep in mind that componentsin the engine compartment will be hot.
Front bulbs (vehicles with halogen headlights)
Low beam
High beam
Parking light/Daytime Running Light
Turn signal
Fog light with corner illumination (LED)
*
Taillight bulbs
Side marker light (LED)
Taillight (LED)
Fog light11
Backup light
Turn signal
12
Brake light (LED)
High-mounted brake light (LED)
Related information
•
Bulb specifications (p. 139)
• Replacing front parking light bulbs (p. 136)
• Replacing front turn signal bulbs (p. 137)
11
Not available in all markets.
12 Must be replaced by a trained and qualified Volvo service technician.
Page 137 of 184

PRACTICAL INFORMATION
}}
135
Replacing low beam headlight bulbs
On models with halogen headlights, the low beam headlight bulb can be replaced by theowner.
Before the bulb can be replaced, the plastic cov- ering over the headlight housing has to be removed, see the article "Replacing bulbs."
CAUTION
Never touch the glass of bulbs with your fin- gers. Grease and oils from your fingers vapor-ize in the heat and will leave a deposit on thereflector, which will damage it.
Driver's side bulb housing shown
1. Remove the low beam round rubber cover from the headlight housing. 2. Remove the connector from the bulb.
3. Remove the bulb by pressing it slightly
upward and then pulling it out.
4. Insert the bulb in the socket. The bulb's guid- ing pin should point straight up.
5. Press the connector into place.
6. Put the rubber cover back into place.
Related information
• Replacing bulbs (p. 132)
• Bulb specifications (p. 139)
Replacing High Beam headlight bulbs
On models with halogen headlights, the High Beam headlight bulb can be replaced by theowner.
Before the bulb can be accessed, the headlight housing's cover must be removed, see the article"Replacing bulbs."
CAUTION
Never touch the glass of bulbs with your fin- gers. Grease and oils from your fingers vapor-ize in the heat and will leave a deposit on thereflector, which will damage it.
Driver's side bulb housing shown
1. Remove the high beam round rubber cover from the headlight housing.
Page 138 of 184

||
PRACTICAL INFORMATION
1362. Remove the bulb by turning the bulb holder
upward and then pulling it straight out.
3. Carefully pry the plastic sleeve by the con- nector's locking lug to release it.
4. Remove the connector from the bulb.
5. Replace the bulb.
6. Position the bulb in the socket and turn it downward.
7. Put the rubber cover back into place.
Related information
• Bulb specifications (p. 139)
• Replacing bulbs (p. 132)
Replacing front parking light bulbs
On models with halogen headlights, the front parking light bulb can be replaced by the owner.
Before the bulb can be accessed, the headlight housing's cover must be removed, see the article"Replacing bulbs." Remove the high beam bulb first by turning the bulb holder upward and then pulling it straightout. This makes it easier to access the parkinglight bulb.
Driver's side bulb housing shown
1. Remove the rubber cover over the parking light bulb.
2. Pull the bulb holder straight out.
3. Remove the bulb by pulling it straight out.
4. Insert a new bulb. 5. Insert the bulb holder in the socket and
press it into place.
6. If the high beam bulb was removed, insert the bulb in the socket and turn downward.
7. Put the rubber cover back into position.
Related information
• Replacing bulbs (p. 132)
• Bulb specifications (p. 139)
Page 139 of 184

PRACTICAL INFORMATION
}}
137
Replacing front turn signal bulbs On models with halogen headlights, the front turn signal bulb can be replaced by the owner.
Before the bulb can be accessed, the headlight housing's cover must be removed, see the article"Replacing bulbs."
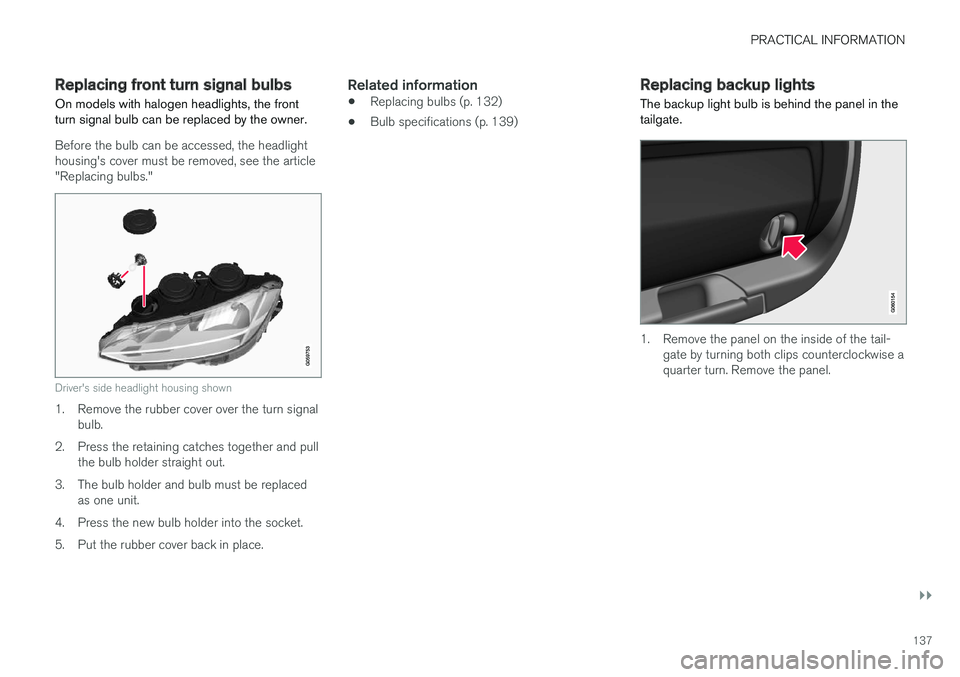
Driver's side headlight housing shown
1. Remove the rubber cover over the turn signalbulb.
2. Press the retaining catches together and pull the bulb holder straight out.
3. The bulb holder and bulb must be replaced as one unit.
4. Press the new bulb holder into the socket.
5. Put the rubber cover back in place.
Related information
• Replacing bulbs (p. 132)
• Bulb specifications (p. 139)
Replacing backup lights The backup light bulb is behind the panel in the tailgate.
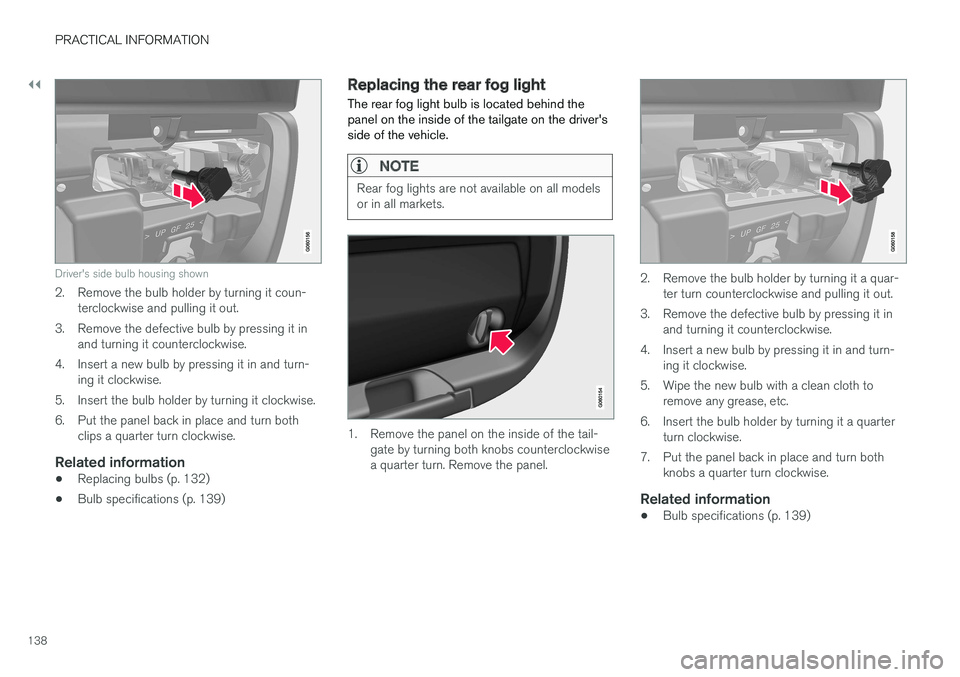
1. Remove the panel on the inside of the tail-
gate by turning both clips counterclockwise a quarter turn. Remove the panel.
Page 140 of 184

||
PRACTICAL INFORMATION
138
Driver's side bulb housing shown
2. Remove the bulb holder by turning it coun-terclockwise and pulling it out.
3. Remove the defective bulb by pressing it in and turning it counterclockwise.
4. Insert a new bulb by pressing it in and turn- ing it clockwise.
5. Insert the bulb holder by turning it clockwise.
6. Put the panel back in place and turn both clips a quarter turn clockwise.
Related information
• Replacing bulbs (p. 132)
• Bulb specifications (p. 139)
Replacing the rear fog light The rear fog light bulb is located behind the panel on the inside of the tailgate on the driver'sside of the vehicle.
NOTE
Rear fog lights are not available on all models or in all markets.
1. Remove the panel on the inside of the tail-
gate by turning both knobs counterclockwise a quarter turn. Remove the panel.
2. Remove the bulb holder by turning it a quar- ter turn counterclockwise and pulling it out.
3. Remove the defective bulb by pressing it in and turning it counterclockwise.
4. Insert a new bulb by pressing it in and turn- ing it clockwise.
5. Wipe the new bulb with a clean cloth to remove any grease, etc.
6. Insert the bulb holder by turning it a quarter turn clockwise.
7. Put the panel back in place and turn both knobs a quarter turn clockwise.
Related information
• Bulb specifications (p. 139)
Page 141 of 184

PRACTICAL INFORMATION
}}
139
Bulb specifications The following specifications apply to models equipped with halogen13
headlights, a backup
light and rear fog lights. If other bulbs need to be replaced, contact a trained and qualifiedVolvo service technician.
Function [W]A
Type
Low beam 55 H11
High Beam 65 H9
Front turn signal 24 PY24WDaytime running light/ parking light 21/5 W21/5W
Backup light 21 H21W LL Rear fog light B
21 H21W LL
AWatt
B Rear fog lights are not available on all models or in all markets.
Related information
• Replacing bulbs (p. 132)
Replacing wiper blades
The wiper blades should be replaced regularly for best effect. The windshield wiper blades must be in the verti- cal (service) position for replacement, washingor to lift them away from the windshield whene.g., removing ice or snow.
Replacing the windshield wiper blades
With the wipers in the service position, fold out the wiper arm from the windshield. Pressthe button on the wiper blade attachmentand pull the wiper blade straight out, parallelwith the wiper arm.
Slide in the new wiper blade until it clicks into place.
Check that the blade is securely in place.
4. Press the wipers back against the wind- shield.
13Halogen headlights are not available in all models.