lock VOLVO V90 CROSS COUNTRY 2017 Quick Guide
[x] Cancel search | Manufacturer: VOLVO, Model Year: 2017, Model line: V90 CROSS COUNTRY, Model: VOLVO V90 CROSS COUNTRY 2017Pages: 184, PDF Size: 5.75 MB
Page 25 of 184

INTRODUCTION
* Option/accessory.23
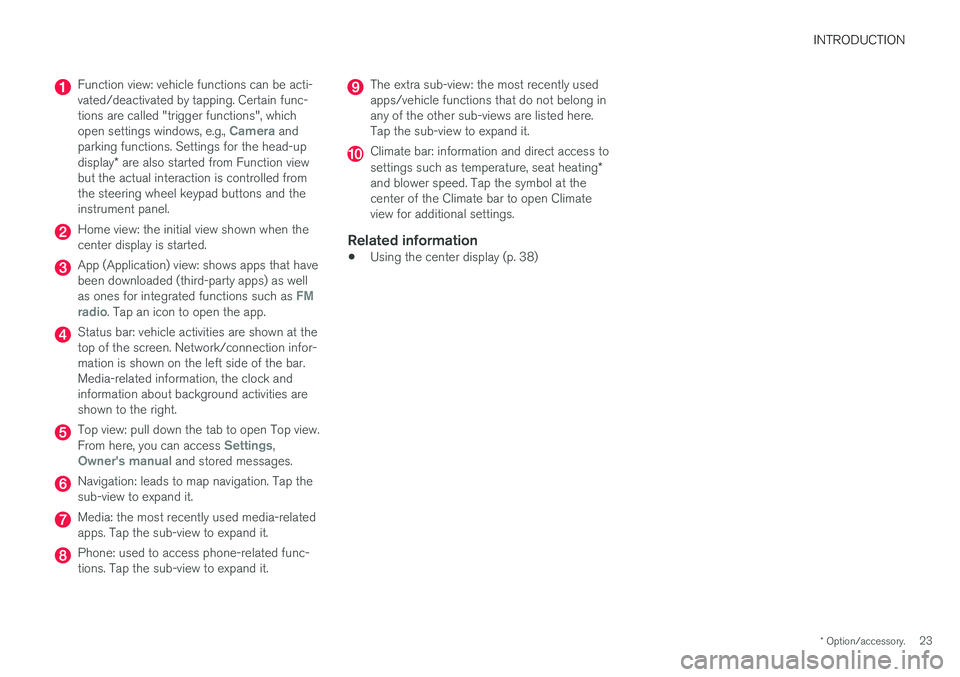
Function view: vehicle functions can be acti- vated/deactivated by tapping. Certain func-tions are called "trigger functions", which open settings windows, e.g.,
Camera and
parking functions. Settings for the head-up display * are also started from Function view
but the actual interaction is controlled from the steering wheel keypad buttons and theinstrument panel.
Home view: the initial view shown when the center display is started.
App (Application) view: shows apps that have been downloaded (third-party apps) as well as ones for integrated functions such as
FM
radio. Tap an icon to open the app.
Status bar: vehicle activities are shown at the top of the screen. Network/connection infor-mation is shown on the left side of the bar.Media-related information, the clock andinformation about background activities areshown to the right.
Top view: pull down the tab to open Top view. From here, you can access Settings,Owner's manual and stored messages.
Navigation: leads to map navigation. Tap the sub-view to expand it.
Media: the most recently used media-related apps. Tap the sub-view to expand it.
Phone: used to access phone-related func- tions. Tap the sub-view to expand it.
The extra sub-view: the most recently used apps/vehicle functions that do not belong inany of the other sub-views are listed here.Tap the sub-view to expand it.
Climate bar: information and direct access to settings such as temperature, seat heating *
and blower speed. Tap the symbol at the center of the Climate bar to open Climateview for additional settings.
Related information
• Using the center display (p. 38)
Page 29 of 184

INTRODUCTION
}}
27
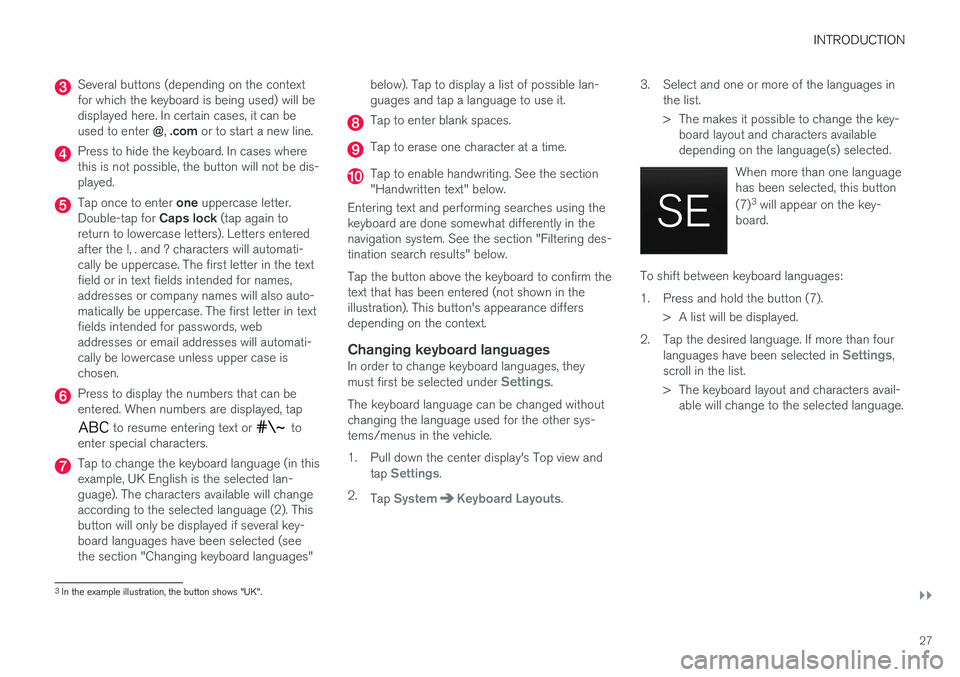
Several buttons (depending on the context for which the keyboard is being used) will bedisplayed here. In certain cases, it can be used to enter @, .com or to start a new line.
Press to hide the keyboard. In cases where this is not possible, the button will not be dis-played.
Tap once to enter one uppercase letter.
Double-tap for Caps lock (tap again to
return to lowercase letters). Letters entered after the !, . and ? characters will automati-cally be uppercase. The first letter in the textfield or in text fields intended for names,addresses or company names will also auto-matically be uppercase. The first letter in textfields intended for passwords, webaddresses or email addresses will automati-cally be lowercase unless upper case ischosen.
Press to display the numbers that can be entered. When numbers are displayed, tap
to resume entering text or to
enter special characters.
Tap to change the keyboard language (in this example, UK English is the selected lan-guage). The characters available will changeaccording to the selected language (2). Thisbutton will only be displayed if several key-board languages have been selected (seethe section "Changing keyboard languages" below). Tap to display a list of possible lan-guages and tap a language to use it.
Tap to enter blank spaces.
Tap to erase one character at a time.
Tap to enable handwriting. See the section "Handwritten text" below.
Entering text and performing searches using thekeyboard are done somewhat differently in thenavigation system. See the section "Filtering des-tination search results" below. Tap the button above the keyboard to confirm the text that has been entered (not shown in theillustration). This button's appearance differsdepending on the context.
Changing keyboard languagesIn order to change keyboard languages, they must first be selected under Settings.
The keyboard language can be changed without changing the language used for the other sys-tems/menus in the vehicle.
1. Pull down the center display's Top view and tap
Settings.
2. Tap
SystemKeyboard Layouts. 3. Select and one or more of the languages in
the list.
> The makes it possible to change the key-board layout and characters available depending on the language(s) selected.
When more than one languagehas been selected, this button (7)3
will appear on the key-
board.
To shift between keyboard languages:
1. Press and hold the button (7).
> A list will be displayed.
2. Tap the desired language. If more than four languages have been selected in
Settings,
scroll in the list.
> The keyboard layout and characters avail- able will change to the selected language.
3In the example illustration, the button shows "UK".
Page 36 of 184

||
INTRODUCTION
34tive app's basic functions. When a sub-view is expanded, the Home view's fourth sub-view will temporarily not be displayed.
• To minimize a sub-view, tap anywhere on thescreen.
Opening/closing a sub-view in full-screen
mode
The extra sub-view and the Navigation sub-view
can be opened in full-screen mode to show addi- tional information and possible settings.
In expanded mode, open theapp in full-screen mode by tap-ping the symbol.
Tap on the symbol or the Home button below the screen toreturn to the expanded view.
It is always possible to return to Home view by pressing the Home button. Press the Home but- ton twice to return to Home view's standard view
from full-screen.
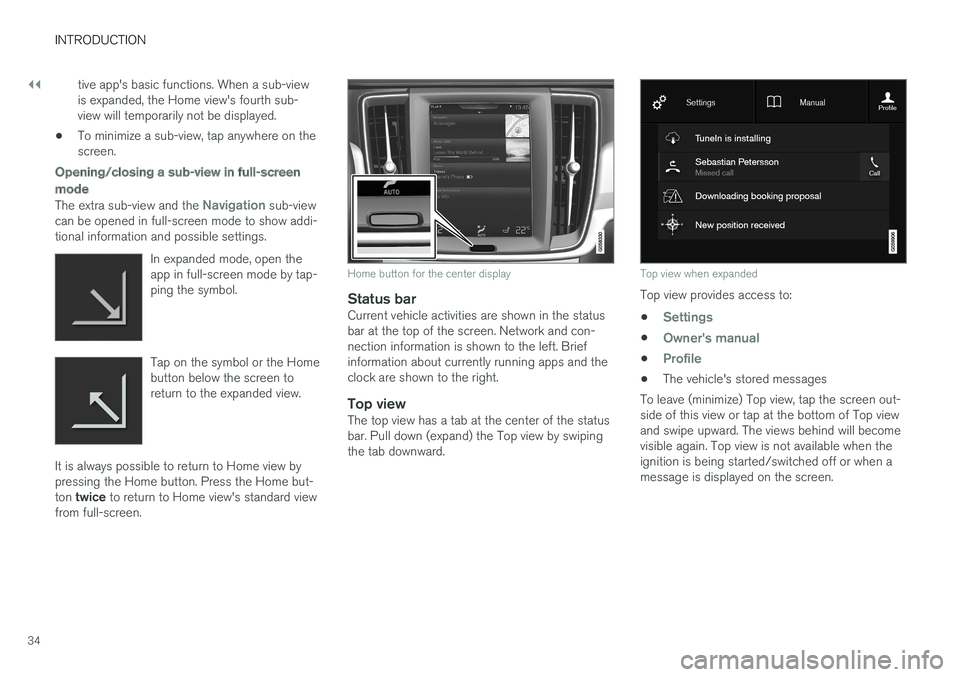
Home button for the center display
Status barCurrent vehicle activities are shown in the status bar at the top of the screen. Network and con-nection information is shown to the left. Briefinformation about currently running apps and theclock are shown to the right.
Top viewThe top view has a tab at the center of the statusbar. Pull down (expand) the Top view by swipingthe tab downward.
Top view when expanded
Top view provides access to: •
Settings
•Owner's manual
•Profile
• The vehicle's stored messages
To leave (minimize) Top view, tap the screen out- side of this view or tap at the bottom of Top viewand swipe upward. The views behind will becomevisible again. Top view is not available when theignition is being started/switched off or when amessage is displayed on the screen.
Page 39 of 184

INTRODUCTION
37
Symbols in the center display status bar
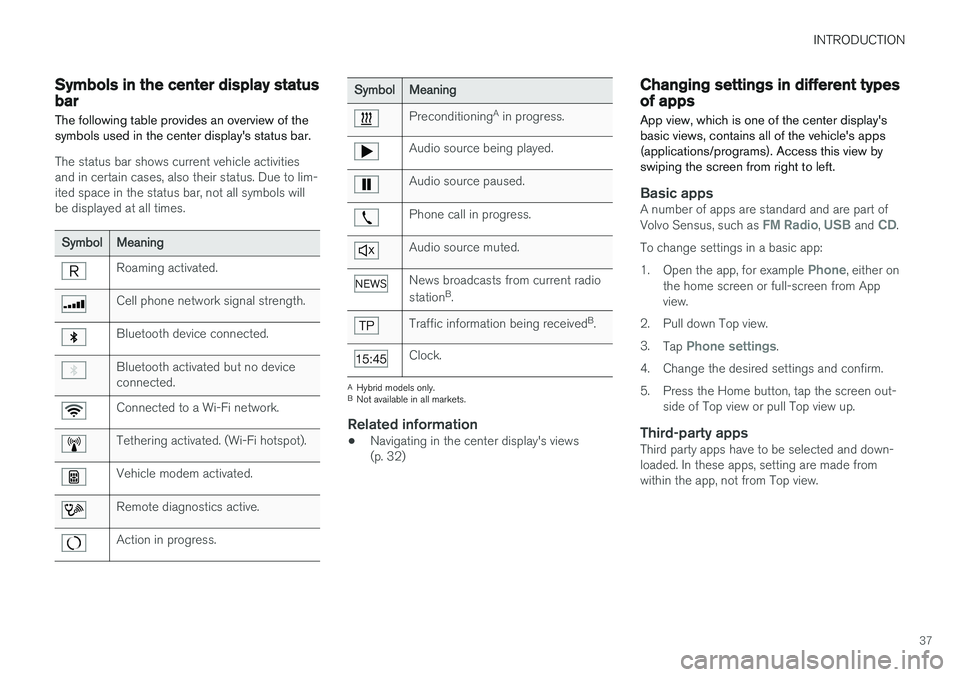
The following table provides an overview of the symbols used in the center display's status bar.
The status bar shows current vehicle activities and in certain cases, also their status. Due to lim-ited space in the status bar, not all symbols willbe displayed at all times.
Symbol Meaning
Roaming activated.
Cell phone network signal strength.
Bluetooth device connected.
Bluetooth activated but no device connected.
Connected to a Wi-Fi network.
Tethering activated. (Wi-Fi hotspot).
Vehicle modem activated.
Remote diagnostics active.
Action in progress.
SymbolMeaning
Preconditioning A
in progress.
Audio source being played.
Audio source paused.
Phone call in progress.
Audio source muted.
News broadcasts from current radio station B
.
Traffic information being received B
.
Clock.
A Hybrid models only.
B Not available in all markets.
Related information
• Navigating in the center display's views (p. 32)
Changing settings in different types of apps
App view, which is one of the center display's basic views, contains all of the vehicle's apps(applications/programs). Access this view byswiping the screen from right to left.
Basic appsA number of apps are standard and are part of Volvo Sensus, such as FM Radio, USB and CD.
To change settings in a basic app: 1. Open the app, for example
Phone, either on
the home screen or full-screen from App view.
2. Pull down Top view. 3. Tap
Phone settings.
4. Change the desired settings and confirm.
5. Press the Home button, tap the screen out- side of Top view or pull Top view up.
Third-party appsThird party apps have to be selected and down- loaded. In these apps, setting are made fromwithin the app, not from Top view.
Page 58 of 184

IMPORTANT INFORMATION
56
Buckling and unbuckling seat beltsSeat belts should be used by all occupants in the vehicle when it is in motion.
Buckling a seat belt1. Pull the belt out slowly. It should not be twis- ted or turned.
NOTE
Each seat belt is equipped with a seat belt retractor that will lock up in the following sit-uations:
• if the belt is pulled out rapidly
• during braking and acceleration
• if the vehicle is leaning excessively
• when driving in turns
• if the Automatic Locking Retractor/Emer-gency Locking Retractor (ALR/ELR) isactivated (each seat belt (except for thedriver's belt) is equipped with theALR/ELR function, which is designed tohelp keep the seat belt taut. ALR/ELRactivates if the seat belt is pulled out as faras possible. If this is done, a sound fromthe seat belt retractor will be audible,which is normal, and the seat belt will bepulled taut and locked in place. This func-tion is automatically disabled when theseat belt is unbuckled and fully retracted).
2. Insert the latch plate into the receptacle. The
seat belt retractor is normally "unlocked" and you can move freely, provided that the shoul-der belt is not pulled out too far.
> A distinct click will be audible.
WARNING
The seat belt latch plate should only be inserted into its intended receptacle. Insertingit into one of the other receptacles may pre-vent it from functioning properly. 3. The height of the seat belts in the front seats
can be adjusted. The height of the shoulder section of the seat belt must be correctlyadjusted.
Press the button and move the upper seat belt anchor up or down. Position it as high as possible so that the shoulder section of the belt is across the seatoccupant's collarbone and not across thethroat.
Page 61 of 184

IMPORTANT INFORMATION
}}
59
Airbag system As an enhancement to the three-point seat belts, your vehicle is equipped with an airbag system.
WARNING
•If the airbag warning light stays on after the engine has started or if it illuminateswhile you are driving, have the vehicleinspected by a trained and qualified Volvoservice technician as soon as possible.
• Never try to repair any component or partof the airbag systems yourself. Any inter-ference in the system could cause mal-function and serious injury. All work onthese systems should be performed by atrained and qualified Volvo service techni-cian.
WARNING
If your vehicle has become flood-damaged in any way (e.g., soaked carpeting/standingwater on the floor of the vehicle), do notattempt to start the vehicle. This may causeairbag deployment which could result in seri-ous injury. Have the vehicle towed to a trainedand qualified Volvo service technician forrepairs. Before attempting to tow the vehicle:
1. Switch off the ignition for at least
10 minutes and disconnect the battery.
2. Follow the instructions in the digital own- ers' information for manually overriding the shiftlock system.
Deployed airbags
WARNING
If any of the airbags have deployed:
• Do not attempt to drive the vehicle. Have it towed to a qualified repair facility.
• If necessary seek medical attentIon.
Driver/passenger side airbags
The front airbags supplement the three-point seat belts. For these airbags to provide the pro-tection intended, seat belts must be worn at alltimes.
Driver and passenger side front airbags
The front airbag systemThe front airbag system includes gas generators surrounded by the airbags, and deceleration sen-sors that activate the gas generators, causing theairbags to be inflated with nitrogen gas. As the movement of the seats' occupants com- presses the airbags, some of the gas is expelledat a controlled rate to provide better cushioning.Both seat belt pretensioners also deploy, mini-mizing seat belt slack. The entire process, includ-ing inflation and deflation of the airbags, takesapproximately one fifth of a second.
Page 67 of 184

IMPORTANT INFORMATION
65
WARNING
•No objects that add to the total weight on the seat should be placed on the frontpassenger's seat. If a child is seated inthe front passenger's seat with any addi-tional weight, this extra weight couldcause the OWS system to enable the air-bag, which might cause it to deploy in theevent of a collision, thereby injuring thechild.
• The seat belt should never be wrappedaround an object on the front passeng-er's seat. This could interfere with theOWS system's function.
• The front passenger's seat belt shouldnever be used in a way that exerts morepressure on the passenger than normal.This could increase the pressure exertedon the weight sensor by a child, andcould result in the airbag being enabled,which might cause it to deploy in theevent of a collision, thereby injuring thechild.
WARNING
• Keep the following points in mind with respect to the OWS system. Failure tofollow these instructions could adverselyaffect the system's function and result inserious injury to the occupant of the frontpassenger's seat:
• The full weight of the front seat passen-ger should always be on the seat cushion.The passenger should never lift him/herself off the seat cushion using thearmrest in the door or the center console,by pressing the feet on the floor, by sit-ting on the edge of the seat cushion, orby pressing against the backrest in a waythat reduces pressure on the seat cush-ion. This could cause OWS to disable thefront, passenger's side airbag.
WARNING
•
Do not place any type of object on the front passenger's seat in such a way thatjamming, pressing, or squeezing occursbetween the object and the front seat,other than as a direct result of the correctuse of the Automatic Locking Retractor/Emergency Locking Retractor (ALR/ELR)seat belt.
• No objects should be placed under thefront passenger's seat. This could inter-fere with the OWS system's function.
Related information
• Airbag system (p. 59)
Page 70 of 184

||
IMPORTANT INFORMATION
68
WARNING
•Never attempt to repair the vehicle your- self or to reset the electrical system after the vehicle has displayed
Safety mode.
This could result in injury or improper sys- tem function.
• Restoring the vehicle to normal operatingstatus should only be done by a trainedand qualified Volvo service technician.
• After
Safety mode has been displayed, if
you detect the odor of fuel vapor, or see any signs of fuel leakage, do not attemptto start the vehicle. Leave the vehicleimmediately.
Related information
• Starting or moving a vehicle in safety mode(p. 68)
• General safety information (p. 50)
Starting or moving a vehicle in safety mode
If
Safety mode has been set, it may be possible
to start and move the vehicle, for example, if it is blocking traffic.
Starting the vehicle in safety mode1. Check the vehicle for damage, particularly for fuel leakage or the smell of gasoline fumes. If the damage to the vehicle is minor and there is no fuel leakage/fumes, you mayattempt to start the engine and move thevehicle.
WARNING
If you smell gasoline fumes or detect fuel leakage while Safety mode See Owner's
manual is displayed in the instrument panel,
do not attempt to start the vehicle . Leave
the vehicle immediately.
2. Turn the start knob to STOP and release it.
3. Try to start the vehicle. >
Vehicle start System check, wait will
be displayed in the instrument panel while the vehicle's electrical system attempts toreset to normal mode.
WARNING
If the message Safety mode See Owner's
manual is still displayed, the vehicle should
not be driven and must be towed. Concealed faults may make the vehicle difficult to control.
Moving the vehicle after safety mode has been set
If the message Normal mode The vehicle is
now in normal mode is displayed, the vehicle
may be moved carefully from its present position if, for example, it is blocking traffic. It should, however, not be moved farther than is absolutely necessary.
WARNING
After Safety mode has been set, the vehicle
should not be driven or towed (pulled on the ground by another vehicle). It must be trans-ported on a flatbed tow truck to a trained andqualified Volvo service technician for inspec-tion/repairs.
Related information
• Safety mode (p. 67)
Page 74 of 184

||
IMPORTANT INFORMATION
72
WARNING
•When not in use, keep the child restraint system secured or remove it from thepassenger compartment to help prevent itfrom injuring passengers in the event of asudden stop or collision.
• A small child's head represents a consid-erable part of its total weight and its neckis still very weak. Volvo recommends thatchildren up to age 4 travel, properlyrestrained, facing rearward. In addition,Volvo recommends that children shouldride rearward facing, properly restrained,as long as possible.
Automatic Locking Retractor/ Emergency Locking Retractor (ALR/ELR)
To make child seat installation easier, each seat belt (except for the driver's belt) is equipped witha locking mechanism to help keep the seat belttaut.
When attaching the seat belt to a child seat:
1. Attach the seat belt to the child seat accord-
ing to the child seat manufacturer's instruc- tions.
2. Pull the seat belt out as far as possible.
3. Insert the seat belt latch plate into the buckle (lock) in the usual way. 4. Release the seat belt and pull it taut around
the child seat.
A sound from the seat belt retractor will be audi- ble at this time and is normal. The belt will nowbe locked in place. This function is automaticallydisabled when the seat belt is unlocked and thebelt is fully retracted.
WARNING
Do not use child safety seats or child booster cushions/backrests in the front passenger'sseat. We also recommend that children whohave outgrown these devices sit in the rearseat with the seat belt properly fastened.
Child restraint registration and recallsChild restraints could be recalled for safety rea- sons. You must register your child restraint to bereached in a recall. To stay informed about childsafety seat recalls, be sure to fill out and returnthe registration card that comes with new childrestraints. Child restraint recall information is readily availa- ble in both the U.S. and Canada. For recall infor-mation in the U.S., call the U.S. Government'sAuto Safety Hotline at 1-800-424-9393 or go tohttp://www-odi.nhtsa.dot.gov/cars/problems/recalls/register/childseat/index.cfm. In Canada,visit Transport Canada's Child Safety website athttp://www.tc.gc.ca/roadsafety/childsafety/menu.htm.
Infant seats Suitable child restraints should always be used when children (depending on their age/size) areseated in the vehicle.
Securing an infant seat with a seat belt
Do not place the infant seat in the front passenger's seat
1. Place the infant seat in the rear seat of the vehicle.
2. Attach the seat belt to the infant seat according to the manufacturer's instructions.
Page 75 of 184

IMPORTANT INFORMATION
}}
73
Positioning the seat belt through the infant seat
WARNING
•An infant seat must be in the rear-facing position only.
• The infant seat should not be positionedbehind the driver's seat unless there isadequate space for safe installation.
WARNING
A child seat should never be used in the front passenger seat of any vehicle with a frontpassenger airbag – not even if the "Passen-ger airbag off" symbol near the rear-view mir-ror is illuminated (on vehicles equipped withOccupant Weight Sensor). If the severity of anaccident were to cause the airbag to inflate,this could lead to serious injury or death to achild seated in this position.
3.
Fasten the seat belt
Fasten the seat belt by inserting the latch plate into the buckle (lock) until a distinctclick is audible.
Pull out the shoulder section of the seat belt
4. Pull the shoulder section of the seat belt out as far as possible to activate the belt's auto- matic locking function.